Table of Contents
Advertisement
Owner's Manual
(this document)
Read this first.
PDF Manual
(download from the Web)
• Sound List
This is a list of the sounds and effect parameters built into the
HandSonic.
• MIDI Implementation
This is detailed information about MIDI messages.
To obtain the PDF manual
1.
Enter the following URL in your computer.
http://www.roland.com/manuals/
2.
Choose "HandSonic HPD-20" as the product
name.
Advertisement
Table of Contents

Subscribe to Our Youtube Channel
Related Manuals for Roland HandSonic HPD-20


Summary of Contents for Roland HandSonic HPD-20
- Page 1 (download from the Web) • Sound List Enter the following URL in your computer. This is a list of the sounds and effect parameters built into the HandSonic. http://www.roland.com/manuals/ • MIDI Implementation This is detailed information about MIDI messages. Choose “HandSonic HPD-20” as the product name.
-
Page 2: Table Of Contents
Contents What is the HandSonic? Look What You Can Do with the HandSonic ... . . 5 This section gives an overview of the HandSonic, and explains how to get started using it. Panel Descriptions ........6 Top Panel . - Page 3 Contents Parameter Guide (Things You Can Do) This section explains all of the HandSonic’s functions and settings in each screen, organized according to the menu structure. You can look up a topic according to its screen, or by what you want to accomplish. For the procedure, refer to “Menu Operations” (p. 22).
- Page 4 Owner’s manual in its entirety. This manual should be saved and kept on hand as a convenient reference. Copyright © 2013 ROLAND CORPORATION All rights reserved. No part of this publication may be reproduced in any form without the written permission of ROLAND CORPORATION.
-
Page 5: What Is The Handsonic
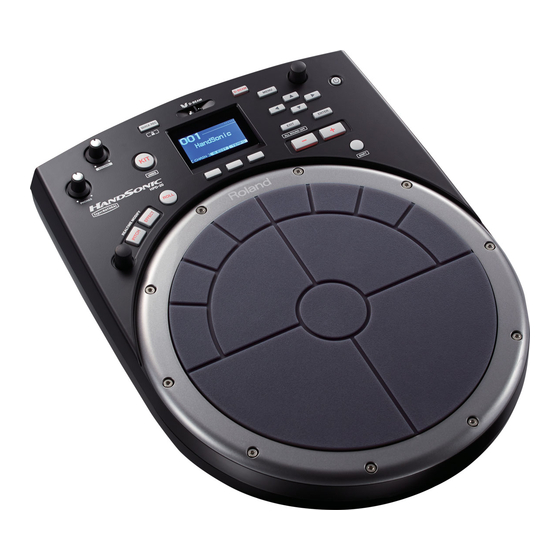
What is the HandSonic? The HandSonic is an electronic percussion instrument that can be played with the hands and fingers. The sound can be varied by the playing position, pressure or interactivity between different pads. With built-in sounds and the possibility of using your own sounds, it’s a unique instrument that will adapt to any musical style. -
Page 6: Panel Descriptions
Panel Descriptions Top Panel... - Page 7 Panel Descriptions Number Name Explanation Page p. 10 [PHONES] knob Adjusts the volume of the headphones connected to the PHONES jack. p. 10 [VOLUME] knob Adjusts the volume of the OUTPUT jacks. Displays the Kit screen (the screen you use for performance). –...
-
Page 8: Rear Panel (Connections)
* Never insert or remove a USB flash drives while this unit is turned on. Doing so may corrupt the unit’s data or the data on the USB flash drives. * Carefully insert the USB flash drives all the way in—until it is firmly in place. * Use USB flash drive sold by Roland. We cannot guarantee operation if other products are used. - Page 9 Panel Descriptions * You must make at least one of these connections in order to hear the sound. MIX IN jack (stereo) OUTPUT jacks PHONES jack By connecting a digital audio player These jacks output the sound. Connect Connect headphones or other audio source here, you can them to amplified speakers etc.
-
Page 10: Turning The Power On/Off
Turning the Power On/Off NOTE * Once everything is properly connected (p. 8), be sure to follow the procedure below to turn on their power. If you turn on equipment in the wrong order, you risk causing malfunction or equipment failure. * Before turning the unit on/off, always be sure to turn the volume down. -
Page 11: Attaching To A Stand
Attaching to a Stand If you want to play the HandSonic with a stand, use a pad stand (PDS-10; sold separately). * You must use the screws on the bottom panel of the HandSonic. Using any other screws may cause malfunction. * When turning the unit over, be careful so as to protect the buttons and knobs from damage. -
Page 12: Quick Guide
Quick Guide Quick Guide HandSonic Basics This section explains the basic terms that you’ll need to know, and how the HandSonic is structured. Pads and Kits Pads The HandSonic has 13 striking surfaces that you can strike with your hands and fingers. Each of these striking surfaces is called a “pad.” You can assign a different sound to each pad. -
Page 13: Effects
Effects In addition to editing the instruments, the HandSonic provides other ways for you to modify the sound. These are called “effects” (abbreviated “FX”). While editing will modify the way in which the instrument produces sound, effects can add a special effect to the sound produced by the instrument. The HandSonic contains the following effect processors. -
Page 14: Performing
Quick Guide Performing Here’s how to use the HandSonic’s pads and D-BEAM for a variety of performance techniques. Pads Strike Strike a pad using your palm or fingers (one to three fingers). The sound you hear will depend on the force of your strike. For the two pads closest to you (M1, M2), the tonal character will change depending on the location of your strike. -
Page 15: D-Beam
D-BEAM To use the D-BEAM, press the [D-BEAM] button to make it light. Playing sounds Position the palm of your hand above the D-BEAM sensor; you’ll hear a sound. The volume will change according to the height of your hand, and will become louder as get closer to the sensor. -
Page 16: Switching Sound Sets (Kits)
Quick Guide Switching Sound Sets (Kits) When you switch kits, the sounds of all pads will be switched simultaneously. The HandSonic comes with more than 100 kits already provided; here’s how to select and play them. Press the [KIT] button to access the kit screen. The kit screen shows the number and name of the currently selected kit. * This screen will appear immediately after you power-on the HandSonic. -
Page 17: Changing Sounds (Instruments)
Changing Sounds (Instruments) You can individually change the instrument that is assigned to each pad of each kit. Your changes are automatically saved to the kit, and the instruments you chose will be there the next time you select that kit. “Assigning Sounds to Pads (Inst)”... -
Page 18: Adjusting Instruments (Quick Edit)
Quick Guide Adjusting Instruments (QUICK EDIT) By using QUICK EDIT you can quickly and easily edit the pitch or decay of an instrument. For more detailed editing, refer to “Adjusting the Sound (Edit).” “Adjusting the Sound (Edit)” (p. 25) Strike the pad whose instrument you want to adjust. HINT Strike You can also adjust the instrument that’s assigned to the D-BEAM or to an external expansion pad. -
Page 19: Using The Metronome
Using the Metronome The HandSonic provides a metronome function. You can use this for rhythm training to improve your skill, or for warming up before a performance. “Specifying the metronome time signature” (p. 59) Starting/stopping the metronome Press Hold down the [SHIFT] button and press the [QUICK REC] button. The metronome will sound. The kit screen will show the tempo. -
Page 20: Recording Your Performance (Quick Rec)
Quick Guide Recording Your Performance (QUICK REC) It’s easy to record your HandSonic performance. A recorded performance can be played back, or exported to a USB flash drive as an audio file. Listening objectively to your performance is a good way to improve your skill, and you can also use a recorded performance as material for your rhythm tracks. - Page 21 Exporting a recorded performance as an audio file “Rear Panel (Connections)” (p. 8) * Connect your USB flash drive before you continue. Stop recording or playback, and then press the [F3] (EXPORT) button. The EXPORT screen will appear. Note the file name, and adjust the tempo. The file will be saved with the name that’s shown here. If you sound the metronome, the tempo will be displayed, allowing you to adjust the tempo.
-
Page 22: Menu Operations
Quick Guide Menu Operations The HandSonic has numerous parameters (items that you can set) that specify how it will operate and its sounds will be produced. This section explains the procedure for the basic menu operations you’ll use when setting the parameters. The basic procedure will be the same for any of the screens. -
Page 23: Frequently Used Functions
Frequently Used Functions This section explains functions that help you take full advantage of the HandSonic. For the procedure, refer to “Menu Operations” (p. 22). Sound Editing You can customize your very own kit by assigning your choice of instruments to the pads, or creating your own sounds. If you like, you can also copy a kit before you start editing it. -
Page 24: Layering Sounds (Layer)
Sound Editing Layering Sounds (Layer) You can assign two instruments (A and B) to each pad. You can make these two instruments sound together, or you can switch between them or vary their balance depending on the strength of your strike. Choose MENU g INST g SETUP. -
Page 25: Adjusting The Sound (Edit)
Sound Editing Adjusting the Sound (Edit) You can adjust the pitch, duration, and tonal character of each instrument. Choose MENU g INST g EDIT. The INST–EDIT screen will appear. Strike to select the pad that you want to change. Use the cursor [ ] [ ] buttons to select instrument “A” or “B.” INST–EDIT screen Use the cursor [ ] [ ] buttons to select a parameter, and use the value knob to edit the value. Parameter Explanation Volume Adjusts the volume. Adjusts the pitch. -
Page 26: Using Effects To Modify The Sound (Fx)
Sound Editing Using Effects to Modify the Sound (FX) While editing an instrument will change the way in which the instrument itself produces sound, effects can modify the sound produced by the instrument. You can use effects to create dramatic changes in the character of the sound. As effect units, the HandSonic provides three multi-effect units (MFX1–3), ambience, and EQ. - Page 27 Sound Editing Selecting the multi-effect type Choose MENU g FX g MULTI-FX g TYPE. The MULTI-FX–TYPE screen will appear. Use the cursor [ ] [ ] buttons to select MFX1–3, and use the value knob to specify the effect type for each unit. You can view a list of the effect types by pressing the [ENTER] button. Press [ENTER] MULTI-FX–TYPE screen button once again to close the list. MULTI-FX type list Name Explanation...
-
Page 28: Ambience
Sound Editing Ambience This effect unit adds reverberation, creating the sensation that you’re performing in a hall or studio. You can adjust the amount of ambience for each instrument assigned to each pad. Applying ambience Choose MENU g FX g AMBIENCE g SEND g PAD. The AMBIENCE SEND–PAD screen will appear. Strike a pad to select it, and use the cursor [ ] [ ] buttons to select instrument A/B. - Page 29 Sound Editing Adjusting the ambience Choose MENU g FX g AMBIENCE g EDIT. The AMBIENCE–EDIT screen will appear. Use the cursor [ ] [ ] buttons to select a parameter, and use the value knob to edit the value. * For details on each parameter, refer to “Sound List” (PDF file). AMBIENCE–EDIT screen Applying ambience to the multi-effect’s sound If you’ve applied a multi-effect unit to the sound of instruments, you can apply ambience to the sound that’s been modified by the multi-effects.
- Page 30 Sound Editing This divides the sound of the entire kit into low, mid, and high frequency regions, allowing you to boost or cut the volume of each region. You can boost the low range to make the sound more powerful, or boost the high range to make the sound brighter. Applying EQ to a kit Choose MENU g FX g EQ.
-
Page 31: Overall Settings For A Kit
Overall Settings for a Kit These settings let you adjust the volume of the entire kit, or assign a name to it. Adjusting the Volume of the Kit This setting adjusts the overall volume of the entire kit. This is convenient when a multi-effect has caused the volume to increase, or if you want to adjust the volume balance relative to other kits. -
Page 32: Copying A Kit
Put a backup containing the factory-set data on your USB flash drive, and load the data as described in “Loading a Backup” (p. 39). The factory-set data can be downloaded from the Roland website. From the following URL, choose “Downloads” and then select “HandSonic HPD-20.”... -
Page 33: Kit Chain
Kit Chain The Kit Chain function lets you successively switch kits in the order you’ve specified, as needed for the songs in your performance. You can create 15 kit chains (banks A–O), and each kit chain can contain up to 50 steps. Bank A (Example) Bank B Bank O... -
Page 34: User Inst
A computer that can read and write a USB flash drive, such as a Windows or Mac computer • USB flash drive * Use USB flash drive sold by Roland. We cannot guarantee operation if other products are used. • Audio file of the sound that you want to import Use your computer to prepare and edit the audio file to the following specifications. -
Page 35: Managing User Instruments
User Inst Importing Choose MENU g USER INST g IMPORT. User instrument space The IMPORT list screen will appear, showing a list of the audio files on the USB flash remaining drive. Use the cursor [ ] [ ] buttons to select the audio file that you want to import, and press the [F3] (IMPORT) button. You can audition the sound by pressing the [F1] (PREVIEW) button. IMPORT list screen Use the value knob to select a user instrument number, and press the [F3] (EXECUTE) button. -
Page 36: Loop Settings
User Inst Loop Settings You can make a user instrument loop (play repeatedly). By looping it, you can play a short rhythm pattern as a longer phrase. Choose MENU g USER INST g LIST. Audition the sound Loop on The USER INST–LIST screen will appear. Use the cursor [ ] [ ] buttons to select a user instrument. Press the [F3] (LOOP) button to turn loop on. -
Page 37: Deleting
User Inst Deleting Here’s how to delete a user instrument. Choose MENU g USER INST g LIST. The USER INST–LIST screen will appear. Use the cursor [ ] [ ] buttons to select the user instrument that you want to delete. Press the [F2] (FUNC) button. The USER INST FUNCTION screen will appear. If this user instrument is used in any kit, ” “ is shown for the “Assigned to Kit” field. NOTE USER INST FUNCTION screen When “Assigned to Kit”... -
Page 38: Backing Up (Usb Flash Drive)
If you want to overwrite the existing data, select “YES” and press the [ENTER] button. NOTE Do not strike the HandSonic’s pads while data is being saved. The vibration may cause unexpected errors. * Backup files are saved in the Roland/HPD-20/Backup folder of the USB flash drive. -
Page 39: Loading A Backup
Do not strike the HandSonic’s pads while data is being loaded. The vibration may cause unexpected errors. * Backup files are saved in the Roland/HPD-20/Backup folder of the USB flash drive. If you want to load a backup file that you obtained from another person, place the file in this folder. -
Page 40: Connecting External Expansion Pads Or Pedals
You can connect one Roland-made pad. For details on pads that are suitable for expanding the HandSonic, refer to p. 41. * V-Hi-Hat pads (VH-13, VH-12, VH-11) are not supported. For the latest information about pads, refer to the Roland website. http://www.roland.com/ Connecting a pad Please also read the owner’s manual of the expansion pad you’re using. - Page 41 Connecting External Expansion Pads or Pedals Pads suitable for external expansion Here are the pads that are suitable for the HandSonic, and some illustrations of how they can be set up. * Only one pad can be connected. Model Name Explanation KD-7 Kick Trigger Unit...
-
Page 42: Using A Footswitch (Foot Sw)
Connecting External Expansion Pads or Pedals Using a Footswitch (FOOT SW) A footswitch let you use your foot to switch kits or turn the D-BEAM on/off. This allows you to control the sound without interrupting your performance. The following footswitches (separately sold) are supported. Model Explanation One or two units can be connected. -
Page 43: Using A Hi-Hat Control Pedal (Hh Ctrl)
Connecting External Expansion Pads or Pedals Using a Hi-hat Control Pedal (HH CTRL) You can use your foot to open/close the hi-hat. You can also press the pedal to play the sound, or vary the sound according to how deeply you press the pedal. The following hi-hat control pedal and footswitches (sold separately) are supported. -
Page 44: Connecting The Handsonic To A Computer
HandSonic along with songs being played back from your computer. Installing the USB driver Before connecting the HandSonic to your computer, you must first install the USB driver. You can download the USB driver from the Roland website. http://www.roland.com/support/en/ For the operating requirements, refer to the Roland website. -
Page 45: Menu
Parameter Guide This section explains all of the HandSonic’s functions and settings in each screen, organized according to the menu structure. For the procedure, refer to “Menu Operations” (p. 22). MENU The menu screen contains six items, organized by the content of the settings. For the content of each item, refer to the page indicated by p. -
Page 46: Inst
INST INST MENU g INST g INST These settings are made for each pad. Parameter Explanation Assign an instrument (Inst) Inst A Assign instrument A or instrument B. Choose “OFF” if you don’t want sound to be produced. Press the [ENTER] button to see the instrument list. Inst B INST–EDIT MENU g INST g EDIT... -
Page 47: Specifying How Instrument B Will Be Sounded
INST INST–SETUP MENU g INST g SETUP These settings are made for each pad. Parameter Explanation Specifying how instrument B will be sounded (Layer, Fade Point) For details, refer to p. 24. Specifies how instrument B will be sounded. Volume Only instrument A will sound. Striking force Volume Instruments A and B will always sound together. Striking force Volume... -
Page 48: Kit
PAD CTRL PAD CONTROL–SEND MENU g KIT g PAD CTRL g SEND These settings are made for each pad. Parameter Explanation Modifying the sound by pressing down on a pad * This cannot be set for external expansion pads. Specifies how the D-BEAM will modify the sound. Type With the “POSITION” setting, the sound will change according to the height of your hand above the sensor. With the “SPEED”... -
Page 49: Adjusting The Roll Speed (Roll Speed)
PAD CONTROL–ROLL MENU g KIT g PAD CTRL g ROLL These settings are made for each pad. Parameter Explanation Adjusting the roll speed (Roll Speed) * This cannot be set for external expansion pads. * You can also set this by holding down the [SHIFT] button and pressing the [ROLL] button. If the [ROLL] button is on, pressing down on a pad will change the roll speed. -
Page 50: Renaming The Kit (Kit Name)
KIT NAME MENU g KIT g KIT PRM g NAME Button Explanation Renaming the kit (Kit Name) Here you can edit the name of the kit. When you’ve finished editing, press the [EXIT] button. For details, refer to p. 31. [F1] (DELETE) Deletes the character at the cursor location. [F2] (INSERT) Inserts a space at the cursor location. -
Page 51: Multi-Fx
MULTI-FX MULTI-FX–TYPE MENU g FX g MULTI-FX g TYPE Parameter Explanation Specifying the multi-effect type (MULTI-FX Type) For details, refer to p. 27. MFX1 Specify the multi-effect type for each unit MFX1–3. Press the [ENTER] button to see the MFX type list. MFX2 For details on each type, refer to “Sound List” (PDF file). MFX3 MULTI-FX–EDIT MENU g FX g MULTI-FX g EDIT... -
Page 52: Ambience
AMBIENCE AMBIENCE–TYPE MENU g FX g AMBIENCE g TYPE Parameter Explanation Specifying the type of ambience (Ambience Type) For details, refer to p. 28. Specifies the type of ambience. Type For details on each type, refer to “Sound List” (PDF file). AMBIENCE–EDIT MENU g FX g AMBIENCE g EDIT Parameter Explanation Adjusting the ambience (Ambience Edit) -
Page 53: Applying Ambience To The Sound Of Each Multi-Effect (Ambience Send Mfx)
AMBIENCE SEND–MFX MENU g FX g AMBIENCE g SEND g MFX Parameter Explanation Applying ambience to the sound of each multi-effect (Ambience Send MFX) For details, refer to p. 29. MFX1 g AMB MFX2 g AMB Specify the amount of ambience that is applied to the sound of each multi-effect. MFX3 g AMB KIT EQ MENU g FX g EQ Parameter/Button Explanation Applying EQ to the kit (EQ) -
Page 54: User Inst
USER INST IMPORT IMPORT MENU g USER INST g IMPORT Button Explanation Importing a user instrument (Import) Here you can view a list of the audio files on a USB flash drive, and import the selected file. For details, refer to p. 34. [F1] (PREVIEW) Auditions the sound. -
Page 55: Renaming The User Instrument
USER INST USER INST NAME MENU g USER INST g LIST g FUNC g NAME Button Explanation Renaming the user instrument (User Inst Name) When you’ve finished editing the name, press the [EXIT] button. For details, refer to p. 37. [F1] (DELETE) Deletes the character at the cursor location. [F2] (INSERT) Inserts a space at the cursor location. -
Page 56: Delete All User Instruments (All Delete)
USER INST ALL DELETE MENU g USER INST g UTIL g All Delete Button Explanation Delete all user instruments (All Delete) This deletes all of the user instruments that you’ve imported. NOTE User instruments used in kits will also be deleted. Pads to which user instruments are assigned will no longer produce sound. Executes the All Delete function. -
Page 57: Tools
TOOLS PAD COPY PAD COPY MENU g TOOLS g PAD COPY Parameter/Button Explanation Copying a pad (Pad Copy) This copies a pad to a different pad. You can use this to create another pad with the same sound. Specify the copy-source and copy-destination pads, and press the [F3] (COPY) button. Exchanging the sounds of pads (Pad Exchange) This exchanges the sounds of two pads. -
Page 58: Chain
TOOLS CHAIN CHAIN MENU g TOOLS g CHAIN Parameter/Button Explanation Editing a kit chain (Chain) The Kit Chain function lets you successively switch kits in the order you’ve specified, as needed for the songs in your performance. You can create 15 kit chains (banks A–O), and each kit chain can contain up to 50 steps. Bank A (Example) Bank B Bank O... -
Page 59: Sys
Metronome METRONOME SETUP–TIMSIG MENU g SYS g Metronome g TIMSIG From the kit screen, TEMPO g SETUP Parameter/Button Explanation Specifying the metronome time signature Beat Time signature Rhythm Type Type of rhythm METRONOME SETUP–SOUND MENU g SYS g Metronome g SOUND Parameter Explanation Specifying the sound and volume of the metronome Sound Sound Volume Volume Panning USB Memory... -
Page 60: Loading A Backup From A Usb Flash Drive
LOAD BACKUP MENU g SYS g USB Memory g Load Backup Parameter/Button Explanation Loading a backup from a USB flash drive (Load Backup) For details, refer to p. 39. NOTE Loading a backup will erase all data that is currently in the HandSonic. Specifies whether user instruments will be loaded ( ) or not loaded ( * Depending on the size of the user instruments, it will take more than 10 minutes to load the backup when loading With User Inst... -
Page 61: Pad Settings
Pad Settings PAD SETTINGS–SENS MENU g SYS g Pad Settings g SENS Strength at which you strike the pad These settings are made for each pad. Parameter Explanation Adjusting the sensitivity etc. for each pad You can adjust the sensitivity of the pads to accommodate your personal playing style. This allows you to have more dynamic control over the sound volume, based on how hard you play. -
Page 62: Adjusting How The Sound Will Respond To
PAD SETTINGS–POSI MENU g SYS g Pad Settings g POSI Parameter Explanation Adjusting how the sound will respond to strike position Adjusts how the tonal character (p. 14) will be affected by the position at which you strike the M1 or M2 pads. Center As you increase this value, it will become easier to produce tonal change by striking the edge. -
Page 63: Adjusting The External Expansion Pad
EXT-TRIGGER SETTINGS–SENS MENU g SYS g ExtTrig Settings g SENS Parameter Explanation Adjusting the external expansion pad If you’ve specified the correct “Type, ” and would like to make additional adjustments, you can edit the following parameters. * If you change the “Type” setting, the following parameters will be changed to the recommended values for the type of pad you specified. You can adjust the sensitivity of the pads to accommodate your personal playing style. -
Page 64: Reducing Crosstalk With An External
EXT-TRIGGER ADVANCED–XTALK MENU g SYS g ExtTrig Settings g ADVNCD g XTALK Parameter Explanation Reducing crosstalk with an external expansion pad If the HandSonic and an external expansion pad are both attached to the same stand, the vibrations produced when you strike the HandSonic may cause unwanted triggering (crosstalk) on the external expansion pad; this parameter can prevent this problem. -
Page 65: Footswitch Polarity Settings
FOOT SWITCH CONTROL–POLARITY MENU g SYS g FootSw Control g POLARITY Parameter Explanation Footswitch polarity settings Here you can set the polarity of footswitches 1 and 2. If the function operates when you take your foot off the footswitch, change this setting. * If only one footswitch is connected, set “Foot Switch 1. ” NORMAL Normal setting. -
Page 66: Midi
MIDI MIDI MENU g SYS g MIDI g MIDI Parameter Explanation MIDI-related settings Here you can make settings such as MIDI channel and control change numbers. MIDI Channel Specifies the transmit and receive channels. The default value is “10. ” If this is “OFF, ” the HandSonic’s pads will be disconnected from its internal sound generator. Local Control Normally you’ll leave this “ON. -
Page 67: Information
What is V-LINK? V-LINK is Roland’s proprietary specification that allows visual expression to be linked with musical performance. Video equipment that is compatible with V-LINK can be connected to electronic musical instruments via MIDI, making it easy... -
Page 68: Error Messages
USB MEMORY connector. Use a different USB flash drive. Data could not be read/written fast enough USB memory busy. Use USB flash drive sold by Roland. We cannot guarantee operation from/to the USB flash drive. if other products are used. USB memory is not A USB flash drive is not connected to the Connect a USB flash drive. -
Page 69: Troubleshooting
If the system does not operate as you expect, please check the following points first. If you are still unable to resolve the problem, contact your retailer, the nearest Roland Service Center, or an authorized Roland distributor, as listed on the “Information” page. -
Page 70: Kit List
Kit List No. Name Explanation A contemporary cajon kit adjusted with the low range and the attack as layers. In addition to the tonal changes of the cajon itself, produced by the location of your strike or by muting, the cymbals and Cajon Plus D-BEAM: Loop On percussion played by the S2–S7 pads provide even more variety for your rhythm performance. - Page 71 No. Name Explanation This kit faithfully simulates an instrument called a waterphone, which is also used to produce sound effects for movies. Waterphone Bowed In addition to controlling the pitch modulation and the decay, you can use the realtime modify PITCH and EFFECT to obtain dynamic tonal changes that go beyond an actual waterphone.
- Page 72 MEMO...
-
Page 73: Main Specifications
USB Flash Memory Hi-Hat Control Pedal: FD series Pad Stand: PDS-10 * Use USB Flash Memory sold by Roland. We cannot Carrying Bag: CB-HPD guarantee operation if other products are used. * In the interest of product improvement, the specifications and/or appearance of this unit are subject to change without prior notice. -
Page 74: Using The Unit Safely
Roland Always make sure that an adult is Use only the attached power-supply Service Center, or an authorized Roland distributor, on hand to provide supervision and cord. Also, the supplied power cord must as listed on the “Information” page. -
Page 75: Important Notes
(PDS- unplug the AC adaptor from the outlet can result in poor insulation and lead to fire. 10) manufactured by Roland. If used in (p. 8). combination with other stands, you risk sustaining injuries as the result of this... - Page 76 Under no circumstances must either of the above wires be connected to the earth terminal of a three pin plug. For the USA DECLARATION OF CONFORMITY Compliance Information Statement Model Name : HPD-20 Type of Equipment : Electronic Drum Responsible Party : Roland Corporation U.S. Address : 5100 S. Eastern Avenue Los Angeles, CA 90040-2938 Telephone : (323) 890-3700...
- Page 77 For EU Countries For China...
- Page 78 Information When you need repair service, call your nearest Roland Service Center or authorized Roland distributor in your country as shown below. AFRICA EUROPE THAILAND GUATEMALA POLAND IRAN Theera Music Co. , Ltd. Casa Instrumental ROLAND POLSKA SP. Z O.O. MOCO INC. 100-108 Soi Verng Calzada Roosevelt 34-01,zona ul. Katy Grodziskie 16B...
-
Page 79: Index
Index Symbols [-][+] button ......22 HH CTRL ....... . 43 QUICK EDIT screen .
Need help?
Do you have a question about the HandSonic HPD-20 and is the answer not in the manual?
Questions and answers
How can I create my own drum kit and how can I create loops
To create your own drum kit and loops on the Roland HandSonic HPD-20:
1. Customize a Drum Kit:
- Choose from 200 preset kits or create a custom kit using up to 850 built-in instruments.
- Assign different sounds to the 13 pressure-sensitive pads.
- Load and edit up to 500 user instruments in WAV format (44.1 kHz, 16-bit).
2. Apply Effects:
- Use the multi-effects system with 25 effect types.
- Adjust ambience (10 types) and 3-band EQ for each kit.
3. Record and Loop Beats:
- Use the Quick Rec function to record beats in real time.
- The recording resolution is 480 ticks per quarter note, with a maximum note storage of approximately 30,000 notes.
4. Expand with External Gear:
- Connect an external pad or hi-hat controller for additional control.
- Use MIDI I/O to trigger sounds from other devices or control external instruments.
5. Export and Integrate:
- Save recordings for use in loop stations like the Boss RC-505.
- Sync with other electronic instruments via MIDI for live performance or studio production.
This answer is automatically generated