Advertisement
Table of Contents
- 1 Important Safety Information
- 2 Hardware Parts List
- 3 Pre-Assembly Check List
- 4 Assembly Instruction
- 5 Tension Control
- 6 Computer Instructions
- 7 Exercise Instructions
- 8 Muscle Toning
- 9 Weight Loss
- 10 Exploded Diagram
- 11 Parts List
- 12 Additional Information
- 13 Care and Maintenance
- 14 Specifications
- 15 Limited Warranty
- 16 Ordering Replacement Parts
- Download this manual
Advertisement
Table of Contents

Related Manuals for Marcy RM403


Summary of Contents for Marcy RM403
- Page 1 Motion Rower Product Code: RM403 30/09/2009-2...
- Page 2 Important Safety Information Weight Limit Capacities Hardware Parts List Pre Assembly Check List Assembly Instructions User Guide Computer Instructions Exercise Instructions Exploded Diagram Parts List Additional Information Care Maintenance Limited Warranty / Customer Services Supplied by Escalade International Ltd Pleasant Road Penllergaer Swansea SA4 9GE...
-
Page 3: Important Safety Information
IMPORTANT SAFETY INFORMATION READ ALL INSTRUCTIONS BEFORE USING THIS OWNER’S MANUAL CONTAINS ASSEMBLY, OPERATION, MAINTENANCE AND SAFETY INFORMATION. IN THE INTEREST OF SAFETY, PLEASE MAKE CERTAIN THAT YOU READ AND UNDERSTAND ALL THE INFORMATION BELOW. 1. This Rower is intended for class H (H=Domestic) use only. It is not designed for commercial use. -
Page 4: Hardware Parts List
HARDWARE PARTS LIST Description Drawing Carriage Bolt M10*75 Curved Washer φ10xφ25 Acorn Nut M10 Flat Washer φ10xφ20 Carriage bolt M10 x 50 Allen Bolt M8X16 Washer φ8xφ17 Allen Key L6 Allen Key L4 Allen Wrench S13,17 Parts described above are all the parts you need to assemble this machine. Before you start to assemble, please check the hardware packing to make sure they are included. -
Page 5: Pre-Assembly Check List
PRE-ASSEMBLY CHECK LIST PART NO. DESCRIPTION Q’TY Main Frame Front Stabilizer w/end caps Computer Pedal R/ L Pedal Support Tube Slide Rail Rear Stabilizer w/end caps Seat... -
Page 6: Assembly Instruction
ASSEMBLY INSTRUCTION Step 1 Attach the front stabilizer (3) to the front of the main frame (1). Secure using two carriage bolts (2), two curved washers (6) and two acorn nuts (7). Attach the pedal support tube (17) to back of the main frame (1). Secure using two carriage bolts (19), two flat washers (16) and two acorn nuts (7). - Page 7 Step 3 Attach the rear stabilizer (28) to back of the slide rail (26). Secure using four allen bolts (24) and four washers (25). Step 4 Remove the allen bolts (12), washers (13) and the axle (15) from the left pedal (14L). ...
- Page 8 Step 5 Connect the computer sensor wire (10) and the sensor wire (11) to the back of the computer (9). Slide the computer (9) onto computer bracket (67) and tighten with two screws (37). Note: Ensure that the wires are not pinched behind the computer. CHECK ALL BOLTS AND NUTS ARE TIGHTENED BEFORE USING THE MACHINE...
-
Page 9: Tension Control
USER GUIDE FOLDING Remove pin, fold the slide rail up and reinsert pin to secure the slide rail in position. TENSION CONTROL Increase Decrease... -
Page 10: Computer Instructions
COMPUTER INSTRUCTIONS BUTTONS GUIDE: To select functions of time, count, distance, and calories. MODE: Press to preset the target values of time, count, distance and calories UP / DOWN The user may use reset key to reset each function individually: time, distance, RESET: calorie, and pulse. -
Page 11: Exercise Instructions
ENTERING PRESET DATA Press MODE until the function you wish to enter is flashing. Press SET to input your preset data. You can press RESET at any time to reset the function data to zero. Once your preset data has been entered, you may begin exercising. Preset data will begin to count down automatically. -
Page 12: Muscle Toning
This stage should last for a minimum of 12 minutes though most people start at about 15-20 minutes 3. The Cool Down Phase This stage is to let your Cardio-vascular System and muscles wind down. This is a repeat of the warm up exercise e.g. -
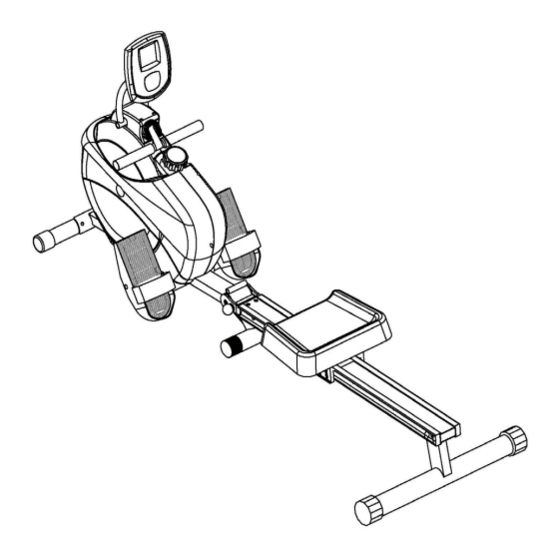
Page 13: Exploded Diagram
EXPLODED DIAGRAM... -
Page 15: Parts List
PARTS LIST DESCRIPTION DESCRIPTION Chain Cover Left Main Frame Chain Cover Right Carriage Bolt M10*75 Nylon Nut M6 Front Stabilizer Φ60 Clip End Cap For Front Stabilizer Φ60 Screw For Clip M6 Phillips Screw ST5*15 France Nut M10 Curved Washer Φ10*Φ25 Flywheel Acorn Nut M10 Hex Bolt M8*105... -
Page 16: Additional Information
ADDITIONAL INFORMATION Packaging Disposal Government guidelines ask that we reduce the amount of waste material disposed of in land fill sites. We therefore ask that you dispose of all packaging waste responsibly at public recycling centres. End of Life Disposal We at Escalade hope you enjoy many years of enjoyable use from your Rower. -
Page 17: Limited Warranty
LIMITED WARRANTY Escalade warrants this product to be free from defects in workmanship and material, under normal use and service conditions, for a period of one year from the date of purchase. This warranty extends only to the original purchaser. Escalade’s obligation under this Warranty is limited to replacing damaged or faulty parts at Escalade’s option.
Need help?
Do you have a question about the RM403 and is the answer not in the manual?
Questions and answers