Table of Contents
Advertisement
Quick Links
Advertisement
Table of Contents

Related Manuals for LifeSize Focus


Summary of Contents for LifeSize Focus
- Page 1 ® LifeSize Focus™ Installation Guide...
- Page 2 LifeSize Communications. Trademark Acknowledgments LifeSize® is the trademark of LifeSize Communications Inc. All other trademarks are the property of their respective owners. Patent Notice For patents covering LifeSize®...
-
Page 3: Installation Overview
Each system is designed to make video communication a highly productive, simple, and reliable experience. This guide explains how to install LifeSize Focus for use with a LifeSize video communications system. Related documentation is available from the documentation CD included in the product box and from the Support page of www.lifesize.com. -
Page 4: Installation Prerequisites
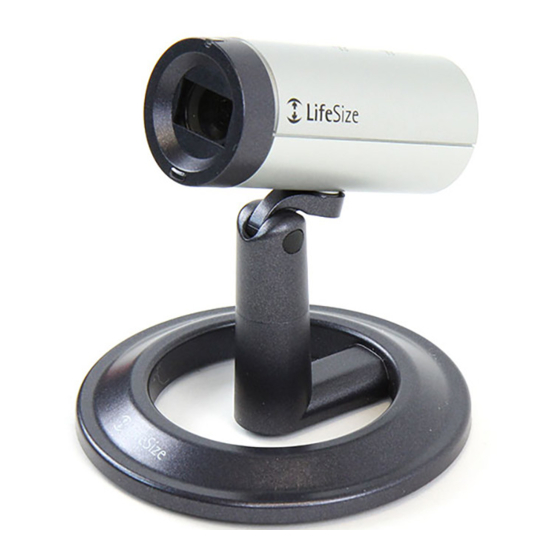
72 hours to achieve full bond strength at room temperature. Plan your installation to allow time for the adhesive to bond securely to the display. The adhesive tape is intended for a single use and permanent application. LifeSize recommends that you determine the optimal area for placing the camera by removing the lens cap and connecting it to the codec as described in this document before attaching the mount to the display. - Page 5 Installing LifeSize Focus LifeSize Focus includes the following components: Component Description camera with lens cap (A-1), pivot collar (A-2), and microphones (A-3) desktop mount display mount camera cable (3 meters) documentation CD LifeSize Focus Installation Guide...
- Page 6 C). The ideal temperature range for applying the adhesive tape on the mount is 70°F to 100°F (21°C to 38°C). ° ° WARNING: At temperatures below 60 F (15 C), the adhesive may fail to adhere readily to the display. LifeSize Focus Installation Guide...
- Page 7 An insecure mount can fail resulting in damage to the camera. 6. Attach the camera to the display mount by sliding the pivot collar on the camera over the pivot on the mount. pivot collar pivot LifeSize Focus Installation Guide...
- Page 8 The tripod socket and a screw secure the pivot collar to the camera. To expose the tripod socket for use with a tripod, loosen the screw until the pivot collar detaches from the camera. Note: The screw remains attached to the pivot collar. tripod socket screw pivot collar LifeSize Focus Installation Guide...
-
Page 9: Removing The Lens Cap
(6.5 feet) to the left or right of the front of LifeSize Focus. If you use the remote control directly in front of LifeSize Focus, the IR sensor detects the signal up to 14 meters (45 feet) away. - Page 10 The camera is receiving power and is inactive. Bright blue The camera is receiving power and is active. Bright blue flash Signal received from the LifeSize remote control. Solid red or purple The camera is malfunctioning. Contact LifeSize Technical Services for assistance.
- Page 11 3. Connecting the Camera to the Codec To connect the camera to the LifeSize codec, insert one end of the camera cable into the port on the back of the camera and insert the opposite end into the port marked with the camera symbol on the back panel of the codec.
-
Page 12: Adjusting The Camera Position
4. Adjusting the Camera Position Use the pivot collar to tilt and pivot the camera manually when using either the desktop or display mount. The pan, tilt, zoom, and camera preset buttons on the LifeSize remote control are not supported with this camera. -
Page 13: Troubleshooting
5. Controlling the Camera Microphones You can use LifeSize Focus as both the video and audio input for your LifeSize video communications system. If you do not have a LifeSize Phone or LifeSize MicPod connected to your LifeSize video communications system in addition to LifeSize Focus, and you use the default system settings, the system uses LifeSize Focus as the active microphone. - Page 14 • Ensure that the primary input for your LifeSize system is set to the high definition camera. • Ensure that cable connections from the display to the codec are correct and secure and that the display is receiving power. Distorted or Dark Video If video appears blurred or dark: •...
Need help?
Do you have a question about the Focus and is the answer not in the manual?
Questions and answers