Table of Contents
Advertisement
Quick Links
Your Hawaiian Telcom TV Set Top Box
The following illustrations outline your Set Top Box (HD or HD DVR) functions and
connections. Set Top Boxes may not be exactly as shown below.
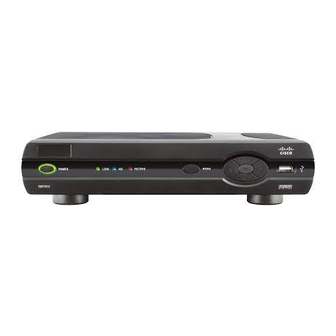
Front View
1
1. Power – Turns your Set Top Box on or off and is lit when power is on
2. Link – Lit when the Set Top Box is connected to the Hawaiian Telcom
network
3. HD – Lit when the Set Top Box is configured to display HD content
4. Record – Lit on all Set Top Boxes when a DVR recording is in progress
5. Menu – Displays onscreen menu
6. Navigation – Moves selection up, down, left or right
7. USB – Not currently enabled
2
4
3
5
6
7
1
Advertisement
Table of Contents

Subscribe to Our Youtube Channel
Related Manuals for Cisco Hawaiian Telcom


Summary of Contents for Cisco Hawaiian Telcom
-
Page 1: Your Hawaiian Telcom Tv Set Top Box
Front View 1. Power – Turns your Set Top Box on or off and is lit when power is on 2. Link – Lit when the Set Top Box is connected to the Hawaiian Telcom network 3. HD – Lit when the Set Top Box is configured to display HD content 4. -
Page 2: Back View
Back View 1. Video In – For Hawaiian Telcom installer use only 2. Video Out – Connects to the antenna jack on the TV 3. Network In – Connects the network cable from your home network or modem 4. Component Video Out – Component video cables can be used for high quality signals to either HD or non-HDTVs 5. - Page 3 Your Hawaiian Telcom TV Remote Control Your Hawaiian Telcom TV Remote Control is universal. That means it works with just about any television set as well as most DVD players, VCRs and A/V receivers. Note: there is one remote provided per Set Top Box.
- Page 5 Pairing Your Remote While the device you want to pair is on, press and hold the Setup button on your remote until the LED light blinks twice. Press a mode button: The DVD button can be paired with your DVD player ...
- Page 6 If the TV does not turn off, repeat steps 1-5 using the next code provided. Your Wireless Gateway The Wireless Gateway connects with your Hawaiian Telcom TV and gives you High-Speed Internet access. Connect your devices wirelessly or through one of the four Ethernet ports.
- Page 7 Flickering green. There is activity from devices connected to the coaxial port. The flickering of the light is synchronized to data traffic. Solid green. The gateway is connected to the Hawaiian Telcom Service network and has obtained a WAN IP address.
-
Page 8: Using The On-Screen Menu
Using the on screen menu The Menu Use the menu to quickly access the Live TV, Recorded TV, Video On Demand, Apps, Music, My Account, and Settings Here is a brief description of each drop down menu: Live TV GUIDE Accesses the program guide. -
Page 9: Video On Demand
Browse 50 music channels organized by genre. Enjoy the fun of karaoke at home with The KARAOKE Channel app. KARAOKE Get access to more than 8,000 songs for $10/mo. Hawaiian Telcom High- Speed Internet required. My Account SELECT MY TV SERVICE Add premium channels and features to your subscription. - Page 10 Settings Allows you to turn system sound effects on or off, access system GENERAL information and troubleshoot your connection. Allows you to customize your guide, favorites list, screen aspect ratio TELEVISION and closed captioning. AUDIO Allows you to change your digital audio output settings. Allows you to block VOD titles, PPV events and programs by PARENTAL CONTROLS channel, rating or content.
-
Page 11: Screen Aspect Resolution
Settings Screen Aspect Resolution Using your TV’s user guide as a reference, you can adjust your screen settings by choosing the most suitable resolution from this list and then following steps 1 to 8: 4:3 standard definition Widescreen standard definition ... -
Page 12: Closed Captioning
Zoom You can also change the aspect ratio of your picture. This can be useful if you are using a widescreen TV to watch SD programming. 1. Press ZOOM button 2. Use UP/DOWN arrows to select Aspect Ratio and press OK. 3. -
Page 13: Digital Audio Output
Closed Captioning Cont. Quick Tip You may program the Closed Captioning settings using your Hawaiian Telcom TV Set Top Box or through your TV itself, in which case you should reference your TV manual for further instructions, questions and troubleshooting. Digital Audio Output Digital audio output allows you to adjust your audio settings. -
Page 14: Secondary Audio
5. Navigate to select Use primary audio or secondary audio and press OK. High Definition TV It’s television as you’ve never seen it before. With Hawaiian Telcom’s High Definition (HD), you’ll experience true widescreen picture quality that’s 10 times better than standard television. -
Page 15: Managing Live Tv Feeds
Managing Live TV Feeds Hawaiian Telcom TV supports up to 8 TVs and delivers 4 live TV feeds to your household. A TV feed can be a live TV show, a Video On Demand (VOD) program or a Pay Per View (PPV) event. If you have a DVR, you can watch or record 4 live TV programs simultaneously among the TVs in your household. -
Page 16: Parental Control
Parental Control Even with hundreds of channels and programs to choose from, you can still easily control the content your family watches. By using your secret PIN to configure the Parental Controls on your Set Top Boxes, you’ll be able to modify your settings, view blocked programs and change your PIN if needed. -
Page 17: Watching A Blocked Program
Blocking and Unblocking Programs Block or unblock programs by channel or content rating. 1. Press MENU. 2. Use Right arrow to select Settings. 3. Use UP/DOWN arrows to select Parental Controls and press OK. 4. Select Parental Locking. 5. Enter your 4-digit Parental Control PIN with the number pad on your remote control. - Page 18 Turn Off or Reset Parental Control You can reset your Parental Control settings or turn off locking for a period of time. 1. Press MENU. 2. Use RIGHT arrow to select Settings. 3. Use UP/DOWN arrows to select Parental Controls and press OK. 4.
-
Page 19: On Screen Tv Guide
On Screen TV Guide Using the Onscreen TV Guide Use the guide to find out which shows are on and which ones are coming up. 1. Press GUIDE button. It will display program listings by time and channel. 2. Use UP/DOWN arrows to scroll through and highlight a program. Detailed program information including the title, time, rating, description and cast information will appear at the bottom of the guide. - Page 20 Customizing Your TV Guide Customize your guide so that it shows only the channels you watch the most. 1. Press MENU button. 2. Use RIGHT arrow to select Settings. 3. Use UP/DOWN arrows to select Television and press the OK. 4.
-
Page 21: Whole Home Dvr
Using Your Hawaiian Telcom TV DVR Whole Home DVR Whole Home DVR puts you in control. Record, pause and replay your favorite shows at the touch of a button. Watch what you want, when you want. Imagine watching the first half of a recorded show in your living room, then moving to your bedroom to view the rest. -
Page 22: Recording Programs
DVR Menu Quickly and easily manage your recordings through the DVR menu. 1. Press the DVR RECORDED TV button. 2. Use UP/DOWN arrows or LEFT/RIGHT arrows to access your recordings, edit your recording settings, or add a recording. Recording Programs When a program is being recorded, a red RECORDING icon will be displayed in the guide regardless of which Set Top Box you are watching TV on. -
Page 23: Recording A Series
Recording a Single Episode 1. Press GUIDE. 2. Navigate to the program that you wish to record. 3. Press RECORD. 4. A single episode record icon will appear in the program guide. Recording a Series 1. Press GUIDE 2. Navigate to the program that you want to record. 3. - Page 24 Cancelling a Future Recording 1. Press DVR RECORDED TV button. 2. Use UP/DOWN arrows to select Scheduled. 3. Use OK button to select the program that you wish to cancel recording and press 4. To cancel a recording of: An episode – select Don’t record, press OK button and then select Cancel episode and press OK button.
-
Page 25: Customizing Recording Settings
Customizing Recording Settings No matter what time an episode of your favorite show ends, you can customize your settings to extend recording time or protect it from being deleted. And if you’d like to save an entire series, you can also customize the start time, extend recording time and choose whether you want to record first runs as well as reruns. -
Page 26: Watching A Recorded Program
Watching a Recorded Program 1. Press DVR RECORDED TV button. 2. Use UP/DOWN arrows to select the recorded show that you want to watch and press OK. 3. Select Play and press OK to view the recording from the beginning. Your recorded program will stop if you tune to another channel. - Page 27 Using Remote DVR Manage your DVR remotely through our online portal. Visit hawaiiantel.com/myaccount and follow the instructions on the screen to login to your account. Under the Hawaiian Telcom TV section, click on Program My DVR. The remote DVR scheduler will look like this: Note: To use the Remote DVR feature you will need to register your account at hawaiiantel.com/myaccount.
- Page 28 Record a Program or Series Using the Date/Time/Channel drop down menus to record a program. Select a date (guide will automatically update as a date is selected). Select a time. Select a channel. Choose the program/series you’d like to record and a new window will open. Determine if you’d like to record the program or the series.
- Page 29 Browsing the guide to record a program Use the up/down/left right buttons on the upper right hand corner of the screen to browse the guide. Choose the program/series you’d like to record and a new window will open. Determine if you’d like to record the program or the series. Choose Stop time.
- Page 30 Record a Program or Series Using Search to record a program. Click on Search at the top of the screen. Enter program title in the box. Click Go. Search Results will be shown below. Choose the program/series you’d like to record and a new window will open. Determine if you’d like to record the program or the series.
-
Page 31: Managing Scheduled Recordings
Managing Recorded Shows You can also manage your recorded shows via the Remote DVR Scheduler. Click on Recorded Shows at the top of the screen. The list of Recorded Shows is shown in chronological order. Click on Title to sort alphabetically by program title. Click on Channel to sort numerically by channel. -
Page 32: Last Channel
TV Features Last Channel Press LAST button to change to the previous channel you were watching. A menu will appear on the right hand side of the screen showing the 5 previously viewed channels. If you’d like to change to one of them, use UP/DOWN arrows to scroll to it and press the OK button. -
Page 33: Picture-In-Picture Browsing
Picture-in-Picture Browsing Find out what’s playing on other channels without missing a moment of what you are currently watching. 1. Press UP/DOWN arrows to scroll through channels while watching live TV. Press RIGHT/LEFT arrows to scroll through time-slots while watching live 3. - Page 34 Quick Tip Quickly search by using the number keypad on your remote to spell the name of the person or program you are looking for.
-
Page 35: Using Caller Id On Tv
Using Caller ID on TV If you have a Hawaiian Telcom Home Phone, Caller ID is automatically available on your TV. When there is an incoming call, the phone number will appear at the top of your TV as shown. - Page 36 Turning On Caller ID 1. Press MENU. 2. Use LEFT/RIGHT arrows to navigate to My Account. 3. Use UP/DOWN arrows to navigate to Caller ID Snooze. 4. Select Turn On and press OK. Caller ID Snooze 1. Press MENU. 2. Use LEFT/RIGHT arrows to navigate to My Account. 3.
-
Page 37: Viewing Call History
Turning Off Snooze 1. Press MENU. 2. Use LEFT/RIGHT arrows to navigate to My Account. 3. Use the UP/DOWN arrows to navigate to Caller ID Snooze. 4. Select Reset and press OK. Viewing Call History 1. Press MENU. 2. Use LEFT/RIGHT arrows to navigate to My Account. 3. - Page 38 3. Browse and purchase HSN products using your remote. Restrictions apply. A HSN account is required to purchase using the HSN Shop by Remote app on Hawaiian Telcom TV. Shop by Remote orders will be sent to the shipping address on your HSN account and orders will be billed to the credit card on your HSN account.
- Page 39 Facebook Connect to the official Facebook fan pages for the programs of channels you’re watching. Setting up the Social TV app on your TV You’ll need an internet connection and your Facebook account information to get started. Part 1: Registration of your email address 1.
- Page 40 3. Scroll to the submenu on the right and select CREATE A NEW USER. 4. Enter the email address you use to login to your Facebook then press OK.
- Page 41 5. Confirm the email address by pressing YES. Part 2: Choosing a PIN 1. Check your email account and open the email from facebook@hawaiiantel.com (user name may only show as Facebook). Click on the link at the bottom of the email.
- Page 42 2. Log in to your Facebook account. 3. Select Okay to allow Facebook feature options.
- Page 43 4. Press Okay to accept and authorize the application. 5. Create a TV profile PIN.
- Page 44 Part 3: Sign in to the Social TV app on your TV 1. If you’ve exited the Social TV App, return to the app on Hawaiian Telcom TV. Press the Go Interactive button on your remote control then scroll to Social TV and select Facebook.
- Page 45 3. Enter your 4-digit Facebook on TV profile PIN then press the OK on your remote control. If you don’t see your profile name you may need to re-authenticate.
- Page 46 4. You’re now logged into the Social TV app and can access your Facebook profile. Use the arrow keys on your remote to navigate.
- Page 47 Top Trends happening now on Twitter with our full screen viewing experience. To sign-in to the Twitter on TV app from your Hawaiian Telcom TV for the first time: 1. Press GO INTERACTIVE on the remote to launch the App Dashboard.
- Page 48 Stingray Music Stingray Music lets you browse and listen to a vast music library on your TV. View via Album Cover to see which artists and songs were last played, are currently playing or are coming up next. To access Stingray Music: 1.
- Page 49 3. Use LEFT/RIGHT and UP/DOWN arrows to navigate through the menu and press OK to make your selection. Access the full library of more than 8,000 songs for $10/mo. Hawaiian Telcom High- Speed Internet service required. The KARAOKE Channel app is owned and operated by Stingray Music USA Inc.
- Page 50 TV Everywhere Now your favorite shows are available anytime, anywhere. Watch your favorite shows here, there and everywhere! Now with your TV Subscription, view live or on demand content on your desktop, laptop, tablet and smartphone. Step 1: Have your My Account username and password ready. If you have not yet registered for My Account, please visit www.hawaiiantel.com/myaccount Step 2: Login or download your app.
-
Page 51: Video On Demand (Vod)
Video On Demand & Pay Per View Video on Demand (VOD) Want to watch it now? With Hawaiian Telcom's VOD, you can order and watch movies whenever you want. There are hundreds of titles to choose from, including the latest Hollywood blockbusters, timeless classics and more. - Page 52 4. Use the Arrow Buttons to select a title and press the OK button to see more information including a quick synopsis, Director, Actors, and rental information. 5. Use the Arrow Buttons to select Rent and press the OK button 6.
- Page 53 You will see the charge for your purchase on your next Hawaiian Telcom bill. Be sure to set your Parental Controls to block the Adult Content to block all titles and poster art from appearing in the Video On Demand Storefront. When Parental Controls...
- Page 54 When the Parental Controls are set by movie rating, the poster art and titles of all videos that fit in the blocked range will be blocked while navigating through the Video On Demand Storefront. You can change the look and feel of your Video On Demand Storefront to List Format. 1.
- Page 55 3. Your Video On Demand storefront will now display in List format. Use the Arrow Buttons to navigate through sub-categories and titles.
-
Page 56: Pay Per View (Ppv)
Watching a Rented VOD Program Watch your rentals as many times as you want within the rental period (24 hours for most rentals). 1. Press On Demand button 2. Use the Arrow Buttons to navigate to the My Videos section of the Video On Demand Storefront 3. - Page 57 Purchasing a PPV Event Simply press the “GUIDE” button on your remote control to purchase PPV events. Charges will appear on your next month’s bill. 1. Press GUIDE. Scroll using the UP/DOWN arrows and navigate to highlight the PPV event that you want to purchase. 3.
-
Page 58: Manage Your Account
Manage Your Account My Account My Account allows you to manage all your Hawaiian Telcom services 24/7, including: – Access your Remote DVR – Upgrade your TV services – View or pay your bills – Check your hawaiiantel.net email and Hawaiian Telcom Voicemail To register, visit hawaiiantel.com/myaccount. - Page 59 From your Hawaiian Telcom TV Set Top Box: 1. Press GO INTERACTIVE. 2. Use LEFT/RIGHT arrows to scroll to Customer Care and select My Account. 3. Press OK. Quick Tip For additional security when adding and subtracting features or channels, set a 4-digit Parental Control PIN from the Settings or My Account menu.
- Page 60 Adding TV Packages Use LEFT/RIGHT arrows to select TV Packages. Use UP/DOWN arrows to highlight the desired TV Package. Press OK to learn more about the chosen TV Package. Press OK to add the TV Package to your cart. You’ll be prompted with two choices: Continue Shopping or Checkout. Select the desired option and press OK.
- Page 61 Adding International Channels Use LEFT/RIGHT arrows to select International Channels. Use UP/DOWN arrows to highlight the desired International Channel or Pack. Press OK to learn more about the highlighted International Channel or Pack. Press OK to add the chosen International Channel or Pack to your cart. You’ll be prompted with two choices: Continue Shopping or Checkout.
- Page 62 Check that your cables are firmly attached to the TV and Set Top Box. Remove any items that may have been placed on top of any Hawaiian Telcom TV equipment. All equipment needs at least two inches of free space for proper ventilation.
- Page 63 You will also want to avoid connecting any equipment to the USB ports on the back of your Hawaiian Telcom TV Set Top Box. They’re for future use only and you could potentially damage both the equipment and the Set Top Box.
-
Page 64: Troubleshooting Your Hawaiian Telcom Tv System
If the green LED light at the front of the Hawaiian Telcom TV Set Top Box lights up, your box is now on and working. The Hawaiian Telcom TV Set Top Box does not initialize ... - Page 65 Manually turn your TV on and off. Check the back of your Hawaiian Telcom TV Set Top Box and any additional devices to ensure that all of your cables are firmly connected. HDMI connected from STB to TV ...
- Page 66 Check to ensure that the audio output cables from the Hawaiian Telcom TV Set Top Box to the TV are firmly connected. The power light on the Hawaiian Telcom TV Set Top Box is on, but I have a snowy screen on my TV ...
- Page 67 How many TVs can I watch Hawaiian Telcom TV on? Hawaiian Telcom TV supports up to 8 TVs, and at any one time you can watch live TV on 4 TVs. If you have a DVR, you can watch your recordings on the rest of your TVs.
- Page 68 You can only pause, rewind and fast-forward live TV on the TV connected to your DVR. How long can I pause live TV for? With a DVR, you can pause live TV for up to 60 minutes. After 60 minutes the paused program will start playing again.
- Page 69 Does Hawaiian Telcom’s TV service support the use of a Tivo DVR? Hawaiian Telcom Whole Home DVR service provides advanced DVR features across all the TVs in your home connected to Hawaiian Telcom’s TV service – something that Tivo cannot provide. However, Tivo Series 1 or Series 2 Single Tuner can be used with Hawaiian Telcom’s TV service by...
Need help?
Do you have a question about the Hawaiian Telcom and is the answer not in the manual?
Questions and answers