Cisco Explorer 8640HD, 8642HD, 8650HD, 8652HD Quick Reference Guide
- User manual (28 pages) ,
- Quick reference manual (2 pages)
Advertisement
Welcome
The Cisco® Explorer® HD High-Defi nition DVR Set-Tops (set-tops) receive and deliver digital signals, and deliver high-defi nition programming in exceptional picture and audio quality. Use the simple user interface to access favorite channels and parental control services. Contact your service provider for information about these and other available services. Use the instructions in this guide to install the set-top and to access your program services.
The consumer support website provides news and information about this product. For more information, please refer to: http://www.cisco.com/web/consumer/support/index.html
Safety First
Before using this set-top read the IMPORTANT SAFETY INSTRUCTIONS section of this guide.
Avoid Screen Burn-In
Images such as letterbox bars or side bars, bright closed-captioning backgrounds, station logos, or any other stationary images may cause the TV screen to age unevenly and cause damage to your TV. Refer to the user guide that came with your TV for more information about screen burn-in.
Automatic Software Updates
A message appears on the TV screen when the set-top is receiving software updates. In addition, download information also appears on the front panel of the set-top during these updates. Wait for the current time to display on the front panel before continuing. When the time appears, the update is complete.
Performance Tips
If the set-top does not perform as expected, the following tips may help.
No picture
- Verify that the power to your TV is turned on.
- If the set-top is plugged into a wall switch, verify the switch is in the ON position. (Avoid plugging into an outlet that is controlled by a wall switch.)
- Verify that all cables are properly connected.
- The current channel may not be available in your service package. Try selecting another channel to see if a picture appears.
No color
- Verify the current TV program is broadcast in color.
- Adjust the TV color controls.
No sound
- If your setup includes a VCR or stereo, verify that you have properly connected them to the set-top.
- Verify the volume is turned up.
- Verify the mute function is not on.
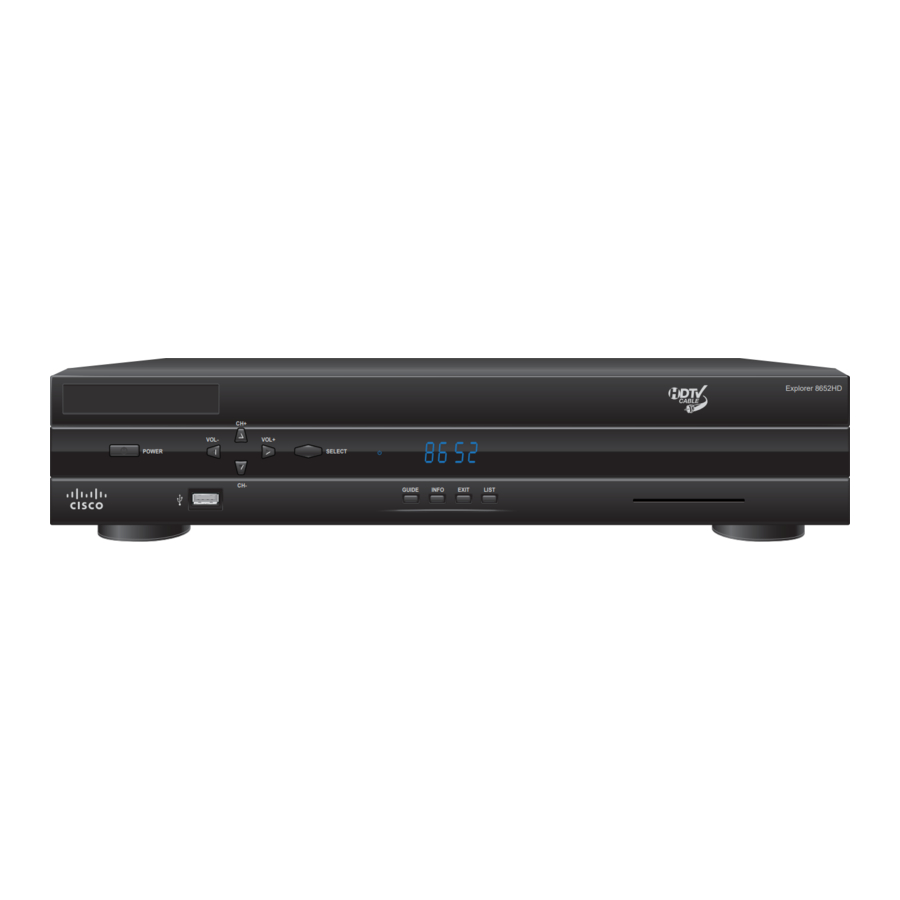
Front Panel

- Power
Turns the set-top on and off - VOL-, VOL+
Decreases and increases the volume - USB 2.0
Connects to external USB equipment approved by your service provider, software controlled - CH+, CH-
Scrolls up and down through the channels - Select
Accesses your on-screen selection - IR Sensor
Receives the infrared signal from the remote control - Guide
Accesses on-screen services, such as the on-screen guide, video-on-demand, or pay-per-view - Info
Displays a description of the selected program. This button is available from the on-screen menu and while viewing a program - Exit
Exit menus, the on-screen menu, and program information - List
Displays the recorded list - Display
Displays the selected channel number and time of day. The display shows the following:- Power (
![]() )
) - Message (
![]() )
) - Record (
![]() )
) - MoCA ™ Link (
![]() )
) - HDTV
- Auto
- 480i / 480P
- 720i / 720P
- 1080i / 1080P
- 5.1
- Power (
- Smart Card
Allows smart card access

 )
) )
)  )
)Note: This illustration may vary from the actual product.
Safety and Performance Tip
Keep the top of the set-top free of all objects and electronic devices, including your TV.
Back Panel

- Cable In
Connects to a coaxial cable that delivers the signal from your service provider - Video Out
Connects to the composite input on your TV - Audio Out
Connects to RCA cables that send analog audio signals (left and right) to the stereo inputs on a TV - HDTV (YPbPr)
Connects to the component input (YPbPr) on the HDTV - Audio Out
Connects to RCA cables that send analog audio signals (left and right) to the stereo inputs on a TV - Digital Audio Out
Connects to an RCA cable that sends a digital audio signal to a surround-sound receiver or other digital audio device input - S-Video Out
Connects to an S-Video cable that sends an S-Video signal to your TV or VCR. This signal is standard-defi nition, but higher quality than other SDTV connections - IR Remote Input
Available to be connected to an approved remote IR receiver (purchased separately) - Cable Out
Connects to a coaxial cable that sends analog audio and video signals to a TV or VCR - Optical Audio Out
Connects to an optical cable that sends a digital audio signal to a surround-sound receiver or other digital audio device input - HDMI
Connects an HDMI™ cable to the HDMI input of an HDTV. HDMI supports both digital audio and video. May be used to connect to a DVI interface using an HDMI-to-DVI adapter for video and separate audio connections. Any of the following audio connections may be used: Audio Out (3 or 5); Digital Audio Out (6); or Optical Audio Out (10) - USB 2.0
Connects to external USB equipment approved by your service provider, software controlled - eSATA
Connects to an external Serial ATA (eSATA) hard disk drive for expanded drive space. A connected eSATA drive is not an archival device. Ask your service provider for a list of approved hard drive models for use with the DVR - 1394
Connects to display devices that are equipped with a 1394 input - Ethernet
Connects to external Ethernet equipment approved by your service provider - AC Power Input
Connects to the power cord to deliver power to the set-top - AC Outlet
Connects to the AC power cord from another device, such as a TV
Note: This illustration may vary from the actual product.
Connecting to an HDTV with HDMI Input
- Unplug all electronic devices before connecting the set-top.
- Connect the set-top and TV to the HDMI input as shown in the diagram.
- Connect the set-top to the coaxial cable coming in from the wall.
- Plug the TV into an AC power source.
- Plug the set-top's power cord into an AC power source.
- For the TV to receive the signal, press the appropriate button on the remote control to select the audio/video inputs to which you have connected the set-top.
- Press the POWER key on the remote control.
8652HD

Note: This illustration may vary from the actual product.

Electric shock hazard! Unplug all electronic devices before connecting or disconnecting any device cables to the set-top.
U.S. Patents
A patent notice is affi xed to this product. In addition, the product may also be covered by one or more of the following patents:
4,498,169; 4,692,919; 4,748,667; 4,829,569; 4,866,770; 4,885,775; 4,888,799; 4,890,319; 4,922,456; 4,922,532; 4,924,498; 4,965,534; 4,991,011; 5,003,384; 5,012,510; 5,029,207; 5,045,816; 5,053,883; 5,054,071; 5,058,160; 5,142,575; 5,142,690; 5,146,526; 5,155,590; 5,214,390; 5,225,902; 5,225,925; 5,235,619; 5,237,610; 5,239,540; 5,241,610; 5,247,364; 5,255,086; 5,257,403; 5,267,071; 5,270,809; 5,271,041; 5,272,752; 5,282,028; 5,285,497; 5,287,351; 5,301,028; 5,309,514; 5,317,391; 5,319,709; 5,341,425; 5,347,388; 5,347,389; 5,357,276; 5,359,601; 5,361,156; 5,367,571; 5,379,141; 5,379,145; 5,381,481; 5,390,337; 5,400,401; 5,406,558; 5,418,782; 5,420,866; 5,420,923; 5,425,101; 5,428,404; 5,430,568; 5,434,610; 5,436,749; 5,438,370; 5,440,632; 5,442,472; 5,455,570; 5,457,701; 5,471,492; 5,477,199; 5,477,262; 5,477,282; 5,477,370; 5,481,389; 5,481,542; 5,485,221; 5,493,339; 5,497,187; 5,500,758; 5,502,499; 5,506,904; 5,519,780; 5,539,822; 5,550,825; 5,579,055; 5,579,057; 5,583,562; 5,592,551; 5,596,606; 5,600,378; 5,602,933; 5,640,388; 5,657,414; 5,675,575; 5,684,876; 5,715,515; 5,724,525; 5,734,822; 5,740,300; 5,742,677; 5,754,940; 5,757,416; 5,771,064; 5,774,859; 5,825,829; 5,826,167; 5,850,305; 5,854,703; 5,870,474; 5,892,607; 5,920,626; 5,923,755; 5,930,024; 5,930,515; 5,937,067; 5,963,352; 5,966,163; 5,982,424; 5,991,139; 5,999,207; 6,005,631; 6,005,938; 6,016,163; 6,028,941; 6,029,046; 6,052,384; 6,055,244; 6,072,532; 6,105,134; 6,148,039; 6,157,719; 6,188,729; 6,195,389; 6,212,278; 6,215,530; 6,219,358; 6,240,103; 6,243,145; 6,246,767; 6,252,964; 6,272,226; 6,292,081; 6,292,568; 6,320,131; 6,374,275; 6,405,239; 6,411,602; 6,417,949; 6,424,714; 6,424,717; 6,433,906; 6,438,139; 6,463,586; 6,467,091; 6,476,878; 6,493,876; 6,510,519; 6,516,002; 6,516,412; 6,526,508; 6,538,595; 6,546,013; 6,560,340; 6,567,118; 6,570,888; 6,622,308; 6,629,227; 6,664,984; 6,667,994; 6,671,879; 6,674,967; 6,678,891; 6,714,598; 6,721,352; 6,721,956; 6,725,459; 6,738,982; 6,744,892; 6,744,967; 6,751,271; 6,760,918; 6,795,972; 6,802,077; 6,804,708; 6,811,447; 6,817,028; 6,822,972; 6,823,385; 6,832,386; 6,845,106; 6,868,473; 6,874,075; 6,889,191; 6,909,471; 6,917,622; 6,917,628; 6,922,412; 6,927,806; 6,928,656; 6,931,058; 6,937,729; 6,969,279; 6,971,008; 6,971,121; 6,978,310; 6,986,156; 6,988,900; 6,996,838; 7,010,801; 7,053,960; 7,065,213; 7,069,578; 7,069572; D348065; D354959; D359737; D363932; D390217; D434753; D507240; D507535; D513407; D516518; RE36368; RE36988
IMPORTANT SAFETY INSTRUCTIONS
Notice to Installers
The servicing instructions in this notice are for use by qualified service personnel only. To reduce the risk of electric shock, do not perform any servicing other than that contained in the operating instructions, unless you are qualified to do so.
Note to System Installer
For this apparatus, the coaxial cable shield/screen shall be grounded as close as practical to the point of entry of the cable into the building. For products sold in the US and Canada, this reminder is provided to call the system installer's attention to Article 820-93 and Article 820-100 of the NEC (or Canadian Electrical Code Part 1), which provides guidelines for proper grounding of the coaxial cable shield.

This symbol is intended to alert you that uninsulated voltage within this product may have sufficient magnitude to cause electric shock. Therefore, it is dangerous to make any kind of contact with any inside part of this product.

RISK OF ELECTRIC SHOCK
DO NOT OPEN
To reduce the risk of electric shock, do not remove cover (or back). No user-serviceable parts inside. Refer servicing to qualified service personnel.
TO PREVENT FIRE OR ELECTRIC SHOCK, DO NOT EXPOSE THIS UNIT TO RAIN OR MOISTURE.

This symbol is intended to alert you of the presence of important operating and maintenance (servicing) instructions in the literature accompanying this product.
- Read these instructions.
- Keep these instructions.
- Heed all warnings.
- Follow all instructions.
- Do not use this apparatus near water.
- Clean only with dry cloth.
- Do not block any ventilation openings. Install in accordance with the manufacturer's instructions.
- Do not install near any heat sources such as radiators, heat registers, stoves, or other apparatus (including amplifiers) that produce heat.
- Do not defeat the safety purpose of the polarized or grounding-type plug. A polarized plug has two blades with one wider than the other. A grounding-type plug has two blades and a third grounding prong. The wide blade or the third prong are provided for your safety. If the provided plug does not fit into your outlet, consult an electrician for replacement of the obsolete outlet.
- Protect the power cord from being walked on or pinched particularly at plugs, convenience receptacles, and the point where they exit from the apparatus.
- Only use attachments/accessories specified by the manufacturer.
![]() Use only with the cart, stand, tripod, bracket, or table specified by the manufacturer, or sold with the apparatus. When a cart is used, use caution when moving the cart/apparatus combination to avoid injury from tip-over.
Use only with the cart, stand, tripod, bracket, or table specified by the manufacturer, or sold with the apparatus. When a cart is used, use caution when moving the cart/apparatus combination to avoid injury from tip-over.- Unplug this apparatus during lightning storms or when unused for long periods of time.
- Refer all servicing to qualified service personnel. Servicing is required when the apparatus has been damaged in any way, such as a power-supply cord or plug is damaged, liquid has been spilled or objects have fallen into the apparatus, the apparatus has been exposed to rain or moisture, does not operate normally, or has been dropped.

Power Source Warning
A label on this product indicates the correct power source for this product. Operate this product only from an electrical outlet with the voltage and frequency indicated on the product label. If you are uncertain of the type of power supply to your home or business, consult your service provider or your local power company.
The AC inlet on the unit must remain accessible and operable at all times.
Ground the Product
Avoid electric shock and fire hazard! If this product connects to coaxial cable wiring, be sure the cable system is grounded (earthed). Grounding provides some protection against voltage surges and built-up static charges.
Outdoor Grounding System
If this product connects to an outdoor antenna or cable system, be sure the antenna or cable system is grounded (earthed). This provides some protection against voltage surges and built-up static charges.
Article 810 of the National Electric Code (NEC) ANSI/NFPA No. 70-1990, provides the following information:
- Grounding of the mast and supporting structure
- Grounding the lead-in wire to an antenna discharge unit
- Size of the grounding conductors
- Location of the antenna-discharge unit
- Connection to grounding electrodes
- Requirements for the grounding electrodes (see the following antenna grounding diagram as recommended by NEC ANSI/NFPA 70)
Avoid electric shock and fire hazard! Do not locate an outside antenna system in the vicinity of overhead power lines or power circuits. Touching power lines or circuits might be fatal.
Example Of Antenna Grounding

Protect the Product from Lightning
In addition to disconnecting the AC power from the wall outlet, disconnect the signal inputs.
Verify the Power Source from the On/Off Power Light
When the on/off power light is not illuminated, the apparatus may still be connected to the power source. The light may go out when the apparatus is turned off, regardless of whether it is still plugged into an AC power source.
Eliminate AC Mains Overloads
Avoid electric shock and fi re hazard! Do not overload AC mains, outlets, extension cords, or integral convenience receptacles. For products that require battery power or other power sources to operate them, refer to the operating instructions for those products.
Handling Disposable Batteries
This product may contain disposable batteries. Heed the following warning and follow the Safety and Disposal instructions below.
There is danger of explosion if the battery is mishandled or incorrectly replaced. Replace only with the same type of battery. Do not disassemble it or attempt to recharge it outside the system. Do not crush, puncture, dispose of in fi re, short the external contacts, or expose to water or other liquids. Dispose of the battery in accordance with local regulations and instructions from your service provider.
Safety
- Insert batteries correctly. There may be a risk of explosion if the batteries are incorrectly inserted.
- Do not attempt to recharge 'disposable' or 'non-reusable' batteries.
- Please follow instructions provided for charging 'rechargeable' batteries.
- Replace batteries with the same or equivalent type that we recommend.
- Do not expose batteries to excessive heat (such as sunlight or fi re).
- Do not expose batteries to temperatures above 100°C (212°F).
Provide Ventilation and Select a Location
- Remove all packaging material before applying power to the product.
- Do not place this apparatus on a bed, sofa, rug, or similar surface.
- Do not place this apparatus on an unstable surface.
- Do not install this apparatus in an enclosure, such as a bookcase or rack, unless the installation provides proper ventilation.
- Do not place entertainment devices (such as VCRs or DVDs), lamps, books, vases with liquids, or other objects on top of this product.
- Do not block ventilation openings.
Protect from Exposure to Moisture and Foreign Objects
Avoid electric shock and fire hazard! Do not expose this product to dripping or splashing liquids, rain, or moisture. Objects filled with liquids, such as vases, should not be placed on this apparatus.
Avoid electric shock and fire hazard! Unplug this product before cleaning. Do not use a liquid cleaner or an aerosol cleaner. Do not use a magnetic/static cleaning device (dust remover) to clean this product.
Avoid electric shock and fire hazard! Never push objects through the openings in this product. Foreign objects can cause electrical shorts that can result in electric shock or fire.
Check Product Safety
Upon completion of any service or repairs to this product, the service technician must perform safety checks to determine that this product is in proper operating condition.
Protect the Product When Moving It
Always disconnect the power source when moving the apparatus or connecting or disconnecting cables.
Manufactured by:
Cisco Systems, Inc.
5030 Sugarloaf Parkway
Lawrenceville, Georgia 30044 USA
Telephone: 770-236-1077

Documents / Resources
References
Download manual
Here you can download full pdf version of manual, it may contain additional safety instructions, warranty information, FCC rules, etc.
Download Cisco Explorer 8640HD, 8642HD, 8650HD, 8652HD Quick Reference Guide
Advertisement


Need help?
Do you have a question about the Explorer 8640HD and is the answer not in the manual?
Questions and answers