Table of Contents
Advertisement
Quick Links
Advertisement
Table of Contents

Subscribe to Our Youtube Channel
Related Manuals for SME 10


Summary of Contents for SME 10
- Page 1 PRECISION TURNTABLE PRECISION TURNTABLE PRECISION TURNTABLE Instructions...
- Page 2 Warning! Important Safety Instructions CAUTION: RISK OF ELECTRIC SHOCK DO NOT REMOVE POWER SUPPLY UNIT COVER. CAUTION: TO REDUCE THE RISK OF ELECTRIC SHOCK, DO NOT REMOVE THE POWER SUPPLY UNIT COVER. THERE ARE NO USER SERVICEABLE PARTS INSIDE. REFER ALL SERVICING TO QUALIFIED PERSONNEL. Please read this manual carefully and keep it in a safe place for future reference.
- Page 3 PRECISION TURNTABLE PRECISION TURNTABLE PRECISION TURNTABLE Instructions This is not an ordinary turntable. These instructions cover This is not an ordinary turntable. These instructions cover This is not an ordinary turntable. These instructions cover unpacking, adjustment and installation procedures and you owe adjustment and installation procedures and you owe adjustment and installation procedures and you owe it to yourself to read them carefully before proceeding further.
-
Page 4: Introduction
Introduction The SME Model 10 Precision Turntable is built to exacting engineering standards providing reliability and freedom from critical adjustments. Build integrity, sophisticated electronics and vibration free moving parts allow the full capabilities of any sound system to be fully explored. -
Page 5: Table Of Contents
Contents Page Introduction Dimensions and specification Packing list Parts identification - Model 10 - Turntable Parts identification - Model 10 - Pick-up Arm Unpacking 10/11 Setting up Fitting the Model 10 Precision Pick-up Arm 11/12 Fitting the Cartridge Fitting the Headshell... - Page 6 Dimensions (turntable) Width 370.0mm (14.57”) Depth 350.0mm (13.80”) Height 161.0mm (6.3”) - Record clamp fitted Platter Diameter 304.0mm (11.97”) Spindle to Arm 215.35mm (8.48”) Net Weight 16.0Kg (35lb) Shipping weight 18.25Kg (40lb) Specification (turntable) The turntable is driven by a 3-phase, 6 pulse, inductance motor, with 8 pole Neodymium magnets and 3 integrated Hall position sensors.
-
Page 7: Packing List
Hexagon Wrench 2.0mm A/F 5924 Hexagon Wrench 0.89mm A/F 5926 Socket Cap Screws M4 x 18 5974/18 Hexagon Wrench 3.0mm A/F 5990 Model 10 Turntable Serial No: ....Model 10 Pick-up arm Serial No: ....Contents checked by: ....Date: .... -
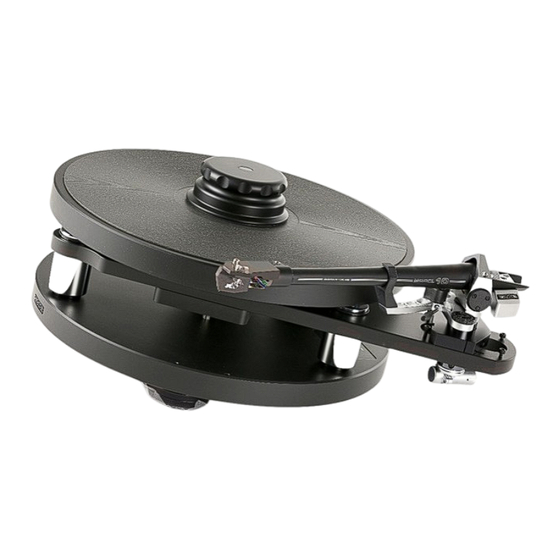
Page 8: Parts Identification - Model 10 - Turntable
Parts Identification - Model 10 Precision Turntable Low Voltage Motor Lubrication Input Cable Point Motor Pulley Sub-Chassis (Arm Mounting) Stylus Guard Turntable Spindle Record Spindle Drive Belt Driven Pulley Washer Platter Socket Cap Screw M3 x 12 Insert Stylus Guard... -
Page 9: Parts Identification - Model 10 Pick-Up Arm
10. Parts Identification - Model 10 Pick-up Arm... -
Page 10: Unpacking
Check the adjustment with a precision spirit level placed on the platter. Any SME nine-inch precision pick-up arm can be used with the Model 10 turntable, the SME Model 10 precision pick-up arm is particularly recommended for its high quality at moderate cost. -
Page 11: Fitting The Model 10 Precision Pick-Up Arm
The movement is internally spring loaded so settings will not be lost in the meantime. Remove the four socket cap screws M3 x 12 from the Model 10 sub-chassis (Arm Mounting). These have been provided in case you should wish to use another model from the wide range of SME precision pick-up arms. -
Page 12: Fitting The Headshell
Red - right channel Green - right channel ground White - left channel Blue - left channel ground The LCOFC cartridge leads, Part No. 4899, can be replaced and may be obtained from your dealer or SME Ltd. Blue Green... -
Page 13: Balancing The Arm
16. Balancing the Arm (Longitudinal) If a detachable stylus guard is fitted to the cartridge it should be removed, thereafter handling the arm with suitable caution. The balance-weight is unlocked by releasing its central screw using the 3mm A/F ball- ended wrench. -
Page 14: Horizontal Tracking Angle Adjustment (Hta)
In standard operation the mounting surface of the cartridge, underside of the headshell and the centreline of the tone-arm should all be approximately parallel with the surface of the record. The alignment protractor has been printed to act also as a height guide in conjunction with the lines on the side of the tone-arm. -
Page 15: Positioning The Armrest
23. Operation - Turntable speed adjustment The Model 10 precision turntable is extensively run-in and it’s speeds set before leaving the factory. If you should wish to check the speed settings and make your own adjustments, the procedure is as follows: Complete the arm and cartridge set-up procedures as detailed in Sections 13 - 22 above. -
Page 16: Operation - Turntable
To adjust speeds depress and hold down the 33 and 45 buttons together for 8 to 10 seconds the 33 LED will flash after this period indicating that the adjustment mode is engaged; release both buttons. Press and release the 33 button to slow down or the 45 button to speed up. -
Page 17: Operation - Pick-Up Arm
Model 10 has a taper top-bearing which can be adjusted but only if it becomes absolutely necessary. Check from time to time by removing platter and drive belt and spinning the driven pulley. -
Page 18: Transit Precautions
27. TRANSIT PRECAUTIONS The Model 10 can be safely transported, SUBJECT ABSOLUTELY TO THE FOLLOWING PRECAUTIONS: Short journeys by car: remove the platter, disengage the drive belt from the motor pulley, and replace the transit screw (see page 8). -
Page 19: Guarantee
The nominal period of the guarantee is twelve months but is liberally interpreted at our discretion subject to the following conditions being observed: Any matter arising must in the first instance be raised with SME Limited at the address appearing below. -
Page 20: Appendix
Do not apply oil other than that supplied by SME Limited for the purpose. Do not attempt to take it to pieces or interfere with any of the screws except as directed in the instructions. To do so will invalidate the warranty and may occasion costly repairs.
Need help?
Do you have a question about the 10 and is the answer not in the manual?
Questions and answers