Table of Contents
Advertisement
Quick Links
Advertisement
Table of Contents

Related Manuals for SME 10


Summary of Contents for SME 10
- Page 1 PRECISION TURNTABLE Instructions...
- Page 2 Precision Turntable Instructions This is not an ordinary turntable. These instructions cover unpacking, adjustment and installation procedures and you owe it to yourself to read them carefully before proceeding further.
-
Page 3: Introduction
Introduction Model 10 Precision Turntable is built to exacting engineering standards providing reliability and freedom from critical adjustments. Build integrity, sophisticated electronics and vibration free moving parts allow the full capabilities of any sound system to be fully explored. -
Page 4: Table Of Contents
Contents Page Introduction Dimensions and specification Packing list Parts identification - Model 10 - Turntable Parts identification - Model 10 - Pick-up Arm Unpacking 9/10 Setting up Fitting the Model 10 Precision Pick-up Arm 10/11 Fitting the Cartridge 11/12 Fitting the Headshell... - Page 5 Motor commutation and speed selection are supervised by an 8-bit micro-controller and regenerative braking reduces run-on to a minimum. The special SME motor sets new standards of speed stability and quiet running. Its rotation is compared 120 times per revolution each speed having its own crystal reference ensuring rotation is exactly 33 1/3 or 45 rpm.
-
Page 6: Packing List
Packing List - Model 10 turntable Description Part No. Base and sub-chassis assembly 1200 Platter 1201 Operating Instructions 1271 Record Clamp 1239A Dust Cover 1244 Stylus guard 1245 Power supply unit - 100V 115V 230V 1266 Power Cord 1098-9 Drive Belt... -
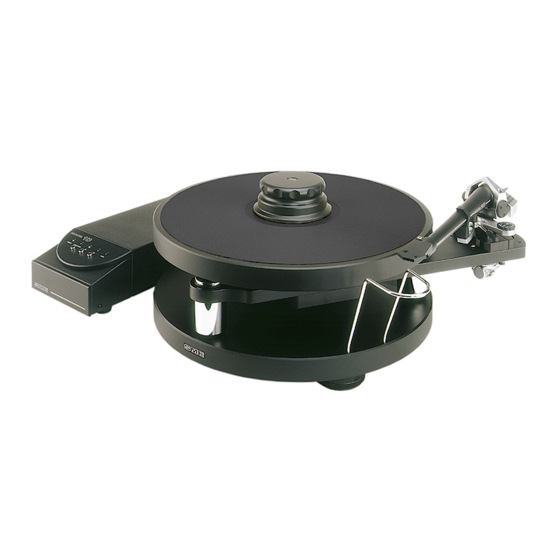
Page 7: Parts Identification - Model 10 - Turntable
Parts Identification - Model 10 Precision Turntable Low Voltage Input Cable Motor Lubrication Point Motor Pulley Sub-Chassis (Arm Mounting) Stylus guard Turntable Spindle Record Spindle Drive Belt Washer Platter Driven Pulley Socket Cap Screw M3 x 12 Insert Stylus guard... -
Page 8: Parts Identification - Model 10 Pick-Up Arm
10. Parts Identification - Model 10 Pick-up Arm... -
Page 9: Unpacking
Check the adjustment with a precision spirit level placed on the platter. Any SME nine-inch precision pick-up arm can be used with the Model 10 turntable, the SME Model 10 precision pick-up arm is particularly recommended for its high quality at moderate cost. -
Page 10: Fitting The Model 10 Precision Pick-Up Arm
The movement is internally spring loaded so settings will not be lost in the meantime. Remove the four socket cap screws M3 x 12 from the Model 10 sub-chassis (Arm Mounting). These have been provided in case you should wish to use another model from the wide range of SME precision pick-up arms. -
Page 11: Fitting The Headshell
LCOFC cartridge leads have 1mm diameter receptacles for the headshell and standard 1,25mm for the cartridge. The latter may require adjustment with pliers or a screwdriver blade for a snug fit on non-standard terminals. Connections to the cartridge must never be made by direct soldering. -
Page 12: Balancing The Arm
lift out using the long leg of the wrench and applying slight side pressure so that it does not slip out of the socket. The nut remains in its housing in the underside of the headshell where it is retained with adhesive. 16. -
Page 13: Horizontal Tracking Angle Adjustment (Hta)
the playing position. Adjust the arm height until there is approximately 3mm (1/8”) clearance between the underside of the tone-arm and the surface of the record at its circumference. In standard operation the mounting surface of the cartridge, underside of the headshell and the centreline of the tone-arm should all be approximately parallel with the surface of the record. -
Page 14: Positioning The Armrest
20. Positioning the Armrest Keeping the tone-arm in the armrest and avoiding any pressure that might disturb the HTA setting, swing both tone-arm and armrest radially until the left-hand front edge of the headshell is at a radius of 205mm (8 1/16”) from the centre of the record spindle. The measurement is not critical within+/- 3mm (1/8”) but the accuracy of the anti-skate control will be affected is this is exceeded. -
Page 15: Operation (Pick-Up Arm)
The stop/start and lock LEDs will go out. The Model 10 is not equipped with a lid as this could cause acoustic feedback. A soft cover is provided to protect the turntable and arm from dust when not in use. The back should be fitted first and the cover then brought forward so that the front can be guided safely past the cartridge and stylus. -
Page 16: Transit Precautions
26. TRANSIT PRECAUTIONS The Model 10 can be safely transported, SUBJECT ABSOLUTELY TO THE FOLLOWING PRECAUTIONS: Short journeys by car: remove the platter, disengage the drive belt from the motor pulley, and replace the transit screw (see page 7). -
Page 17: Guarantee
27. GUARANTEE Your Model 10 precision turntable and pick-up arm is guaranteed against faulty material and workmanship. The nominal period of the guarantee is twelve months but is liberally interpreted at our discretion subject to the following conditions being observed:... -
Page 18: Appendix
Do not apply oil other than that supplied by SME Limited for the purpose. Do not attempt to take it to pieces or interfere with any of the screws except as directed in the instructions. To do so will invalidate the warranty and may occasion costly repairs.
Need help?
Do you have a question about the 10 and is the answer not in the manual?
Questions and answers