Table of Contents
Advertisement
Quick Links
Advertisement
Table of Contents

Related Manuals for SME Diamond MK2 Synergy


Summary of Contents for SME Diamond MK2 Synergy
- Page 1 INSTRUCTIONS...
- Page 2 SME is an iconic brand founded in 1946 by audio legend Alastair Robertson-Aikman in West Sussex, England. Today SME is recognised as makers of the finest precision turntables and tonearms in the world. Entirely made in-house with state of the art manufacturing processes, complemented by traditional craftsmanship methods.
- Page 3 PRECISION TURNTABLE INSTRUCTIONS This is no ordinary turntable. These instructions include unpacking, set up, specifications and operation. Please read carefully.
- Page 4 Warning! Important Safety Instructions CAUTION: RISK OF ELECTRIC SHOCK DO NOT REMOVE POWER UNIT COVERS. CAUTION: TO REDUCE THE RISK OF ELECTRIC SHOCK, DO NOT REMOVE THE POWER UNIT OR SPEED CONTROL UNIT COVER. THERE ARE NO USER SERVICEABLE PARTS INSIDE. REFER ALL SERVICING TO QUALIFIED PERSONNEL. •...
-
Page 5: Table Of Contents
1. CONTENTS Page Introduction Dimensions & Weights Drive System Speed Range Packing List Parts Identification - Turntable Unpacking Setting Up - Turntable Cartridge Power Cable Connections Operation - Turntable Operation - Playing a Record 16 Operation - Tonearm Maintenance Transit Precautions Guarantee Appendix... -
Page 6: Introduction
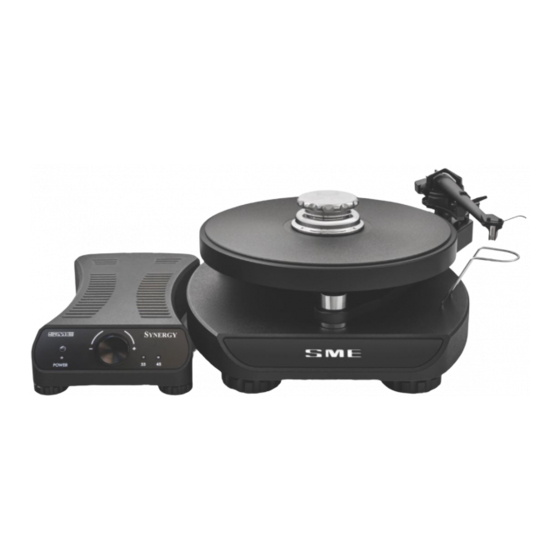
2. INTRODUCTION Synergy is a unique precision engineered integrated turntable of new design combined with the highly acclaimed SME Series IV tonearm, Ortofon’s ‘exclusive series’ MC Windfeld Ti moving coil cartridge and an exclusive phono stage by NAGRA, coupled with mono crystal silver wire by Crystal Cable, all factory configured requiring minimal user set-up. Compact, sleek, modern and built to exacting engineering standards providing reliability and freedom from critical adjustments. Build integrity, sophisticated electronics and vibration free moving parts allow the full capabilities of any sound system to be fully explored, above all Synergy delivers an extraordinary vinyl listening experience. -
Page 7: Dimensions & Weights
3. DIMENSIONS & WEIGHTS Turntable mm (inch) Width 370 (14.57) Depth 350 (13.80) Height (top of tonearm) 178 (7.0) Platter Diameter 304 (11.97) Spindle to Arm 215.35 (8.48) Speed Control Unit Width 170 (6.70) Depth 305 (12.0) Height 68 (2.68) Power Unit Height 83 (3.26) Width 190 (7.48) Depth 243 (9.56) Platter 303 (11.92) Weight kg (Ib) Turntable 19.59 (43.18) Power Unit 4.04 (8.90) -
Page 8: Packing List
PACKING LIST Qty Description Synergy Turntable ....Tonearm ....Speed Control Unit Power Unit – 100V 115V 230V Power Cable – UK LEMO Connection Cables Nagra Power Unit – 100V 115V 230V Nagra Power Cable – UK Nagra Low Voltage Cable Ortofon Cartridge (fitted) Drive Belt Platter Stroboscopic Disc Oil Filler Adaptor (fitted) Oil Filler Box Spanner Syringe of Bearing Oil Stylus Guard Record Spindle Washer Record Clamp Tonearm Tool Kit 3mm Hex Handle 4mm Hex Wrench Velcro Strap Guarantee Card Tonearm Instruction Manual Synergy Instruction Manual... -
Page 9: Parts Identification - Turntable
8. PARTS IDENTIFICATION - TURNTABLE 1. Speed Control Unit 5. Platter Stylus Guard 2. Power Button 6. Record Clamp 10. Sub Chassis 3. Rotary Speed Control Tonearm 11. Main Chassis Air Vents Headshell 12. Adjustable Foot 1. Nagra Phono Stage Input 3. Left RCA Phono Output 5. Earth Post - Turntable 2. Right RCA Phono Output 4. Speed Control Unit Input 6. Motor & Earth Post... -
Page 10: Unpacking
9. UNPACKING Unpack and check all items against the packing list in Section 7. H aving opened the packing box carefully lift upwards the top section high density foam module which covers the turntable/ tonearm unit. Lift out the turntable lifting from under the main chassis (bottom of turntable). The turntable should be sited on a substantial table or strong audio stand which must be capable of supporting the turntable weight. W ith the turntable sited lift the left side of the turntable to gain access to the motor transit screw which secures (clamps) the motor to the main chassis. -
Page 11: Setting Up - Turntable
10. SETTING UP - TURNTABLE Levelling W ith the use of a spirit/bubble level ensure that the main chassis (lower chassis) is level in the lateral and longitudinal planes. The 4 feet are height adjustable and can be used to achieve a level chassis. When adjusting the feet it is recommended to slightly lift the chassis adjacent to the foot being adjusted. This aides ease of rotation of the foot and prevents the foot rubber pad binding. Transit Locks F or transit the suspension is locked (secured) by two screws; these are accessible through holes in the driven pulley. The transit screws should be turned anti-clockwise with the supplied 4mm hex wrench and removed. Drive Belt 1. P lace the drive belt over the large driven pulley and stretch over the motor pulley. Slowly turn the driven pulley to allow the drive belt to take up its natural running position. 2. R otate the driven pulley by hand to ensure the drive belt is positioned correctly and rotating freely. - Page 12 The mains voltage setting is indicated on the rear panel of the power unit. Before fitting the mains power cable check carefully that this matches your mains voltage. Phono Stage Power Unit C onnect the Nagra power unit low voltage output cable into the turntable chassis connector at the rear of the turntable. Tonearm Set Up S ynergy is equipped with a factory fitted SME tonearm. Refer to the tonearm instruction manual for set up procedures.
-
Page 13: Cartridge
B efore removal and installation of the cartridge, ensure that its stylus guard is in position as a precaution against accidental damage. T he Siltech silver cartridge leads have 1mm diameter receptacles for the headshell and standard 1.25mm for the cartridge. The latter may require adjustment with pointed nose pliers or a screwdriver blade for a snug fit on non-standard terminals. Connections to the cartridge must never be made by direct soldering. The cartridge lead colour coding is as follows: Red - Right Channel Green - Right Channel Ground White - Left Channel Blue Green Blue - Left Channel Ground White R eplacement Siltech silver cartridge leads can be obtained direct from SME. -
Page 14: Power Cable Connections
12. POWER CABLE CONNECTIONS Right RCA Phono Output Left RCA Phono Output Power Unit Speed Control Unit AC Power Cable Nagra Phono Stage Input Connection Cable ‘A’ Connection Cable ‘B’ NOTE: Mains power must be off when connecting and disconnecting Cables A and B. -
Page 15: Operation - Turntable
13. OPERATION - TURNTABLE Your Synergy precision turntable is partly run-in before leaving the factory but will benefit and improve after a few weeks of use. Do not worry if initially the bearing is not totally silent. A slight ‘swish’ barely audible at very close range in a silent room will quickly disappear after use of the turntable. If you should wish to check the speed settings and make your own adjustments the procedure is as follows: M ains Power: the power ON/OFF button is located on the rear of the power unit. With power ON the last used speed indicator LED light will illuminate on the speed control unit fascia. Motor Power: pressing the power button on the speed control unit fascia will start the motor. With power OFF and pressing the rotary button on the fascia the speed settings of 33... -
Page 16: Operation - Playing A Record
T o raise the stylus from the record slowly move the control lever back to its original position. When the tonearm is not in use it should always be returned to the armrest for safety. 16. MAINTENANCE - TURNTABLE T here are no critical adjustments or need for ‘tweak’ and only very little maintenance is required. Clean the drive belt occasionally by drawing it through a piece of soft tissue or linen moistened with lighter fuel. The same material may be used to clean the periphery of the motor pulley and driven pulley. The main bearing is lubricated for life. R eplace the drive belt after 1000 hours use. A replacement belt is available directly from SME. T here are no user-serviceable parts inside the power unit and speed control unit. -
Page 17: Transit Precautions
Your SME Synergy turntable is guaranteed against faulty material and workmanship. The nominal period of the guarantee is 24 months but is liberally interpreted at SME’s discretion subject to the following conditions being observed: A ny matter arising must in the first instance be reported to SME at the address appearing below. D o not return the turntable or any part thereof to SME unless requested to do so. S ME will not accept liability for any items until they reach the factory safely. Any parts found to be faulty will be replaced free of charge. Return transport and insurance costs will be charged. -
Page 18: Appendix
BS EN 62368-1:2014 International Safety Standard. For the purposes of testing the SME Synergy Turntable was used with the high quality interconnects supplied as standard equipment. Compliance with the above standards may only be made if the unit is installed as per this instruction manual and using the correct cables. SME Limited · Mill Road · Steyning · West Sussex · BN44 3GY · England Printed in Steyning England... - Page 20 SME LIMITED STEYNING WEST SUSSEX ENGLAND • • •...
Need help?
Do you have a question about the Diamond MK2 Synergy and is the answer not in the manual?
Questions and answers