Corbin Russwin Access 800 Installation Instructions Manual
Hide thumbs
Also See for Access 800:
- Installation instructions manual (16 pages) ,
- Installation instructions manual (23 pages) ,
- Programming instruction (16 pages)
Table of Contents
Advertisement
Installation Instructions
For ML20800 TCAC2 Series
Mortise Lockset
Please read these instructions carefully to prevent missing important steps.
Please Note: Improper installation may result in damage to the lock and void the factory warranty.
Important:
The accuracy of the door preparation is critical for proper functioning and security of this lock.
Misalignment can cause premature wear and a lessening of security.
For installation assistance contact Corbin Russwin Inc., at 1-800-810-WIRE (9473)
1
2
3
4
5
6
7
8
9
0
#
*
A
ccess 800
FM 224A 3/07
(617417420)
C A U T I O N
DOOR MUST REMAIN OPEN
DURING INSTALLATION.
USE DOOR STOP.
TEST
FOR PROPER
OPERATION
BEFORE
CLOSING
DOOR
TM
Advertisement
Table of Contents

Related Manuals for Corbin Russwin Access 800


Summary of Contents for Corbin Russwin Access 800
- Page 1 Misalignment can cause premature wear and a lessening of security. C A U T I O N DOOR MUST REMAIN OPEN DURING INSTALLATION. USE DOOR STOP. TEST FOR PROPER OPERATION BEFORE CLOSING DOOR For installation assistance contact Corbin Russwin Inc., at 1-800-810-WIRE (9473)
-
Page 2: Table Of Contents
Page Table of Contents 1) Warning 2) General Description/Specifications/Features 3) ML20800 TCAC2 Series Product Illustration 4) Installation Instructions 4-10 5) Installation of RF Technology Lock 6) Operational Check 7) ML20800 TCAC2 Hard Wiring Instructions for Mortise 7.1) Important 7.2) Installation Notes 7.3) Electrolynx™... -
Page 3: General Description/Specifications/Features
2) General Descriptions/ Specifications/ Features General Description The Access 800 Mortise Lock is designed for areas which require stand-alone authorized entry. It is a self- contained microprocessor-controlled keypad with non-volatile memory. The keypad will hold a total of 100(M800) or 2000 (M801, M802, M803, M804, M805, M806) different user codes. -
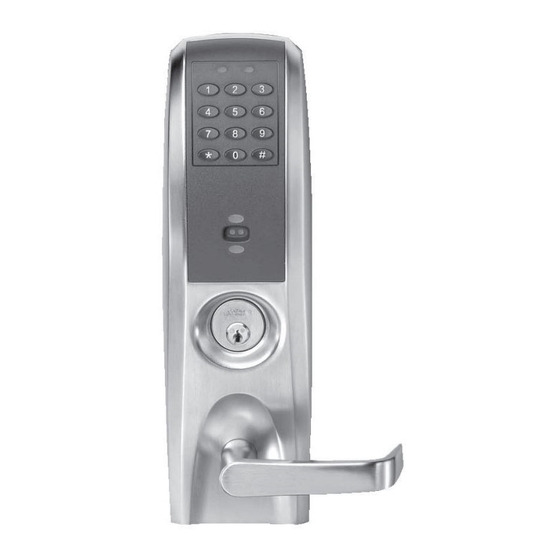
Page 4: Ml20800 Tcac2 Series Product Illustration
3) ML20800 TCAC2 Series Product Illustration... - Page 5 Open Inward. Hinges Right. "LH" Open Outward "RH" Open Outward "LHR" "RHR" Prep door according to supplied Corbin Russwin Inc. door marker. Outside of Door Hole for ribbon cable 7/8" 1/8" Dia. holes (2) required equired Fire Stop Plate r...
- Page 6 Installation Instructions Lock Assembly Instructions Align bevel accordingly. Engage 7/64 Allen wrench on to cap screw required for step 2 page 6. Feed connector and wires through non cylinder side of door. Insert lockbody into mortised cutout in door and hold loosely in place with (2) #12x1" lockbody screws. 7/64 Allen Wrench Inside of Door...
- Page 7 Installation Instructions Installation of Outside Escutcheon 1. For exterior applications, an optional M99 Weatherseal Gasketing Kit can be ordered when a device is ordered. this kit includes gaskets and a conduit. When ordering the kit separately, order part number 794F929. The gaskets may be used as a seal between the escutcheon and the door surfaces.
- Page 8 Installation Instructions Installation of Inside Escutcheon NOTE: Connectors go on only one way. Do not offset connector and be sure they are completely seated. 1. Connect Ground wire to Ground terminal, Keypad ribbon cable connector to controller, and lockbody harness to motor connector. If you have a turnpiece, connect the male turnpiece switch connector to the female turnpiece switch connector.
- Page 9 Installation Instructions Installation of Inside Escutcheon (continued) CAUTION: Do not allow lockbody harness wires to enter cylinder hole in lockbody. Wire damage and/or malfunction of the lock may occur. 1. Turn inside lever to the horizontal position and rotate the turnpiece to the vertical position. Slide onto spindle halfway.
-
Page 10: Installation Instructions
Installation Instructions Installation of Armored Front Plate 1.Install armored front plate using two #8-32 x 1/4"screws provided. Lockbody screws Armored Front Plate Front Plate screws... - Page 11 Installation Instructions Battery Installation 1. Remove battery keeper by lifting top tab and pulling away from the unit. 2. Install (6) AA Batteries into controller compartment being careful to align +/- polarity properly. 3. Install Battery Keeper by first inserting bottom tabs in bottom slots of controller. Lift the top tab over batteries and snap into position.
-
Page 12: Operational Check
DURING INSTALLATION. USE DOOR STOP. TEST FOR PROPER OPERATION BEFORE CLOSING DOOR Corbin Russwin, Inc. Technical Product Support: Canada: Assa Abloy DSS Canada 225 Episcopal Road Corbin Russwin, Inc. 160 Four Valley Drive Berlin, CT 06037-4004 Phone 800-810-WIRE (9473) Vaughun, ONT L4K 4TG www.yalecorbin.on.ca... -
Page 13: Important
7) ML20800 TCAC2 Hardwiring Instructions Hardwiring options include one or a combination of the following: M861 Forced Door Propped Door Option, M35 Power/Remote Unlocking Harness 7.1) Important 1. Caution: disconnect all input power before beginning installation to prevent electrical shock and equipment damage. 2. - Page 14 7) ML20800 TCAC2 Hard Wiring Instructions 7.4) Illustration with M861 Harness DPS SWITCH IN DOOR DPS to FRAME Controller DPS Wire in Door Raceway Harness from Mortise Case...
-
Page 15: M861 Forced Door Propped Door Option
7) ML20800 TCAC2 Hard Wiring Instructions 7.5) M861 Quick Code, Forced Door Propped Door Option. Door Inside Escutcheon Fig. 1 REX Connector Ground Tab Controller Outside Escutcheon DPS Connector used for M861 EXIT Option PRODUCT SHOWN Motor Connector Fig. 2 Forced Door/Propped Door Option ElectroLynx™... -
Page 16: M35 Power/Remote Unlocking
7) ML20800 TCAC2 Hard Wiring Instructions 7.6) M35 Power/Remote Unlocking Harness. Door 6 AA batteries MUST be removed from controller if 784 Power supply is used. Inside Remote Power and Ground Tab Escutcheon REX Connector TB2 Outside Escutcheon -9 VDC 9VDC +9 VDC Power Supply... - Page 17 7) ML20800 TCAC2 Hard Wiring Instructions 7.7) M35 Power/Remote Unlocking with M861 Propped Door, Forced Door. Door 6 AA batteries MUST be removed from controller if 784 Power supply is used. NOTE: Inside Remote Power and Escutcheon M861 Harnesses are REX Connector TB2 Ground Tab Illustrated on page 14...
Need help?
Do you have a question about the Access 800 and is the answer not in the manual?
Questions and answers