
Related Manuals for Magnadyne Linear M3200CD


Summary of Contents for Magnadyne Linear M3200CD
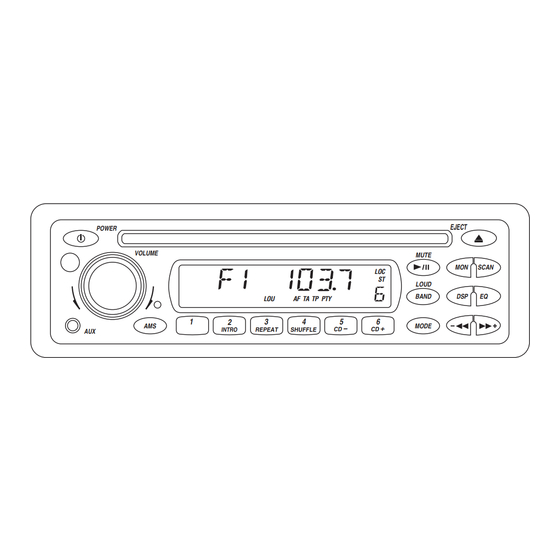
- Page 1 Installation and Operations Manual EJECT POWER VOLUME MUTE SCAN LOUD BAND TA TP PTY MODE M3200CD AM / FM and CD Stereo Receiver with CD Changer Control A Registered Trademark of Magnadyne Corporation...
- Page 2 Introduction Your new M3200CD indash entertainment system has been designed to give you many years of listening pleasure. Take a moment to read through this manual and become familiar with the operations and features of this outstanding product. It is advisable to keep this manual in your vehicle so it is readily available for reference. Be sure to fill out and send in your warranty card to ensure that you receive the full benefits of warranty repair in the unlikely event that your system will need service.
- Page 3 Location and Function of Controls at a Glance 1. Power On/Off: Turns the unit on and off. 2. Infrared Sensor: Receives the signals from the remote control allowing you to adjust the basic functions of this unit. 3. Auxiliary Input Jack: Allows you to listen to an auxiliary input audio source, such as a portable MP3 player or cassette player.
- Page 4 Location and Function of Controls at a Glance 15. Play / Pause Button: Starts / pauses disc play. Mute Button: Mutes audio level. 16. Tack Up / Track Down Buttons: Adjusts the radio frequency, changes CD tracks and sets the clock. 17.
-
Page 5: Radio Operation
Radio Operation Select a Band In Tuner Mode, press the “BAND” button (13) to select the desired band in the following order: F1, F2, F3 and AM. Each band can store up to six pre- set stations. Tuning Automatic Search Tuning: Press the “TRACK DOWN”... -
Page 6: General Operations
General Operations Power Press the “POWER” button (1) to turn the unit On/Off. Audio Beep Press and hold the Audio Control knob (4) for 3 seconds. Either BEEP OFF or BEEP ON will appear in the display. Rotate the Audio Control knob for the desired mode: BEEP OFF = No beeps when buttons are pushed. - Page 7 Specialty Features Reset Button The radio panel or LCD display may fail to func- tion normally due to the vehicle’s battery condi- tion, and may require resetting the radio micro- processor if: • The vehicle has been “jump started” from a dead battery condition •...
-
Page 8: Installation Procedures
Installation Procedures Step 1: The radio chassis is designed to be “Sleeve Mounted” through a opening in the dashboard panel. The required opening size is 182mm (7-3/16") x 84mm (3-5/16"). Cut or enlarged an opening in the dashboard to accommodate the mounting sleeve. Step 2: If you are replacing an existing factory installed radio, an adapter harness might be avail-... -
Page 9: Wiring Diagram
White Wire Front Speaker White Wire with Black Stripe Left Green Wire Rear Speaker Green Wire with Black Stripe M3200CD Audio Line Output Gray Wire Gray Wire with Black Stripe Violet Wire Violet Wire with Black Stripe 8-Pin Din Connector External... - Page 10 Audio Line Out Connection M3200CD CD Changer Connection M3200CD Final Installation - Method A Push Out Mounting Sleeve Tabs X IN IS C Removing the Unit from Dashboard: 1. Remove the metal strap holding the back of the radio chassis.
-
Page 11: Specifications
Final Installation - Method B DIN Rear-Mount If your vehicle is a Nissan or Toyota, fol- low these mounting instructions: Use the screw holes marked T (Toyota), N (Nissan) located on both sides of the unit to fasten the unit to the factory radio mounting brackets supplied with your vehicle. -
Page 12: One (1) Year Limited Warranty
Warranty ONE (1) YEAR LIMITED WARRANTY Magnadyne Corporation or its authorized agents will within one year from the date of sale to you, repair, replace or refund the retail sales price of said product or any part thereof, at the...
Need help?
Do you have a question about the Linear M3200CD and is the answer not in the manual?
Questions and answers
Comment d'ésactiver speaker extérieur