
Related Manuals for Magnadyne LINEAR SERIES RV4000


Summary of Contents for Magnadyne LINEAR SERIES RV4000
- Page 1 AS/PS DISP and Installation PUSH 3-Beam Laser Pickup Multi-Media Receiver Operation Manual SPEAKER AM/FM DISC RESET AUX HEADPHONES RV4000 AM / FM Stereo...
-
Page 2: Table Of Contents
Introduction Please take the time to read all of the information in this manual. Familiarity with operation and installation procedures will help you obtain the best possible performance from your new AM/FM Stereo Multi-Media Receiver. WARNING! To prevent fire or electrical shock hazard, do not expose this product to moisture, or remove cover or bottom screws. -
Page 3: Button Locations And Functions
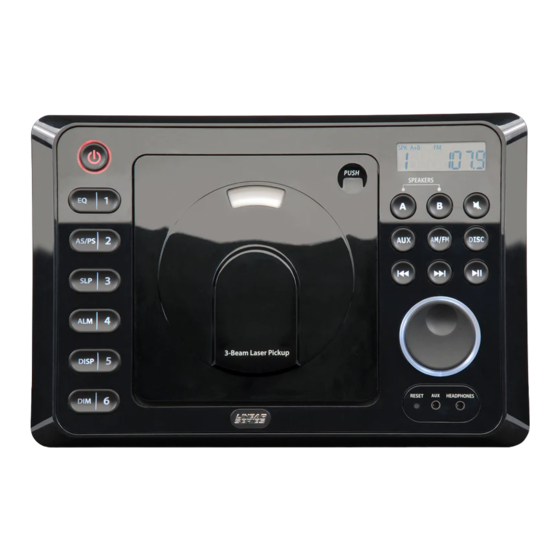
Button Locations and Functions AS/PS DISP 1. Power On/Off: Press to turn the unit on or off. 2. Disc Door: To play a disc, insert the disc with label facing forward. 3. Disc Door Release: Press to open the door so the disc can be inserted. 4. -
Page 4: Button Locations And Functions
Button Locations and Functions 16. Dimmer Button (DIM): Press to dim the lighting in the display area. Sequential presses will select dif- ferent levels of display area lighting. 17. Radio Preset Button (6): Recalls a memorized radio station, and programs a radio station into memory. -
Page 5: General Operation
General Operations Power On/Off: Press the POWER button to turn the unit On/Off. Selecting a Play Source: To select a play source, press one of the follow- ing mode buttons: AUX (Auxiliary Audio Input), AM/FM (AM or FM Radio Band) or DISC (Music) Dimming the Display: Press the DIM button to select the desired level... - Page 6 Sound Controls Bass, Treble and Balance Control Select the desired sound mode by pressing the VOLUME knob. The modes will be displayed in the fol- lowing order: Bass, Treble, Balance and Volume. Bass: Select the Bass mode by pressing the VOLUME knob.
-
Page 7: Sound Controls
Sound Controls (Continued) Mute: Press the button to mute the volume level. Press the button again to restore the volume. Speaker Selection Selecting Speaker Sets: • Press the A button to toggle speaker set A on and off. “SPK A” appears in the display when speaker set A is on. -
Page 8: Setting The Clock
Setting the Clock (Continued) 4. Press the VOLUME knob and the Minute indica- tors will start flashing. 5. Rotate the VOLUME knob until the correct Minutes appears in the display. Wait 5 seconds and the colon between the hours and the min- utes will start flashing indicating the clock is set. -
Page 9: Alarm Operation
Alarm Operation Setting the Alarm Timer: 1. Press the ALM button and the clock will appear in the display with the hour number flashing. 2. Rotate the VOLUME knob until the correct Hour appears in the display. “ALM” will appear in the display indicating the alarm is activated. -
Page 10: Radio Operations
Radio Operations Selecting the Play Source: Press the AM/FM button and “rAdIO” appears in the display. After a brief moment either AM or FM will appear in the display. Selecting the AM or FM: Press the AM/FM button repeatedly and select from FM 1, FM 2, FM 3, AM 1 or AM 2. -
Page 11: Disc Warnings
Radio Operation (Continued) Automatically Store Radio Stations: 1. Press the AM/FM button to select either the FM or AM radio band. 2. Press and hold the AS/PS button then release. The tuner will search for the strongest sta- tions and store them into memory. The new stations will replace stations that were previ- ously stored in the current band. -
Page 12: Music Disc Operation
Music Disc Operation General Operations: 1. Push the door access the disc player. 2. Insert the disc onto the hub with the label facing forward. Use your thumb to make sure the disc snaps onto the hub. 3. Press the DISC button and “LOAd” will appear in the display. -
Page 13: Music Disc Operation
Music Disc Operation Pausing the Disc: Press the ll button to pause the disc, press it � again to resume play. Removing the Disc: 1. Push the door to access the disc player. Wait until the disc stops spinning before opening up the door. -
Page 14: Mp3 Disc Operation
MP3 Disc Operation General Operations: 1. Push the door access the disc player. 2. Insert the disc onto the hub with the label facing forward. Use your thumb to make sure the disc snaps onto the hub. 3. Press the DISC button and “LOAd” will appear in the display. -
Page 15: Mp3 Disc Operation
MP3 Disc Operation Pausing the Disc: Press the ll button to pause the disc, press it � again to resume play. Removing the Disc: 1. Push the door to access the disc player. Wait until the disc stops spinning before opening up the door. -
Page 16: Audio Input
Audio Input Selecting the Audio Input Source: Note 1: The RV4000 does not control the device, it just allows the audio to be played through the system. Note 2: If the rear audio input is being used once you plug a device into the front audio input jack the audio will be diverted to playing the front device. -
Page 17: Reset Button
Reset Button The LCD display may fail to function normally due to the vehicle’s battery condition, and could require resetting the radio microprocessor if: • The vehicle has been “jump started” from a dead battery condition. • The vehicle battery becomes very low and is quick-charged. -
Page 18: Installation
Installation Wall Panel Chassis Opening Structural Stud Caution: Do not install radio without rear cover installed: No user-serviceable parts inside. Rear cover provides protection against potential fire hazard. Trim Ring ”... -
Page 19: Speaker Connections
Speaker Connections Left Speaker B Gray Wire Left Speaker A Brown Wire White/Black Wire (Common -) Gray/Black Wire Brown/Black Wire White Wire (Common -) Right Speaker B Right Speaker A... -
Page 20: Wiring And Auxiliary Connections
Wiring and Auxiliary Connections External Automotive Type Antenna (Optional) Red Wire (+) to 12 Volt DC Power Black Wire Ground Audio In Audio Out 10A Fuse Music Disc Player (Optional) In-Dash Unit (Optional) -
Page 21: Safety Instructions
Safety Instructions • Read Instructions: All the safety and operating instructions should be read before the appliance is operated. • Retain Instructions: The safety and operating instructions should be retained for future reference. • Heed Warnings: All warnings on the appliance and in the operating instructions should be adhered to. •... -
Page 22: Warranty
Warranty ONE (1) YEAR LIMITED WARRANTY Magnadyne Corporation or its authorized agents will within one year from the date of sale to you, repair, replace or refund the retail sales price of said product or any part thereof, at the option of the Magnadyne Corporation or its authorized agents, if said product or part is found defective in materials or workmanship, when properly connected and operating on the correct power requirements designated for the specific product. - Page 24 © Copyright 2011 RV4000-UM Magnadyne Corporation Rev. A 5-19-11...
Need help?
Do you have a question about the LINEAR SERIES RV4000 and is the answer not in the manual?
Questions and answers