Advertisement
Codelocks - CL6010 Lock Installation
You are currently in: Codelocks UK > CL6010 Lock Installation
CL6010 Installation Guide
Number relating to picture
1
2
3
4
5
6
7
8
9
10
11
Tools Required
Power Drill
Drill bits 10mm (3/8"), 25mm (1"),
32mm (1 1/4"), 53mm (21/8")
Philips screwdriver
Hammer / Mallet
Chisel 25mm (1")
Stanley knife
Adhesive tape, pencil, bradawl, tape
measure
Installation of CL6000 Lock
Installation holes must be drilled in exactly the correct positions and precisely at right angles to the door surface. Lock
components must be vertically and horizontally accurate in relation to each other and to the door.
Wedge the door firmly to prevent movement whilst drilling and chiselling
1 MARK DOOR
1 of 5
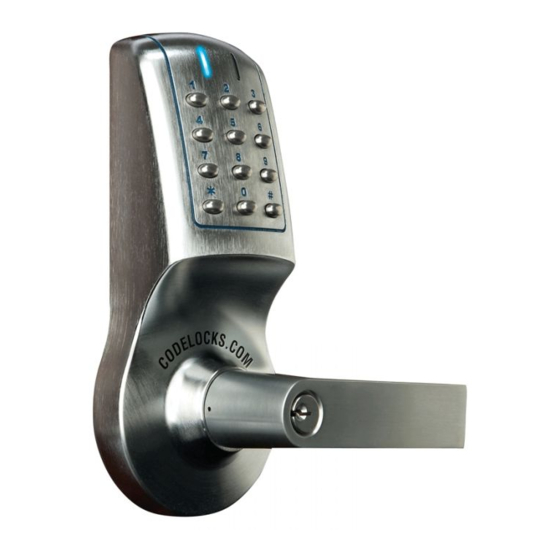
Item
Front Plate
Back Plate
Battery Cover
Lever Handles
Cylindrical lock assembly, inside and outside rose
1.5v AA Batteries (x4)
Mortice Latch, Strike and 4 screws
8.5 x Mounting Bolts (1 x spare), 2 x brass rose mounting bolts
Cable Connections for REM1 and REM2
Keys
Lever catch tool
http://www.codelocks.co.uk/Locks-Technical-Support/CL6010-Lock-Ins...
Print Page
Download Template
CL6010
*
*
*
*
*
*
*
*
*
*
*
Download Diagram
21/11/2011 11:44
Advertisement
Table of Contents

Related Manuals for CODELOCKS CL6010


Summary of Contents for CODELOCKS CL6010
- Page 1 Codelocks - CL6010 Lock Installation http://www.codelocks.co.uk/Locks-Technical-Support/CL6010-Lock-Ins... You are currently in: Codelocks UK > CL6010 Lock Installation CL6010 Installation Guide Print Page Download Template Number relating to picture Item CL6010 Front Plate Back Plate Battery Cover Lever Handles Cylindrical lock assembly, inside and outside rose 1.5v AA Batteries (x4)
-
Page 2: Installing The Strike Plate
Codelocks - CL6010 Lock Installation http://www.codelocks.co.uk/Locks-Technical-Support/CL6010-Lock-Ins... Check local requirements for proper ADA recommended height from finished floor. Attach template and mark horizontal height line on the edge of the door, both door faces and the door jamb. Mark the holes to be drilled. -
Page 3: Connect Wires
Codelocks - CL6010 Lock Installation http://www.codelocks.co.uk/Locks-Technical-Support/CL6010-Lock-Ins... Place the inside rose mounting plate over the spindle ensuring to pass the latch retractor cable through the piercing in the plate. See diagram. Secure the inner rose mounting plate against the door and into the front plate using the two fixing bolts. See diagram. -
Page 4: Operational Check
Codelocks - CL6010 Lock Installation http://www.codelocks.co.uk/Locks-Technical-Support/CL6010-Lock-Ins... 9 INSTALL BATTERIES / INSTALL LEVER Install batteries provided and fit battery cover. See diagram. Install inside lever onto spindle according to the hand of door. Lever will be secure when pushed firmly onto spindle with a "click". - Page 5 Codelocks - CL6010 Lock Installation http://www.codelocks.co.uk/Locks-Technical-Support/CL6010-Lock-Ins... 2 Turn rose and chasis 180 degress for different hand of door. 3 Install lever to desired hand, LH, position at 90 degrees. 4 Turn key clockwise and push lever on fully, until positive engagement 'click'.
Need help?
Do you have a question about the CL6010 and is the answer not in the manual?
Questions and answers