Table of Contents
Advertisement
Advertisement
Table of Contents

Subscribe to Our Youtube Channel
Related Manuals for Johannus Rembrandt 377 AGO


Summary of Contents for Johannus Rembrandt 377 AGO
- Page 1 SER MANUAL OHANNUS EMBRANDT 377, 397 497 AGO...
- Page 2 All rights reserved. Nothing in this publication may be reproduced, stored in a data file or made public in any form or in any way either electronically, mechanically by way of photocopying, recording or in any other way without the prior written permission of Johannus Orgelbouw b.v.
-
Page 3: Table Of Contents
Overview of Rembrandt 497 controls ......11 Overview of the toe studs Rembrandt 377 AGO ..... . 12 Overview of the toe studs Rembrandt 397 AGO . - Page 4 4.11.11 General Crescendo ........27 4.11.12 Programming MIDI stops .
-
Page 5: Safety
Keep this user manual with the organ. The organ may only be opened by a technician authorised by Johannus Orgelbouw b.v. The organ contains static-sensitive components. The warranty becomes null and void if the organ is opened by a non-authorised person. -
Page 6: Installation
NSTALLATION Placement and connection 1. Place the organ on a stable, horizontal surface. 2. Lean the organ slightly backward. 3. Slide the pedalboard (A) against the organ (B). 4. Set the organ upright. 5. Place the music desk (E), see § 2.2. 6. -
Page 7: Placing The Music Desk
Placing the music desk Before placing the music desk, check that the electrical cord of the lamp is connected to the music desk. If not, contact your dealer. Do not connect the electrical cord yourself. You can get injured and cause damage to the organ. -
Page 8: Transport And Storage
Transport and storage Pay attention to the following during transport and storage: Remove the music desk and the pedalboard from the organ. Relative humidity within the storage area: 10 to 90%. Opening and closing the rolltop cover The organ can be closed with a wooden rolltop cover that has a lock. The rolltop cover lock is behind the music desk. -
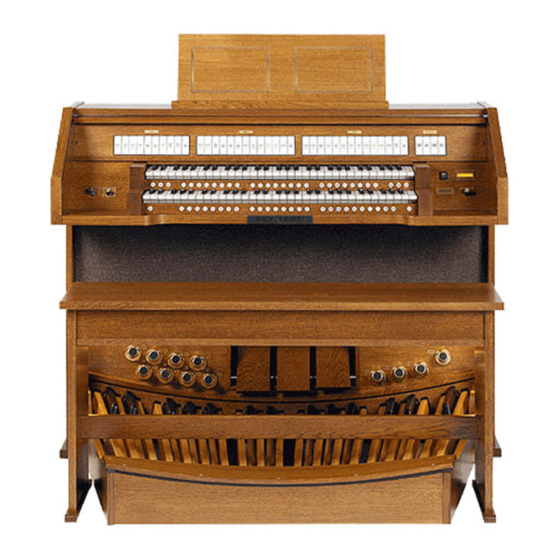
Page 9: Description Of The Organ
ESCRIPTION OF THE ORGAN Overview of the main components Rolltop cover General Crescendo Rolltop cover lock Expression pedals Music desk Pedalboard Toe studs Organ bench... -
Page 10: Overview Of Rembrandt 377 And 397 Controls
Overview of Rembrandt 377 and 397 controls SOLO HYM.N TRIO SPEELHULPEN SPEELHULPEN SPEELHULPEN SPEELHULPEN SOLO HYM.N TRIO MENU LENGTE LENGTE MENU Pedal stops Memory lock Swell stops On/off Preprogrammed memory Tutti Reeds Off accessory Cancel (CAN) Orchestrals MENU Pedal couplers General Crescendo Capture memory (Divisionals) Chorus... -
Page 11: Overview Of Rembrandt 497 Controls
Overview of Rembrandt 497 controls M N O SOLO HYM.N TRIO SPEELHULPEN SPEELHULPEN SPEEL SPEEL SPEELHULPEN SPEELHULPEN SO/P SO/S SOLO HYM.N TRIO SO/G MENU LENGTE SO/C MENU Pedal stops On/Off Swell stops Memory lock Preprogrammed memory Tutti Reeds Off Cancel (CAN) Orchestrals MENU Pedal couplers... -
Page 12: Overview Of The Toe Studs Rembrandt 377 Ago
Overview of the toe studs Rembrandt 377 AGO SW-CH CH-GT SW-GT TUTTI CH-PED SW-PED GT-PED Generals (8 x) Reversible couplers (6 x) Tutti (1 x) Overview of the toe studs Rembrandt 397 AGO SW-CH TUTTI CH-GT CH-PED SW-GT SW-PED GT-PED... -
Page 13: Overview Of The Toe Studs Rembrandt 497 Ago
Overview of the toe studs Rembrandt 497 AGO SO-GT SW-GT SO-SW CH-GT SO-CH SW-CH TUTTI SO-PED GT-PED 32'BOM. CH-PED SW-PED 32'SUB. Generals (8x) Tutti (1 x) Reversible Coupler (5x) Reversible 32’ (2x) Reversible Coupler (5x) Pedal division (3x) Connecting and switching on the accessories You can connect accessories (for example, a MIDI device) to the organ. -
Page 14: External Connections
MIDI SEQ.: This is a non-programmable MIDI output for connecting a sequencer or PC (with the optional Johannus Intonat program), for example. AUX IN: This is a (stereo) input for playing the sound of an external device through the amplifiers of the organ. -
Page 15: External Loudspeaker Output
PHONES: This connection for a (stereo) headphone is suited for a headphone with an impedance of 30 Ω or higher (see headphone specifications). When the headphone is used, the internal and/or external loudspeakers of the organ are automatically switched off. External loudspeaker output The external loudspeaker output (8 Ω) is situated at the rear of the organ. -
Page 16: Operation
PERATION Expression pedals Expression pedals adjust the volumes of the different Solo stops (Solo is only possible with an organ that has four keyboards), Choir (Choir is only possible with an organ that has three keyboards), Great stops/Pedal and Swell. The level indicators in the display show how much the expression pedals are pressed and thereby indicate the level of volume. -
Page 17: Factory Intonation
Factory intonation Save the intonation settings In order to save the intonation settings, you need the Johannus intonation programme. 1. Connect a PC to the organ. Use the MIDI SEQ. output, see § 3.8. 2. Save the intonation settings on the PC using the intonation programme of Johannus. -
Page 18: Couplers
Couplers Manual coupler: Fully couples all keys of the Swell to the Great. Activate the manual coupler through the following stops: Swell - Great; Choir - Great (only with an organ that has three keyboards); Swell - Choir (only with an organ that has three keyboards); Choir - Solo (only with an organ that has four keyboards);... -
Page 19: Changing The Registration
All swells to swell: Combines all expression pedals to the Swell expression pedal. Antiphonal: Normally the entire organ sounds through the main loudspeaker system. You can switch one or more divisions to the antiphonal loudspeaker system with the Antiphonal function. Changing the registration The registrations can be cancelled in two ways: Press the Recall piston (REC): Only the last change is cancelled. -
Page 20: Easy Menu
1. Check that the key switch is to the right. 2. Select the desired stops. 3. Push the SET piston in. Hold the piston down. 4. Press the desired preprogrammed memory location (PP-T) in. 5. Release the preprogrammed memory location piston (PP-T). 6. -
Page 21: General Volume
Programming a capture memory location The current setting of the capture memory location will be lost. 1. Select the desired stops. 2. Use the - and + pistons to select a level (1-100) on the display. 3. Press the SET piston. Hold the piston down. 4. -
Page 22: Tuning Mode
Programming the transposer 1. Push the TRANS piston in. 2. Use the - and + pistons to set the pitch. 3. Press the SET piston. The pitch shift is stored in memory.. When the organ is switched on again, the programmed pitch will be active. 4.11.4 Tuning Mode The Tuning Mode function shifts the pitch in fourteen steps of 1 Hz (from 426... -
Page 23: Keyboard Mode
4. Use the - and + pistons to select the desired temperament. You can choose from twelve temperaments: Equal: Normal or equal temperament Young II Vallotti Kirnberger II Kirnberger III Neidhardt III Werckmeister III Meantone: Meantone temperament Meantone: Meantone temperament ¼... -
Page 24: Reset Procedures
7. Press the SET piston. The manual setting is now saved in the memory. 8. Press the MENU piston to return to the main menu. 9. Press the MENU piston again to exit the Easy Menu. 4.11.7 Reset Procedures The Reset Procedures function is used to delete the capture memory, or to reset a number of settings to the factory settings. -
Page 25: Demo Songs
6. Press the MENU piston to return to the main menu. 7. Press the MENU piston again to exit the Easy Menu. 4.11.9 Demo Songs The Demo Songs function plays twelve different demo songs. 1. Press the MENU piston. 2. Use the - and + pistons to select the Demo Songs 3. -
Page 26: 4.11.11 General Crescendo
Use the - and + pistons to select ON or OFF to switch the Surround system on or off. Select OFF to exit the Std. Intonation function. Select ON to go to the volume settings of the Surround system. b. Use the - and + pistons to select the volume for the left channel. Press the SET piston. - Page 27 4.11.12 Programming MIDI stops MIDI is a protocol for communication between the organ and other devices, such as: Sound Module Other musical instruments With the programmable MIDI stops, you can control any module voice through any MIDI channel. Connecting external device 1.
-
Page 28: Programming Midi Stops
5. Use the - and + pistons to select the desired MSB number (MSB:..) 6. Press the SET piston. 7. Use the - and + pistons to select the desired LSB number (LSB:..). 8. Press the SET piston. 9. Use the - and + pistons to select the desired MIDI voice number (Voice:..). -
Page 29: Maintenance, Problems And Warranty
AINTENANCE PROBLEMS AND WARRANTY Maintenance Overview Component Maintenance Frequency Cabinet Cleaning. See § 5.1.1. As required Manuals Cleaning and removing scratches. As required See § 5.1.2. 5.1.1 Cabinet maintenance The cabinet is made of solid wood and wood veneer. Do not use furniture polish or teak oil to clean the organ cabinet. -
Page 30: Repositioning The Pedal
6. Contact your dealer if the pedalboard does not work properly. Warranty The conditions are specified in the warranty certificate. The warranty becomes null and void if changes or repairs are made to the organ by persons or organisations that are not authorised by Johannus Orgelbouw b.v. -
Page 31: Midi Implementations
IDI IMPLEMENTATIONS MIDI Implementation Chart JOHANNUS Organs Date: April 2005 MIDI Implementation Chart Version 1.00 MIDI Implementation Chart Functions Transmitted Recognized Remarks Basic Default See MIDI Specs See MIDI Specs See MIDI Specs Channel Changes See MIDI Specs Mode Default... -
Page 32: Midi Specifications
MIDI specifications This paragraph contains more details about the specifications in the MIDI Implementation Chart. 6.2.1 Default basic channels (transmitted/recognized) 2-manual instrument (with standard keyboard layout): 1: Great stops 2: Swell stops 3: Pedal stops 12: Stops 3-manual instrument (with standard keyboard layout): 1: Choir 2: Great stops 3: Swell stops... -
Page 33: Control Changes (Transmitted)
Each ‘sys ex’ (system exclusive) message largely looks the same. The first 7 bytes and the last byte are always the same. Only the value of the 8th byte varies. This is the ‘sys ex message’ that Johannus generally uses: F0 00 4A 4F 48 41 53 XX F7 (hexadecimal). - Page 34 (for example PP = 00 P = 01) through the MIDI MOD. output. These sys ex codes are only important when the Johannus sound module CSM 128 is connected to your instrument. Other MIDI codes (transmitted) Press the 0 piston to transmit the sys ex code, ‘all stops off’...
-
Page 35: Index
NDEX ....13, 18 ....16 Accessories Intonations . - Page 36 ....30 Warranty...
Need help?
Do you have a question about the Rembrandt 377 AGO and is the answer not in the manual?
Questions and answers