Advertisement
INSTALLATION AND USER INSTRUCTIONS
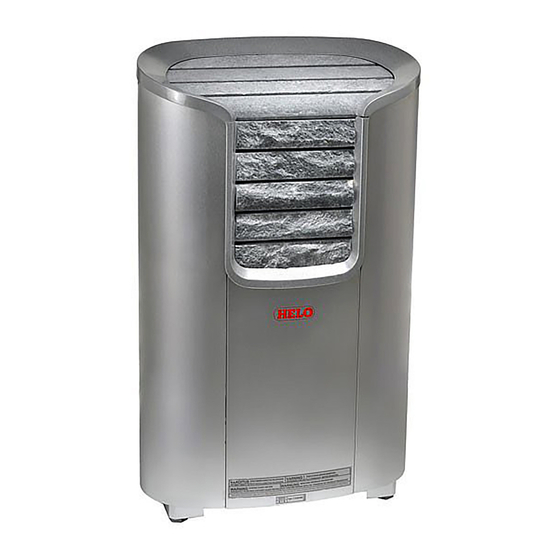
ELECTRICAL SAUNA HEATER:
Can be connected to the following control unit:
RA 18 Midi control unit
RA 12 Digi II control unit
RA 13 Digi I control unit
RA 16 Easy control unit
INSTALLATION OF THE SAUNA HEATER
The following points have to be observed when installing the heater:
Adhere to the given installation measurements.
-
-
Wood panelling is recommended as material for the walls and ceiling of the sauna.
-
Ensure that the panel wall has been reinforced at the point of the fixing screws.
-
Only one heater may be installed into a sauna.
-
The heater must only be connected to the mains by a qualified person as defined by current
electrical safety regulations.
NOTE! Prior to switching the heater on, ensure that the sauna room is ready for heating.
CONNECTING THE HEATER TO THE MAINS
The heater is semi-connected to the mains with H07RN-F (VSN) or A07BB-F(VSB) rubber cable.
HEATER STONES
We recommend that the heater stones are cleaned before placing them in the heater. The largest stones are placed at
the bottom and the smallest on the top. Stones must not be loaded too tightly, or air circulation is inhibited. Nor must
the stones be placed so that heating elements become wedged together or against the heater body. The stones must
completely cover the heating elements. The stones have to be replaced at the latest when they start to crumble,
because otherwise the air circulation through the stones is affected. When replacing the stones, new stones have to
be of a high quality.
NOTE!
- The heater stones MUST NOT be placed in the space between the front soapstones and the first heating
element.
- Before using the heater check that the soapstones in the heater are undamaged and installed according to
instructions. Otherwise the use of the heater is prohibited. The guarantee does not cover faults due to poor
air circulation caused by small and tightly packed stones. Ceramic stones may damage the heater. The
guarantee of the heater does not cover any damage caused by the use of ceramic stones.
INSTALLATION OF THE CONTROL UNIT AND SENSOR ELEMENTS
The control unit is electrically connected via a cable to the heater. The control unit is intended for installation in the
sauna room or outside of it, depending on the model of the control unit. Check the control unit location from the control
unit installation and user instructions.
The sensor is fixed to the wall of the sauna, directly on the middle line of the heater, 40mm from the ceiling. Any
deviation from the given installation measurements will cause a risk of fire.
The temperature limiter in the sensor element cuts off all the electricity to the heating elements if the heater
temperature increases to a level where it causes a danger to the wooden parts of the sauna. Once the temperature is
reduced the limiter can be restored by pressing the reset button.
Before pressing the reset button, the reason for the triggering of the temperature limiter must always be
clarified!
Sensor OLET 19
1118-60-0405
1118-90-0405
Restore
Main switch
7013487 314 SKLT 7 C
Advertisement
Table of Contents

Related Manuals for Helo Cava series


Summary of Contents for Helo Cava series
- Page 1 INSTALLATION AND USER INSTRUCTIONS ELECTRICAL SAUNA HEATER: 1118-60-0405 1118-90-0405 Can be connected to the following control unit: RA 18 Midi control unit RA 12 Digi II control unit RA 13 Digi I control unit RA 16 Easy control unit Main switch INSTALLATION OF THE SAUNA HEATER The following points have to be observed when installing the heater: Adhere to the given installation measurements.
- Page 2 Drill diameter o 3,5 mm FIXING THE HEATER TO THE WALL. Min. 240 mm Once the adjustable legs are turned in the fixing height of the heater, wall rack is 750mm from the floor. The adjustable legs have a 15mm adjustment allowance just in case the floor is on an incline.
- Page 3 Heater's connection box placement on the wall. 100 mm 100 mm 1. Suggested placement for the connection box. 2. Siluminium boxes should be used in this area. 3. This area should be avoided and the siluminium box used A heat resistant box (T125 ºC) and leads (T170°C) should be used in all other areas. The connection box should be in a place where it is easy to service.
-
Page 4: Recommended Sauna Room Ventilation
Recommended sauna room ventilation 1000 mm 500 mm 1. Sauna room 3. Electric sauna heater 5. Exhaust flue or channel 2. Washroom 4. Exhaust valve 6. Door to the sauna room 7. A ventilation valve can be installed here to be kept closed while the sauna is heated and during bathing. Inlet vent can be positioned in the A zone. -
Page 5: Wiring Diagram
Wiring diagram Teho, Effekt Lämpövastukset, Värmeelement, Éléments chauffants Power, Leistung Heating elements, Heizeelement, Verwarmingselementen Puissance, Vermogen Resistencias Potencia SEPC 64 SEPC 65B 2000W 3000W 1,2,3 1,2,3 230 V 1N~ / 2~ Max. 6 kW 230 V 3~ Control L2 L3 400 V 3N~ Light L1 L2 L3... -
Page 6: Control Unit
Principal wiring diagram Sensor Heater 1 2 3 4 5 6 Electrical heating Sauna light Control 230V 230V 100W ( NOTE ! No function 230V 100W with the RA 16 Easy ( NOTE ! Input 230V 1N~ control centre!) Not with the RA 18 230V 2~ Midi control centre Control unit... -
Page 7: Helo Cava - Assembly Instructions For The Heater Soapstones
HELO CAVA – ASSEMBLY INSTRUCTIONS FOR THE HEATER SOAPSTONES Before the installation of the soapstones the heater has to be fixed to the wall. See the instructions on page 2. Take the front soapstones out from the package. The stone to be placed as the lowest has rounded lower corners. - Page 8 After installing the sauna rocks, install the metallic supports above them. The illustration shows the order. The heater body has both vertical and end limiters which prevent the movement of the soapstone both vertically and horizontally once they are installed. Install the metallic supports between the vertical limiters.
- Page 9 Install the round-edged stone next. Push the other end under the edge and then push the stone along the support plate against the end limiter. In the illustration the round edge stone and the soapstone furthest at the back remain where they are. The illustration shows both the vertical and horizontal limiters of the soapstones.
- Page 10 Ympäristönsuojeluun liittyviä ohjeita Anvisningar för miljöskydd Tämän tuotteen käyttöiän päätyttyä sitä ei Denna produkt får inte kastas med saa hävittää normaalin talousjätteen vanliga hushållssopor när den mukana, vaan se on toimitettava inte längre används. Istället ska den sähkö- ja elektroniikkalaitteiden kierrätykseen levereras till en återvinningsplats tarkoitettuun keräyspisteeseen.
Need help?
Do you have a question about the Cava series and is the answer not in the manual?
Questions and answers