Table of Contents
Advertisement
Available languages
Available languages
10. Especificaciones técnicas
Peso:
Dimensiones:
Temperatura de almacenamiento:
Humedad:
Temperatura de funcionamiento:
Pantalla:
Método de medición:
Sensor de presión:
Alcance de medición:
SYS/DIA:
pulso:
Límites de indicación de la presión
de la muñequera:
Memoria:
Resolución de las medidas:
Exactitud:
presión:
pulso:
Fuente de Energía:
Accesorios:
* A reserva de modificaciones técnicas.
30
265 g (pilas incluidas)
131 x 174 x 73 mm
–5 a +50°C
15 a 85% de humedad relativa como máximo
10 a 40°C
Pantalla LCD (display de cristal líquido)
oscilométrico
capacitivo
30 a 280 mmHg
40 a 200 por minuto
0–299 mmHg
almacenamiento automático del último valor
medido
1 mmHg
± 3 mmHg
± 5 % de la lectura
4 celulas secas (pilas) UM-3, tamaño AA, 1.5 V
brazalete modelo MDS9872 para brazos de
circunferencia 22–30 cm
brazalete modelo MDS9873 para brazos de
circunferencia 30–38 cm
Advertisement
Table of Contents

Related Manuals for Medline MDS2002


Summary of Contents for Medline MDS2002
- Page 1 10. Especificaciones técnicas Peso: 265 g (pilas incluidas) Dimensiones: 131 x 174 x 73 mm Temperatura de almacenamiento: –5 a +50°C Humedad: 15 a 85% de humedad relativa como máximo Temperatura de funcionamiento: 10 a 40°C Pantalla: Pantalla LCD (display de cristal líquido) Método de medición: oscilométrico Sensor de presión:...
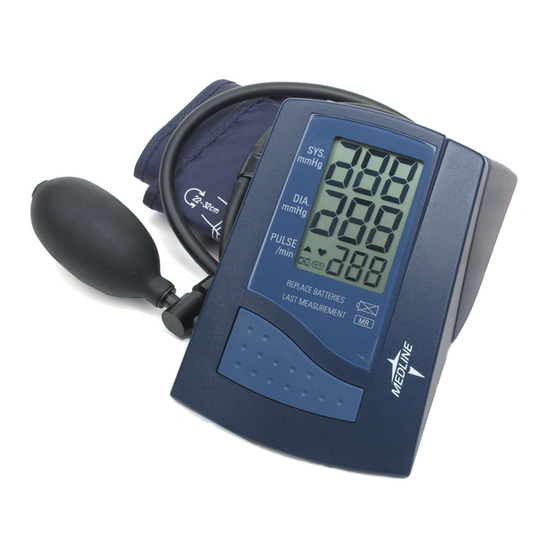
- Page 2 Medline Semi-Automatic Blood Pressure Monitor Model # MDS2002: For upper arm (Manual inflate with bulb, auto deflate) Instruction Manual Tensiómetro automático Instrucciones de uso PLEASE NOTE: THIS MEDICAL INSTRUMENT MUST BE USED ACCORDING TO IN- STRUCTIONS TO ENSURE ACCURATE READINGS.
-
Page 3: Table Of Contents
Medline Semi-automatic Upper Arm Blood Pressure Monitor Instruction Manual Table of contents Introduction 1.1 Features of your blood pressure monitor 1.2 Important information about self measurement Important information on blood pressure and its measurement 2.1. How does high/low blood pressure arise? 2.2. - Page 4 9. Estándares de referencia Estándar del aparato: El aparato cumple los requerimientos del estándar europeo sobre instrumentos de control de la presión arterial no invasivos EN1060-1 / 12:95 EN1060-3 / 09:97 DIN 58130, NIBP – investigación clínica ANSI / AAMI SP10, NIBP – requerimientos Compatibilidad electromagnética: El aparato cumple las especificaciones del estándar europeo EN 60601-1-2...
- Page 5 8. Garantía El monitor de tensión arterial MDS2002 tiene una garantía de 2 años a partir de la fecha de compra. Esta garantía incluye el instrumento. El brazalete está garantizado por un año a partir de la fecha de la compra.
-
Page 6: Introduction
This device offers clinically proven accuracy and has been designed to be user friendly. The large display of MDS2002 allows both operational status and cuff pressure to be visible for the duration of the measurement. -
Page 7: Important Information On Blood Pressure And Its Measurement
2. Important information on blood pressure and its measurement 2.1. How does high/low blood pressure arise? The level of blood pressure is determined in the circulatory center of the brain, and adjusts to a variety of situations through feedback from the nervous system. To adjust blood pressure, the strength and frequency of the heart (Pulse), as well as the width of circulatory blood vessels is altered. - Page 8 Los resultados de cada medición son distintos, • Preste atención a la siguiente información, aunque el aparato funciona correctamente y los así como a los puntos enumerados en valores indicados son normales. «Fuentes de error comunes» y repita la medición. Los valores medidos de la tensión arterial difieren •...
- Page 9 6. Mensajes de error/funcionamiento defectuoso Si se produce un error durante una medición, se inter- rumpe la medición y se visualiza el correspondiente código de error (ejemplo: error nº 1). Error No. Posible(s) causa(s) ERR 1 Se ha medido la presión sistólica, pero después la presión del brazalete ha descendido por debajo de 20 mmHg.
- Page 10 Further information • If your values are mostly normal under resting conditions but exceptionally high under conditions of physical or psychological stress, it is possible that you are suffering from so-called “labile hyperten- sion”. Consult your doctor. • Correctly measured diastolic blood pressure values above 120mmHg require immediate medical treatment.
-
Page 11: Components Of Your Blood Pressure Monitor
Type MDS9872, for arm circumference 22–30 cm (8 ”-11 ”) Type MDS9873, for arm circumference 30–38 cm (11 ”-15”) pressure release valve connect cuff pumping bulb to unit (T Connector) cuff Please Note: If the cuff does not fit properly, call Medline and order the appropriate size. -
Page 12: Inflado Adicional
5.5. Inflado adicional Cuando el brazalete no se ha inflado lo suficiente, la medición se interrumpe y tras unos segundos aparece en la pantalla una flecha que señala hacia arriba. Indica que es neceario inflar más el brazalete, como mínimo hasta alcanzar 20 mmHg por encima del valor anterior. -
Page 13: Procedimiento De Medición
5.4. Procedimiento de medición Una vez colocada la muñequera correctamente, puede comenzar la medición: a) Ponga en marcha el aparato presionando el botón O/I y Memoria. El tubo no debería estar,aún, conectado al aparato. En la pantalla aparece lo siguiente durante 2 segundos: (Diagrama.)., Un corto pi-pi-piip indica que el aparato ha equilibrado su presión con la ambiental y la medición puede empezar. -
Page 14: Operation Of Your Blood Pressure Monitor
4. Operation of your blood pressure monitor 4.1. Inserting the batteries After you have unpacked your device, insert the batteries. The battery compartment is located on the underside of the device (see illustration). a) Remove cover as illustrated b) Insert the batteries (4 x size AA 1,5 V), following the indicated polarity. -
Page 15: Measurement Procedure
The permissible range is printed on the cuff. If this is not suitable for your use, please contact your dealer. Note: Use only clinically approved Medline Cuffs. Medline cuffs are specially manufactured and tested. • A loose cuff or a sideways protruding air pocket causes false measurement values. -
Page 16: Ajuste Del Brazalete
5.3. Ajuste del brazalete a) Pasar el extremo del brazalete (con tope de goma integrado) a través del arco metálico. El cierre de Vel- cro debe quedar mirando al exterior. (Si el brazalete ya está preparado, sáltese este paso.) b) Coloque el brazalete en la parte superior del brazo, de manera que el tubo señale la parte inferior del brazo. -
Page 17: Desarrollo De Una Medición
5. Desarrollo de una medición 5.1. Antes de la medición: • Evite comer, fumar, así como cualquier forma de ejercicio directamente antes de la medición. Todos estos factores influyen sobre el resultado de la medición. Busque y encuentre tiempo para relajarse sentado en un sillón en una atmósfera tranquila durante unos diez minutos antes de la medición. -
Page 18: Fitting The Cuff
5.3. Fitting the cuff a) Pass the end of the cuff through the flat metal ring so that a loop is formed. The Velcro closer must be facing outwards. (Ignore this step if the cuff has already been prepared) b) Place the cuff over the left upper arm so that the tube is closer to your lower arm. -
Page 19: Measuring Procedure
5.4. Measuring procedure After the cuff has been appropriately positioned, the measurement can begin: a) Switch the instrument on by pressing the ON/OFF /Memory button. A short “be-be-beep” follows to indi- cate that the instrument has adjusted to the surround- Before ings and the measurement can begin. -
Page 20: Puesta En Funcionamiento Del Monitor De Tensión Arterial
4. Puesta en funcionamiento del monitor de tensión arterial 4.1. Colocación de las pilas Una vez desempaquetado el aparato, inserte primero las pilas. El compartimento de la batería está situado en la parte inferior del aparato (vea la ilustración). a) Retire la tapa como se indica en la figura b) Inserte las pilas (4 x tamaño AA 1.5V), teniendo en cuenta la polaridad indicada. - Page 21 El le aconsejará sobre los tipos de deporte apropiados para Ud. 3. Los diversos componentes del monitor de tensión arterial La figura muestra el monitor de tensión arterial MDS2002 que consta de: a) Unidad de medición Pantalla de cristal líquido...
-
Page 22: No Reading: Inflating Further
5.5. No Reading: Inflating further If the cuff was not inflated sufficiently, the measurement process is stopped after a few seconds and a flashing ar- Cuff Pressure row pointing upwards appears in the display. Too Low Inflate again to at least 20 mmHg higher than the previous value. -
Page 23: Error Messages/Troubleshooting
6. Error messages/troubleshooting If an error occurs during a measurement, the measurement is discontinued and a corresponding error code is displayed. (example: error no. 1) Error No. Possible cause(s)/solutions ERR 1 The systolic pressure was determined. The tube may have loos- ened. - Page 24 Informacion adicional • Si sus valores son prácticamente normales en reposo, pero excepcionalmente altos bajo estrés físico o psíquico, es posible que sufra de la llamada «hipertensión lábil». Consulte con su médico si tiene la sospecha de que ese puede ser su caso. •...
- Page 25 2. Informaciones importantes sobre la tension arterial y su medicion 2.1. ¿Cómo se origina la tensión arterial alta/baja? El nivel de la tensión arterial se determina en una parte del cerebro, en el llamado centro circulatorio, y se adapta a la situación concreta por retroalimentación a través del sistema nervioso. Para ajustar la tensión arterial se modifican la potencia y la frecuencia cardiacas (pulso), así...
-
Page 26: Care And Maintenance
7. Care and maintenance a) Do not expose the device to either extreme tempera- tures, humidity, dust or direct sunlight. b) The cuff contains a sensitive air-tight bubble. Handle this carefully and avoid all types of stress through twisting or buckling. c) Clean the device with a soft, dry cloth. - Page 27 The Medline blood pressure monitor MDS2001 is guaranteed for 2 years from date of purchase. This warranty includes the instrument only. The cuff is covered for 1 year from the date of purchase. The warran- ty does not apply to damage caused by improper handling, accidents, not following the operating instruc- tions or alterations made to the instrument by third parties.
-
Page 28: Características Del Mds
El aparato ofrece una exactitud de medición muy alta y clínicamente comprobada, y ha sido diseñado para proporcionar un máximo de sencillez en su utilización. El tensiómetro MDS2002 posee una gran pantalla LCD que permite visualizar el estado de funcionamiento y la presión, durante todo el proceso de medición. - Page 29 Tabla de contenido Introducción 1.1. Características del MDS2002 1.2. Información importante sobre las automediciones Informaciones importantes sobre la tensión arterial y su medición 2.1. ¿Cómo se origina la tensión arterial alta/baja? 2.2. ¿Cuáles son los valores normales? 2.3. ¿Qué podemos hacer si se miden regularmente valores altos/bajos? Los diversos componentes del monitor de tensión arterial...
-
Page 30: Certifications
9. Certifications Device standard: This medical device is manufactured to meet the re- quirements European and United States standards for non-invasive blood pressure monitors EN1060–1 / 12:95 EN1060–3 / 09:97 DIN 58130, NIBP – clinical investigation ANSI / AAMI SP10, NIBP - requirements Electromagnetic compatibility: Device fulfils the stipulations of the European stan- dard EN 60601–1–2... -
Page 31: Technical Specifications
The computer program used to measure blood pressure values was tested by experienced car- diac specialists in Germany. The manufacture of your Medline Blood Pressure monitor is in accordence with the terms of the European standard for blood pressure measuring devices (see technical data) under the supervision of the Technical... - Page 32 Tensiómetro semi-automático Instrucciones de uso...
Need help?
Do you have a question about the MDS2002 and is the answer not in the manual?
Questions and answers