Medline MDS5001 User Manual
Automatic blood pressure monitor
Hide thumbs
Also See for MDS5001:
- Quick start manual (2 pages) ,
- Quick start manual (2 pages) ,
- User manual
Table of Contents
Advertisement
Available languages
Available languages
Advertisement
Chapters
Table of Contents

Related Manuals for Medline MDS5001


Summary of Contents for Medline MDS5001
- Page 1 AUTOMATIC BLOOD PRESSURE MONITOR USER’S MANUAL MDS5001...
-
Page 2: Table Of Contents
TABLE OF CONTENTS Important Notes Measurement Accuracy Helpful Information Correct Method of Measurement Parts Identification Description of Display Marks Preparation before Taking a Measurement Taking a Measurement Setting Date and Time Memory Function Er Indicators / Troubleshooting 12, 13 Sensor Calibration Mode Care and Maintenance Specifications Blood Pressure Log... -
Page 3: Important Notes
IMPORTANT NOTES 1. Only a physician is qualified to interpret changes in your blood pressure. This device is not intended to replace regular medical examinations. It is recommended that your physician review your procedure for using this monitor. Never make adjustments to your medication unless it is the advice of a physician. 2. -
Page 4: Helpful Information
HELPFUL INFORMATION What is Blood Pressure? Blood pressure is the force that blood exerts on the arteries. This force is constantly changing as the heart beats. When the heart contracts, blood pressure reaches its highest value. This is called systolic blood pressure. When the heart relaxes between beats, the value of blood pressure is lower. This is called the diastolic blood pressure. - Page 5 Blood Pressure Classification The World Health Organization (WHO) and the International Society of Hypertension (ISH) Why is it Important to Measure Your Blood Pressure at Home? Having your blood pressure taken at the doctor’s office may cause you to become nervous, thus artificially raising your reading.
-
Page 6: Correct Method Of Measurement
5. Do not be concerned with the results of one measurement. Many measurements, recorded over an extended period of time, will provide a better indication of your blood pressure. 6. Relax for 5 to 10 minutes before remeasuring your blood pressure. 7. -
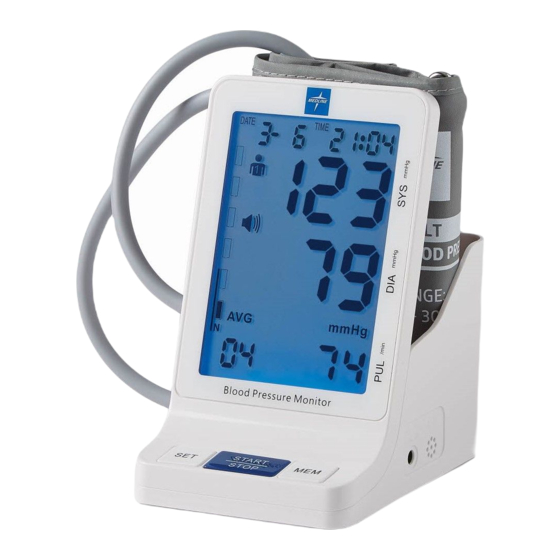
Page 7: Parts Identification
PARTS IDENTIFICATION Monitor Accessories AC Adaptor port DESCRIPTION OF DISPLAY MARKS Battery Display Inflating *The battery indicator will reset when power resets. Please replace with new batteries when the battery Deflating indicator flashes. Measurement Error Arrhythmia Detection Function Measuring... -
Page 8: Preparation Before Taking A Measurement
PREPERATION BEFORE TAKING A MEASUREMENT Battery Installation/Replacement 1. Slide the battery cover off in the direction of the arrow. 2. Install or replace the four alkaline “AA” batteries, noting the proper orientation of positive (+) and negative (-) terminals in the battery compartment. 3. -
Page 9: Taking A Measurement
TAKING A MEASUREMENT Please read the previous section on proper placement of the cuff and arm position. 1. After the cuff has been properly placed on the arm, please press Set button and select [ ] or [ on the upper left hand corner of the LCD screen, and then press the Start I Stop button. 2. -
Page 10: Setting Date And Time
4. When the unit is powered off, the clock will continue to display on the LCD screen. SETTING TALKING FEATURE For the MDS5001, after the date and time settings are selected, the "SP" character will flash. Press the MEM (Memory) button to move from English, "SP 01", to Spanish, "SP 02", or to off, "SP OF". - Page 11 SETTING ALARM CLOCK 1. Make sure the machine is powered OFF, then hold the SET button for 5 seconds until digits on the screen start flashing. 2. Press the SET button to advance the screen from the date, time, and talking feature. 3.
-
Page 12: Er Indicators / Troubleshooting
Memory Erase Press memory button and hold it down more than 3 seconds. You will erase all of the records of readings for the selected user. ER INDICATORS Error Indicators Possible Sources of Errors Indication: Incomplete inflation Correction: Check that the cuff has been firmly connected with the device. If the same Er message is displayed, contact Product Support. - Page 13 TROUBLESHOOTING Problem Recommended Method Make sure that the batteries are installed in the proper direction. (Polarity No display matches to the indication in the battery case.) Check that the cuff is positioned properly, then repeat the No measurement occurs measurement procedure. 1.
-
Page 14: Sensor Calibration Mode
SENSOR CALIBRATION MODE The blood pressure device should NOT attempt to be calibrated. The unit arrives pre-calibrated by the vendor. Should any issues arise with the device, please contact Product Support. mmHg and kPa Transferring lnstruction If you want to change the measurement units, power off the device and then press the Start/Stop button for 10 seconds. -
Page 15: Specifications
SPECIFICATIONS Manufacturer Model: BA-813 Medline Item Numbers: MDS5001 Measuring Method: Oscillometric Memory Function: Storage and recall for 90 measurements per user (up to 2 users) Display: Backlight LCD Display Measuring Range: Pressure: 0-280 mmHg Pulse: 40-199/minute Sensor Accuracy: Pressure: ±3mmHg Pulse: ±5%... -
Page 16: Blood Pressure Log
BLOOD PRESSURE LOG... - Page 18 ©2017 Medline Industries, Inc. Manufactured in China for Medline Industries, Inc., Northfield, IL 60093 USA. 1-800-MEDLINE RL17CN1...
- Page 19 MONITOR DE PRESIÓN ARTERIAL AUTOMÁTICO MANUAL DEL USUARIO MDS5001...
- Page 20 ÍNDICE Notas importantes Exactitud de la medición Información útil Método de medición correcto Identificación de las piezas Descripción de las indicaciones en pantalla Preparación antes de tomar una medición Cómo tomar una medición Configuración de fecha y hora Función de memoria Indicadores de error/solución de problemas 30, 31 Modo de calibración del sensor...
-
Page 21: Notas Importantes
NOTAS IMPORTANTES 1. Solo el médico está calificado para interpretar los cambios en su presión arterial. Este dispositivo no tiene como objetivo reemplazar los exámenes médicos periódicos. Se recomienda que su médico revise el procedimiento que emplea para utilizar este monitor. Nunca realice ajustes en sus medicamentos a menos que se lo recomiende el médico. -
Page 22: Información Útil
INFORMACIÓN ÚTIL ¿Qué es la presión arterial? La presión arterial es la fuerza que ejerce la sangre sobre las arterias. Esta fuerza cambia constantemente mientras late el corazón. Cuando el corazón se contrae, la presión arterial alcanza su valor más alto. Esto se denomina presión arterial sistólica. - Page 23 Clasificación de la presión arterial La Organización Mundial de la Salud (OMS) y la Sociedad Internacional de Hipertensión (ISH, por sus siglas en inglés) Sistólica (mmHg) Hipertensión-grado 3 Hipertensión-grado 2 Hipertensión-grado 1 Alta-normal Normal Óptima Diastólica (mmHg) ¿Por qué es importante medirse la presión arterial en el hogar? Cuando se toma la presión arterial en el consultorio del médico puede ponerse nervioso, por lo tanto la lectura podría aumentar artificialmente.
-
Page 24: Método De Medición Correcto
Intente tomarse la presión arteri al a la misma hora cada día. 5. No se preocupe por los resultados de una medición. Muchas mediciones, registradas durante un período de tiempo prolongado, proporcionarán una mejor indicación de la presión arterial. 6. Relájese durante 5 a 10 minutos antes de volver a medirse la presión arterial. 7. -
Page 25: Identificación De Las Piezas
IDENTIFICACIÓN DE LAS PIEZAS Monitor Accesorios Manguito Pantalla LCD Conector del tubo de aire Puerto adaptador A / C Manguera del manguito Botón “Memory” (Memori a ) Botón “Start/Stop” (Inicio/Detener) Botón “Set” (Configurar) Toma del tubo de aire DESCRIPCIÓN DE LAS INDICACIONES EN PANTALLA Indicador de la batería Inflando *El indicador de la batería se restablecerá... -
Page 26: Preparación Antes De Tomar Una Medición
PREPARACIÓN ANTES DE TOMAR UNA MEDICIÓN Instalación/sustitución de las pilas 1. Deslice la tapa de las pilas en la dirección de la flecha. 2. Instale o sustituya las cuatro pilas alcalinas “AA”, observando la orientación adecuada de las terminales positiva (+) y negativa (-) en el compartimiento de las pilas. 3. -
Page 27: Cómo Tomar Una Medición
CÓMO TOMAR UNA MEDICIÓN Lea la sección anterior sobre la colocación adecuada del manguito y la posición del brazo. 1. Después de colocar correctamente el manguito en el brazo, pulse el botón “Set” (Configurar) y seleccione ] o [ ] en la esquina superior izquierda de la pantalla LCD y pulse el botón “Start I Stop” (Inicio I Detener). 2. -
Page 28: Configuración De Fecha Y Hora
AJUSTE DE LA FUNCIÓN DE CONVERSACIÓN Para el modelo MDS5001, después de seleccionarse los ajustes de fecha y hora, destellará el carácter "SP". Pulse el botón MEM (Memoria) para pasar del inglés, "SP 01", al español, "SP 02", o desactivar, "SP OF". - Page 29 AJUSTE DEL RELOJ DE ALARMA 1. Cerciórese de que el aparato esté apagado, luego mantenga pulsado el botón SET (Fijar) durante 5 segundos hasta que los dígitos en la pantalla comiencen a destellar. 2. Pulse el botón SET (Fijar) para avanzar la pantalla desde la función de fecha, hora y conversación. 3.
-
Page 30: Indicadores De Error/Solución De Problemas
es la lectura anterior. Al pulsar repetidamente el botón de memoria, los registros se mostrarán en forma secuencial, junto con la fecha correspondiente de la medición. FECHA HORA Borrar memoria Press memory button and hold it down more than 3 seconds. You will erase all of the records of readings for the selected user. - Page 31 SOLUCIÓN DE PROBLEMAS Problema Método recomendado Asegúrese de que las pilas estén instaladas en la dirección correcta. (La Sin visualización polaridad coincide con la indicación en el compartimento de las pilas). Compruebe que el manguito esté colocado correctamente, a continuación, No se produce la repita el procedimiento de medición.
-
Page 32: Modo De Calibración Del Sensor
MODO DE CALIBRACIÓN DEL SENSOR No intente calibrar el dispositivo de presión arterial. La unidad ha sido previamente calibrada por el proveedor. En caso de que surjan problemas con el dispositivo, póngase en contacto con el servicio de asistencia técnica. Instrucción de transferencia de mmHg y kPa Si desea cambiar las unidades de medición, apague el dispositivo y luego pulse el botón “Start/Stop”... -
Page 33: Especificaciones
ESPECIFICACIONES Modelo del fabricante: BA-813 Números de artículos de Medline: MDS5001 Método de medición: Oscilométrico Función de memoria: Almacena y recupera 90 mediciones por usuario (hasta 2 usuarios) Pantalla: Pantalla LCD con luz de fondo Rango de medición: Presión: 0-280 mmHg Pulso: 40-199/minuto Exactitud del sensor: Presión: ±3 mmHg Pulso: ±5 %... -
Page 34: Registro De Presión Arterial
REGISTRO DE LA PRESIÓN ARTERIAL Fecha Hora Pulso Estado físico... - Page 36 ©2017 Medline Industries, Inc. Fabricado en China para Medline Industries, Inc., Northfield, IL 60093 EE. UU. 1-800-MEDLINE RL17CN1...
Need help?
Do you have a question about the MDS5001 and is the answer not in the manual?
Questions and answers
How do I turn off the voice ?
To turn off the voice on the Medline MDS5001, follow these steps:
1. Ensure the device is off.
2. Press and hold the "SET" button for 5 seconds until the digits on the screen start blinking.
3. Continue pressing the "SET" button to navigate past the date and time settings until "SP" appears on the screen.
4. Press the "MEM" button to cycle through the options:
- "SP 01" for English
- "SP 02" for Spanish
- "SP OF" to turn off the voice.
5. Select "SP OF" to disable the voice function.
The voice is now turned off.
This answer is automatically generated
very frustrated, the medline 54001 begins and at approx 30 to 40 inflates again, repeatedly!!!
how do i get the monitor off of military time?
Is it possible to get rid of the voice on my blood pressure machine?
how do you change the user with the 5001. Please describe the steps in the text of your response, and do not attach a file.