Table of Contents
Advertisement
Available languages
Available languages
7OFD 610 RU/HA
English
Operating Instructions
OVEN
Contents
Operating Instructions,1
Warnings,2
Description of the appliance,5
Installation,6
Русскии
Руководство по эксплуатации
ДУХОВОЙ ШКАФ
Содержание
Руководство по эксплуатации,1
Предупреждения,2
Сервисное обслуживание,3
Описание изделия,4
Описание изделия,5
Установка,13
Включение и эксплуатация,15
Программы,15
Предосторожности и рекомендации,18
Техническое обслуживание и уход,18
Advertisement
Table of Contents

Related Manuals for Hotpoint Ariston 7OFD 610 RU/HA


Summary of Contents for Hotpoint Ariston 7OFD 610 RU/HA
-
Page 1: Table Of Contents
7OFD 610 RU/HA English Operating Instructions OVEN Contents Operating Instructions,1 Warnings,2 Assistance,3 Description of the appliance,4 Description of the appliance,5 Installation,6 Start-up and use,8 Modes,8 Precautions and tips,11 Maintenance and care,11 Русскии Руководство по эксплуатации ДУХОВОЙ ШКАФ Содержание Руководство по эксплуатации,1 Предупреждения,2... -
Page 2: Warnings
Warnings Предупреждения WARNING: The appliance and its accessible parts ВНИМАНИЕ: Данное изделие и его доступные become hot during use. Care should be taken to комплектующие сильно нагреваются в процессе avoid touching heating elements. Children less than 8 эксплуатации. years of age shall be kept away unless continuously Будьте... -
Page 3: Assistance
Assistance ! Never use the services of an unauthorised technician. Please have the following information to hand: • The type of problem encountered. • The appliance model (Mod.). • The serial number (S/N). The latter two pieces of information can be found on the data plate located on the appliance. -
Page 4: Description Of The Appliance
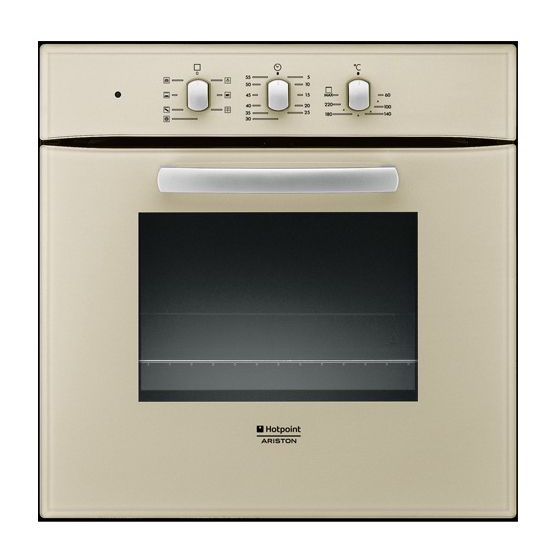
Description of the appliance Overall view 1. POSITION 1 2. POSITION 2 3. POSITION 3 4. POSITION 4 5. POSITION 5 6. GUIDES for the sliding racks 7. DRIPPING PAN 8. GRILL 9. Control panel Описание изделия Общии вид 1. ПОЛОЖЕНИЕ 1 2. -
Page 5: Description Of The Appliance,4
Description of the appliance Control panel SELECTOR Knob TIMER Knob Indicator light THERMOSTAT THERMOSTAT Knob Описание изделия Панель управления Рукоятка ПРОГРАММЫ Рукоятка ТАЙМЕРА Индикатор ТЕРМОСТАТА Регулятор ТЕРМОСТАТА... -
Page 6: Electrical Connection
Installation Centring and fixing Position the 4 tabs on the side of the oven so that they are lined up with the 4 holes on the outer frame. Adjust the tabs according to the thickness of the ! Please keep this instruction booklet in a safe place for future reference. If cabinet side panel, as shown below: the appliance is sold, given away or moved, please make sure the booklet is also passed on to the new owners so that they may benefit from the advice... - Page 7 Connecting the supply cable to the mains APPLIANCE SPECIFICATIONS Install a standardised plug corresponding to the load indicated on the data width 43.5 cm plate (see side). Dimensions* height 32,4 cm The appliance must be directly connected to the mains using an omnipolar depth 41.5 cm circuit-breaker with a minimum contact opening of 3 mm installed between the appliance and the mains, suitable for the load indicated and complying with...
-
Page 8: Start-Up And Use,8
Start-up and use Modes WARNING! The oven is provided ! A temperature value can be set for all cooking modes between 60°C and with a stop system to extract the Max, except for racks and prevent them from coming out of the oven (1).As shown in the •... -
Page 9: Practical Cooking Advice
Practical cooking advice ! Do not place racks in position 1 and 5 during fan-assisted cooking. Excessive direct heat can burn temperature sensitive foods. ! In the GRILL and GRATIN cooking modes, place the dripping pan in position 1 to collect cooking residues (fat and/or grease). MULTILEVEL •... -
Page 10: Cooking Advice Table
Cooking advice table Cooking Weight Rack Preheating time Recommended duration Modes Foods (in kg) position (minutes) temperature (minutes) Duck 65-75 Roast veal or beef 70-75 Traditional Roast pork 70-80 Biscuits (shortcrust pastry) 15-20 Tarts 30-35 Pizza (on 2 racks) 2 and 4 15-20 Lasagne 30-35... -
Page 11: Precautions And Tips
Precautions and tips collected. Consumers should contact their local authority or retailer for information concerning the correct disposal of their old appliance. ! This appliance has been designed and manufactured in compliance with international safety standards. The following warnings are provided for safety Respecting and conserving the environment reasons and must be read carefully. -
Page 12: Cleaning The Oven Door
Cleaning the oven door Clean the glass part of the oven door using a sponge and a non-abrasive cleaning product, then dry thoroughly with a soft cloth. Do not use rough abrasive material or sharp metal scrapers as these could scratch the surface and cause the glass to crack 1. - Page 13 Установка ! Важно сохранить данное руководство для его последующих консультации. В случае продажи, передачи изделия или при переезде на новое место жительства необходимо проверить, чтобы руководство оставалось вместе с изделием, для того чтобы его новыи владелец мог ознакомиться с правилами эксплуатации и с соответствующими предупреждениями.
- Page 14 Подсоединение сетевого кабеля ! Производитель не несет ответственности за последствия несоблюдения перечисленных выше требовании. 1. Откройте зажимную коробку, нажав при помощи отвертки на выступы с боков крышки: потяните и откройте крышку (см. схему). 2. Порядок подсоединения сетевого кабеля: отвинтите винт кабельного сальника и три...
- Page 15 Включение и эксплуатация ! Таймер не управляет включением или выключением духового шкафа. ВНИМАНИЕ! Духовой шкаф Программы у к о м п л е к то ва н с и с те м о й б л о к и р о в к и р е ш е т о к , позволяющей...
- Page 16 Программа КОНДИТЕРСКАЯ ВЫПЕЧКА Включается задний нагревательный элемент и вентилятор, обеспечивая умеренный и однородный жар внутри духовки. Данная функция рекомендуется для приготовления деликатных блюд (например, кондитерских изделий, требующих подъема теста) и мелкой выпечки одновременно на трех уровнях. Практические советы по приготовлению ! В...
- Page 17 Та а П а В П В Р а П У а а а а У а 65-75 70-75 Жа Т а а а а Жа 70-80 П 15-20 П а 30-35 П а ( а 2- 15-20 Ла а 30-35 Ба...
- Page 18 Предосторожности и Утилизация • Уничтожение упаковочных материалов: соблюдаите местные рекомендации нормативы с целью повторного использования упаковочных материалов. • Согласно Европеискои Директиве 2012/19/СЕ касательно утилизации ! Изделие спроектировано и изготовлено в соответствии с электронных и электрических электроприборов электроприборы международными нормативами по безопасности. Необходимо не...
- Page 19 Замена лампочки специальные чистящие средства, имеющиеся в продаже. После чистки рекомендуется тщательно удалить остатки моющего средства влажной тряпкой и высушить духовку. Не используйте абразивные Замена лампочки в духовом порошки или коррозийные вещества. шкафу: • Следует производить внутреннюю чистку духового шкафа после ...
- Page 20 195114220.01 11/2013 - XEROX FABRIANO...
Need help?
Do you have a question about the 7OFD 610 RU/HA and is the answer not in the manual?
Questions and answers