Table of Contents
Advertisement
Quick Links
IMPORTANT: Before you install the automatic gate lock be sure your gate is level, moves freely on its
hinges, and does not bind or drag against the ground.
Installation Manual
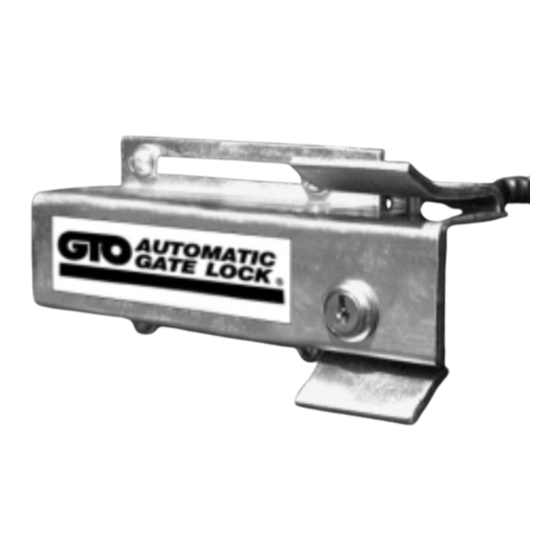
PLEASE NOTE: Because of the various mounting applications, no mounting hardware is
provided with the GTO Automatic Gate Lock. All necessary mounting hardware can be ob-
tained from your local hardware store; all other hardware is provided.
This manual shows two examples of the most common installations, and should provide insight
into most other applications. If you have any questions during installation, please call (850)
575-0176 for technical support.
RB909
rev-05/18/01
AUTOMATIC
GATE LOCK
1
®
© GTO, Inc. 2000
Advertisement
Table of Contents

Related Manuals for GTO Automatic Gate Lock


Summary of Contents for GTO Automatic Gate Lock
- Page 1 IMPORTANT: Before you install the automatic gate lock be sure your gate is level, moves freely on its hinges, and does not bind or drag against the ground. AUTOMATIC GATE LOCK ® Installation Manual PLEASE NOTE: Because of the various mounting applications, no mounting hardware is provided with the GTO Automatic Gate Lock.
-
Page 2: Before You Start
Before You Start... For the GTO Automatic Gate Lock work properly, the gate must close firmly and engage the lock catch against the lock receiver. Achieving optimal closure may require slight adjustments to the gate opener settings. ® Installing the lock with the Mighty Mule E-Z Gate Opener may require slight movement of the stroke adjustment knob (and changes to the obstruction sensitivity–on Generation 2000 Control Boards ONLY). -
Page 3: Mounting The Lock
(see Illustration D), and check the alignment again. Manual Lock Release: The GTO Automatic Gate Lock is keyed for manual release. Should the electronic release be disabled for any reason, simply use the key to manually open the lock. Illustration A Lock and receiver must be level and aligned with opener. - Page 4 Illustration B Iron or Aluminum Tube Fence and Gate Installation Remember to check the alignment and mark positions before drilling holes in fence post and gate. Clevis Pin GTO Automatic Gate Lock Receiver Locking Cap Carriage bolts, washers, and nuts (not provided;...
- Page 5 If a diagram of your control board and control box is not pictured on Lock Board page 5 please call the GTO 1 2 3 4 5 ServiceDepartment at (800) 543- RED Wire To Battery WHITE Wire to...
- Page 6 Opener Control Board SERIES (PRO) 12 Volt Battery Double Spade Tongue Connectors Lock Board Strain Relief Opener Control Board (Generation 2000) For Generation 2000 Control Boards (Mighty Mule, GTO/PRO 1000, GTO/PRO 2000 openers WITH Serial Numbers) Lock Board Strain Relief...
- Page 7 Scotch Loc Connector is not needed with the Generation 2000 control board (i.e., Mighty Mule GTO/PRO 1000, and GTO/PRO 2000 openers with serial numbers. Connect the WHITE wire from the lock board directly to the OPENER terminal block along with the power cable wire. Connect the WHITE wire to the BLACK terminal for a Pull-to-Open installation (see illustration below), connect WHITE wire to the RED terminal for a Push-to-Open installation.
- Page 8 After the one (1) year warranty period, GTO, Inc. or one of its authorized service centers will make any necessary repairs for a nominal fee. Call GTO at (850) 575-0176 for more information. This warranty gives you specific legal rights, and you may also have other rights which may vary from state to state.
Need help?
Do you have a question about the Automatic Gate Lock and is the answer not in the manual?
Questions and answers