Advertisement
Advertisement
Table of Contents

Subscribe to Our Youtube Channel
Related Manuals for Bodyworx KR905AT


Summary of Contents for Bodyworx KR905AT
-
Page 2: Table Of Contents
CONTENTS SAFETY PRECAUTIONS PRE-ASSEMBLY CHECK LIST PART LIST ASSEMBLY INSTRUCTION 9-11 EXPLODED DIAGRAM CARE & MAINTENANCE HARDWARE PARTS LIST COMPUTER INSTRUCTIONS 13-21 EXERCISE INSTRUCTIONS 22-24 IMPORTANT SAFETY PRECAUTIONS This exercise machine is built for optimum safety. However, certain precautions apply whenever you operate a piece of exercise equipment. -
Page 3: Part List
PART LIST PART#. DESPRIPTION PART#. DESPRIPTION Main Frame Flat Washer Φ6*Φ17 Rear Stabilizer Axle For Rowing Pedal Adjustable End Cap Pedal Left Front Stabilizer Pedal Right Transportation Wheel Left Allen Bolt M8*20 Transportation Wheel Right Bumper Carriage Bolt M10*55 Allen Bolt M10*50 Flat Washer Φ10*Φ25 Spacer Domed Nut M10... - Page 4 PART#. DESPRIPTION PART#. DESPRIPTION Allen Bolt M8*45 Screw ST3.5*10 Clip Φ8 Screw ST3.5*15 Square End Cap □38 Belt Wheel End Cap For Aluminum Rail Left Idler Wheel End Cap For Aluminum Rail Right Spring Nylon Locknut M10 Hex Head Bolt M6*20 Square End Cap □30*60 Nut M6 Powder Metal...
-
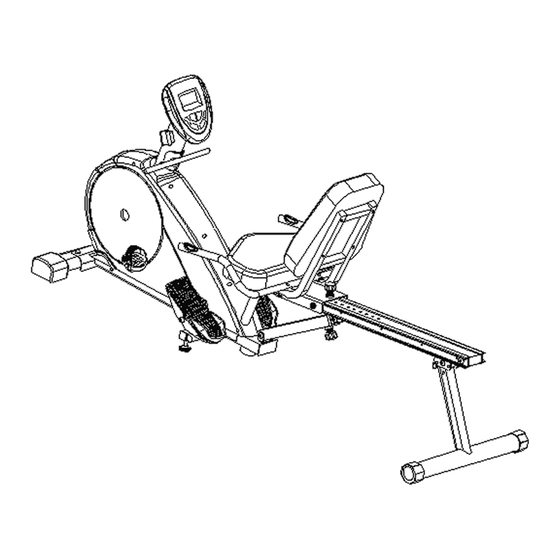
Page 5: Exploded Diagram
EXPLODED DIAGRAM... - Page 6 EXPLODED DIAGRAM...
-
Page 7: Hardware Parts List
HARDWARE PARTS LIST Description Drawings Carriage Bolt M10*75 Flat Washer Φ10*Φ25 Domed Nut M10 Flat Washer Φ8*Φ17 Quick Release Knob Nylon Locknut M8 Allen Screw M6*35 Allen Screw M6*12 Flat Washer Φ6*Φ17 Axle For Rowing Pedal Allen Bolt M8*20 Collar Allen Bolt M10*50 Allen Bolt M8*55 Carriage Bolt M8*45... -
Page 8: Pre-Assembly Check List
PRE-ASSEMBLY CHECK LIST PART NO. DESCRIPTION Q’TY Main Frame Rear Stabilizer Front Stabilizer Seat Support Bracket Monitor Fixed Handlebar Aluminum Rail 15 & 16 Seat Cushion & Back Cushion Support Tube 30 R & L Pedal Right & Left 40 R & L Rower Pedal Right &... -
Page 9: Assembly Instruction
ASSEMBLY INSTRUCTION Step 1 Attach the front stabilizer (4) w/transportation wheels (5L/5R) to the main frame (1). Secure using two carriage bolts (6), two flat washers (7) and two domed nuts (8). Attach the left and right pedals (30L/30R) to the opening of the right and left run disc (76). ... - Page 10 Step 3 Attach the rear stabilizer (2) with adjustable end cap (3) to the aluminum rail (14). Secure using one allen bolt (33), flat washer (7) and one nylon locknut (57). Plug the lock pin (101). Attach the aluminum rail (14) onto the upper back bracket of the main frame (1). Secure using one allen bolt (21), two spacers (34), one flat washer (12) and one nylon locknut (22).
- Page 11 Step 5 Slide the seat support bracket (9) onto the aluminum rail (14). Secure using the quick release knob (20) into your desired position. Connect the coil wire (50) to the back pulse wire (52). Fix two bumpers (32)on each side of aluminum rail (14). Secure using two allen bolts (31). Note:To aviod the noise between the quick release knob and the aluminum rail, please make sure the quick release knob were loosen enough when you doing the rower exercise.
-
Page 12: Care & Maintenance
CARE & MAINTENANCE Proper maintenance is very important to ensure your equipment is always in top working condition. Improper maintenance could cause damage or shorten the life of your equipment and exceed the WARRANTY coverage. Important: Never use abrasives or solvents to clean the equipment. To prevent damage to the computer, keep liquids away and keep it out of direct sunlight. - Page 13 Important notice: 1. When doing Rower exercise, please make sure the adjustable knobs are tightened. Please see the pictures as below. 2. How to change the rower to recumbent: a. Pull up the handlebar and place it onto the holder on the upright. b.
-
Page 14: Computer Instructions
COMPUTER INSTRUCTIONS The things you should know before exercise A. Input Power Plug in the adaptor to the equipment then the computer will produce a beep sound and turn on the computer at the Manual mode. B. Program select and setting value 1. - Page 15 10. PULSE RECOVERY: During the START stage, leave the hands holding on grips or leave the chest transmitter attached and then press “PULSE RECOVERY” key, time starts counting from 00:60 - 00:59 - - to 00:00. As soon as 00:00 is reached, the computer will show your heart rate recovery status with the grade F1.0 to F6.0.
- Page 16 CALORIES. Press ENTER key to confirm your desired CALORIES. 6. The PULSE will flash and then you can press UP or DOWN keys to set your exercise PULSE. Press ENTER key to confirm your desired Pulse. 7. Press the START/STOP key to begin exercise. Preset Program: Steps, Hill, Rolling, Valley, Fat Burn, Ramp, Mountain, Intervals, Random, Plateau, Fartlek, Precipice Program PROGRAM 2 to PROGRAM 13 is the preset programs.
- Page 17 Heart Rate Control Program: 55% H.R.C., 65% H.R.C., 75% H.R.C., 85% H.R.C., Target H.R.C. Program 18 to Program 22 is the Heart Rate Control Programs and Program 22 is the Target Heart Rate Control program. Program 18 is the 55% Max H.R.C. - - Target H.R. = (220 – AGE) x 55% Program 19 is the 65% Max H.R.C.
- Page 18 confirm your Gender. The default sex is 1 (MAN). 6. The AGE will flash and you can press UP or DOWN keys to set your AGE. Press ENTER key to confirm your AGE. The default AGE is 35. 7. Press the START/STOP key to begin body fat measurement. If the window show E on the window, please make sure your hands are attached well on the grips or the chest belt is touch well on your body.
- Page 19 LCD Workout Graphics PRESET PROGRAM PROFILES: PROGRAM 1 PROGRAM 2 PROGRAM 3 MANUAL STEPS HILL PROGRAM 4 PROGRAM 5 PROGRAM 6 ROLLING VALLEY FAT BURN PROGRAM 7 PROGRAM 8 PROGRAM 9 RAMP MOUNTAIN INTERVALS PROGRAM 10 PROGRAM 11 PROGRAM 12 RANDOM PLATEAU FARTLEK...
- Page 20 PROGRAM 15 USER 2 PROGRAM 16 USER 3 PROGRAM 17 USER 4 HEART RATE PROGRAM PROFILES: PROGRAM 18 55% H.R.C. PROGRAM 19 65% H.R.C. PROGRAM 20 75% H.R.C. PROGRAM 21 85% H.R.C.
- Page 21 PROGRAM 22 TARGET H.R.C. BODY FAT TEST PROGRAMS: PROGRAM 23 BODY FAT (STOP MODE) BODY FAT (START MODE) One of the Following Six Profiles Will Display Automatically after Measuring Your BODY FAT: Workout Time: 40 minutes Workout Time: 40 minutes Workout time: 20 minutes Workout Time: 40 minutes Workout Time: 40 minutes...
-
Page 22: Exercise Instructions
EXERCISE INSTRUCTIONS Using your PROGRAMMABLE ROWER RECUMBENT will provide you with several benefits, it will improve your physical fitness, tone muscle and in conjunction with a calorie controlled diet help you lose weight. 1. The Warm Up Phase This stage helps get the blood flowing around the body and the muscles working properly. It will also reduce the risk of cramp and muscle injury. -
Page 23: Lock Pin
3. The Cool Down Phase This stage is to let your Cardio-vascular System and muscles wind down. This is a repeat of the warm up exercise e.g. reduce your tempo, continue for approximately 5 minutes. The stretching exercises should now be repeated, again remembering not to force or jerk your muscles into the stretch.
Need help?
Do you have a question about the KR905AT and is the answer not in the manual?
Questions and answers