Table of Contents
Advertisement
Quick Links
Advertisement
Table of Contents

Summary of Contents for Emotiva Stealth SP-1
-
Page 3: Important Safety Precautions And Explanation Of Symbols
STEALTH SP-1. THERE ARE NO USER-SERVICEABLE PARTS INSIDE THE UNIT. REFER ALL SERVICE TO QUALIFIED SERVICE PERSONNEL. Do not install the Stealth SP-1 near or above any heat sources such as radiators, heating vents, or other apparatus that produce heat. Do not block any ventilation openings or heat sinks. - Page 4 Only replace the fuse(s) in the Stealth SP-1 with a fuse(s) of proper value and voltage rating. The Stealth SP-1 should only be cleaned as directed in the manual. Avoid spraying liquids directly onto the unit and NEVER spray liquids into the vents or controls, or directly onto the face plate.
-
Page 5: Table Of Contents
Stealth SP-1 (Front Panel) ..............7 Stealth SP-1 (Rear Panel) ..............8 Stealth SP-1 (Remote Control) ............10 Using The Stealth SP-1 With a Stealth DC-1 ........11 Hardware Configuration ..............12 Care and Maintenance ..............13 Specifications .................. 14 Emotiva Audio Corporation Five-Year Limited Warranty ...... -
Page 6: Introduction
Thank you for purchasing the new Stealth SP-1 Input Selector and Phono Preamp. The Emotiva Stealth SP-1 is a totally new type of audio component. The SP-1 is designed to work with your current analog preamp to expand its input capabilities dramatically. -
Page 7: About This Manual
Stealth SP-1 Input Selector and Phono Preamp About This Manual This manual will provide you with all the information you need to get great performance, accurate sound, and many years of reliable service from your Stealth SP-1. Many of you are experienced studio professionals and are probably familiar with studio and audiophile preamplifiers, switchers, and D/A converters. -
Page 8: Features
Stealth SP-1 Input Selector and Phono Preamp Features The Stealth SP-1 was designed to expand the analog capabilities of any stereo analog preamp which has at least one available line level analog stereo input. When any of the line level inputs on the SP-1 is selected, the signal from that input is routed directly to the output via precision switching relays, which add virtually no distortion or noise to the signal. -
Page 9: Quick Start
Stealth SP-1 Input Selector and Phono Preamp Quick Start Even though you may be eager to try out your Stealth SP-1 right away, there are a few important details you need to check first: 1) Remove the insulator tab from the batteries in the remote control. (See Inserting or changing batteries in the remote control in the Hardware Configuration section for details.) -
Page 10: Connecting The Stealth Sp-1
Stealth SP-1 Input Selector and Phono Preamp Connecting the Stealth SP-1 The Output of the Stealth SP-1 should be connected to an available line level input on a preamp, an integrated amp or receiver, or a DAC with an analog input. It may also be connected to a power amplifier via our Control Freak passive level control (see the illustration below). -
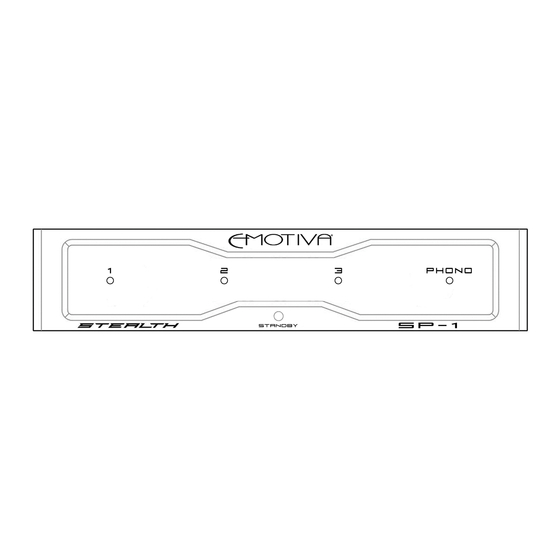
Page 11: Stealth Sp-1 (Front Panel)
Stealth SP-1 Input Selector and Phono Preamp Stealth SP-1 (Front Panel) 1. Standby button Press this button once to turn the SP-1 On, press it again to turn the SP-1 Off. Note: The SP-1 can only be turned On using the Standby button if the Power switch on the rear panel is On. -
Page 12: Stealth Sp-1 (Rear Panel)
MM position. 2. Main AC Power switch This switch controls the main AC power to the Stealth SP-1. Turning this switch On places the SP-1 into Standby mode; turning it off switches the SP-1 Off. This switch must be in the On position before you can turn the SP-1 On using the front panel Standby button. - Page 13 Connect your line level stereo analog sources to these inputs. 7. IEC AC power inlet Use this connection to provide AC power to the Stealth SP-1. A high-quality commerical AC power cord is provided with the SP-1. You may substitute any IEC power cable of your choice.
-
Page 14: Stealth Sp-1 (Remote Control)
Stealth SP-1 Input Selector and Phono Preamp Stealth SP-1 (Remote Control) The Stealth SP-1 can be used with its own compact IR remote control, or it can be controlled by the remote control that is included with the Stealth DC-1. The following section describes the included SP-1 compact remote control. -
Page 15: Using The Stealth Sp-1 With A Stealth Dc-1
Connections When the Stealth SP-1 is used with the DC-1, a single set of short stereo interconnects is placed between the outputs on the SP-1 and the Analog Inputs on the DC-1. -
Page 16: Hardware Configuration
Hardware Configuration Inserting or changing batteries in the remote control The battery compartment for the Stealth SP-1’s remote control is located on the back towards the bottom. To open the battery compartment, place the remote control face down on a soft surface, and press gently inwards while sliding the battery cover towards the end of the remote control. -
Page 17: Care And Maintenance
Stealth SP-1 Input Selector and Phono Preamp Care and Maintenance Periodic Maintenance Your Emotiva Stealth SP-1 requires no periodic maintenance or calibration. Cleaning the Cabinet and Front Panel • The cabinet of the SP-1 should normally be cleaned with a rag dampened with plain water. -
Page 18: Specifications
Stealth SP-1 Input Selector and Phono Preamp Specifications Line Level Analog Inputs Line level analog inputs on the SP-1 are switched using precision control relays. This signal path is entirely passive, and so introduces virtually no additional noise or distortion to the analog signal. The signal level and source impedance are determined solely by the source device. - Page 19 Stealth SP-1 Input Selector and Phono Preamp Troubleshooting (line level inputs) If you don’t get any sound at all..Make sure that you have selected the correct input device. Make sure the SP-1 has power and the halo ring around the selected input is lit.
- Page 20 Stealth SP-1 Input Selector and Phono Preamp If the sound is overloaded or distorted..If you’re using a moving magnet (MM) cartridge, make sure both switches are set to MM. Some MC cartridges also have a high output and require that the switches be set to MM.
-
Page 21: Emotiva Audio Corporation Five-Year Limited Warranty
Term. A claim shall not be valid (and Emotiva has no obligation related to the claim) if it is not made within the Term and if it is not made in strict compliance with the requirements of the “How do you get service?”... - Page 22 The CSR will provide you with a returned material authorization number (“RMA”). Ship the product to Emotiva at the following address, with the RMA written in large, bold numbers on the shipping label on the outside of the box, and with the letters “RMA”...
-
Page 23: Notes
Stealth SP-1 Input Selector and Phono Preamp Notes All information contained in this manual is accurate to the best of our knowledge at the time of publication. In keeping with our policy of ongoing product improvement, we reserve the right to make changes to the design and features of our products without prior notice.
Need help?
Do you have a question about the Stealth SP-1 and is the answer not in the manual?
Questions and answers