Table of Contents
Advertisement
234Z
KPD Series
MPEG-4 DVR QUICK
ROHS AND WEEE
All lead-free products offered by the company comply with the requirements of the European law on
the Restriction of Hazardous Substances (RoHS) directive, which means our manufacture processes
and products are strictly "lead-free" and without the hazardous substances cited in the directive.
The crossed-out wheeled bin mark symbolizes that within the European Union the product must be
collected separately at the product end-of-life. This applies to your product and any peripherals
marked with this symbol. Do not dispose of these products as unsorted municipal waste.
Please read this instruction thoroughly before operation and retain it for future reference.
The image shown above may differ from the actual product appearance.
616, 616F, 608, 608F, 604, 604F quick_V1.5
Advertisement
Table of Contents

Subscribe to Our Youtube Channel
Related Manuals for Avtech KPD616


Summary of Contents for Avtech KPD616
- Page 1 234Z KPD Series MPEG-4 DVR QUICK ROHS AND WEEE All lead-free products offered by the company comply with the requirements of the European law on the Restriction of Hazardous Substances (RoHS) directive, which means our manufacture processes and products are strictly “lead-free” and without the hazardous substances cited in the directive. The crossed-out wheeled bin mark symbolizes that within the European Union the product must be collected separately at the product end-of-life.
-
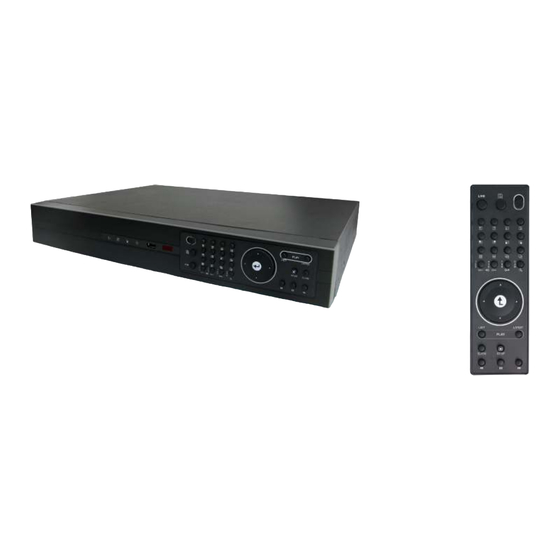
Page 2: Product Description
1. OVERVIEW 1.1 Product Description This MPEG-4 multiplex network DVR series combines remote surveillance, burglar prevention, and evidentiary recording features and is designed to become a simple entry-level system with all necessary functions. 1.2 Package Contents □ Digital video recorder (DVR) □... - Page 3 (USB port) To quickly backup or upgrade firmware/OSD, you can insert a compatible USB flash drive into this USB port. Before using the USB flash drive, please use your PC to format the USB flash drive as “FAT32” first. Note: For the list of compatible USB flash drives, please refer to “Appendix 2” in the user manual. IR receiving zone If the control panel is removed from the DVR and used as a remote controller, aim the remote controller at this area to control the DVR operation.
- Page 4 (16-cut channel display / 9-cut channel display / 4-cut channel display) Press one of these buttons to switch the channel display. : Display 16-cut display (for 16CH DVR). : Display 9-cut display (for 16CH, 8CH DVR). : Display 4-cut display (for 8CH DVR). : Display 4-cut display (for 4CH DVR).
-
Page 5: Remote Controller
16) LIST (Event List Search) To quick search the recorded files by event list, press this button to show all types of the event lists. ALARM: List the information of the alarm-trigger-recorded files. MANUAL: List the information of the manual-recorded files. The DVR will save one recorded file once any recording setting is changed MOTION: List the information of the motion-trigger-recorded files. -
Page 6: Rear Panels
2.3 Rear Panels ‧ 16CH (The fan is optional) MONITOR RS485 EXTERNAL I/O RI S K OF EL ECTRI C S HO CK LINK DO NOT OPEN ACT. WARNING : TO REDUCE THE RISK O F ELE CTRIC SHOCK, DO NO T REMOV E COVER (OR BACK). NO USE R-SERVICEABLE P ARTS INSIDE. - Page 7 6) EXTERNAL I/O Insert the supplied 25PIN DSUB to this port for connecting external devices (external alarm, etc). For detailed I/O port PIN configuration, please refer to “APPENDIX 1 PIN CONFIGURATION” in the user’s manual. 7) LAN Connect to Internet by LAN cable. 8) LINK ACT.
-
Page 8: Connections And Setup
3. CONNECTIONS AND SETUP (Take 16CH DVR as an example) 3.1 HDD Installation The HDDs must be installed before the DVR is turned on. Step 1: Loose the screws on the upper cover and open the upper cover of the DVR. Step 2: Screw out the L-shape HDD brackets. -
Page 9: Power Setup
3.3 Power Setup This device should be operated only with the type of power source indicated on the manufacturer’s label. Connect the indicated AC power cord to the power adapter, and plug into an electrical outlet. Power LED “ ” will be on as blue. It takes approximately 10 to 15 seconds to boot the system. -
Page 10: System Diagram
3.6 System Diagram After you finish all the connections and setup, a surveillance system is established and you can experience the marvelous and useful functions of this DVR. The diagram below illustrates all the available connections of this DVR for you to picture your surveillance system. -
Page 11: Basic Operation
4. BASIC OPERATION (Take 16CH DVR as an example) 4.1 Live Page In this live page of the DVR, you can see the live viewing of 1- / 4- / 9- / 16-cut screen. Icon Function Icon Function Icon Function Icon Function live audio live audio... -
Page 12: Key Lock And Unlock
4.3 Playback Press the “LATEST” button on the DVR control panel, and the device will playback the latest recorded video. Note: There must be at least 8192 images of recorded data for playback to work properly. If not, the device will stop playback. For example, if the IPS is set to 30, the recording time should be at least 273 seconds (8192 images / 30 IPS) for the playback to work properly. - Page 13 4.5 Upgrade Note: Do not disconnect the power of your DVR while the upgrade process is in progress, or the DVR functions may not work properly or be unable to use. ‧ Firmware / Multilanguage OSD Upgrade Use USB to upgrade firmware or OSD: Step 1.
-
Page 14: Menu Configuration
5. MAIN MENU 5.1 Menu Configuration CHANNEL TITLE STATUS EVENT STATUS IMAGE SIZE RECORD QUALITY IMAGE PER SECOND QUICK START MENU RECORD TIMER TIMER DETECTION TIMER DATE DATE FORMAT DAYLIGHT SAVING CAMERA DETECTION ALERT ADVANCE CONFIG NETWORK DISPLAY RECORD SERIAL TYPE BAUD RATE HOST ID PASSWORD...
Need help?
Do you have a question about the KPD616 and is the answer not in the manual?
Questions and answers