Table of Contents
Advertisement
Quick Links
Download this manual
See also:
User Manual
Advertisement
Table of Contents

Related Manuals for Ubiquiti airCam Dome


Summary of Contents for Ubiquiti airCam Dome
- Page 1 Security Camera...
-
Page 3: Package Contents
Introduction Introduction Thank you for purchasing the airCam Dome. This Quick Start Guide is designed to guide you through the installation of the airCam Dome and show you how to access the configuration interface. The airCam Dome includes the airVision software. -
Page 4: Hardware Overview
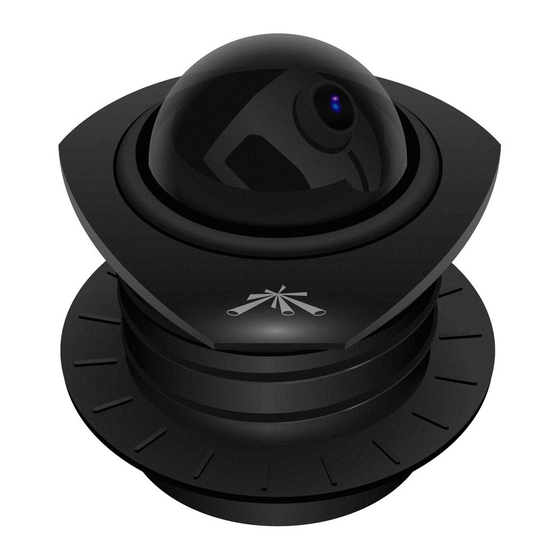
Dome Hardware Overview Removable Lens Cover Lens Manual Lens Adjustment AirCam Dome base MicroSD Card Slot Bezel... -
Page 5: Installation
Ethernet connection is made and flash when there is activity. Power The Power LED will light steady orange when the airCam Dome is connected to a power source. Note: LED operation may be disabled using the camera configuration interface. - Page 6 2. Cut a 73 mm diameter hole through the ceiling tile. You may use the "Cutting Template" on page 12 of this Quick Start Guide. 3. Insert the bezel into the ceiling tile and thread on the nut. Bezel 4. Insert the airCam Dome base into the bezel.
- Page 7 5. Align the indicator on the camera with the arrow on the bezel. Align Arrow on bezel Indicator on camera The airCam Dome is designed to be inserted Note: and removed when the indicator on the camera is aligned with the arrow on the bezel.
- Page 8 Dome 7. Connect an Ethernet cable to the Ethernet port on the camera. 8. Connect the other end of the Ethernet cable to the Ethernet port labeled POE on the PoE Adapter.
- Page 9 10. Connect the power cord to the power port on the PoE Adapter. Connect the other end of the power cord to a power outlet. The Power LED should light up on the airCam Dome. 11. Set the ceiling tile into place.
-
Page 10: Camera Configuration Interface
1. Make sure that your host machine is connected to the same LAN as the airCam Dome. 2. The airCam Dome is set to DHCP by default. If you have a router or DHCP server providing addresses on your network, check your DHCP Client Table to obtain the address of the airCam Dome. -
Page 11: Adjusting The Camera View
Adjusting the Camera View 6. The Main screen will appear and you should see a live stream of video from the airCam Dome. Adjusting the Camera View To adjust the camera lens angle, remove the dome . The camera lens can be tilted 0 to 70°. Rotate the camera inside the bezel to the desired position. -
Page 12: General Warranty
Repair or replacement in the manner provided herein shall be the sole and exclusive remedy of Buyer for breach of warranty and shall constitute fulfillment of all liabilities of UBIQUITI NETWORKS with respect to the quality and performance of the Products. UBIQUITI NETWORKS reserves the right to inspect all defective Products (which must be returned by Buyer to UBIQUITI NETWORKS factory freight prepaid). - Page 13 Compliance Returns In the unlikely event a defect occurs, please work through the dealer or distributor from which this product was purchased. Compliance This device complies with Part 15 of the FCC Rules. Operation is subject to the following two conditions: 1.
-
Page 14: Cutting Template
Cutting Template To mount the airCam Dome in a ceiling tile, you will need to cut a 73 mm diameter circle in the ceiling tile. You can use the template below as a guide for cutting the hole. -
Page 16: Ubiquiti Networks Support
Email: support@ubnt.com Phone (9 a.m. - 5 p.m. PST): 408-942-1153 Online Resources Wiki Page: www.ubnt.com/wiki Support Forum: www.ubnt.com/forum Downloads: www.ubnt.com/support/downloads w w w . u b n t . c o m © 2011 Ubiquiti Networks, Inc. All rights reserved.
Need help?
Do you have a question about the airCam Dome and is the answer not in the manual?
Questions and answers