
Related Manuals for Primus PW 5


Summary of Contents for Primus PW 5
- Page 1 PW 5, DAM 5 INSTALLATION AND MAINTENANCE MANUAL WASHING MACHINE, PUBLICATION DATE: 04/02 TUMBLE DRYER- 8065471 VENTED AND CONDENSED VERSION...
-
Page 2: Washing Machine
INSTALLATION AND MAINTENANCE WASHING MACHINE TUMBLE DRYER WASHING MACHINE 2-17 TUMBLE DRYER 18-36 SERVICE AND GUARANTEE INDEX... -
Page 3: Table Of Contents
CONTENTS – WASHING MACHINE SAFETY CHANGING SETTINGS 12-13 Transit screws Language General Locking the programme Child lock on Start/Stop button Wash temperature, C or F Door Changing preset wash temperature Overfill cut-out Child lock Packaging Transport/Winter storage MAINTENANCE 14-15 Scrapping Emptying/cleaning trap and drain pump Inspection holes under drum paddles PARTS OF THE WASHING MACHINE... -
Page 4: Safety
SAFETY GENERAL TRANSPORT/WINTER STORAGE • Read and keep this manual! If you intend to transport the machine or store • Any electrical work or plumbing must be car- it over winter in unheated premises, empty the ried out by qualified tradesmen. trap and the drain pump, see the chapter on •... -
Page 5: Parts Of The Washing Machine
PARTS OF THE WASHING MACHINE 1. DETERGENT DRAWER 2. POWER SWITCH 3. PROGRAMME PANEL 4. RATING PLATE 5. DOOR-DRAIN PUMP/EMERGENCY OPEN 6. DRAIN PUMP/EMERGENCY OPEN (BEHIND FLAP) 7. DOOR 1. DETERGENT COMPARTMENT – PRE-WASH 2. DETERGENT COMPARTMENT – MAIN WASH 3. -
Page 6: Technical Information
TECHNICAL INFORMATION TECHNICAL DATA Height: 850 mm. Width: 595 mm. Depth: 585 mm. Weight: 73 kg. Drum capacity: 50 l. Max wash load: 5.0 kg. Spin speed: 1200 rpm. Power rating: See rating plate. Element power: See rating plate. Water pressure: 0.1–1 MPa, 1–10 kp/cm2, 10–100 N/cm2. -
Page 7: Programme Cycles
PROGRAMME CYCLES PROGRAMME CYCLES Your machine is equiped with EURO-, MEDICAL-, MOP or US-programmes. All versions are not available in all countries. If you are unsure which programmes your machines has, compare the programmes below with the enclosed washing guide or contact your dealer. EURO PROGRAMMES P1 Heavy wash 90°C... - Page 8 EXPLANATIONS Rinse 1/1 (5,0 kg) 1/2 (2,5 kg) Short spin (3 min) 1/3 (1,7 kg) Long spin (6 min) PROGRAMMES P1 Heavy wash 90°C P2 Heavy wash 60°C P3 Normal wash 90°C P4 Normal wash 60°C P5 Normal wash 40°C P6 Synthetic wash 40°C P7 Wool/handwash 30°C (1) P8 Rinse...
-
Page 9: Mechanical Installation
MECHANICAL INSTALLATION 3. Finally, refit the rubber spacers to cover the TRANSIT SCREWS Before the machine can be used the three trans- transit holes. it screws must be removed as described below. Each transit screw has a washer and a rubber spacer. -
Page 10: Positioning The Washing Machine
The machine can be anchored to the floor, see POSITIONING THE WASHING MACHINE enclosed bag containing instructions and parts. The washing machine can be built-in or free- standing. It should be positioned so that there is an electrical socket within easy reach. ADJUSTING THE FEET Adjust the feet so that the machine is level and steady on the floor. -
Page 11: Water Intake - Mixed Or Cold Water
first to remove any dirt. Otherwise this could CONNECTING TO THE DRAIN clog the intake filter in the machine and block Machine with drain pump the water supply. The machine is supplied with a drain hose al- ready fitted and this should be connected to a laundry sink, or the like, at a height of 600–900 WATER INTAKE –... -
Page 12: Electrical Installation
ELECTRICAL INSTALLATION ELECTRICAL INSTALLATION CONNECTING TO A COIN MECHANISM The washing machine must be connected using Connection to a coin mechanism must be car- a permanently installed cable through an isola- ried out by a qualified electrician. ting switch by a qualified electrician. A special connecting cable is required to con- nect the machine to a coin mechanism. -
Page 13: Changing Settings
CHANGING SETTINGS LANGUAGE button for the fifth time you should hold in the You can change the language of the displayed programme button for the programme you want text. to lock for 5-10 seconds until the information The languages you can choose from are Dansk, in the display starts flashing. -
Page 14: Child Lock
- C, 30, 35, …, 85, 90, 95ºC. Press the button five times, then press Super quick wash (US) - Not possible to button five times. You have to comple- change. te these ten button presses within fifteen seconds. Delicate and Wool wash - C, 30, 35, 40ºC. Press the programme button, If you choose C, the wash temperature will select the programme you want to change the... -
Page 15: Maintenance
MAINTENANCE EMPTYING/CLEANING TRAP AND DRAIN PUMP INSPECTION HOLES UNDER DRUM PADDLES (only machines with drain pump) If you think that an item such as a nail, paper- The washing machine has a trap that is desig- clip, hair clip or the like has fallen through the ned to catch coins, hair clips, etc. -
Page 16: Inspection Holes Under Drum Paddles
Push the paddle cover away from you until it is CLEANING THE OUTSIDE OF THE MACHINE in its original position. Clean the outside and the programme panel using mild detergent. Do not use abrasives or CLEANING THE DETERGENT DRAWER solvents as they may damage the machine. Do Pull the drawer out as far as it will go. -
Page 17: Troubleshooting
TROUBLESHOOTING • Pull the handle to open the door. DOOR WILL NOT OPEN 1. Check that the power switch is on. 2. Has there been a power cut? Check the fuses in the fuse box. The door cannot be opened with the button if there is no power. -
Page 18: The Display Is Lighting When A
outlet. THE DISPLAY IS LIGHTING WHEN A PROGRAMME – that the drain pump is not blocked by a fo- IS SELECTED, BUT NO CHARACTERS OR DIGITS reign object. Clean the pump, see chapter on ARE SHOWN Maintenance. No characters or digits are shown on the dis- –... -
Page 19: Tumble Dryer
CONTENTS - TUMBLE DRYER SAFETY CHANGING SETTINGS General Language Using the dryer first time Locking the programme Child lock on Start/Stop buttons Child lock Thermal cut-out Float MAINTENANCE 32-34 Door Cleaning the outside of the machine Packaging Cleaning the fan Scrapping Cleaning the condenser Cleaning the lint filter... -
Page 20: Safety
SAFETY GENERAL DOOR • Read and keep this manual! The tumble dryer has a magnetic lock, which • Any electrical work must be carried out by a makes it easy to open the door from the outside qualified electrician. or inside. The door is fitted with a switch that automatically switches off the tumble dryer USING THE DRYER FOR THE FIRST TIME when the door is opened. -
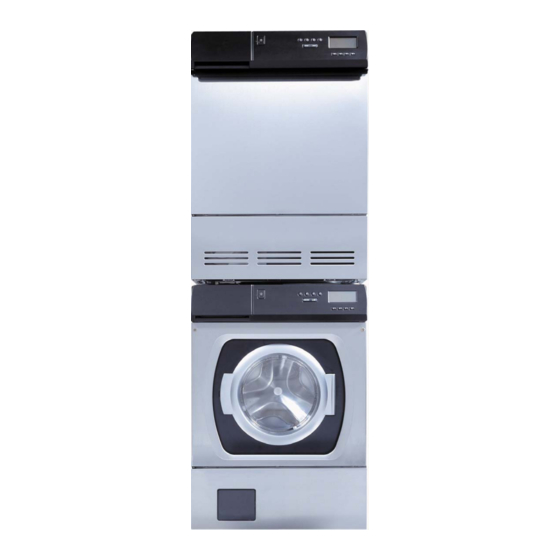
Page 21: Parts Of The Tumble Dryer
PARTS OF THE TUMBLE DRYER 1. LINT FILTER HOLDER 5. DOOR 2. RATING PLATE 6. FAN (BEHIND FRONT PANEL) 3. CONDENSATION WATER TANK – 7. CONDENSER – CONDENSER TUMBLE CONDENSER TUMBLE DRYERS ONLY DRYERS ONLY (BEHIND FRONT PANEL) 4. PANEL 8. -
Page 22: Technical Information
TECHNICAL INFORMATION TECHNICAL DATA Height: 850 mm. Width: 595 mm. Depth: 585 mm. Weight: 39 kg (vented) / 47 kg (condenser). Drum capacity: 111 l. Drying capacity: 5.0 kg. Speed: 52 rpm. Power rating: See rating plate. Composition of drum: Stainless steel. -
Page 23: Mechanical Installation
MECHANICAL INSTALLATION POSITIONING THE TUMBLE DRYER B. Built-in The tumble dryer can be installed free-stan- The tumble dryer can be built in under a work- ding, built-in or stacked on top of a washing top with a minimum height of 850 mm. The machine. -
Page 24: Adjusting The Feet
4. Position the plastic cups so that the arrowed Fit the stacking kit as follows: 1. Unscrew the two arrowed screws at the rear lugs are flush with the of the washing machine. front and side of the top, then press down onto the top. -
Page 25: Condensed Water
CONDENSED WATER VENTING (only applies to condenser tumble dryer) (only applies to venting tumble dryer) The machine is supplied with a 2.0 metre-long The exhaust air from the tumble dryer must be drain hose. Use this to remove the condensed led to a ventilation duct or a wall outlet using water. - Page 26 The hose must always run downwards or stay Connecting to vent duct The vent hose must follow the shortest, straigh- level with the tumble dryer. test path possible from the tumble dryer to the vent duct. Cut the vent hose to length if it is Accessories too long.
-
Page 27: Reversing The Door
3. Move the hinge pin to the other side of the REVERSING THE DOOR The dryer is supplied with the door hinged on bracket. When the door is hung on the right the left side. You can reverse the door so that side the hinge bracket must be the hinge is on the right side turned upside down. - Page 28 7. Lift out the door magnet (1) and plate (2). 11. Unscrew the arrowed screw. If the dryer is a condenser model you must also open the cover over the condenser. 12. Now fit the door to the right side of the machine.
- Page 29 13. Fit the hinge bracket, tightening the screws in the order shown. 14. Refit the screw you unscrewed in step 11. 15. Refit the lower front panel. TUMBLE DRYER MECHANICAL INSTALLATION...
- Page 30 This page has been left blank for technical printing reasons.
-
Page 31: Electrical Installation
ELECTRICAL INSTALLATION ELECTRICAL INSTALLATION Connecting the tumble dryer and the washing The washing machine must be connected using machine together a permanently installed cable through an isola- Wiring the two machines together as described ting switch by a qualified electrician. below must be carried out by a qualified elec- trician. -
Page 32: Changing Settings
CHANGING SETTINGS LANGUAGE Within three seconds of pressing the You can change the language of the displayed button for the fifth time you should hold in the text. programme button for the programme you want The languages you can choose from are Dansk, to lock for 5-10 seconds until the information Deutsch, English, Espanol, Français, Italiano, in the display starts flashing. -
Page 33: Maintenance
MAINTENANCE CLEANING THE OUTSIDE OF THE MACHINE 4. Hold the fan and unscrew the nut. Clean the outside and the programme panel using mild detergent. Do not use abrasives or solvents as they may damage the machine. Do not spray the machine with water. NOTE! Do not let dust collect around the machine. -
Page 34: Cleaning The Condenser
5. Refit the condenser. Make sure you put it in CLEANING THE CONDENSER The condenser should be cleaned at least six the right way times a year, or more often if the user has pets. up. The top of the con- 1. -
Page 35: Cleaning The Lint Filter
IN AREAS WITH HARD WATER CLEANING THE LINT FILTER HOLDER If the machine is installed in an area that has Dust and dirt can gather in the bottom of the hard water this can produce a limescale deposit lint filter holder. Take out the lint filter and use on the lint filter. -
Page 36: Troubleshooting
TROUBLESHOOTING MACHINE WILL NOT START ERROR MESSAGES Check The character display shows whether a fault has • that the door is closed properly. occurred during the programme. To cancel an • if the child lock is activated. To start the tum- error message after the fault has been corrected ble dryer when the child lock is activated, hold as described below, switch off the machine or... -
Page 37: The Display Is Lighting When A Program
THE DISPLAY IS LIGHTING WHEN A PROGRAMME IS SELECTED, BUT NO CHARACTERS OR DIGITS ARE SHOWN No characters or digits are shown on the dis- play when a locked programme is selected. To unlock a programme, see Changing set- tings. WRONG LANGUAGE DISPLAYED If the display language has changed for some reason you can go back to the original langua-... - Page 38 This page has been left blank for technical printing reasons.
- Page 39 This page has been left blank for technical printing reasons.
-
Page 40: Service And Guarantee
SERVICE AND GUARANTEE SERVICE AND GUARANTEE Before calling for service, check to see whether the faults is due to something that you can put right yourself. See chapter, Trouble shooting or Maintenance. For more details contact your local dealer. SERVICE AND GUARANTEE... -
Page 41: Index
INDEX WASHING MACHINE Page Page Page Hard water Rating plate Child lock 3,13 Hardness of water Cleaning Safety precautions Coin mechanism Imbalance sensor Scrapping Connecting to drain Inspection holes Service Connecting to water Installation, electrical Spinning time,change Installation, mechanical Detergent drawer 4,15 Technical data Door...
Need help?
Do you have a question about the PW 5 and is the answer not in the manual?
Questions and answers