
Related Manuals for Spypoint SMART-PRO


Summary of Contents for Spypoint SMART-PRO
- Page 1 USER MANUAL INTELLIGENT TRAIL CAMERA Model: SMART-PRO v1.0 support.spypoint.com 1-888-779-7646 tech@spypoint.com ...
- Page 2 This manual will guide you through all the features of your device GG Telecom’s mission is to offer products that are easy so that you will get optimal use out of your SPYPOINT product. to use, innovative, affordable and of exceptional quality.
-
Page 3: Table Of Contents
Mounting bracket ................. 8 Settings ..................9 I.T.T. Presets ................11 Custom settings ................12 Sound recording ................13 File transfer to a computer ............14 Troubleshooting ................15 Error messages................16 Available accessories ..............17 Specifications SMART-PRO ...................19 Regulation ...................20 Limited warranty .................21 Repair service ................21... -
Page 4: Package Contents
Altoparlante incorporato lo. AA alcaline. Si consiglia, inoltre, di fare at- tenzione durante l’inserimento delle batterie v1.0 *Per il modello SMART-PRO non è possibile l'impiego di una scheda SIM. En la caja Para empezar INTRODUZCA UNA TARJETA DE MEMORIA Nota: La tarjeta de memoria y las pilas se venden por Inserte una tarjeta de memoria SD/SDHC SAQUE LA CÁMARA DEL SOPORTE... -
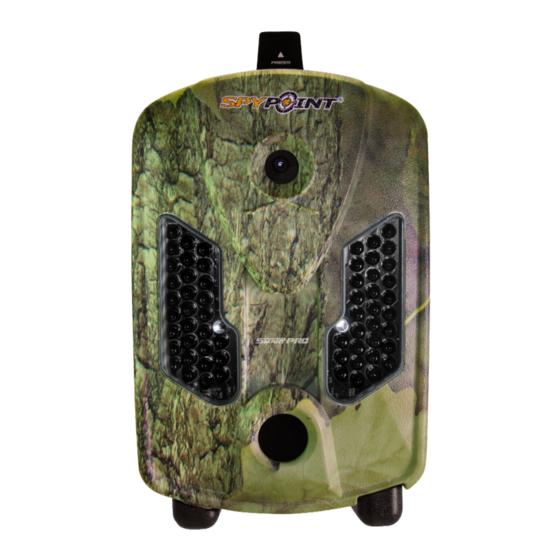
Page 5: Components
12V/Solar panel jack Invisibles LEDs BUSY LED USB port Slot for installation strap Test light Viewing screen SD card slot Tripod mount Light sensor Navigation buttons Built-in speaker Battery case Microphone Fresnel lens Power button No SIM card slot for SMART-PRO model... - Page 6 Components Photo lens Image sensor and infrared filter. Microphone Records sound in video mode. Invisible LEDs Night lighting to obtain black and white photos and videos. Power button Press the button to turn on or off the camera. Test light Flashes in TEST mode when there is detec- 1) 12V power jack 1) This camera can be powered from an...
-
Page 7: Power
12V cable. of the camera. Then, the camera can be reinstalled in the mounting bracket. The battery compartment adapts to SPYPOINT LIT-09 lithium battery pack or 6 AA alkaline batteries. Therefore, it is important to be careful SOLAR PANEL while inserting AA batteries. -
Page 8: Memory Card
Here is a table of the approximate number of photos and length of videos that can be recorded with different memory card capacities. Many photo and video resolutions are noted, see those corresponding to the camera. REMOVING THE MEMORY CARD Note: This SPYPOINT camera equiped with continuous file Lightly press the memory card into the camera once to pop it out of the slot recording. -
Page 9: Settings
Settings Use the arrows to navigate in the interface and modify the selection, the OK Press OK to view the different options available: button to select and the button to return to the previous menu. Play: Allows the user to play or pause the video on the screen ... - Page 10 Settings SETTINGS LIT-09 charger Sets the advanced options of the camera. Allows the user to change the power source (AA batteries, Lithium battery pack, External 12V or Solar panel) see p.7 for more details. Device name Info on photos: Allows naming the camera with the electronic keyboard to identify it clearly.
-
Page 11: I.t.t. Presets
I.T.T. presets Two I.T.T. Presets are available; Trail and Feeder. Each have an ideal confi- I.T.T. TECHNOLOGY guration for its respective usage. After selecting a preset, no configuration The two I.T.T. presets (Trail and Feeder) are configured by default with the is required. -
Page 12: Custom Settings
Custom Settings PRO SETTINGS VIDEO SETTINGS Sets the options of the VIDEO mode. The Pro settings allows to personalize the configuration. Choose Delay: the mode (PHOTO, TIME LAPSE, or VIDEO) and set their respective options. (10s/1m/3m/5m/10m/15m/30m) When the PHOTO or VIDEO mode is selected, the test light in front of the Allows the user to choose the time interval between each detection before camera will flash for 60 seconds to allow the user to leave the area without the camera records the next video. -
Page 13: Sound Recording
Sound recording The SPYPOINT camera offers the possibility to record sound in VIDEO mode. When the VIDEO mode is selected, the camera automatically records the sound. Under the camera, there is a rubber cap with the inscription MIC. If the user does not want to record the sound, the rubber cap needs to stay in place. -
Page 14: File Transfer To A Computer
File transfer to a computer To transfer photos/videos to a computer: 1. Turn on the camera. Note that the camera has to be turned on in order for the computer to recognize the SD card. 2. Connect the USB cable from the camera to a computer. It is recommended to use the supplied cable. -
Page 15: Troubleshooting
Troubleshooting Problem Possible solutions Impossible to turn • Verify if there are batteries in the camera. No person/animal • Sunrise or sunset can trigger the sensor. Camera on the camera • Verify if the batteries are correctly installed. on photos must be re-orientated. -
Page 16: Error Messages
Error messages Error message Possible solutions Insert memory The use of a memory card is required to record photos card and videos. The camera cannot access the memory card. • Turn off the camera and turn it on again Card error •... -
Page 17: Available Accessories
Available accessories obtain more information available accessories, www.spypoint.com. Here are the main accessories available: Rechargeable 12V battery, Solar panel POWER charger & housing kit #SP-12V, Solar panel with #KIT-12V, 12-volt 7.0Ah rechar- adjustable steel mounting kit. geable battery with water... - Page 18 #TP-CAM, SPYPOINT Lightweight tripod, in black aluminum, with a unique anchor system and a remo- vable quick release plate. Max. height: 4.9 ft (1.5 m), min. height: 1.7 ft (0.5 m), max. load weight: 11 lbs (5 kg). Fits most SPYPOINT products.
-
Page 19: Specifications
Specifications (SMART-PRO) Photo recording Solar panel Solar panel (SP-12V) combined with rechargeable battery pack (LIT-09/ Photo resolution 12 MP *see I.T.T. presets section LIT-C-8) File format Detection system Time lapse mode Predefined intervals from 30 s to 1 h Motion sensor... -
Page 20: Regulation
Hereby, GG Telecom declares that this camera is in compliance with the essential requirements and other relevant provisions of Directive 2004/108/EC. The user can obtain a copy of the Declaration of Conformity by e-mail at info@spypoint.com. -
Page 21: Limited Warranty
Limited warranty and repair This SPYPOINT product designed by GG Telecom, is covered by a one (1) INSTRUCTIONS FOR REPAIR SERVICE year warranty on material and workmanship starting from the original date GG Telecom will repair the product without charge or replace it at its discre- of purchase.
Need help?
Do you have a question about the SMART-PRO and is the answer not in the manual?
Questions and answers