Table of Contents
Advertisement
Quick Links
1x mSATA + 3x SATA PCIe SATA III 6Gbps
RAID Controller Card
PEXMSATA343
DE: Bedienungsanleitung - de.startech.com
FR: Guide de l'utilisateur - fr.startech.com
ES: Guía del usuario - es.startech.com
IT: Guida per l'uso - it.startech.com
NL: Gebruiksaanwijzing - nl.startech.com
PT: Guia do usuário - pt.startech.com
For the most up-to-date information, please visit: www.startech.com
Manual Revision: 08/13/2014
*actual product may vary from photos
Advertisement
Table of Contents

Related Manuals for StarTech.com PEXMSATA343


Summary of Contents for StarTech.com PEXMSATA343
- Page 1 DE: Bedienungsanleitung - de.startech.com FR: Guide de l'utilisateur - fr.startech.com ES: Guía del usuario - es.startech.com IT: Guida per l'uso - it.startech.com NL: Gebruiksaanwijzing - nl.startech.com PT: Guia do usuário - pt.startech.com For the most up-to-date information, please visit: www.startech.com Manual Revision: 08/13/2014...
- Page 2 StarTech.com. Where they occur these references are for illustrative purposes only and do not represent an endorsement of a product or service by StarTech.com, or an endorsement of the product(s) to which this manual applies by the third-party company in question. Regardless of any direct acknowledgement elsewhere in the body of this document, StarTech.com hereby...
-
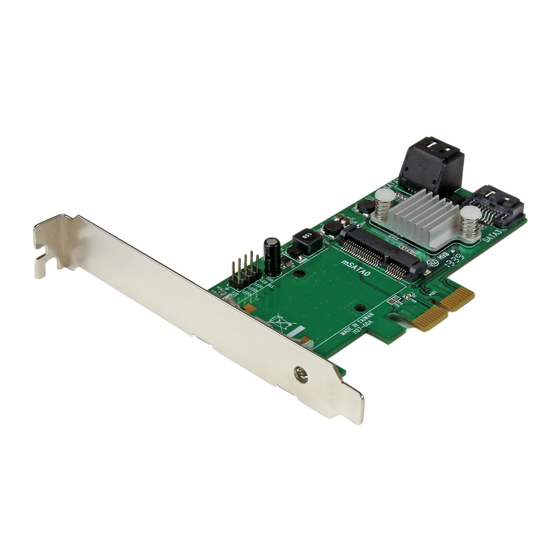
Page 3: Product Overview
Product Overview 3x SATA III ports 1x mSATA slot LED and PIN Header LED LED / Header Status On: Drive is linked mSATA - Green LED Blinking: Accessing the drive On: Drive is linked SATA LED 0-3 - Pin Headers Blinking: Accessing the drive On: When any one of the 4 drives is linked LED All - Pin Header... -
Page 4: Msata Ssd Installation
WARNING! PCI Express cards, like all computer equipment, can be severely damaged by static electricity. Be sure that you are properly grounded before opening your computer case or touching your PCI Express card. StarTech.com recommends that you wear an anti-static strap when installing any computer component. If an anti-static strap is unavailable, discharge yourself of any static electricity build-up by touching a large grounded metal surface (such as the computer case) for several seconds. -
Page 5: Driver Installation
4. Gently insert the card into the open PCI Express slot and fasten the bracket to the rear of the case. NOTE: If installing the card into a small form factor/low profile system, replacing the pre-installed full profile bracket with the included low profile installation bracket may be necessary. -
Page 6: Management Utility Installation
4. If AutoPlay is disabled, browse to your CD/DVD drive and open the “drvSetup_ V1057.exe” application located in the “SATA6G_M9128” folder to start the installation process. 5. Follow any on-screen instructions to complete the software installation. Note: You may be prompted to restart your system. Management Utility Installation RAID and/or HyperDuo configuration can be accomplished either through the integrated card-BIOS utility, or through the Marvell Storage Utility (MSU). - Page 7 3. Before opening the MSU, verify that Active Scripting or JavaScript is enabled in the browser. a. Internet Explorer i. From the menu bar, select Tools > Internet Options. ii. Select the “Security” tab, then “Local Intranet”, then “Custom level”. iii.
-
Page 8: Verifying Installation
Verifying Installation Windows 1. From the main desktop or start menu, right-click on “Computer” (“My Computer” in XP), then select “Manage. ” 2. In the new Computer Management window, select Device Manager from the left window panel. Instruction Manual... -
Page 9: Hard Drive Initialization
3. Under the “Storage Controllers” category (“SCSI and RAID Controllers” in XP) should be a “Marvell 92xx” device. Right-click on the device and select “Properties” to make sure it is installed and working correctly. Note: After a successful installation, some users may notice a yellow icon next to “Marvell Console ATA Device”... -
Page 10: Port Multiplier
5. Follow the on-screen prompts to initialize the drive in the format of your choice. Port Multiplier Port Multiplier (PM) allows for multiple SATA drives (up to 4) to be connected to a single SATA host port. PM allows for easy, cost-effective storage scalability both inside and outside the PC or server. -
Page 11: Operation
Operation RAID Configuration Card BIOS Method WARNING! Creating a RAID virtual disk destroys all data on the physical disks included in the virtual disk set. Make sure to back up all data before continuing. 1. When prompted on startup, press Ctrl+M to enter the card BIOS utility Press <Ctrl>+<M>... -
Page 12: Administration Console Method
1. The “Create Virtual Disk” configuration options appear in the “Information” pane (right-side), here you are able to select the RAID level and other configuration options: a. Select 2 HDDs for RAID 0 or RAID 1 b. Select 3 HDDs for RAID 0 c. -
Page 13: Hyperduo Configuration
3. From the “Create new VD” screen that appears, click the “Select RAID Level” drop- down to choose the appropriate RAID type 4. This will enable you to place a checkbox beside the disks that you would like to use as part of the RAID set. -
Page 14: Card Bios Method
WARNING! Capacity mode is a data-destructive process. Please back up all data before using capacity mode. Card BIOS Method 1. When prompted on startup, press Ctrl+M to enter the card BIOS utility Press <Ctrl>+<M> to enter BIOS Setup or <Space> to continue_ 2. - Page 15 7. Highlight “Keep original data” and press Enter to select. Select Yes or No and press Enter. WARNING! Selecting “No” will destroy all data on the disks included in the virtual disk set. Make sure to back up all data before continuing. The “Keep original data” option is disabled when you choose Capacity mode, as it is inherently data- destructive.
-
Page 16: Hyperduo Management
The newly created HyperDuo drive will then appear in the left pane and begin initializing. This can take up to 30 minutes to complete, and system performance may be slow during this period. HyperDuo Management 1. From the left pane of the MSU, select “HyperDuo Service” 2. - Page 17 3. Select Submit to apply your changes, then select “OK” on the pop-up that follows. 4. If the folder you would like to optimize is not available, select “Advanced” from the “HyperDuo Service” pane. 5. The “Customize Wizard” will pop-up and allow you to select the desired folders. Instruction Manual...
-
Page 18: Specifications
Specifications PCI Express 2.0 Host Interface SATA Revision 3.0 Card Profile Standard Profile (LP bracket incl.) Chipset ID Marvell 9230 3x 7-pin SATA plug Internal Connectors 1x 52 pin mSATA slot Maximum Transfer Rate SATA: 6Gbps RAID Support RAID 0, 1, 1+0 Port Multiplier Operating Temperature 5°C to 50°C (41°F to 122°F) -
Page 19: Technical Support
Limitation of Liability In no event shall the liability of StarTech.com Ltd. and StarTech.com USA LLP (or their officers, directors, employees or agents) for any damages (whether direct or indirect, special, punitive, incidental, consequential, or otherwise), loss of profits, loss of business, or any pecuniary loss, arising out of or related to the use of the product exceed the actual price paid for the product. - Page 20 StarTech.com is an ISO 9001 Registered manufacturer of connectivity and technology parts. StarTech.com was founded in 1985 and has operations in the United States, Canada, the United Kingdom and Taiwan servicing a worldwide market.
Need help?
Do you have a question about the PEXMSATA343 and is the answer not in the manual?
Questions and answers