Table of Contents
Advertisement
Advertisement
Table of Contents

Related Manuals for Intermatic PE653RC Multi Wave


Summary of Contents for Intermatic PE653RC Multi Wave
-
Page 2: Important Safety Instructions
WARNING: Risk of electric shock – Install the control center at least five (5) feet (152.4cm) from the inside wall of the pool and/or hot tub using non-metallic plumbing. Canadian installations must be at least three (3) meters from the water. Copyright © 2010 Intermatic, Inc. - Page 3 Safety • Children should not use spas or hot tubs without adult supervision. • Do not use spas or hot tubs unless all suction guards are installed to prevent body and hair entrapment. • People using medications and/or having an adverse medical history should consult a physician before using a spa or hot tub.
-
Page 4: Table Of Contents
240V 2-speed pump + 240V booster pump + 240V blower + heater ........32 240V 2-speed pump + 240V booster pump + 120V light + heater .........33 240V 2-speed pump + 240V booster pump + other 120 VAC equipment + heater ....34 Copyright © 2010 Intermatic, Inc. - Page 5 Contents Low-Voltage Wiring ........................35 Water Temperature Sensor .....................35 Freeze/Air Temperature Sensor ....................35 Communications to a Variable-Speed Pump .................36 Motorized Valve Actuator Connection and Synchronizing .............36 Fireman’s Switch Connection .....................37 Connection for Jandy Heaters ....................37 Connection for Raypak Heaters .....................38 Connection for Hayward Heaters ..................38 Connection for Pentair Heater ....................39 Connection for Sta-Rite / Pentair Heater with DDTC ..............40 Section 4:...
- Page 6 Linking the PE953 Hand-Held Controller with the PE650 Receiving Device ......70 Section 9: Checking Out and Verifying the System ..............71 Section 10: Troubleshooting ......................75 Section 11: Appendix ........................80 Glossary of Z-Wave Terminology ....................80 FCC Statement ...........................81 Section 12: Warranty .........................82 Copyright © 2010 Intermatic, Inc.
- Page 7 Notes ________________________________________________________________________________________________ ________________________________________________________________________________________________ ________________________________________________________________________________________________ ________________________________________________________________________________________________ ________________________________________________________________________________________________ ________________________________________________________________________________________________ ________________________________________________________________________________________________ ________________________________________________________________________________________________ ________________________________________________________________________________________________ ________________________________________________________________________________________________ ________________________________________________________________________________________________ ________________________________________________________________________________________________ ________________________________________________________________________________________________ ________________________________________________________________________________________________ ________________________________________________________________________________________________ ________________________________________________________________________________________________ ________________________________________________________________________________________________ ________________________________________________________________________________________________ ________________________________________________________________________________________________ ________________________________________________________________________________________________ ________________________________________________________________________________________________ ________________________________________________________________________________________________ ________________________________________________________________________________________________ ________________________________________________________________________________________________ ________________________________________________________________________________________________ ________________________________________________________________________________________________ ________________________________________________________________________________________________ ________________________________________________________________________________________________ ________________________________________________________________________________________________ ________________________________________________________________________________________________ ________________________________________________________________________________________________ Providing a brighter solution.™...
-
Page 8: System Overview
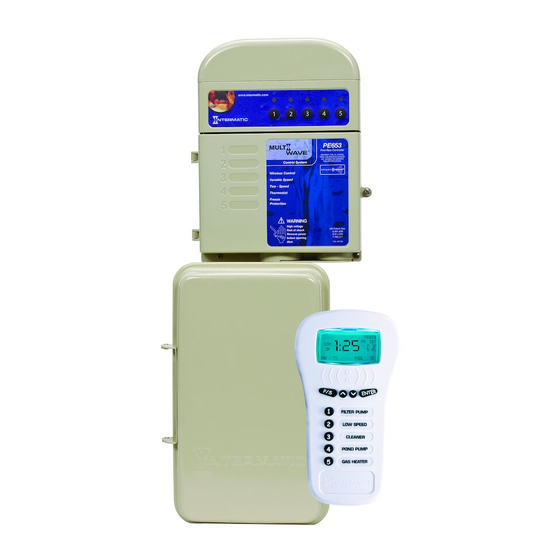
Multi-Wave PE653-PE953 Installation Guide Section 1: System Overview The Intermatic Multi-Wave Pool/Spa PE653RC Wireless Control System brings wireless control to a new level of simplicity and affordability. The following features make the system distinctive: • Easy to Use — with simple, push button controls and a clear, easy-to-read display panel •... -
Page 9: Additional Detail On Key Components
Water Temperature Sensor (PA122) The Intermatic Water Sensor (PA122) monitors both pool and spa water temperature, depending on the position of the diverter valves. Installation is necessary for the thermostatic control to work. The sensor can be ordered separately. -
Page 10: 24-Volt Valve/Pump Switch (P4243Me)
Valve Actuator Supply: 24VAC 40VA • Agency approval – CSA/C-US Optional — Freeze (Air Temperature) Sensor (178PA28A) Add the Intermatic Freeze or Air Temperature Sensor (178PA28A) to installations where below-freezing outdoor temperatures are a concern. Copyright © 2010 Intermatic, Inc. -
Page 11: Plumbing Examples
Two: Plumbing and Wiring Examples Section 2: Plumbing Examples The following diagrams show several plumbing and wiring examples of installations for pool and spa that share a single filter pump, filter, and heater. If you are installing a pool only or spa only, these diagrams will not apply. -
Page 12: For Non-Booster Pump Pool Cleaner Installations
Multi-Wave PE653-PE953 Installation Guide For Non-Booster Pump Pool Pool Cleaner Installations Return Return Intake Intake Energy Filter Check Valve Make-up Filter Filter Pump Heater Copyright © 2010 Intermatic, Inc. -
Page 13: Installing And Wiring The Pe653 Receiving Device
Three: PE653 Receiving Device Installation Section 3: Installing and Wiring the PE653 Receiving Device To avoid fire, shock, or death, turn off power at circuit breaker and test that power is off before wiring. • Read instructions completely before installation and retain for future reference. •... -
Page 14: Wiring Instructions
CAUTION: The PE653 is a control device and NOT a safety disconnect. A proper sized fused disconnect or breaker of no more than 125 Amp capacity must be provided in the power supply circuit. Proper gauge wire should be based on local code requirements of amperage and wire length. Copyright © 2010 Intermatic, Inc. -
Page 15: Upper Terminal Connections
Three: PE653 Receiving Device Installation Upper Terminal Connections Water Sensor (PA122) Solar Sensor (PA122) Air Sensor (178PA28A) Remote Antenna Connector Local Antenna Connector Serial Connection (RS485) NOTE: Observe polarity when connecting pump manufacturer’s cable to the Serial connection. Figure 3-3 PE653 Master Control Center Upper Terminal identification Installation Instructions To avoid fire, shock, or death, turn off power at circuit breaker and test that power is off before wiring. -
Page 16: List Of Wiring Diagrams
240V 2-Speed pump + 240V Booster pump + 240V Blower + Heater ......... Figure 3-19 240V 2-Speed pump + 240V Booster pump + 120V Light + Heater ..........Figure 3-20 240V 2-Speed pump + 240V Booster pump + other 120 VAC equipment + Heater ..... Figure 3-21 Copyright © 2010 Intermatic, Inc. -
Page 17: Variable-Speed Pumps
Three: PE653 Receiving Device Installation Variable-Speed Pumps 240V Variable-Speed Pump Figure 3-4 Providing a brighter solution.™... -
Page 18: 1-Speed Pumps
Multi-Wave PE653-PE953 Installation Guide 1-Speed Pumps 120V 1-speed pump Figure 3-5 Copyright © 2010 Intermatic, Inc. -
Page 19: 120V 1-Speed Pump + Any Four 120 Vac Auxiliary Equipment
Three: PE653 Receiving Device Installation 120V 1-speed pump + any four 120 VAC auxiliary equipment Figure 3-6 Providing a brighter solution.™... -
Page 20: 120V 1-Speed Pump + 120 Vac Blower Or Lights + 120V Booster Pump + 120V Actuator + Heater
Multi-Wave PE653-PE953 Installation Guide 120V 1-speed pump + 120 VAC blower or lights + 120V booster pump + 120V actuator + heater Figure 3-7 Copyright © 2010 Intermatic, Inc. -
Page 21: 120V 1-Speed Pump + 120V Blower + 120V Lights + 120V Actuator + Heater
Three: PE653 Receiving Device Installation 120V 1-speed pump + 120V blower + 120V lights + 120V actuator + heater Figure 3-8 Providing a brighter solution.™... -
Page 22: 240V Pumps
Multi-Wave PE653-PE953 Installation Guide 240V Pumps 240V 1-speed pump Figure 3-9 Copyright © 2010 Intermatic, Inc. -
Page 23: 240V 1-Speed Pump + Any Four 240 Vac Auxiliary Equipment
Three: PE653 Receiving Device Installation 240V 1-speed pump + any four 240 VAC auxiliary equipment Figure 3-10 Providing a brighter solution.™... -
Page 24: 240V 1-Speed Pump + 240V Blower + 240V Booster Pump + 240V Actuator + Heater
Multi-Wave PE653-PE953 Installation Guide 240V 1-speed pump + 240V blower + 240V booster pump + 240V actuator + heater Figure 3-11 Copyright © 2010 Intermatic, Inc. -
Page 25: 240V 1-Speed Pump + 120V Lights + 120V Blower + 240V Actuator + Heater
Three: PE653 Receiving Device Installation 240V 1-speed pump + 120V lights + 120V blower + 240V actuator + heater Figure 3-12 Providing a brighter solution.™... -
Page 26: 240V 2-Speed Pump
Multi-Wave PE653-PE953 Installation Guide 240V 2-Speed Pump Figure 3-13 Copyright © 2010 Intermatic, Inc. -
Page 27: 240V 2-Speed Pump + Any Three 240Vac Auxiliary Equipment
Three: PE653 Receiving Device Installation 240V 2-speed pump + any three 240VAC auxiliary equipment Figure 3-14 Providing a brighter solution.™... -
Page 28: 240V 2-Speed Pump + Any 3 120 Vac Auxiliary Equipment
Multi-Wave PE653-PE953 Installation Guide 240V 2-Speed pump + any 3 120 VAC auxiliary equipment Figure 3-15 Copyright © 2010 Intermatic, Inc. -
Page 29: 240V 2-Speed Pump + 240V Booster Pump + 240V Actuator + Heater
Three: PE653 Receiving Device Installation 240V 2-Speed pump + 240V Booster Pump + 240V Actuator + Heater Figure 3-16 Providing a brighter solution.™... -
Page 30: 240V 2-Speed Pump + 120V Lights + 240V Blower + Heater
Multi-Wave PE653-PE953 Installation Guide 240V 2-speed pump + 120V lights + 240V blower + heater Figure 3-17 Copyright © 2010 Intermatic, Inc. -
Page 31: 240V 2-Speed Pump + 240V Blower + 240V Actuator + Heater
Three: PE653 Receiving Device Installation 240V 2-speed pump + 240V blower + 240V actuator + heater Figure 3-18 Providing a brighter solution.™... -
Page 32: 240V 2-Speed Pump + 240V Booster Pump + 240V Blower + Heater
Multi-Wave PE653-PE953 Installation Guide 240V 2-speed pump + 240V booster pump + 240V blower + heater Figure 3-19 Copyright © 2010 Intermatic, Inc. -
Page 33: 240V 2-Speed Pump + 240V Booster Pump + 120V Light + Heater
Three: PE653 Receiving Device Installation 240V 2-speed pump + 240V booster pump + 120V light + heater Figure 3-20 Providing a brighter solution.™... -
Page 34: 240V 2-Speed Pump + 240V Booster Pump + Other 120 Vac Equipment + Heater
Multi-Wave PE653-PE953 Installation Guide 240V 2-speed pump + 240V booster pump + other 120 VAC equipment + heater Figure 3-21 Copyright © 2010 Intermatic, Inc. -
Page 35: Low-Voltage Wiring
It must be installed for the thermostat control to work. Power must be disconnected when connecting the temp sensor. Only an Intermatic Sensor will work with this controller. Follow these directions to install and mount the water temperature sensor. -
Page 36: Communications To A Variable-Speed Pump
PE653RC system. The P4243ME is prompted to position the 24 volt motorized actuators when the P /S (Pool / Spa) button is pushed on the PE953 Hand Held Transmitter. Figure 3-25 Copyright © 2010 Intermatic, Inc. -
Page 37: Fireman's Switch Connection
Verify that the Actuators are correctly synchronized with your installation. Fireman’s Switch Connection The Intermatic Multi-Wave Control System is capable of controlling most heaters or heat pumps in the market today. Circuit number 5 in the PE653 is configured to control the heater using the 24 VAC thermostatic circuitry. -
Page 38: Connection For Raypak Heaters
8 and 9 to the two (2) red wires of the heater (see Figure 3-29). Do not disconnect high limit or pressure switches. Set the thermostat selector switch to ON, HIGH, or SPA. Set the heater thermostat(s) to maximum. Figure 3-29 — Wiring with PE653 Receiving Device Copyright © 2010 Intermatic, Inc. -
Page 39: Connection For Pentair Heater
Do not disconnect high limit or pressure switches. Turn the heater toggle switch on, and the heater thermostat(s) to max. When connecting an Intermatic PE653 to a Pentair Figure 3-31 — Heater, Pentair requires that you install the low Pentair Heater wiring connected to PE653 voltage thermostat wires in conduit separate from ANY line voltage wires. -
Page 40: Connection For Sta-Rite / Pentair Heater With Ddtc
With the “POWER” and “PRESSURE” light’s lit on the front panel, depress the remote button on the front display panel of the DDTC, the “REMOTE” light will come on and the remote system now has control. Figure 3-32 — DDTC Control Board Copyright © 2010 Intermatic, Inc. -
Page 41: Programming The Pe953 Hand-Held Controller
NOTE: If the word FAILURE instead of SUCCESSFUL appears at the bottom of the screen during any of the following steps, repeat the programming procedure. If the delete still fails, try replacing the batteries in the Hand-Held. If the problem persists, contact Intermatic Customer Service. - Page 42 Press and release the <2> function button to select RESET DEVICE. The screen displays instructions. Using a pen or pencil, press the INCLUDE button — to the right of the red light — as shown. Copyright © 2010 Intermatic, Inc.
-
Page 43: Linking The Hand-Held Controller To The Pe653 Receiving Device
NOTE: If the word FAILURE appears at the bottom of the screen during any of the following steps instead of SUCCESSFUL, repeat the programming procedure, or try replacing the batteries in the Hand-Held Controller. If the problem persists, contact Intermatic Customer Service. -
Page 44: Configuring For A 1-Speed Or 2-Speed Pump
You are in programming mode when the LEARN MODE screen is displayed, as shown at the right. Press the DOWN arrow as necessary to view the PE653 OPTION screen, as shown. Copyright © 2010 Intermatic, Inc. -
Page 45: Configuring For A Booster (Cleaner) Pump
Four: Programming the PE953 Hand-Held Controller Press and release the <2> function button to select CALIBRATE TEMPS. The screen refreshes, as shown. Using POOL as an example, press the <1> function button to calibrate the POOL temperature setting. The screen displays only the POOL setting, as shown. -
Page 46: Configuring The Fireman Switch Time Interval
(up to 15 minutes max), then press the <ENTER> button. The screen displays the word SUCCESSFUL, then returns to the PE653 OPTION screen. <ENTER> button again to return to the TIME OF DAY screen. Press the Copyright © 2010 Intermatic, Inc. -
Page 47: Setting The Time Of Day
Four: Programming the PE953 Hand-Held Controller Setting the Time of Day This procedure sets the clock displayed on the Hand-Held’s screen. You can set the time from either the PE653 or VARSPD INT variable pump screens (as shown). Press and hold the <P/S>... -
Page 48: Configuring The Freeze Temperature (Optional)
<ENTER> button to cancel the reset. Configuring the Freeze Temperature (optional) If the system has an optional Intermatic Freeze Sensor (178PA28A), you can set the temperature where the heater turns on to protect the pool. If necessary, press and release any button on the Hand-Held Controller to wake it from sleep. -
Page 49: Configuring For A Variable Speed Pump (Optional)
Four: Programming the PE953 Hand-Held Controller Configuring for a Variable Speed Pump (optional) If a variable-speed pump has been installed for the filter and cleaner pump functions, the Hand-Held Controller can be toggled between the PE653 screen and this variable speed control screen (VARSPD INT) by pressing and releasing the <ENTER>... -
Page 50: Testing Z-Wave Reception
CAT 5 ethernet cable suitable for outdoor use and/or burying in the ground. Attach the mounting plate — on top of its waterproofing gasket — to the wall or post where you plan to relocate the antenna. Copyright © 2010 Intermatic, Inc. -
Page 51: Labeling For The Pe653 Screen
Receiving Device, using the original screws. Labeling the Hand-Held Controller Intermatic provides a sheet of peel-and-stick labels to use in identifying the five buttons on the Hand-Held Controller. When installation is complete and the system has been programmed, apply the appropriate stickers to guide the owner in using the system. For additional stickers, contact Intermatic Inc., at 815-675-7000. -
Page 52: Everyday Use Of The Hand-Held Controller
<ENTER> button to save your choice. The next time you wake the Hand-Held Controller from sleep, it will awaken to the screen you have selected. Press the <ENTER> button as necessary to toggle to other main screens. Copyright © 2010 Intermatic, Inc. -
Page 53: Controlling The Pe653 Receiving Device
Five: Everyday Use of the PE953 Hand-Held Controller Controlling the PE653 Receiving Device To control settings configured with the PE653 Receiving Device Press and release any button on the Hand-Held Controller to wake it from sleep. (The unit goes to sleep to conserve battery life when it has been idle for 60 seconds.) Press the <ENTER>... -
Page 54: Setting Pool And Spa Temperatures
Use the UP or DOWN arrow buttons to scroll through the list of available characters to use in the Scene name. The valid character set for names is: A-Z, 1-9, and SPACE. Copyright © 2010 Intermatic, Inc. -
Page 55: Changing Pump Speeds
Five: Everyday Use of the PE953 Hand-Held Controller When you have selected the right letter or number, press the <P/S> button to move right to the next character. Repeat Steps 6 and 7 until you have completed the renaming. Press the <ENTER>... -
Page 56: Controlling Pe650 Functions
Place three new batteries in the unit, making sure to observe “+” and “–” polarity. Be sure to re-install the gasket correctly to maintain the water- tight seal. Copyright © 2010 Intermatic, Inc. -
Page 57: Manually Turning Equipment On And Off
Five: Everyday Use of the PE953 Hand-Held Controller Manually Turning Equipment On and Off At the Receiving Device For service purposes, the five circuits and / or the pool/spa actuators can be operated manually at the PE653 Receiving Device. Simply press any of the circuit buttons on the PE653 Receiving Device to toggle between ON and OFF. -
Page 58: Advanced Features
SECONDARY controllers cannot add or remove devices from the network in the Intermatic Multi-Wave system — they can only control devices on the network. You can tell the status of a Hand-Held from the VER (version) code at the top right corner of the display on the programming screens: the letter “P”... - Page 59 Six: Advanced Features On the Primary Hand-Held used to set up and configure the network, press and release the <3> button to select SEND NET AND CONFG. On the new Hand-Held you are adding to the network, follow Steps 1-3, then press and release the <4>...
-
Page 60: Changing A Secondary Remote Control Into A Primary Control
After a few seconds the controller will return to the Main screen. Various screens on the two remotes displays only the menu options capable of their primary or secondary status. Press the <ENTER> button on both controls as necessary to return to the Main screen. Copyright © 2010 Intermatic, Inc. -
Page 61: Including The Pe953 Controller Into A Non-Multi-Wave (Other Manufacturer's) Network
Six: Advanced Features Including the PE953 Controller into a non-Multi-Wave (other manufacturer’s) network. The PE953 is a Z-Wave compliant device that may be included into networks created by other manufacturer’s Z-Wave compliant controllers. To include the PE953 into another manufacturer’s controller network: Activate the 3rd party controller’s Controller Replication function to transmit network information to the PE953 according to that controller manufacturer’s instructions. -
Page 62: Programming For Use With Z-Wave Home Control Devices
NOTE: If you are seeing the word FAILURE at the bottom of the screen, carefully repeat the procedure. If the problem persists, contact Intermatic Customer Service. For assistance with any non-Intermatic devices, you may need to contact that manufacturer’s customer support department. -
Page 63: Including Z-Wave Devices Into The Network
FAILURE at the bottom of the screen, carefully repeat the procedure. If the problem persists, contact Intermatic Customer Service. Repeat this procedure for all other Z-Wave home control devices that are to be part of the network. -
Page 64: Adding Z-Wave Devices To Scenes For Everyday Control
Repeat Steps 4 through 6 for other devices you want to add to the scene, or Steps 2 through 6 to create other scenes as necessary. Press the <ENTER> button if you wish to return to the Main screen. Copyright © 2010 Intermatic, Inc. -
Page 65: Renaming A Scene
Seven: Programming for Use with Z-Wave Devices Renaming a Scene As supplied, the PE953 screen displays the names of the five scenes as SCENE 1, SCENE 2, etc. You can rename the scenes so they better describe their actual function, making the system easier to use. -
Page 66: Removing Z-Wave Devices From Scenes
You are in programming mode when the LEARN MODE screen is displayed, as shown at the right. Press the <2> button to reset the device. The screen displays PRESS BUTTON ON DEVICE TO RESET, as shown: Copyright © 2010 Intermatic, Inc. -
Page 67: Setting Up Z-Wave Associations With Capable Devices
Seven: Programming for Use with Z-Wave Devices Press the button on the Z-Wave device for resetting the device (refer to the manufacturer’s instructions). The screen displays WORKING followed by SUCCESSFUL. The device is now removed from the network. Press the <ENTER>... - Page 68 Press the <ENTER> button if you wish to return to the Main screen. You can now control all the devices in the association with the association-capable controller. You don’t need the hand held. Copyright © 2010 Intermatic, Inc.
-
Page 69: Removing Z-Wave Devices From An Association
Seven: Programming for Use with Z-Wave Devices Removing Z-Wave Devices from an Association If necessary, press and release any button on the Hand-Held Controller to wake it from sleep. If the screen is not displaying LEARN MODE, press and hold the <P/S> and <ENTER> buttons at the same time to put the device into programming mode. -
Page 70: Using The Pe953 With The Pe650 Receiving Device
NOTE: If the word FAILURE instead of SUCCESSFUL appears at the bottom of the screen during any of the following steps, repeat the programming procedure, then try replacing the batteries in the Hand-Held. If the problem persists, contact Intermatic Customer Service. If necessary, press and release any button on the Hand-Held Controller to wake it from sleep. -
Page 71: Checking Out And Verifying The System
SET TIME under the time display. Up/Down Arrow buttons to set the correct time. Use the ENTER Key to return to the main PE653 main Press the screen. Refer to page 46 for additional help. Contact Intermatic support services. Providing a brighter solution.™... - Page 72 Press the number 2 switch again to turn OFF. Repeat for all 5 circuits. Review Section 4: Refer to page 43: Linking the Hand-Held Controller to the Programming the PE953 PE653 Receiving Device. Hand-Held Controller starting on page 41. Copyright © 2010 Intermatic, Inc.
- Page 73 Nine: Checking Out and Verifying the System What to do If it doesn’t work Reference/Procedure Verify that the PE953 Review the Section Carry the PE953 Hand-Held Controller to several parts Hand-Held Controller will covering “Testing Z-Wave of the area from which commands might be sent to the communicate with the PE653 Reception”...
- Page 74 Find the Wiring Diagram that is the most like your installation. Verify that the system is wired according to the diagram. Refer to the manufacturer’s installation instructions if your heater is not shown in this manual. Copyright © 2010 Intermatic, Inc.
-
Page 75: Troubleshooting
Ten: Troubleshooting Section 10: Troubleshooting After you have completed installation and programming, make sure the system is working OK by completing the procedures listed below. Later on, if problems develop in using the system, going over these same procedures will help you troubleshoot the problem. This section will help you troubleshoot the following problems: •... - Page 76 SPD 2” in the upper left hand corner of the screen. Refer to the illustration on page 41. Reprogram for 2-speed Refer to “Configuring for a 1-Speed or 2-Speed Pump” pump operation. starting on page 44. Copyright © 2010 Intermatic, Inc.
- Page 77 Ten: Troubleshooting Problem What to do Reference/Procedure The circuit breaker for the Confirm that the system is Press any release any button on the PE953 Hand-held pump trips every time that programmed for a 2-speed Controller to wake it up. the Pump turns ON.
- Page 78 57 for instructions. NOTE: Be sure to re-install the gasket correctly to create a water-tight seal. Refer to page 57 in this manual for instructions. If required, follow programming instructions starting on page 41. Copyright © 2010 Intermatic, Inc.
- Page 79 Ten: Troubleshooting Problem What to do Reference/Procedure The PE653 Device appears to Power down the PE653 Turn OFF the AC power to the PE653 by turning OFF be ‘LOCKED UP”. device to reset. the breaker that feeds terminals 1 & 2 on the device. Turn the AC power back ON.
-
Page 80: Appendix
Primary Controller — The controller used to set up your devices or network. This can be a tabletop or handheld remote controller or it can be software. NOTE: In the Intermatic Pool & Spa system, only the Primary Controller can be used to add or remove devices from a network. -
Page 81: Fcc Statement
Consult the dealer or an experienced radio/TV technician for help. NOTICE Changes or modifications not expressly approved by Intermatic Inc. could void the user’s authority to operate the equipment. The installer of this radio equipment must ensure that the antenna is located or pointed such that it does not emit RF field in excess of Health Canada limits for the general population;... -
Page 82: Warranty
ONE YEAR LIMITED WARRANTY If, within one (1) year from the date of purchase, this product fails due to defect in material or workmanship, Intermatic Incorporated will repair or replace it, as its sole option, free of charge. This warranty is extended to the original household purchaser only and is not transferable. This warranty does not apply to: (a) damage to units caused by accident, dropping, or abuse in handling, acts of God, or any negligent use;... - Page 83 Installation Notes ________________________________________________________________________________________________ ________________________________________________________________________________________________ ________________________________________________________________________________________________ ________________________________________________________________________________________________ ________________________________________________________________________________________________ ________________________________________________________________________________________________ ________________________________________________________________________________________________ ________________________________________________________________________________________________ ________________________________________________________________________________________________ ________________________________________________________________________________________________ ________________________________________________________________________________________________ ________________________________________________________________________________________________ ________________________________________________________________________________________________ ________________________________________________________________________________________________ ________________________________________________________________________________________________ ________________________________________________________________________________________________ ________________________________________________________________________________________________ ________________________________________________________________________________________________ ________________________________________________________________________________________________ ________________________________________________________________________________________________ ________________________________________________________________________________________________ ________________________________________________________________________________________________ ________________________________________________________________________________________________ ________________________________________________________________________________________________ ________________________________________________________________________________________________ ________________________________________________________________________________________________ ________________________________________________________________________________________________ ________________________________________________________________________________________________ ________________________________________________________________________________________________ ________________________________________________________________________________________________ ________________________________________________________________________________________________ Providing a brighter solution.™...
- Page 84 Intermatic, Inc. 7777 Winn Road Spring Grove, Illinois 60081-9698 www.intermatic.com Intermatic Customer Service: 815-675-7000 (8 a.m. through 4:30 p.m. CT, Monday through Friday) ©2010 Intermatic, Inc. 158--00973...
Need help?
Do you have a question about the PE653RC Multi Wave and is the answer not in the manual?
Questions and answers