Table of Contents
Advertisement
Advertisement
Table of Contents

Related Manuals for Emotiva Fusion Flex


Summary of Contents for Emotiva Fusion Flex
- Page 3 Do not install the Fusion Flex Amplifier on any stand, shelf, or other piece of furniture that is unable to support its weight. If a cart is used to move the unit, use caution to avoid injury from tip-over.
- Page 4 NEVER spray liquids into the vents. Care should be taken so that small objects do not fall into the inside of the unit. You should seek service for your Fusion Flex Amplifier by qualified service personnel if any of the following occur: 1. The power-supply cord or the plug has been damaged.
-
Page 5: Table Of Contents
Inputs and Outputs ...................... 11 Installation Tips ......................12 Configuration ........................13 Operation ......................... 14 Care and Maintenance ....................16 Performance Specifications ..................17 Troubleshooting ......................18 Emotiva Audio Corporation Five-Year Limited Warranty ........ 19 Notes ..........................21 Page 1... - Page 6 Fusion Flex Amplifier Page 2...
-
Page 7: Introduction
115 VAC or 230 VAC power line, and doesn’t have any noisy fans to annoy you - and, with its diminutive size, the Fusion Flex Amp is easy to fit into most cabinets or racks. -
Page 8: About This Manual
Fusion Flex Amplifier About This Manual This User Manual will provide you with the information you need to get started enjoying your Fusion Flex Amplifier. We suggest that you read through the entire manual; we kept things as short and direct as possible. -
Page 9: Features
• Low profile (3” high) “half-sized” unit. • Two Fusion Flex Amplifiers can be mounted side by side in a single 2 RU rack space with the optional dual rack mount kit. • Loop output for easy daisy chaining of multiple units. -
Page 10: Unpacking
Fusion Flex Amplifier Unpacking Your Fusion Flex Amplifier was carefully packed and should reach you in perfect condition. If you notice any shipping damage or other issues when you unpack it, please contact Emotiva immediately. Gently remove your Fusion Flex Amplifier from the packing carton and remove all wrappings and shipping material. -
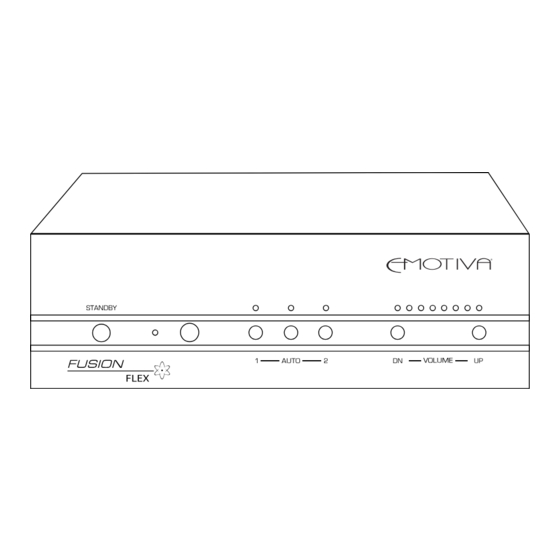
Page 11: Fusion Flex Amplifier Front Panel
4. Input Selector Pushbuttons and Input LEDs Pressing 1 or 2 manually selects that input; pressing Auto instructs the Fusion Flex Amp to use whichever input has active audio signal on it. (If both inputs are active, Input 1 has priority.) When each input / mode is selected, the corresponding LED will illuminate. -
Page 12: Fusion Flex Amplifier Remote Control
VOL- 3. Input Selector and Auto Button Pressing 1 or 2 manually selects that input; pressing the Auto Button instructs the Fusion Flex Amp to use whichever MUTE AUTO input has active audio signal on it. (If both inputs are active, Input 1 has priority.) When each input / mode is selected,... -
Page 13: Fusion Flex Amplifier Rear Panel
Heavy duty binding posts accept bare wires, spade lugs, and banana plugs. 5. Power Switch Switches the AC mains power to the Fusion Flex Amplifier On and Off. When this switch is Off, the Fusion Flex Amplifier will not respond to trigger signals or manual controls. -
Page 14: Power Mode Switch
7. RS-232 Serial Remote Control Interface Accepts RS-232 control codes from a wired serial remote control. 8. Trigger Input The Trigger Input is used to allow other trigger-enabled equipment to switch the Fusion Flex Amplifier between On and Standby. 9. IR Input. -
Page 15: Inputs And Outputs
Fusion Flex Amplifier Inputs and Outputs Analog inputs: 2 inputs; each one stereo pair of unbalanced (RCA) inputs. Analog (line level) outputs: 1 output; one stereo pair of unbalanced (RCA) outputs . Input sensitivity (for full output into 8 ohms):... -
Page 16: Installation Tips
Auto Power Mode When the rear panel Power switch is set to On, and Power Mode is set to Auto, the Fusion Flex Amplifier will switch On when signal is detected at either input (regardless of which input is selected as the signal source). -
Page 17: Configuration
When the rear panel Power rocker switch is set to Off, the Fusion Flex Amp is powered completely off and will not respond to any other control, switch setting, or input. In order for the Fusion Flex Amp to operate as described below, the rear panel Power rocker switch must be set to On. -
Page 18: Operation
When the Fusion Flex Amp is in Standby mode, the single LED next to the front panel Standby switch will be lit red; when the Fusion Flex Amp is On, the LED will be lit blue; if a fault occurs, the LED will flash red (and all other LEDs will be off ). -
Page 19: Volume Control
Fusion Flex Amplifier Volume Control To control the volume of the Fusion Flex Amp from the front panel or the IR remote control, press or press and hold the Volume Up or Volume Dn button. The level will increase or decrease by a very small increment each time the button is pressed, and move smoothly up or down if the appropriate button is held down. -
Page 20: Care And Maintenance
If necessary, the Fusion Flex Amp should be cleaned gently with a soft rag. • If something sticky gets on the front panel or case of the Fusion Flex Amp, it should be cleaned with a mild cleaning solution applied to a soft rag, followed by wiping with a clean rag dampened with plain water and drying with a soft dry rag or cloth. -
Page 21: Performance Specifications
Fusion Flex Amp will automatically power down and the front panel Standby LED will flash red. To reset the protection, turn the Fusion Flex Amp Off and then On again using the REAR PANEL POWER SWITCH after the fault has been removed. -
Page 22: Troubleshooting
Fusion Flex Amplifier Troubleshooting If problems occur, the first step should be to verify that the Fusion Flex Amplifier is set to the proper line voltage for your AC power source, and that your power source is operating correctly. Problem: No sound is heard from either channel (the Standby LED is not lit). -
Page 23: Emotiva Audio Corporation Five-Year Limited Warranty
Term. A claim shall not be valid (and Emotiva has no obligation related to the claim) if it is not made within the Term and if it is not made in strict compliance with the requirements of the “How do you get service?”... - Page 24 The CSR will provide you with a returned material authorization number (“RMA”). Ship the product to Emotiva at the following address, with the RMA written in large, bold numbers on the outside of the box, and with the letters “RMA” written before the number.
-
Page 25: Notes
Fusion Flex Amplifier Notes All information contained in this manual is accurate to the best of our knowledge at the time of publication. In keeping with our policy of ongoing product improvement, we reserve the right to make changes to the design and features of our products without prior notice. - Page 26 Emotiva Audio Corporation 135 Southeast Parkway Court Franklin, TN 37064 emotiva.com...
Need help?
Do you have a question about the Fusion Flex and is the answer not in the manual?
Questions and answers