Table of Contents
Advertisement
Advertisement
Table of Contents

Related Manuals for Emotiva basX A-100


Summary of Contents for Emotiva basX A-100
- Page 3 WARNING: To prevent the risk of fire or electric shock, do not use the BASX A-100 near water or in wet locations and do not expose it to rain or moisture. Doing so may result in damage to the A-100 and the risk of electric shock, which may result in bodily injury or death.
- Page 4 Only connect the BASX A-100 to an electrical outlet or extension cord of appropriate type and rating. DO NOT defeat the safety purpose of a grounding or three-pronged plug by removing ground pins or using unsafe adapters. If you replace the A-100 power cord, only use one of similar type and equal or greater current rating.
-
Page 5: Table Of Contents
Quick Start ........................12 Connections ........................13 Application Suggestions / Examples ..............14 Care and Maintenance ....................15 Specifications ......................... 16 Troubleshooting ......................17 Emotiva Audio Corporation Three-Year Limited Warranty ......18 Accessories ........................21 Notes ..........................22 Page 1... - Page 6 -100 Page 2...
-
Page 7: Introduction
The BASX A-100 is also a true integrated amplifier, and includes a front panel Volume control. Another special feature, which serious headphone aficionados will appreciate, is a headphone output which is derived from the main amplifier outputs via a set of high quality, low noise, series resistors. -
Page 8: About This Manual
This manual will provide you with all the information you need to achieve great performance, accurate sound, and many years of reliable service from your BASX A-100 amplifier. We suggest that you read through the entire manual; we kept things as short and concise as possible. -
Page 9: Features
-100 Features The BASX A-100 is a great sounding, compact, and very flexible, stereo amplifier. The A-100 includes features that make it a great choice in a wide variety of situations; from driving a small music system in a home or business, to providing audio for a second zone in a larger home theater installation, or whole house music system. -
Page 10: Unpacking
-100 Unpacking Your BASX A-100 was carefully packed and should reach you in perfect condition. If you notice any shipping damage or other issues when you unpack the unit, please contact us immediately. Gently remove your A-100 from the packing carton and remove all wrappings and shipping material. -
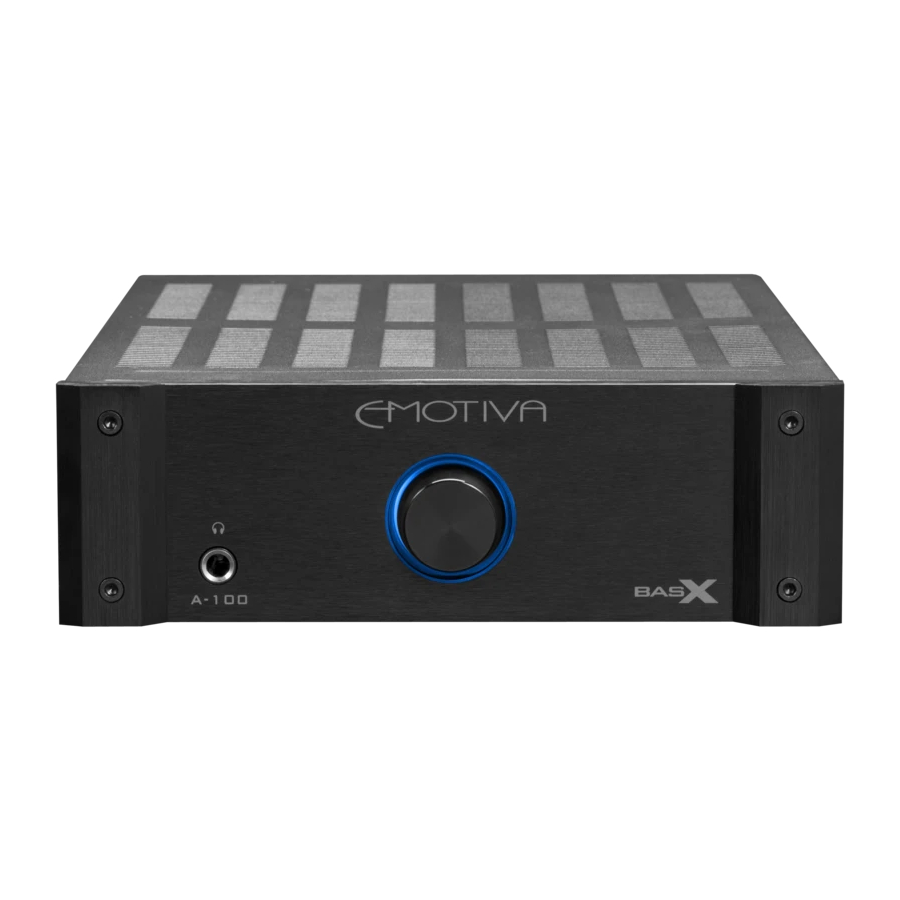
Page 11: Basx A-100 Front Panel
Use this headphone output to connect a pair of high quality headphones. Note: The main speaker output is disabled when headphones are inserted into the headphone output. Note: Please see BASX A-100 Headphone Options for important information about the headphone output on the BASX A-100. 2. Volume Control The Volume Control is used to adjust both the main and headphone output volume. -
Page 12: Basx A-100 Rear Panel
Switches the main AC power to the A-100 On and Off. Note: When the AC Power Switch is Off, the BASX A-100 will ALWAYS be Off (and will not operate). When the AC Power Switch is On, operation of the BASX A-100 will depend on the Trigger Switch setting. -
Page 13: Power Cord Receptacle
-100 5. Line Voltage Selector Switch The BASX A-100 is designed to operate on either 115 VAC or 230 VAC. Use this switch to select the appropriate line voltage for your area. Note: The A-100 will not operate correctly, and may be damaged, if the incorrect line voltage is selected. -
Page 14: Triggering The Basx A-100
-100 Triggering The BASX A-100 The BASX A-100 offers a very flexible set of power control and triggering options; the way the A-100 responds to audio and trigger signals is configured by the Trigger Switch. Note: WHEN THE REAR PANEL POWER SWITCH IS SET TO OFF, THE BASX A-100 IS FULLY OFF, AND WILL NOT RESPOND TO AUDIO SIGNALS OR TRIGGER COMMANDS. -
Page 15: Basx A-100 Headphone Options
The headphone output on the BASX A-100 is powered by the main output amplifiers, after being passed through a set of high-quality series resistors to reduce the output to a level appropriate for headphones. -
Page 16: Quick Start
Quick Start In order to get the most from your BASX A-100 amplifier, we urge you to read the entire manual. If you just want to connect it to a source and a pair of speakers and don’t need to know about all the triggering options and other features right away, this section will cover the basics you will need to get started. -
Page 17: Connections
(you will find them in the Interconnects section on our website at www.emotiva.com) Connecting an Input Source The BASX A-100 expects a line level analog input source via unbalanced (RCA) type connectors. Since the A-100 has a front panel Volume control, your source may be either fixed or variable level. -
Page 18: Application Suggestions / Examples
Application Suggestions / Examples Manual control The BASX A-100 is connected to a pair of speakers and receives its input from a stereo preamp. The Trigger Switch is set to On. The A-100 is switched On and Off directly by the rear panel AC Power Switch. -
Page 19: Care And Maintenance
-100 Care and Maintenance Periodic Maintenance Your BASX A-100 amplifier requires no periodic maintenance or calibration. Cleaning the BASX A-100 • If necessary, the A-100 should be cleaned gently with a soft rag. • If something sticky gets on the front panel or case of the A-100, it should be cleaned with a mild cleaning solution applied to a soft rag, followed by wiping with a clean rag dampened with plain water and drying with a soft dry rag or cloth. -
Page 20: Specifications
Auto-sense of audio input signal Trigger Output: direct hardware feed through of input trigger signal Protection: The BASX A-100 is protected against all common fault conditions. The status ring will blink amber when a fault is detected. Power requirements: 115 VAC or 230 VAC +/- 10% @ 50 / 60 Hz (selectable by rear-panel switch) Dimensions: 8.5”... -
Page 21: Troubleshooting
-100 Troubleshooting The BASX A-100 amplifier is carefully designed and manufactured from high quality precision components to ensure years of trouble free operation. We really doubt you’ll ever have any problems with your A-100, but if you do, here are a few things you could try. -
Page 22: Emotiva Audio Corporation Three-Year Limited Warranty
The original owner must make a claim within the Term of the Warranty. A claim shall not be valid (and Emotiva has no obligation related to the claim) if it is not made within the Term and if it is not made in strict compliance with the requirements of the “How do you get service?”... - Page 23 365 days of the Term, Warrantor shall refund to you the purchase price that you paid for the Product; and (ii) if the claim was submitted after the first 365 days of the Term, Emotiva shall issue you a credit equal to the purchase price that you paid for the product. The credit may only be used for the purchase of merchandise from Emotiva, and cannot be used for freight charges.
- Page 24 What if my product is damaged on the way to you? Emotiva is not liable for damages that may incur while an item is in transport to us. Please purchase insurance when you ship your item. If your Product was not adequately packaged, we will refuse receipt and the damaged package will be returned to you at your cost.
-
Page 25: Accessories
Using high quality speaker and interconnect cables will ensure that you achieve the best sound quality and maximum reliability from your BASX A-100 amplifier and the speakers connected to it. Emotiva offers high quality speaker cables, and audio and digital interconnect cables, that feature solid engineering, premium build quality, excellent performance, and reasonable cost. -
Page 26: Notes
In keeping with our policy of ongoing product improvement, we reserve the right to make changes to the design and features of our products without prior notice. BASX A-100 User Manual Revision 1.0 July 2016 Page 22...
Need help?
Do you have a question about the basX A-100 and is the answer not in the manual?
Questions and answers