
Subscribe to Our Youtube Channel
Related Manuals for Oricom PMR1290


Summary of Contents for Oricom PMR1290
-
Page 1: Operating Instructions
PMR1290 PMR1295 Operating Instructions PMR1290 and PMR1295 80 Channel UHF 2 Way Citizen Band Radio Keep this user guide for future reference. Always retain your proof of purchase in case of warranty service. - Page 2 Need Help? If you need assistance setting up or using your Oricom product now or in the future, call Oricom Support. Australia 1300 889 785 or (02) 4574 8888 www.oricom.com.au Mon-Fri 8am – 6pm AEST New Zealand 0800 67 42 66 www.oricom.co.nz...
-
Page 3: Table Of Contents
During this time wideband channel use will be gradually phased out as users upgrade their existing radios. This means that the new Oricom narrowband radio you have purchased will have more channels than older wideband radios. Some of these channels are locked and cannot be used, (see the attached channel chart for more information). -
Page 4: Safety Information And Warnings
Safety Information and Warnings Safety Information and Warnings Information on Safe Operation Read This Information Before Using Your Oricom Radio. WARNING The operation of your UHF radio in Australia and New Zealand is subject to conditions in the following licenses:... - Page 5 • If you believe the batteries are damaged, remove product from the charger and stop using the product. Contact Oricom for assistance. • Never use damaged batteries as they may explode. • Remove batteries when they are no longer able to hold a...
- Page 6 OFF near electrical blasting caps or in a “blasting area” or in areas posted: “Turn off the two way radio.” Obey all signs and instructions. Exposure to Radio Frequency Energy Your Oricom two-way radio complies with Australian Communications Authority Radio communications (Electromagnetic Radiation-Human Exposure) Standard, 2003.
- Page 7 Safety Information and Warnings Transmit and Receive Procedure Your two-way radio contains a transmitter and WARNING a receiver. To control your exposure and ensure compliance with the general population/uncontrolled environment exposure limits, always adhere to the following procedure: • Transmit no more than 50% of the time. • To receive calls, release the PTT button. • T o transmit (talk), press the Push to Talk (PTT) button.
- Page 8 Safety Information and Warnings Aircraft When instructed to do so, turn off your radio when onboard WARNING an aircraft. Any use of a radio must be in accordance with applicable regulations per airline crew instructions. Medical Devices - Pacemakers The Advanced Medical Technology Association recommends that a minimum separation of 6 inches (15cm) be maintained between a handheld wireless radio and a pacemaker.
-
Page 9: Getting Started
Getting Started Pack Contents Model No. PMR1295 Model No. PMR1290 2 UHF RADIOS 2 UHF RADIOS 1 TWIN CHARGING POD 2 CAR CHARGERS POWER ADAPTOR 2 USB CABLES RECHARGEABLE BATTERIES POWER ADAPTOR WITH Y CABLE BELT CLIPS RECHARGEABLE BATTERIES BELT CLIPS... - Page 10 Getting Started Charging the batteries (using charging pod) - PMR1290 a. Insert the small plug in the end of the mains adaptor into the Power-in Connection Jack at the back of the desktop charger. b. Plug the mains adaptor into a 230V AC, 50Hz mains socket with the switch on the socket set to OFF.
-
Page 11: Battery Life
Getting Started Battery Icon A low battery icon will appear in the bottom left corner of the LCD display when the batteries are getting low. This indicator will flash and continue to flash until the batteries are fully discharged. TIP: At this stage, you need to recharge the unit at once, otherwise the battery will run down totally. -
Page 12: Oricom Pmr1290/1295 Instructions
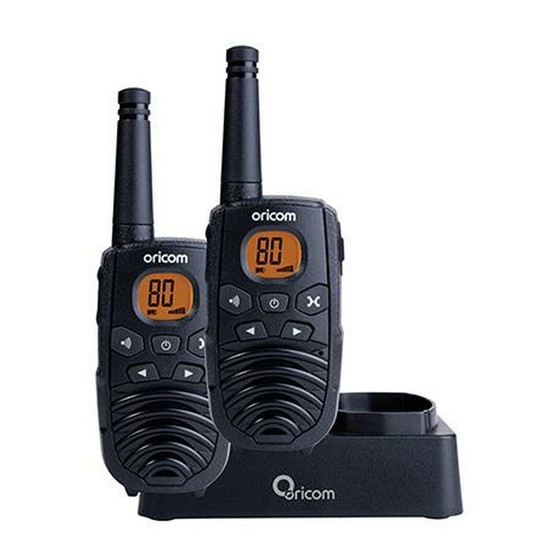
Oricom PMR1290 or PMR1295 instructions Oricom PMR1290-1295 2-Way CB Radio Antenna LCD screen PTT(push to talk) -Displays the current button Channel selection and -press and hold other radio symbols. to transmit. USB Charge and Headphone Jack CALL button -press to send a... -
Page 13: Operation
Press and hold the POWER button until the LCD screen turns blank. Changing Channels The PMR1290 or PMR1295 has 77 available channels, to communicate with other radios, you must have your radio tuned to the same channel. a. Press the MENU button once, the current channel number flashes on the LCD Screen. - Page 14 Operation The PMR1290/1295 is a Class License band. Always identify yourself when transmitting on the same channel. IMPORTANT: Before transmitting on a UHF channel listen to ensure it is not already in use. Transmitting (sending speech) The unit is continuously in the Receive mode when the unit is turned ON and not transmitting.
-
Page 15: Channel Scan
Operation Calling (Paging) Tone You can use the CALL button to send a tone to other users on the same channel. To activate this feature; a. With the PMR in normal mode, press and release the CALL button. The unit will transmit a 2-second page tone to the other unit/s set with the same channel within transmitting range Channel Scan... - Page 16 The PMR1290 or PMR1295 is equipped with and auxiliary microphone, earphone, and charge jack located at the opposite side of PTT button. Note: It requires a microphone/earphone with a 2.5mm,jack connector and this is not supplied with your PMR1290 or PMR1295.
- Page 17 Operation Using a PTT Headset You can plug an optional headset into the right side of your PMR1290 or PMR1295 handset. By pressing the PTT button to transmit you can then talk with other radios. Roger Beep The Roger beep is a tone which is automatically transmitted whenever the PTT button is released.
- Page 18 Operation Turning on/off Duplex on channels Select the required channel to suit the repeater station you wish to access (Channels 1 – 8 and 41 – 48) Press the Menu button twice, “RPT” icon will display Press the UP or DOWN button to set the Duplex function to On or Off.
- Page 19 Operation Important • S peech transmissions are not allowed on channel 22 and 23 (Receive only) • I f Call ring tone calling is provided, it is only allowed to operate for a maximum of 3 seconds and it can only be possible to operate once in any 60 second period. Auxiliary Features LCD Screen Back Light Every time the Power/Vol button is activated (except PTT and CALL button), the LCD Screen back light will illuminate for 5 seconds.
-
Page 20: Uhf Channels And Frequencies
UHF channels and frequencies UHF channels and frequencies EMC Technologies (NZ) Ltd IMPORTANT NOTE: The operation of your UHF radio in Australia and Test Report No 101127.1 New Zealand is subject to conditions in the following licenses: Report date: 25 November 2010 In Australia the ACMA Radio communications (Citizen Band Radio Nominal Carrier... - Page 21 476.6000 476.6000 477.1000 477.1000 476.6125 477.1125 477.1125 476.6250 476.6250 477.1250 477.1250 UHF channels and frequencies 476.6375 476.6375 477.1375 477.1375 476.6500 476.6500 477.1500 477.1500 476.6625 476.6625 477.1625 477.1625 476.6750 476.6750 477.1750 477.1750 476.6875 476.6875 477.1875 476.7000 476.7000 477.2000 477.2000 476.7125 476.7125 477.2125 476.7250 476.7250...
-
Page 22: Customer Support
Troubleshooting section of this user guide as well as “Frequently Asked Questions” on our website www.oricom.com.au. If you have further questions about using the product after reviewing the resources above or would like to purchase replacement parts or accesso- ries please call our Customer Support Team. -
Page 23: Warranty
Please note that if a Customer Support Team member advises that your product does not qualify for return, this warranty does not apply to your product. Products that are authorised to be returned to Oricom in Australia must include all of the following: • A completed Return Authorisation form • A copy of your Proof of Purchase (please keep your original copy) -
Page 24: Information
Warranty Information (Australia) This Warranty is provided by Oricom International Pty Ltd ABN 46 086 116 369, Unit 1, 4 Sovereign Place, South Windsor NSW 2756, herein after referred to as “Oricom”. - Page 25 Spare parts may be new or equivalent to new. Spare parts are warranted to be free from defects in material or workmanship for thirty (30) days or for the remainder of the Warranty Period of the Oricom branded prod- uct in which they are installed, whichever is longer. During the Warranty Period, Oricom will where possible repair and if not replace the faulty product or part thereof.
- Page 26 Warranty Oricom will not be in breach of a warranty expressly set out in this User Guide or under the Competition and Consumer Act 2010 and excludes any liability for damages or any other remedy arising under any other legislation or the common law if the damage occurs as a result of: 1.
- Page 27 Phone: 1300 889 785 or (02) 4574 8888 (Monday to Friday 8am to 6pm AEST) Web: www.oricom.com.au Fax: (02) 4574 8898 Contact details for Oricom support and warranty claims in New Zealand Email: support@oricom.co.nz Phone: 0800 674 266 (Monday to Friday 10am to 8pm NZST) Web: www.oricom.co.nz...
Need help?
Do you have a question about the PMR1290 and is the answer not in the manual?
Questions and answers