Advertisement
Stay in touch for FREE with Oricom
Stay in touch for FREE with Oricom
Highly sophisticated: You can communicate when you are out and about enjoying sport
and leisure activities, whilst at work or out on a job site.
Long range: With a massive 1 watt of power you can expect up to 7km range
depending on terrain and environmental conditions. The range is longer when using the
duplex feature.
Free communication: No call costs.
No license required: Start using your Oricom PMR1000R radios straight away.
Highly compact: Lightweight and small, they easily fit in your pocket or bag, or clip
them on your belt with the clips included.
Smart features: Advanced features include 40 UHF channels, long in use time, range
extender in duplex mode, channel scan, hands-free with or without a headset and Roger
beep confirmation tone.
Channel scan: Lets you easily find your group's channel by searching all possible channels.
12-month replacement warranty
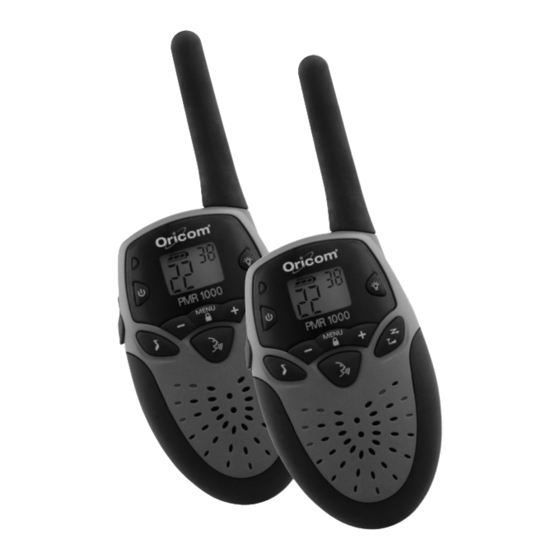
Oricom PMR1000R
High Powered 1 Watt
UHF Two-Way Radios
Read this manual
carefully before use.
Advertisement
Table of Contents

Related Manuals for Oricom PMR1000R


Summary of Contents for Oricom PMR1000R
- Page 1 Free communication: No call costs. No license required: Start using your Oricom PMR1000R radios straight away. Highly compact: Lightweight and small, they easily fit in your pocket or bag, or clip them on your belt with the clips included.
- Page 2 Australia Customer support Important safety information Email: support@oricom.com.au Oricom International Pty Ltd • Do not use the radios in areas where there is a risk of explosion, such as fuel stores, Web: www.oricom.com.au PO Box 5681 blasting areas, chemical stores or areas in which chemicals or other solids are...
-
Page 3: Safety And General Information
Your radio contains both a receiver and transmitter. When it is turned on it receives and transmits RF energy. Your Oricom unit is designed to comply with local If you feel this product is not working correctly please consult the user guide and ensure regulatory requirements concerning exposure of human beings to RF energy (Specific that you are using the product in accordance with the instructions. - Page 4 Your Oricom PMR1000R radio controls Attaching the belt clips Attaching the belt clips Your Oricom PMR1000R radio controls Attaching the belt clips (2 included) Headset Each radio is supplied with a belt clip. socket Menu button Indicator light To attach, simply slide into place.
- Page 5 Your Oricom PMR1000R radio display Changing the faceplates Changing the faceplates Your Oricom PMR1000R radio display Additional coloured faceplates Your radios are supplied with additional coloured faceplates, which you can change Keypad lock as required. Scan Removing the faceplate Rodger beep Battery level 1.
-
Page 6: Installing The Batteries
This pack contains This pack contains Channel Frequency (MHz) Usage Channel Frequency (MHz) Usage 476.425 Simplex/Duplex 476.925 Simplex • 2 UHF radios 476.450 Simplex/Duplex 476.950 No Use • 2 belt clips 476.475 Simplex/Duplex 476.975 No Use • 2 headsets 476.500 Simplex/Duplex 477.000 Simplex... - Page 7 1. Ensure radio is turned off. Remove the belt clip on the back. Automatic energy saving mode The radios are designed with a power saving mode. If no transmissions take place within a certain time, the unit switches itself off automatically. The time can be set to 30, 60 or 90 minutes.
-
Page 8: Monitor Function
Using the twin charging kit Using the twin charging kit 2. Select sensitivity level 1, 2 or 3 by using . Choose - 1- If you speak loudly, or are in a noisy environment. 2- Suitable for most applications. 3- If you speak softly, or are in a quiet environment. Note: When you connect a VOX headset, the radio will automatically be set to the last chosen VOX sensitivity level. - Page 9 Turning your radio on and off How to use the IVOX feature Press and hold for two seconds to turn your radio on. The radio chirps and the This feature allows you to transmit “hands-free” by talking into the radio microphone display will show all feature icons for a brief period.
-
Page 10: Hands Free Use (Vox)
Talking and listening 1. Select the repeater channel in your area (channel 1 to channel 8). It is good radio etiquette to monitor the channel for activity before you transmit, to 2. Press the menu button 4 times to enter duplex mode, press to switch ensure that you do not interrupt other users already on the channel. - Page 11 1. Press until the code number begins to flash. Channel busy indicator 2. Use to select required CTCSS tone 0 (off) or 1-38. The red LED will flash twice per second to indicate that the channel is in use. 3. Press to set the new code.
- Page 12 You can specify a different code for each channel. Monitor 1. To set a channel and CTCSS code combination, press and then press Pressing and holding allows you to monitor your channel for activity. to select the channel. 2. Press again and then press to select a CTCSS code.
Need help?
Do you have a question about the PMR1000R and is the answer not in the manual?
Questions and answers