
Related Manuals for Widex SUPER 220 S2-VSD


Summary of Contents for Widex SUPER 220 S2-VSD
- Page 1 USER INSTRUCTIONS THE SUPER™220 SERIES S2-VSD model RIC/RITE Receiver-in-canal/Receiver-in-the-ear...
-
Page 2: Table Of Contents
CONTENTS SYMBOLS..........3 THE HEARING AID . -
Page 3: Symbols
SYMBOLS The following symbols will be used throughout the manual: WARNING Messages with this heading indicate serious adverse reactions, potential safety hazards and inadequate performance of device. CAUTION Messages with this heading indicate/include information regard- ing any special care to be exercised. Not for general waste. -
Page 4: The Hearing Aid
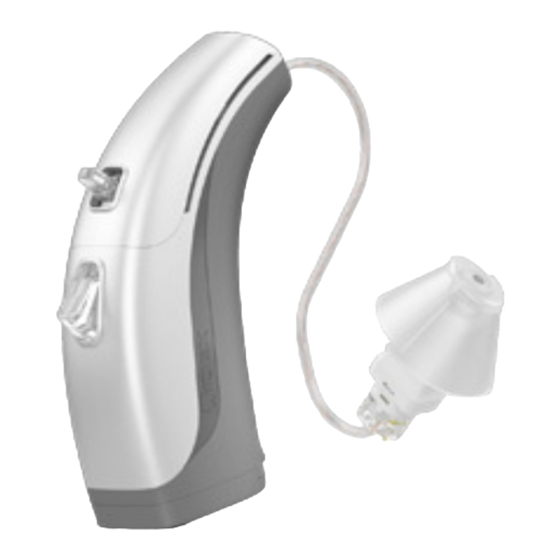
THE HEARING AID The illustration below shows the hearing aid without the ear-set. The ear-set consists of an earwire and an ear-tip or earmould, in which the receiver is placed. 1. Program button 2. LED 3. On/off switch 4. Battery drawer with nail grip 5. -
Page 5: Intended Use
“Ear-sets for Widex BTE hearing aids”. WARNING This booklet and the manual “Ear-sets for Widex BTE hear- ing aids” contain important information and instructions. Read these booklets carefully before you start using the hearing aid. - Page 6 They are to be programmed by licensed hearing care professionals (audiologists, hearing aid specialists, oto- laryngologists) who are trained in hearing (re)habilita- tion. Description of device Your SUPER™ hearing aid is used with an ear-set which consists of an earwire and an ear-tip or earmould, in which the receiver is placed.
-
Page 7: Acoustic Indicators
Acoustic indicators The hearing aid may be set to produce a signal to in- dicate the use of certain functions. The signal may be a spoken message or tones. The signal can also be de- activated. Default Other Functions settings settings Adjusting volume Tone... -
Page 8: The Battery
The battery We recommend zinc-air batteries. Use a size 675 bat- tery for the hearing aid. To obtain replacement batteries, please consult your hearing care professional. It is important to take note of the expiry date and the recommendations on the bat- tery pack regarding disposal of used batteries. - Page 9 Place the battery in the drawer, so that the plus (+) sign on the battery faces upward. You can use the battery magnet provided to steer the battery into place. If the battery drawer does not close easily, the battery is incorrectly inserted.
-
Page 10: Low Battery Indication
The battery drawer is opened as illus- trated. Low battery indication An acoustic indicator will sound when the battery is nearly exhausted, unless this function has been dis- abled (see page 7). We recommend that you always have a spare battery with you. WARNING Never leave an exhausted battery in the hearing aid. -
Page 11: Turning The Hearing Aid On And Off
Turning the hearing aid on and off The battery drawer of the hearing aid also functions as the on/off switch. Close the battery drawer complete- ly to turn on the hearing aid. An acoustic indicator will indicate that the hearing aid has been switched on, unless this function has been disabled. -
Page 12: Right/Left Identification
Right/left identification If you wear hearing aids on both ears, the hearing aids can be pro- vided with coloured marks (red mark = right and blue mark = left). The arrow shows the position of the identification mark. -
Page 13: Positioning The Hearing Aid In The Ear
Positioning the hearing aid in the ear Hold the earmould with your thumb and forefinger and slowly guide it into your ear canal until you feel resist- ance. Let go of the earmould and use the tip of your forefinger to gently push it into your ear until it rests comfortably in your ear canal. -
Page 14: Removing The Hearing Aid
Removing the hearing aid Remove the hearing aid from its position behind the ear. Hold the earmould with your thumb and forefinger and pull gently. WARNING Do not pull the earwire to remove the earmould, as this may damage the earwire. If it is difficult, you can try to move the earmould care- fully from side to side. -
Page 15: Volume Adjustment
Volume adjustment The hearing aid volume is adjusted automatically in ac- cordance with your sound environment. Manual volume adjustment Furthermore, your hearing aid is provided with a vol- ume control, shaped like a small lever (unless your hearing care professional has removed it for you). Push the lever upwards to gradually raise the volume. - Page 16 To turn off the sound completely: • Keep pressing the volume control lever downwards after the steady tone has sounded. To turn the sound on again: • Press the lever upwards or • Change listening program Any adjustment of the volume setting will be can- celled when your hearing aid is turned off, or when you change program.
-
Page 17: Listening Programs
Listening programs Your hearing aid may be provided with three of the fol- lowing programs, plus either the special Zen program called Zen+, or the Phone+ program. Under “Your hear- ing aid” at the back of this booklet your hearing care professional can list the listening programs that are available in your hearing aid. - Page 18 Compound The Master program in one ear and Zen, programs Reverse focus, Audibility Extender, T, MT or Phone in the other. Zen+ (optional) Special Zen program with up to three different Zen styles Phone+ For phone use only. Transmits the telephone sound received in one hearing aid to the other hearing aid.
- Page 19 Zen program (optional) Your hearing aid may be provided with a unique option- al listening program called Zen. It makes musical tones (and sometimes a rushing noise) in the background. These sounds are shaped according to your hearing loss. The Zen program may be used alone (without am- plification) in quiet when you are not required to hear surrounding sounds.
- Page 20 Directions for use Because of the unique ways in which Zen is pro- grammed in your hearing aid, please follow the rec- ommendations of your hearing care professionals as to how to use the program, when to use the program and/ or how long to use the program.
-
Page 21: Switching Between The Listening Programs
Switching between the listening programs Each time you switch to another program, an acoustic indicator will sound unless this function has been disabled. Program 1: One short beep or message Program 2: Two short beeps or message Program 3: Three short beeps or message Zen+ or Phone+: Tone or message In the default setting, both your hearing aids will be affected when you change programs. -
Page 22: Zen
Zen+ This program is accessed via a long press (more than 1 sec.) on the program button on the hearing aid or RC-DEX remote control. A short press then allows you to cycle through the available Zen styles. You can exit Zen+ by pressing and holding the program button for more than one second. -
Page 23: Using A Telephone
Using a telephone When using a telephone, we recommend that you hold the telephone against your head at an angle above your ear, rath- er than directly against the ear. If the sound is not optimal, try moving the telephone earpiece to a slightly different position. -
Page 24: Cleaning
CLEANING The following cleaning accessories are available for the hearing aid and ear-set.* For cleaning the ear-set, see the user manual “Ear-sets for Widex BTE hearing aids.” 1. Cloth 2. Brush 3. Wax removing tool Contact your hearing care professional if you need ad- ditional supplies of cleaning accessories. - Page 25 Clean the hearing aid with the soft cloth after use. WARNING Never use water or cleaning solutions to clean the hearing aid, as this may cause it to malfunction. When the hearing aid is not in use, keep it in a warm, dry place with the battery drawer open to ventilate the hearing aid and allow it to dry.
-
Page 26: Accessories
ACCESSORIES A variety of assistive listening devices are available for your hearing aid. RC-DEX remote control TV-DEX for listening to TV and audio M-DEX for mobile phone applications and remote control PHONE-DEX for easy landline use* T-DEX for connecting hearing aids to mobile phones using a telecoil SCOLA FLEX-i integrated FM receiver... - Page 27 Attaching the universal DAI adapter: 1. Use the tip of your finger to slide off the cover plate at the bottom of the hearing aid. 2. Slide the DAI adapter onto the hearing aid until it clicks into place. 3. Lock it into place by sliding the locking button downwards, as illustrated.
- Page 28 Removing the universal DAI adapter: Remove the three-pin Europlug device attached to the DAI adapter 1. Unlock the DAI adapter by sliding the locking button upwards, as illustrated. 2. Slide the DAI adapter off the hearing aid. 3. Slide the cover plate on. For more information on the use of audio input consult your hearing care professional.
- Page 29 Program order M-DAI WARNING If the hearing aid is connected to equipment which is connect- ed to the electrical mains, this equipment must comply with IEC 60065, IEC 60950-1, IEC 60601-1 or equivalent safety stand- ards.
- Page 30 FM systems The Widex FM system, SCOLA, consists of a wireless microphone and a receiver integrated in an FM shoe. The Widex receiver suitable for your hearing aid is called SCOLA FLEX-i. The system can be set according to your needs.
- Page 31 Removing the SCOLA FLEX-i: 1. Unlock the SCOLA FLEX-i by sliding the locking button upwards, as illustrated. 2. Slide the SCOLA FLEX-i off the hearing aid. 3. Slide the cover plate on. For more information on the SCOLA FM system, con- sult the SCOLA™...
-
Page 32: In Case Of Malfunction
IN CASE OF MALFUNCTION Problem Possible cause Solution The hearing aid The hearing aid is Make sure the battery is completely not turned on drawer is completely silent closed The battery does not Insert a new battery in work the hearing aid The hearing aid Your ear is blocked Contact your ENT... - Page 33 DAI adapter Note: This information covers only the hearing aid. See the “Ear-sets for Widex BTE hearing aids” user manual for information specific to your ear-set and the SCOLA FM system manual for information on your SCOLA de- vices.
-
Page 34: Caring For Your Hearing Aid
CARING FOR YOUR HEARING AID The hearing aid is a valuable object and should be treated with care. Here are some things you can do to prolong the life of your hearing aid: CAUTION • Turn off your hearing aid when it is not in use. Remove the battery if the hearing aid will not be used for several days. -
Page 35: Warnings
WARNINGS WARNING Hearing aids and batteries can be dangerous if swal lowed or used improperly. Swallowing or improper use can result in severe injury or even fatalities. In case of ingestion, contact a physician immediately. • Keep hearing aids and their parts, accessories and batteries out of reach of children and anyone else who might swallow such items or otherwise cause injury to themselves. - Page 36 Do not under any circumstances use alcohol, chlorine or similar substances for this purpose. • Regular use of a de-humidifier is recommended to help avoid malfunction of the hearing aid. • Do not use Widex hearing aids in mines or other areas with ex- plosive gases.
- Page 37 WARNING • Do not wear your hearing aid during radiation, X-rays, MRIs, CT or other medical treatments and scans. The emissions from these procedures as well as from other types of radia- tion, such as that in a microwave oven, can damage your hear- ing aid.
-
Page 38: Advice
ADVICE NOTE • The hearing aid will not restore normal hearing and will not pre- vent or improve a hearing loss resulting from organic condi- tions. However, the hearing aid can help you to make the best possible use of your remaining hearing ability. You should also bear in mind that it can take time to get used to a new hearing aid and new sounds. -
Page 39: Regulatory Information
REGULATORY INFORMATION FCC ID: TTY-S4VSD IC: 5676B-S4VSD Federal Communications Commission Statement This device complies with part 15 of the FCC Rules. Operation is subject to the following two conditions: (1) This device may not cause harmful interference, and (2) this device must accept any interference received, including interference that may cause undesired operation. - Page 40 Changes or modifications to the equipment not expressly approved by Widex could void the user’s authority to operate the equipment. Industry Canada Statement / Déclaration d’industrie Canada...
- Page 41 This device complies with Industry Canada licence- exempt RSS standard(s). Operation is subject to the following two conditions: (1) this device may not cause interference, and (2) this device must accept any interference, including interference that may cause undesired operation of the device.
- Page 42 Hereby, Widex A/S declares that this S2-VSD is in com- pliance with the essential requirements and other rele- vant provisions of Directive 1999/5/EC. A copy of the Declaration of Conformity can be found at: http://www.widex.com...
- Page 43 Hearing aids, accessories and batteries should not be disposed of with normal household waste. Please consult your na- tional Widex distributor for advice on how to dispose of these items.
-
Page 44: Your Hearing Aid
YOUR HEARING AID (To be filled out by the hearing care professional) Date: _________________________________________ Battery size: 675 Programs available in your hearing aid: Program 1: Program 2: Program 3: Special program:... - Page 45 Programs available in your hearing aid: Program 1: Program 2: Program 3: Special program:...
- Page 48 Manufacturer ¡9 514 0157 0010¤ ¡#01v¤ Printed by HTO / 2012-09 9 514 0203 001 #01...
Need help?
Do you have a question about the SUPER 220 S2-VSD and is the answer not in the manual?
Questions and answers