Table of Contents
Advertisement
Quick Links
COMPLETE RTF AIRPLANE
REQUIRES:
8 "AA" Alkaline Batteries
Please read through this instruction booklet to THOROUGHLY familiarize yourself with the assembly and fl ight characteristics
of this airplane before beginning to assemble the kit.
Please inspect all parts carefully before starting assembly! If any parts are missing, broken or defective, or if you have any
questions about the assembly or fl ying of this airplane, please call us at (217) 398-8970 and we'll be glad to help.
Hobbico
®
guarantees this kit to be free from defects in both material and workmanship at the date of purchase. This warranty
does not cover any component parts damaged by use or modifi cation. In no case shall Hobbico's liability exceed the original cost
of the purchased kit. Further, Hobbico reserves the right to change or modify this warranty without notice.
In that Hobbico has no control over the fi nal assembly, no liability shall be assumed nor accepted for any damage resulting
from the use by the user of the fi nal user-assembled product. By the act of using the user-assembled product, the user accepts
all resulting liability.
If the buyers are not prepared to accept the liability associated with the use of this product, they are advised to return this kit
immediately in new and unused condition to the place of purchase.
To make a warranty claim send the defective part or item to Hobby Services at the address below:
Include a letter stating your name, return shipping address, as much contact information as possible (daytime telephone
number, fax number, e-mail address), a detailed description of the problem and a photocopy of the purchase receipt. Upon
receipt of the package the problem will be evaluated as quickly as possible.
Entire Contents © Copyright 2007
Please retain this information for future reference.
ASSEMBLE ONLY WITH ADULT SUPERVISION
WARRANTY
Hobby Services
3002 N. Apollo Dr., Suite 1
Champaign IL 61822 USA
Printed in China
™
HCAZ2800 for HCAA28**
Advertisement
Table of Contents

Related Manuals for Flyzone DIABLO


Summary of Contents for Flyzone DIABLO
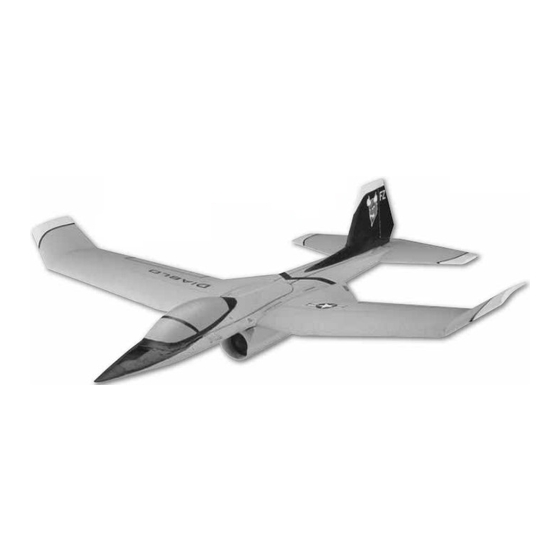
- Page 1 COMPLETE RTF AIRPLANE ™ REQUIRES: 8 “AA” Alkaline Batteries Please retain this information for future reference. ASSEMBLE ONLY WITH ADULT SUPERVISION Please read through this instruction booklet to THOROUGHLY familiarize yourself with the assembly and fl ight characteristics of this airplane before beginning to assemble the kit. Please inspect all parts carefully before starting assembly! If any parts are missing, broken or defective, or if you have any questions about the assembly or fl...
- Page 2 IMPORTANT SAFETY PRECAUTIONS and initiates roll when using the beginner wing. The rudder is used to steer the airplane when Your Diablo EDF plane is not a toy, but rather a using the beginner wing. sophisticated, working model that functions very much like an actual airplane.
-
Page 3: Unpacking The Box
AIRFRAME PARTS AND HARDWARE UNPACKING THE BOX Check the parts against the list below. If any parts are damaged or missing, give us a call at: (217) 398-8970. Part Name ..........Qty. Part Name ..........Qty. ❏ ❏ Beginner Wing ..........1 6. -
Page 4: Prepare The Transmitter
LITHIUM BATTERY HANDLING & USAGE WARNING!! Read the entire instruction sheet included with the battery charger. Failure to follow all instructions could cause permanent damage to the battery and its surroundings, and cause bodily harm! • ONLY use a LiPo approved charger. •... - Page 5 • Batteries are to be inserted with the depleted, the green and yellow LEDs will go out. correct polarity. When only the red LED is illuminated, land your Diablo EDF and install fresh batteries. • Exhausted batteries are to be removed from the transmitter. OPTIONAL RECHARGEABLE •...
- Page 6 power outlet. Fully extend the power cords and CHARGE THE PLANE’S LIPO BATTERY set the charger and battery outside of the vehicle Read the “LITHIUM BATTERY HANDLING AND and away from fl ammable materials. NEVER charge USAGE” and the “LIPO BATTERY CHARGING your airplane’s battery while driving or with the PRECAUTIONS”...
- Page 7 ❏ 3. Holding the fuselage in one hand and the Removing and reinstalling the wings many Power Pod in the other, slide the Power Pod into times may loosen the fi t of the Power Pod locks the forward part of the slots in the fuselage. Make in the slots.
-
Page 8: Prepare The Battery
❏ 1. Peel the backing paper off of the “loop” side (fuzzy side) of the hook and loop material that was supplied with your Diablo EDF. Stick the loop side to the back of the battery as shown. - Page 9 ADJUST THE RADIO ❏ 2. Peel the backing paper off of the “hook” side of the hook and loop material. Position the battery ❏ 1. Set the airplane down on a fl at surface that is all the way forward in the battery compartment clear of any debris.
- Page 10 FINISH THE RADIO SETUP The control throws (the distance of control surface defl ection) are measured at the widest part of the elevator and rudder. If it is necessary, adjust the position of the pushrods at the servo arms and the control horns to change the amount of throw.
- Page 11 Move the right stick down all the way. The elevator should defl ect NOTE: Although your Diablo EDF comes balanced up 1/4" [6.4mm]. Move the right stick up all the way. from the factory, the balance point should be The elevator should defl...
-
Page 12: Trainer System
CHOOSE A GOOD FLYING SITE Cord must be purchased. Connect the trainer The Diablo EDF should be fl own only when the cord to the trainer port on the back of the Tactic wind speed is 5 mph or less. If the wind is calm or... - Page 13 fi nished fl ying. 5. With the throttle stick moved fully up, hand launch the Diablo EDF with a fi rm toss into the wind at a slight upward angle. Note: For the fi rst couple FLYING THE DIABLO EDF of fl...
-
Page 14: After The Flight
fl y when landing. 10. The Diablo EDF is set up in the beginner 3. To land the Diablo EDF, fl y down wind, past the confi guration with rudder on the right stick. landing area. Gently turn into the wind and reduce Moving the right control stick (rudder) to the left the throttle so that the airplane starts to come down. -
Page 15: Replacement Parts List
TACM4402 ..Tx Battery Door REPLACEMENT PARTS LIST TACM4403 ..Tx Battery Holder TACM0100 ..TSX100 Micro Servo To order replacement parts for your Diablo EDF, TACM5101 ..TSX100 Servo Arms use the order numbers listed. Replacement TACM5100 ..TSX100 Servo Gear Set parts are available only as listed. Replacement... - Page 16 UPGRADES AVAILABLE FOR YOUR DIABLO EDF The advanced wing is available when you’re ready to add aileron roll control and more speed. One servo is installed in each wing to control each aileron. This wing can be used with either the Single or Dual EDF Power Pod.
Need help?
Do you have a question about the DIABLO and is the answer not in the manual?
Questions and answers