Table of Contents

Related Manuals for UTStarcom PLS-7025


Summary of Contents for UTStarcom PLS-7025
- Page 1 Phone Guide UTStarcom PLS-7025 © 2006 UTStarcom Personal Communications LLC. All rights reserved. UTStarcom is a registered trademark and the UTStarcom logo is a trademark of UTStarcom, Inc., and its subsidiaries. Printed in the U.S.A.
-
Page 2: Table Of Contents
Table of Contents Introduction ........i Your Phone's Menu . - Page 3 Using Special Numbers ........56 Restricting Calls .
- Page 4 Using Your Phone's Countdown Timer ..... . .87 Using Your Phone's Notepad ....... .88 Using Your Phone's World Clock .
-
Page 5: Introduction
Introduction This Phone Guide introduces you to your wireless service and all the features of your new phone. It's divided into four sections: Section 1: Getting Started Section 2: Your Phone Section 3: Wireless Service Features Section 4: Safety and Warranty Information Throughout this guide, you'll find tips that highlight special shortcuts and timely reminders to help you make the most of your new phone and service. -
Page 6: Your Phone's Menu
Your Phone's Menu The following list outlines your phone's menu structure. For more information about using your phone's menus, see “ N avigating Through Phone Menus” on page 18. 1. Call History 1. Outgoing Calls 2. Incoming Calls 3. Missed Calls 4. - Page 7 2. Messaging 3. Voicemail 4. Alarms 5. Roaming Ringer 2. Volume 1. Ringer 2. Speakerphone 3. Receiver 4. Headset 5. Key Beep 6. Advanced 3. Alerts 1. Minute Beep 2. Connect Tone 3. Service Tone 4. Fade Tone 4. Tone Length (Normal/Long) 2.
- Page 8 3. Special # 4. Limit Use 5. Erase Contacts 6. Erase Message 7. Erase Voice Memo 8. Default Settings 9. Reset Phone 7. Text Entry 1. Auto-Capital 2. Auto-Space 3. My Words 4. Input Language 5. T9 Settings 6. Help 8.
-
Page 9: Section 1: Getting Started
Section 1 Getting Started... -
Page 10: Setting Up Service
Section 1A Setting Up Service In This Section Getting Started (page 3) Setting Up Your Voicemail (page 4) Getting Help (page 5) Setting up service on your new phone is quick and easy.This section walks you through the necessary steps to unlock your phone, set up your voicemail, and contact your service provider for assistance with your wireless service. -
Page 11: Getting Started
Getting Started Unlocking Your Phone To unlock your phone, follow these easy steps: Press and hold to turn the phone on. Press Unlock ( Note: To select a softkey, press the softkey button directly below the softkey text that appears at the bottom left and bottom right of your phone's display screen. -
Page 12: Setting Upyour Voicemail
Setting UpYour Voicemail All unanswered calls to your phone are automatically transferred to your voicemail, even if your phone is in use or turned off. Therefore, you will want to set up your voicemail and personal greeting as soon as your phone is activated. To set up your voicemail: From standby mode, press and hold Follow the system prompts to:... -
Page 13: Getting Help
Getting Help Directory Assistance Call from your phone and you'll have access to a variety of services and information through Directory Assistance, including residential, business, and government listings; movie listings or showtimes; driving directions, restaurant reservations, and major local event information. -
Page 15: Section 2: Your Phone
Section 2 Your Phone... -
Page 16: Your Phone: The Basics
Section 2A Your Phone: The Basics In This Section FrontView of Your Phone (page 9) Viewing the Display Screen (page 12) Features of Your Phone (page 13) Turning Your Phone On and Off (page 14) Using Your Phone's Battery and Charger (page 15) Navigating Through Phone Menus (page 18) Displaying Your Phone Number (page 19) Making and Answering Calls (page 19) -
Page 17: Front View Of Your Phone
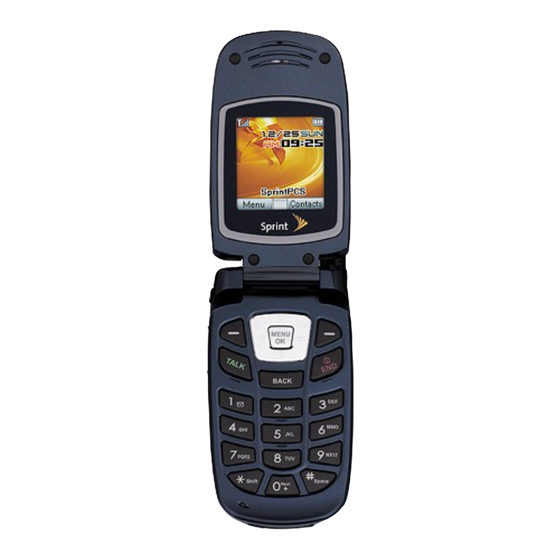
Front View of Your Phone 13. Earpiece 12. Display Screen 1. Softkey Buttons 2. Headset Jack 11. MENU/OK 3. Volume Control 4. Talk 10. End (Power) 9. Navigation Key 5. Back 8. Charger Jack 6. Microphone 7. Accessory Jack Section 2A: Your Phone-The Basics... -
Page 18: Key Functions
Key Functions Softkey Buttons let you select softkey actions or menu items corresponding to the bottom left and right lines on the display screen. Headset Jack allows you to plug in an optional headset for convenient, hands-free conversations. CAUTION! Inserting an accessory into the incorrect jack may damage the phone. - Page 19 Navigation Key scrolls through the phone's menu options and acts as a shortcut key from standby mode. Press Up to access Messaging. Press Down to view your Calendar Press Right to access Contacts. Press Left to access your own customized shortcuts (My Favorites).
-
Page 20: Viewing The Display Screen
Viewing the Display Screen Your phone's display screen provides a wealth of information about your phone's status and options. This list identifies the symbols you'll see on your phone's display screen: Note: To view a list of your phone's icons and descriptions, from the main menu select Settings >... -
Page 21: Features Of Your Phone
(For more information, see Section 2D: Controlling Your Roaming Experience on page 60.) Features of Your Phone Congratulations on the purchase of your phone. The PLS-7025 is lightweight, easy-to-use, and reliable, and it also offers many significant features and service options. The following... -
Page 22: Turning Your Phone On And Off
Turning Your Phone On and Off Turning Your Phone On To turn your phone on: Press and hold for approximately two seconds. Once your phone is on, it may display “ Looking for Serv i c e , ” which indicates that your phone is searching for a signal. When your phone finds a signal, it automatically enters standby mode. -
Page 23: Using Your Phone's Battery And Charger
Manufacturer-approved batteries and accessories may be located online at www.buywirelessnow.com/utstarcom Battery Capacity Your phone is equipped with a Lithium-Ion (Li-Ion) battery. It allows you to recharge your battery before it is fully drained. - Page 24 Installing the Battery To install the Li-Ion battery: To install, insert the battery into the opening on the back of the phone and gently press down until the latch snaps into place. Removing the Battery WARNING: Do not handle a damaged or leaking Li-Ion battery as you can be burned.
- Page 25 Charging the Battery Your phone's Li-Ion battery is rechargeable and should be charged as soon as possible so you can begin using your phone. Keeping track of your battery's charge is important. If your battery level becomes too low, your phone automatically turns off and you will lose all the information you were just working on.
-
Page 26: Navigating Through Phone Menus
Navigating Through Phone Menus The navigation key on your phone allows you to scroll through menus quickly and easily. The scroll bar at the right of the menu keeps track of your position in the menu at all times. To navigate through a menu, simply press the navigation key up or down. -
Page 27: Displayingyour Phone Number
Backing Up Within a Menu To go to the previous menu: Press To return to standby mode: Press DisplayingYour Phone Number Just in case you forget your phone number, your phone can remind you. To display your phone number: Select Menu > Settings > Phone Info > Phone Number. (Your phone number and other information about your phone and account will be displayed.) Note:... -
Page 28: Dialing Options
Enter a phone number from standby mode. (If you make a mistake while dialing, press to erase one digit at a time. Press and hold to erase the entire number and return to standby mode.) Press . (To make a call when you are roaming and Call Guard is enabled, highlight Roam Call and press . -
Page 29: Answering Calls
Answering Calls To answer an incoming call: Make sure your phone is on. (If your phone is off, incoming calls go to voicemail.) Press to answer an incoming call. (Depending on your phone's settings, you may also answer incoming calls by opening the phone or by pressing any number key. -
Page 30: Missed Call Notification
Answering a Roam Call With Call Guard Enabled Call Guard is an option that helps you manage your roaming charges when making or receiving calls while outside the available network. Please see Section 2D: Controlling Your Roaming Experience for more information about roaming. To answer a call when you are roaming and Call Guard is enabled: Select Answer to answer the call. - Page 31 During the call press Options ( ) to display your options. To select an option, highlight it and press Speaker On to activate speakerphone mode. (If you are in speakerphone mode, the option will appear as Speaker Off to deactivate speakerphone mode.) Unlock Phone to unlock your phone (appears only if the phone is locked).
-
Page 32: In-Call Options
In-Call Options Pressing Options ( ) during a call displays a list of features you may use during the course of a call. To select an option, press the corresponding keypad number or highlight the option and press . The following options are available through the Options menu: Speaker On ( ) to activate or deactivate speakerphone... -
Page 33: Saving A Phone Number
Saving a Phone Number Your phone can store up to five phone numbers in each of 500 Contacts entries. Each entry's name can contain 16 characters. Your phone automatically sorts the Contacts entries alphabetically. (For more information, see Section 2F: Using Contacts on page 72.) To save a number from standby mode: Enter a phone number and press Options (... -
Page 34: Dialing And Saving Phone Numbers With Pauses
Dialing and Saving Phone Numbers With Pauses You can dial or save phone numbers with pauses for use with automated systems, such as voicemail or credit card billing numbers. There are two types of pauses available on your phone: P Hard Pause sends the next set of numbers when you press T 2-sec Pause automatically sends the next set of numbers after two seconds. -
Page 35: Plus Code Dialing
4-Digit Calling To make a call using 4-Digit Calling: Dial the last four digits of a Contacts entry's phone number. Press . (The matching Contacts entry/entries will be displayed.) Highlight the correct entry and press Shortcut: Dial the last four digits of a Contacts entry's phone number and press to place the call. -
Page 36: Dialing From The Contacts List
Dialing From the Contacts List To dial directly from a Contacts entry: Press Menu > Contacts > Find Name. Shortcut: Press and then select Find Name to list entries. Highlight the entry you want to call and press dial the entry's default phone number. –... -
Page 37: Entering Text
Entering Text Selecting a Character Input Mode Your phone provides convenient ways to enter words, letters, punctuation, and numbers whenever you are prompted to enter text (for example, when adding a Contacts entry or when using SMS Text Messaging). To change the character input mode: When you display a screen where you can enter text, press the right softkey to change the character input mode. -
Page 38: Entering Characters Using T9 Text Input
Entering Characters Using T9 Text Input T9 Text Input lets you enter text in your phone by pressing keys just once per letter. (To select the T9 Word mode when entering text, see “Selecting a Character Input Mode” on page 29.) T9 Text Input analyzes the letters you enter using an intuitive word database and creates a suitable word. - Page 39 Adding a Word to the T9 Database If a word you want to enter is not displayed as an option when you are using T9 Text Input, you can add it to the database. Enter your word using T9 mode. If your word is not in the list, scroll to ADD WORD and press Enter the word using Alphabet mode.
-
Page 40: Entering Characters Using Alphabet Mode
Entering Characters Using Alphabet Mode To enter characters by using Alphabet mode (multi-tap entry): Select the Alphabet mode (see “Selecting a Character Input Mode” on page 29). Press the corresponding keys repeatedly until the desired letter appears. (For example, to enter the word “ B i l l , ” press twice, three times,... - Page 41 Entering Numbers, Symbols, Smileys and Preset Messages To enter numbers: Select the Number mode and press the appropriate key. (See “Selecting a Character Input Mode” on page 29). To enter symbols: Select the Symbols mode. (See “Selecting a Character Input Mode” on page 29.) To enter a symbol, press the appropriate key indicated on the display.
-
Page 42: Controlling Your Phone's Settings
Section 2B Controlling Your Phone's Settings In This Section Sound Settings (page 35) Display Settings (page 39) Messaging Settings (page 41) Location Settings (page 45) TTY Use (page 46) Text Entry Settings (page 48) Phone Setup Options (page 50) Phone Info (page 52) Using the menu options available on your phone, you can customize your phone to sound, look, and operate just the way you want it to. -
Page 43: Sound Settings
Sound Settings Ringer Types Ringer types help you identify incoming calls and messages. You can assign ringer types to individual Contacts entries, types of calls, and types of messages or others. Preprogrammed Ringers include a variety of standard ringer types and familiar music. Vibrating Ringer alerts you to calls or messages without disturbing others. - Page 44 Use your navigation key to scroll through the available ringers, and then press to save a selected ringer. Press Play ( ) to preview a sound. To return to the previous page, press or Done Selecting Ringer Types for Voicemail To select a ringer type for Voicemail: Select Menu >...
-
Page 45: Adjusting The Phone's Volume Settings
To return to the previous page, press or Done Adjusting the Phone's Volume Settings You can adjust your phone's volume settings to suit your needs and your environment. To adjust your phone's volume settings: Select Menu > Settings > Sounds > Volume. Select Ringer, Speakerphone, Receiver, Headset, Key Beep, or Advanced. -
Page 46: Alert Notification
Tip: You can adjust the ringer volume in standby mode (or the earpiece volume during a call) by using the volume key on the left side of your phone. Alert Notification Your phone can alert you with an audible tone when you change service areas, once a minute during a voice call, or when a call has been connected. -
Page 47: Display Settings
Silence All There may be times when you need to silence your phone entirely. The phone's Silence All option allows you to mute all sounds without turning your phone off. To activate Silence All: With the phone open, press the volume key down repeatedly to activate Silence All in standby mode. -
Page 48: Changing The Text Greeting
Changing the BacklightTime Length The backlight setting lets you select how long the display screen and keypad are backlit after any keypress is made. To change the backlight setting: Select Menu > Settings > Display > Backlight. Select Main Display or Keypad. Select a time setting and press Main Display Time Setting : 10 sec, 20 sec, 30 sec, Flip Open, Always Dim... -
Page 49: Messaging Settings
Changing the Contrast You can adjust your screen's contrast (brightness) to suit your surroundings. To adjust the display's contrast: Select Menu > Settings > Display > Contrast. Press the navigation key left or right to adjust the screen contrast and press or Done ( Changing the Phone's Menu Style Your phone allows you to choose how the menu appears on... - Page 50 sent message, and create your own preset messages, to name just a few. Displaying Pop-up Messages When you receive a text message, your phone notifies you by displaying an icon on your display screen. You can also choose to be notified with a larger pop-up message on your display screen.
- Page 51 Managing Preset Messages Your phone is loaded with 20 preset messages to help make sending text messages faster and easier. These messages, such as “Where are yo u ? , ” “ Let's get lunch,” and “Meet me at,” can be customized or deleted to suit your needs. You can even add your own preset messages to the list.
- Page 52 To send a preset message: Select Menu > Settings > Messaging > Preset Msg.. (The list of preset messages is displayed.) To send a preset message, press Options ( and then select Send To. (To access the Send Message editor, see “Using SMS Text Messaging” on page 107.) Adding a Customized Signature Each message you send can have a customized signature to reflect your personality.
-
Page 53: Location Settings
Location Settings Your phone is equipped with a Location feature for use in connection with location-based services that may be available in the future. The Location feature allows the network to detect your position. Turning Location off will hide your location from everyone except 911. -
Page 54: Tty Use
TTY Use A TTY(also known as a TDD or TextTelephone) is a telecommunications device that allows people who are deaf, hard-of-hearing, or who have speech or language disabilities, to communicate by telephone. Your phone is compatible with select TTY devices. Please check with the manufacturer of your TTY device to ensure that it supports digital wireless transmission. - Page 55 Note: In TTY Mode, your phone will display the TTY access icon. Note: If TTY mode is enabled, the audio quality of non-TTY devices connected to the headset jack may be impaired. WARNING: 911 Emergency Calling It is recommended thatTTY users make emergency calls by other means, including Telecommunications Relay Services (TRS), analog cellular, and landline communications.
-
Page 56: Text Entry Settings
Text Entry Settings Auto-Capital Select Menu > Settings > Text Entry > Auto-Capital. Select On or Off and press To return to the previous page, press or Done Auto-Space Select Menu > Settings > Text Entry > Auto-Space. Select On or Off and press To return to the previous page, press or Done My Words... -
Page 57: Input Language
Input Language Select Menu > Settings > Text Entry > Input Language. Select English or Spanish and press To return to the previous page, press or Done T9 Settings Select Menu > Settings > Text Entry > T9 Settings. Select Prediction Length, NextWord Predict., Word Completion, or Word Choice List, and press For Prediction Length, select 3+letter words, 4+letter words, 5+letter words, or 6+letter words and... -
Page 58: Phone Setup Options
Phone Setup Options Setting Abbreviated Dialing Abbreviated Dialing is another form of speed dialing. It allows you to dial a number by entering 3-6 digits of any number in your Contacts directory. If the digits you enter do notmatch any stored Contacts entry, your phone will automatically prepend the digits you specify. -
Page 59: Auto Answer Mode
To select an option, highlight it and press Talk Key to require to be pressed to answer all incoming calls. Any Key to allow an incoming call to be answered by pressing any key. Flip Open to allow an incoming call to be answered by opening the phone. -
Page 60: Phone Info
Headset Only Select Menu > Settings > Others >Headset Only. Select Normal or Discreet and press To return to the previous page, press or Done Phone Info Displays information about your phone: Select Menu > Settings > Phone Info. Select Phone Number, Help, Version or Advanced, and press To return to the previous page, press or Done... -
Page 61: Setting Your Phone's Security
Section 2C Setting Your Phone's Security In This Section Accessing the Security Menu (page 54) Using Your Phone's Lock Feature (page 54) Using Special Numbers (page 56) Restricting Calls (page 57) Erasing the Contacts List (page 57) Erasing the Message List (page 58) Erasing the Voice Memo List (page 58) Restoring Default Settings (page 59) Resetting Your Phone (page 59) -
Page 62: Accessing The Security Menu
Accessing the Security Menu All of your phone's security settings are available through the Security menu. You must enter your lock code to view the Security menu. To access the Security menu: Select Menu > Settings > Security. Enter your lock code to display the Security menu. Tip: If you can't recall your lock code, try using the last four digits of your wireless phone number or try 0000. -
Page 63: Changing The Lock Code
Changing the Lock Code To change your lock code: Select Menu > Settings > Security, and then enter your lock code. (The Security menu is displayed.) Select Change Lock Code. Enter your current lock code. Enter and re-enter your new lock code. Calling in Lock Mode You can place calls to 911 and to your special numbers when in lock mode. -
Page 64: Using Special Numbers
Using Special Numbers Special numbers are important numbers that you have designated as being “always available. ” You can call and receive calls from special numbers even if your phone is locked. You can save up to 10 special numbers in addition to your Contacts entries (the same number may be in both directories). -
Page 65: Restricting Calls
Restricting Calls There may be occasions when you want to limit the numbers your phone can call or from which it can receive calls. You can use the Restrict Calls setting to do just that. (The Restrict Calls setting does not apply to 911.) To restrict calls: Press Menu >... -
Page 66: Erasing The Messages List
Erasing the Messages List You can quickly and easily erase all of your saved messages. To erase all messages: Press Menu > Settings > Security, and then enter your lock code. (The Security menu is displayed.) Select Erase Message. If you are certain you would like to erase all of your messages, select Yes. -
Page 67: Restoring Default Settings
Restoring Default Settings You can easily restore all the factory defaults, including the ringer types and display settings. The Contacts, Call History, Scheduler, and Messaging are not affected. To restore your phone's default settings: Select Menu > Settings > Security, and then enter your lock code. -
Page 68: Controlling Your Roaming Experience
Section 2D Controlling Your Roaming Experience In This Section Understanding Roaming (page 61) Setting Your Phone's Roam Mode (page 64) Using Call Guard (page 65) Roaming Help (page 66) Roaming is the ability to make or receive calls when you're off the available network.Your new dual band/tri-mode PLS- 7025 works anywhere on the available network and allows you to roam on other analog and 1900MHz digital... -
Page 69: Understanding Roaming
Understanding Roaming Recognizing the Roaming Icon on the Display Screen Your phone's display screen always lets you know when you're off the available network. Any time you are roaming, the phone displays the roaming icon ( ). If you are roaming on a digital system, the roaming icon will be displayed along with the text - Digital Roam -. - Page 70 Roaming on Analog Networks When you roam on analog networks, you will experience a similar quality provided by other analog carriers today. Although some features, such as data services, may be unavailable, you can still make and receive calls and access voicemail.
- Page 71 Checking for Voicemail Messages While Roaming When you are roaming off the available network, you will not receive on-phone notification of new voicemail messages. Callers can still leave messages, but you will need to periodically check your voicemail for new messages if you are in a roaming service area for an extended period of time.
-
Page 72: Settingyour Phone's Roam Mode
SettingYour Phone's Roam Mode Your phone allows you to control your roaming capabilities. By using the Roaming menu option, you can determine which signals your phone accepts. Set Mode Choose from three different settings on your tri-mode phone to control your roaming experience. To set your phone's roam mode: Select Menu >... -
Page 73: Using Call Guard
Using Call Guard Your phone has two ways of alerting you when you are roaming off the available network: the onscreen roaming icon and Call Guard. Call Guard makes it easy to manage your roaming charges by requiring an extra step before you can place or answer a roaming call. -
Page 74: Roaming Help
Roaming Help Select Menu > Settings > Roaming > Help. A help message will be displayed. To return to the previous page, press or Done ( Section 2D: Controlling Your Roaming Experience... -
Page 75: Managing Call History
Section 2E Managing Call History In This Section Viewing History (page 68) Call History Options (page 69) Making a Call From Call History (page 69) Saving a Phone Number From Call History (page 70) Prepending a Phone Number From Call History (page 71) Erasing Call History (page 71) The Call History keeps track of incoming calls, calls made from your phone, and missed calls.This section guides... -
Page 76: Viewing History
Viewing History You'll find the Call History feature very helpful. It is a list of the last 20 phone numbers (or Contacts entries) for calls you placed, accepted, or missed. Call History makes redialing a number fast and easy. It is continually updated as new numbers are added to the beginning of the list and the oldest entries are removed from the bottom of the list. -
Page 77: Call History Options
Call History Options For additional information and options on a particular call, highlight a Call History entry and press This feature displays the date and time of the call, the phone number (if available), and the caller's name (if the number is already in your Contacts). -
Page 78: Saving A Phone Number From Call History
Saving a Phone Number From Call History Your phone can store up to 500 Contacts entries. Contacts entries can store up to a total of five phone numbers, and each entry's name can contain 16 characters. To save a phone number from Call History: Use your navigation key to select a Call History entry and press Options ( Select Save (... -
Page 79: Prepending A Phone Number From Call History
Prepending a Phone Number From Call History If you need to make a call from Call History and you happen to be outside your local area code, you can add the appropriate prefix by prepending the number. To prepend a phone number from Call History: Select a Call History entry and press Options ( Select Prepend ( Enter the prefix and press... -
Page 80: Using Contacts
Section 2F Using Contacts In This Section Adding a New Contacts Entry (page 73) Finding Contacts Entries (page 74) Contacts Entry Options (page 76) Adding a Phone Number to a Contacts Entry (page 76) Editing a Contacts Entry's Phone Number (page 77) Assigning Speed Dial Numbers (page 78) Selecting a Ringer Type for an Entry (page 79) Group Setting (page 80) -
Page 81: Adding A New Contacts Entry
Adding a New Contacts Entry Your phone can store up to 500 Contacts entries. Contacts entries can store up to a total of five phone numbers, and each entry's name can contain 32 characters. To add a new entry: Select Menu > Contacts > Add New Entry. Enter a name for the new entry and press (See “Entering Text”... -
Page 82: Finding Contacts Entries
Finding Contacts Entries There are several ways to display your Contacts entries: by name, by speed dial number, by group, and by voice dial tags. Follow the steps outlined in the sections below to display entries from the Contacts menu. Finding Names To find Contacts entries by name: Select Menu >... - Page 83 Finding Group Entries To find entries designated as part of a group: Select Menu > Contacts > Group Setting. Scroll through the group titles using your navigation key. To display entries belonging to a group, highlight the group and press To display an entry within the group, highlight it and press To dial the entry's default phone number, press...
-
Page 84: Contacts Entry Options
Contacts Entry Options To access a Contacts entry's options, highlight the entry in the list and press Options ( ). To select an option, highlight it and press Call to dial the selected number. Send Msg. to send a text message. Edit to edit the selected entry. -
Page 85: Editing A Contacts Entry's Phone Number
Editing a Contacts Entry's Phone Number To edit an entry's phone number: Display a Contacts entry. Press Edit ( Highlight the number you wish to edit and press Press again to edit the number. Press to clear one digit at a time, or press and hold to erase the entire number. -
Page 86: Assigning Speed Dial Numbers
Assigning Speed Dial Numbers Your phone can store up to 99 phone numbers in speed dial locations. For details on how to make calls using speed dial numbers. Speed dial numbers can be assigned when you add a new Contacts entry, when you add a new phone number to an existing entry, or when you edit an existing number. -
Page 87: Selecting A Ringer Type For An Entry
Selecting a Ringer Type for an Entry You can assign a ringer type to a Contacts entry so you can identify the caller by the ringer type. (See “Ringer Types” on page 35.) To select a ringer type for an entry: Display a Contacts entry. -
Page 88: Group Setting
Group Setting You can assign up to 10 individual Contacts entries to a group. Existing groups include Unassigned, Family, Friend, and Work. Calling or Sending a Message to a Group: Select Menu > Contacts > Group Setting. Select an existing group name with the navigation key, press To display a group entry, press Options ( ), and then... -
Page 89: My Phone
Setting a Ringer Type for a Group Select Menu > Contacts > Group Setting. Select an existing group name that you added with the navigation key. Press Options ( ), and then press Ringer ( Use your navigation key to scroll through available ringers, press . -
Page 90: Dialing Services
Dialing Services Your Contacts list is preprogrammed with contact numbers for various services. To dial a service from your Contacts: Press Menu > Contacts > Services. Select Directory or Account Info.. To dial a service from standby mode using your keypad: Dial the appropriate service number: Directory Assistance –... -
Page 91: Using The Phone's Tools
Section 2G Using the Phone's Tools In This Section Using Your Phone's Alarm Clock (page 84) Using Your Phone's Calendar (page 85) Using Your Phone's Countdown Timer (page 87) Using Your Phone's Notepad (page 88) Using Your Phone's World Clock (page 89) Using Your Phone's Stop Watch (page 89) Using Your Phone's Calculator (page 90) Using Your Phone's Conversion Tool (page 90) -
Page 92: Using Your Phone's Alarm Clock
Using Your Phone's Alarm Clock Your phone comes with a built-in alarm clock with multiple alarm capabilities. To use the alam clock: Select Menu > Tools > Alarm Clock. Select Alarm #1, Alarm #2, or Alarm #3. Press or Set ( Turn the alarm on or off by highlighting the activation field and pressing the left or right navigation key. -
Page 93: Using Your Phone's Calendar
Using Your Phone's Calendar Adding an Event to the Calendar Your phone has a built-in calendar that helps you to organize time and reminds you of important events. To add an event: Select Menu > Tools > Schedule. Using your navigation key, highlight the day to which you would like to add an event and press Add ( Enter the event title, and then press Done ( Press... -
Page 94: Viewing Events
Press Save ( ) to save the event or to return to the calendar. The date of the event will be marked on your calendar. Viewing Events To view your scheduled events. Select Menu > Tools > Schedule. Using your navigation key, highlight the day for which you would like to view events and press . -
Page 95: Using Your Phone's Countdown Timer
Using Your Phone's Countdown Timer Your phone has a built-in countdown timer to alert you when a specified time has elapsed. Set a Timer Event To set a new timer event: Select Menu > Tools > Countdown. Press Options ( ) and then select Add or press Add ) to add new countdown. -
Page 96: Using Your Phone's Notepad
Using Your Phone's Notepad Your phone comes with a notepad that can be used to compose and store reminders and notes to help keep you organized. To compose a note (there is an 80-letter limit): Select Menu > Tools > Memo Pad. Press Options ( ) to 1. -
Page 97: Using Your Phone's World Clock
Using Your Phone's World Clock To view the time in over 50 different locations: Select Menu > Tools > World Time. A world map displays a city showing its current date and time. Press the navigation key left or right to scroll though different time zones. -
Page 98: Using Your Phone's Calculator
Using Your Phone's Calculator Your phone comes with a built-in calculator. To use the calculator: Press Menu > Tools > Calculator. Enter a number using your keypad and perform one of the following functions: Press to multiply. Press to divide. Press to subtract. -
Page 99: Using Your Phone's Fun & Games
Press to highlight the conversion field. Then press the right or left navigation key to find your answer in the desired conversion unit. Using Your Phone's Fun & Games For those times when you need a break, your phone comes with two exciting games to play: To play built-in games: Press Menu >... -
Page 100: Using Your Phone's Voice Services
Section 2H Using Your Phone's Voice Services In This Section Using Voice-Activated Dialing (page 93) Managing Voice Memos (page 95) Your phone's Voice Services let you place calls using your voice, store voice reminders, and record memos right on your phone. This section includes easy-to-follow instructions on using voice-activated dialing and managing voice memos. -
Page 101: Using Voice-Activated Dialing
Using Voice-Activated Dialing You can use a voice dial tag to automatically dial a phone number in your Contacts. (A voice dial tag is a command you record and use to place calls without using the keypad.) Your phone can store up to 20 voice dial tags. Making a Call Using Voice-Activated Dialing To use a voice dial tag to call a phone number: Press and hold... - Page 102 Status Help (When it recognizes one of these commands, the phone launches the associated application. You may be asked to repeat a command if the command is not recognized by voice recognition.) Voice Tools Options To set voice tools options: Select Menu >...
-
Page 103: Managing Voice Memos
Managing Voice Memos You can use your phone's Voice Services to record brief memos to remind you of important events, phone numbers, or grocery list items. Recording Voice Memos To record a voice memo: Select Menu > Tools > Voice > Voice Memo. Press Record ( ) to record a new voice memo. -
Page 104: Voice Memo Options
Voice Memo Options To play voice memos you have recorded: Select Menu > Tools > Voice > Voice Memo. Select the voice memo you want to play, and press Play ). Press Stop ( ) to stop playing a voice memo. Erasing Voice Memos To erase all voice memos: Select Menu >... -
Page 105: Section 3: Wireless Service Features
Section 3 Wireless Service Features... -
Page 106: Wireless Service Features: The Basics
Section 3A Wireless Service Features: The Basics In This Section Using Voicemail (page 99) Using SMS Text Messaging (page 107) Using Caller ID (page 112) Responding to Call Waiting (page 112) Making a Three-Way Call (page 113) Using Call Forwarding (page 114) Now that you've mastered your phone's fundamentals, it's time to explore the calling features that enhance your wireless service.This section outlines your basic service... -
Page 107: Using Voicemail
Using Voicemail Setting UpYour Voicemail All unanswered calls to your phone are automatically transferred to your voicemail, even if your phone is in use or turned off. Therefore, you will want to set up your Svoicemail and personal greeting as soon as your phone is activated. To set up your voicemail: Press and hold Follow the system prompts to:... -
Page 108: Voicemail Notification
Voicemail Notification There are several ways your phone alerts you to a new message: By displaying a message on the screen. By sounding the assigned ringer type. By the LED blinking red. By displaying at the top of your screen. New Voicemail Message Alerts When you receive a new voice message, your phone alerts you and prompts you to call your voicemail. - Page 109 RetrievingYour Voicemail Messages You can review your messages directly from your phone or from any other touch-tone phone. To dial from your wireless phone, you can either speed dial your voicemail or use the menu keys. Using One-Touch Message Access Press and hold .
-
Page 110: Voicemail Options
Voicemail Button Guide Here's a quick guide to your keypad functions while listening to voicemail messages. For further details and menu options, s e e “ Voicemail Menu Key” on page 106. Date/Time Send Reply Advance Replay Rewind Forward Erase Call Back Save Cancel... - Page 111 Press for Expert Mode. Press to turn Expert Mode on or off. Setting Up Group Distribution Lists Create up to 20 separate group lists, each with up to 20 customers. Press and hold to access your voicemail. (If your voicemail box contains any new or saved messages, press to access the main voicemail menu.) Press...
- Page 112 Voicemail-to-Voicemail Message Reply Reply to a voice message received from any other voicemail user. After listening to a voice message, press Follow the voice prompts to record and send your reply. Voicemail-to-Voicemail Message Forwarding Forward a voice message, except those marked “Private,” to other voicemail users.
-
Page 113: Clearing The Message Icon
Continue Recording When leaving a voice message, you can choose to continue recording even after you've stopped. Before pressing to indicate that you are satisfied with the message you recorded, press to continue recording. Extended Absence Greeting When your phone is turned off or you are off the available network for an extended period, this greeting can be played instead of your normal personal greeting. -
Page 114: Voicemail Menu Key
Voicemail Menu Key Following the prompts on the voicemail system, you can use your keypad to navigate through the voicemail menu. The following list outlines your phone's voicemail menu structure. Listen Envelope Information Reply Advance 8 Seconds Replay Rewind Forward Message Erase Callback Save... -
Page 115: Using Sms Text Messaging
Personal Greetings Name Announcement Extended Absence Greeting Return to Personal Options Menu Expert Mode (On/Off) Place a Call Disconnect Using SMS Text Messaging With SMS Text Messaging, you can use other caller's wireless phone numbers to send instant text messages from your phone to their messaging-ready phones - and they can send messages to you. - Page 116 Under “Recipients”, input the phone number and press Next ( ) to save the recipient. (To include additional recipients, select Enter Addr 2, Enter Addr 3, etc., after each entry. You may include up to 10 recipients per message.). Press Options ( ) to choose from the following: Find to find and select a recipient from your internal...
- Page 117 Accessing SMS Text Messages (Inbox) To read an SMS Text message: When you receive a text message, it will automatically appear on your phone's main display screen. Use your navigation key to scroll down and view the entire message. To reply to an SMS Text message: While the message is open, select Reply ( Press Options ( ) to choose from the following:...
- Page 118 Accessing SMS Text Messages (Outbox) To forward to an SMS Text message: While the message is open, select Send ( Press Options ( ) to choose from the following: Call to place a call to a sent message number. Edit to edit a previously sent message. Lock/Unlock to lock or unlock a text message.
- Page 119 Accessing SMS Text Messages (Drafts) To edit to a saved SMS Text message: While the message is open, select Edit ( Press Options ( ) to choose from the following: Call to place a call to a draft message number. Send to send a draft message.
-
Page 120: Using Caller Id
Using Caller ID Caller ID allows people to identify a caller before answering the phone by displaying the number of the incoming call. If you do not want your number displayed when you make a call, just follow these easy steps. To block your phone number from being displayed for a specific outgoing call: Press... -
Page 121: Making A Three-Way Call
Making a Three-Way Call With Three-Way Calling, you can talk to two people at the same time. When using this feature, the normal airtime rates will be charged for each of the two calls. To make a Three-Way Call: Enter a number you wish to call and press Once you have established the connection, enter the second number you wish to call and press . -
Page 122: Using Call Forwarding
Using Call Forwarding Call Forwarding lets you forward all your incoming calls to another phone number - even when your phone is turned off. You can continue to make calls from your phone when Call Forwarding is activated. To activate Call Forwarding: Press Enter the area code and phone number to which your future calls should be forwarded. -
Page 123: Section 4: Safety And Warranty Information
Section 4 Safety and Warranty Information... -
Page 124: Important Safety Information
Section 4A Important Safety Information In This Section General Precautions (page 117) Maintaining Safe Use of and Access to Your Phone (page 117) Using Your Phone With a Hearing Aid Device (page 120) Caring for the Battery (page 121) Radiofrequency (RF) Energy (page 122) Owner's Record (page 124) Phone Guide Proprietary Notice (page 124) This phone guide contains important operational and safety... -
Page 125: General Precautions
General Precautions There are several simple guidelines to operating your phone properly and maintaining safe, satisfactory service. Hold the phone with the antenna raised, fully-extended, and over your shoulder. Try not to hold, bend, or twist the phone's antenna. Don't use the phone if the antenna is damaged. Speak directly into the mouthpiece. - Page 126 Using Your Phone While Driving Talking on your phone while driving (or operating the phone without a hands-free device) is prohibited in some jurisdictions. Laws vary as to specific restrictions. Remember that safety always comes first. Following Safety Guidelines To operate your phone safely and efficiently, always follow any special regulations in a given area.
- Page 127 Turning Off Your Phone in Dangerous Areas To avoid interfering with blasting operations, turn your phone off when in a blasting area or in other areas with signs indicating two-way radios should be turned off. Construction crews often use remote-control RF devices to set off explosives.
-
Page 128: Using Your Phone With A Hearing Aid Device
Not all phones have been rated. Phones that are rated will have the rating on the box. Your PLS-7025 has an M3 rating Note: Phones rated M3 or M4 meet FCC requirements and may generate less interference to hearing devices than phones that are not labeled. -
Page 129: Caring For The Battery
UTStarcom is not aware of similar problems with phones resulting from the proper use of batteries and accessories approved by UTStarcom. Use only manufacturer-approved batteries and accessories. -
Page 130: Radiofrequency (Rf) Energy
Don't use the battery charger in direct sunlight or in high humidity areas, such as the bathroom. Never dispose of the battery by incineration. Keep the metal contacts on top of the battery clean. Don't attempt to disassemble or short-circuit the battery. The battery may need recharging if it has not been used for a long period of time. - Page 131 SAR values at or below the federal standard of 1.6 W/kg are considered safe for use by the public. The highest reported SAR values of the PLS-7025 are: AMPS mode (Part 22): Head: 1.16 W/kg; Body-worn: 1.19 W/kg...
-
Page 132: Owner's Record
The model number, regulatory number and serial number are located on a nameplate inside the battery compartment. Record the serial number in the space provided below. This will be helpful if you need to contact us about your phone in the future. UTStarcom PLS-7025 Model: Serial No.: Phone Guide Proprietary Notice... -
Page 133: Manufacturer's Warranty
Section 4B Manufacturer's Warranty In This Section Manufacturer's Warranty (page 126) Your phone has been designed to provide you with reliable, worry-free service. If for any reason you have a problem with your equipment, please refer to the manufacturer's warranty in this section. For information regarding the terms and conditions of service for your phone, please contact your service provider. -
Page 134: Manufacturer's Warranty
12 MONTH LIMITED WARRANTY UTStarcom Personal Communications (the Company) warrants to the original retail purchaser of this UTStarcom handheld portable cellular telephone, that should this product or any part thereof during normal consumer usage and conditions, be proven defective in material or... - Page 135 In addition, if your wireless device utilizes a SIM or Multimedia card, please remove the card before submitting the device and store for later use when your device is returned, UTStarcom Personal Communications is not responsible for and does not guarantee restoration...
- Page 136 This Warranty gives you specific legal rights, and you may also have other rights, which vary from state to state or province to province. IN USA: UTStarcom Personal Communications 555 Wireless Blvd. Hauppauge, NY 11788 (800) 229-1235...
- Page 137 Notes ________________________________________________________ ________________________________________________________ ________________________________________________________ ________________________________________________________ ________________________________________________________ ________________________________________________________ ________________________________________________________ ________________________________________________________ ________________________________________________________ ________________________________________________________ ________________________________________________________ ________________________________________________________ ________________________________________________________ ________________________________________________________ ________________________________________________________ ________________________________________________________ ________________________________________________________...
- Page 138 Notes ________________________________________________________ ________________________________________________________ ________________________________________________________ ________________________________________________________ ________________________________________________________ ________________________________________________________ ________________________________________________________ ________________________________________________________ ________________________________________________________ ________________________________________________________ ________________________________________________________ ________________________________________________________ ________________________________________________________ ________________________________________________________ ________________________________________________________ ________________________________________________________ ________________________________________________________...
- Page 139 Notes ________________________________________________________ ________________________________________________________ ________________________________________________________ ________________________________________________________ ________________________________________________________ ________________________________________________________ ________________________________________________________ ________________________________________________________ ________________________________________________________ ________________________________________________________ ________________________________________________________ ________________________________________________________ ________________________________________________________ ________________________________________________________ ________________________________________________________ ________________________________________________________ ________________________________________________________...
- Page 140 Notes ________________________________________________________ ________________________________________________________ ________________________________________________________ ________________________________________________________ ________________________________________________________ ________________________________________________________ ________________________________________________________ ________________________________________________________ ________________________________________________________ ________________________________________________________ ________________________________________________________ ________________________________________________________ ________________________________________________________ ________________________________________________________ ________________________________________________________ ________________________________________________________ ________________________________________________________...
Need help?
Do you have a question about the PLS-7025 and is the answer not in the manual?
Questions and answers