Table of Contents
Advertisement
Quick Links
Download this manual
See also:
User Manual
Advertisement
Table of Contents

Related Manuals for UTStarcom 6700


Summary of Contents for UTStarcom 6700
-
Page 1: Getting Started
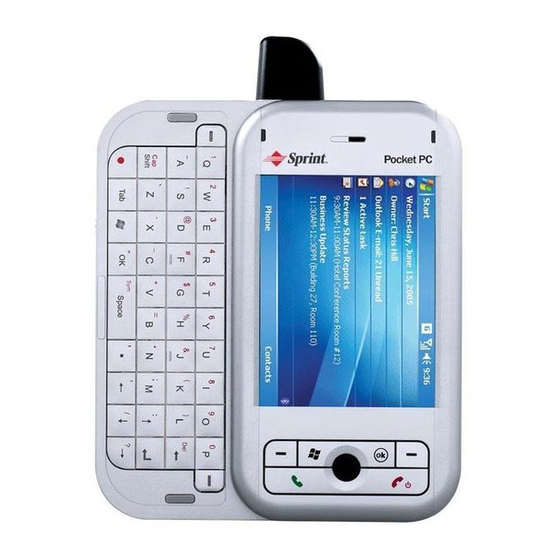
UTStarcom 6700 ® the future is friendly ®... -
Page 3: Table Of Contents
table of contents activate self service full service setting up your email corporate email accounts internet service provider email (POP3/IMAP4) laptop internet access through your device other useful settings customizing the Today screen synchronizing larger files / attachments and additional email folders moving email attachments to the storage card support... - Page 4 Thanks for choosing the UTStarcom 6700 wireless PDA from TELUS Mobility. Let’s get started!
-
Page 5: Activate
Full service activation support is available by calling 1-888-552-3333 from any device other than your UTStarcom 6700. An Activations Representative will take you through the steps to create a 4-digit PIN number, set up your account and guide you through the programming of your new phone. -
Page 6: Setting Up Your Email
setting up your email You can configure your handheld email with: your company’s Microsoft Exchange Server, or your own personal POP3/IMAP email account. (a) Corporate email accounts (Microsoft Exchange 2003 required): Please contact your email administrator to obtain the following information before proceeding with configuration of Exchange ActiveSync client: User name (network account):... - Page 7 1. Tap the clock icon to modify the time zone, time and date. Tap OK and then Yes to Save Changes to Clock Settings. 2. On the Today screen, tap Start, tap Programs, tap ActiveSync, tap on Menu select Add Server Source (or Configure Server).
- Page 8 setting up your email (continued) 3. In the Server address text box, type the name of the Exchange 2003 server as provided by your email administrator. 4. By default, the SSL connection check box is selected. Clear the check box if your server does not use a SSL connection.
- Page 9 5. Tap Next and enter the following information: In the User name box, enter the user name for the account to be synchronized. In the Password box, enter the password for the account to be synchronized. In the Domain box, enter the domain provided by your email administrator.
- Page 10 setting up your email (continued) 6. By default, Contacts, Calendar, E-mail & Tasks are selected for synchronization. De-select each type of data you do not wish to synchronize. 7. Tap Finish and then tap Sync to start synchronization. After your first synchronization an ActiveSync message will appear prompting you to use the “Always up to date feature”...
- Page 11 your calendar updates/emails as and when they arrive. Select Yes. You will then be taken to the Schedule screen, where you can set your synchronization preferences. This is the time between network synchronizations. The default is set to 10 minutes but you can adjust the schedule to suit your needs.
- Page 12 setting up your email (continued) Select TELUS from under the Service Provider field. Ensure your 10 digit mobile phone number is in the Phone number for this device field. Note: Generally your mobile phone will self-populate but you will need to validate. Tap OK to return to the ActiveSync screen.
-
Page 13: Internet Service Provider Email (Pop3/Imap4)
(b) Internet service provider email (POP3/IMAP) You can access Internet (IMAP or POP3) based email. To access Internet-based email, an IMAP or POP3 email account must be created on the device. Please have the following information handy before starting to set-up your email account. - Page 14 setting up your email (continued) 4. Select New Account. 5. Enter your email address and select Next. 6. Your device may perform an auto configuration. This will only take a few seconds. 7. Enter Your Name, User Name and Password. 8.
-
Page 15: Laptop Internet Access Through Your Device
For set up instructions please refer to the UTStarcom 6700 user manual Using Wireless Modem, page 76. Refer to telusmobility.com/ppc6700 for details on our email & web rate plans. other useful settings customizing the Today screen To customize the information you want displayed: On the Today screen tap Start >... - Page 16 (continued) ActiveSync Software on your Personal computer to do this. Place your UTStarcom in the cradle attached to your PC. On the ActiveSync of your computer screen tap Tools > Options > under Exchange Server, highlight E-mail and tap on Settings. You...
-
Page 17: Moving Email Attachments To The Storage Card
moving email attachments to the storage card Insert a mini SD Storage Card in the accessories slot located at the top of your device. Tap Start > Messaging > Menu > Tools > Options Select the Storage tab, tap Store attachments on storage card then tap OK. -
Page 18: Support
If you have any questions about the set-up of your handheld, rate plans, or billing please visit us at telusmobility.com/PPC6700 or contact us at 1-866-771-7292. © 2005 TELUS Mobility. © 2005 UTStarcom Personal Communications LLC. All rights reserved. UTStarcom is a registered trademark of UTStarcom, Inc. and its subsidiaries.
Need help?
Do you have a question about the 6700 and is the answer not in the manual?
Questions and answers