Table of Contents
Advertisement
Advertisement
Table of Contents

Related Manuals for Bresser 433MHz


Summary of Contents for Bresser 433MHz
-
Page 1: Weather Center
WEATHER CENTER Instruction Manual... -
Page 2: General Information
General Information About this Instruction Manual Please read the safety instructions in this manual carefully. To avoid damage to the unit and the risk of injury, only use this product as described in the manual. Keep the instruction manual handy so that you can easily look up information on all the functions. DANGER! You will fi... -
Page 3: Notes On Cleaning
GB/IE NOTE! Do not disassemble the device. In the event of a defect, please contact your dealer. He will contact the Service Centre and can send the device in to be repaired, if necessary. Use only the recommended batteries. Always replace weak or empty batteries with a new, complete set of batteries at full capacity. - Page 4 Introduction Congratulations on your purchase of the BRESSER Weather Center. The weather center consists of a main console unit with a remote control, as well as an assortment of remote sensors which collect and transmit a wide range of weather data, including outdoor temperature, humidity, wind speed and direction, rain amount and rain rate.
-
Page 5: Weather Forecast
GB/IE Remote Weather Sensors The remote weather sensors include a thermo-hygrometer, anemometer (wind sensor) and rain sensor. All data collected by the sensors are transmitted to the main console unit by wireless RF, with a range up to 100 meters (open area). The weather center supports a maximum of 5 thermo-hygrometers, allowing 5 channels of temperature/humidity display. -
Page 6: Clock And Calendar
Clock and Calendar (12 hr/ 24 hr) (month/day or day/month) - Different combinations of clock and calendar displays - 6 languages for day of week (English/ German/ French/ Italian/ Spanish/ Dutch) Alarms - Single alarm: activated once at specifi ed time - Weekday alarm: activated everyday from Monday to Friday at specifi... - Page 7 GB/IE Contents of Complete Weather Center Kit Before installing your weather center, please check that the following are complete: Hardware Fittings Components Main Console Unit Thermo-Hygro Sensor Rain Sensor: 4 screws for - Funnel shaped lid securing unit to with battery hatch ground - Sensor base - Bucket see-saw...
-
Page 8: Setting Up The Remote Weather Sensors
Installing your Weather Center Setting up the Remote Weather Sensors Before starting up the main console unit, setup all the remote sensors fi rst. When placing the sensors, make sure that they are within receiving range of the console unit. Ideally, they should be within the line of sight of the console unit. -
Page 9: Setting Up The Anemometer (Wind Sensor)
GB/IE Placement Tips: - The rain sensor should be placed in an open area away from walls, fences, trees and other coverings which may either reduce the amount of rainfall into the sensor, defl ect the entry of wind- blown rain, or create extra precipitation runoff. Trees and rooftops may also be sources of pollen and debris. -
Page 10: Setting Up The Main Console Unit
Setting up the Main Console Unit 1. Open the latch at the back of the main console unit. 2. Insert 4 x UM-3 or “AA” size 1.5 V batteries according to the polarities shown. 3. Reattach the latch. 4. If placing the console unit on a table or horizontal surface, fold out the table stand and adjust to the optimal viewing angle. - Page 11 GB/IE Using your Weather Center Buttons and Controls The following controls are available on the main console unit: - Switches to next mode in anti-clockwise direction - Increment for setting parameters - Switches to next mode in clockwise direction DOWN - Decrement for setting parameters - Rotates display for current mode - Press and hold to enter setup or change units...
-
Page 12: Navigating Between Different Modes
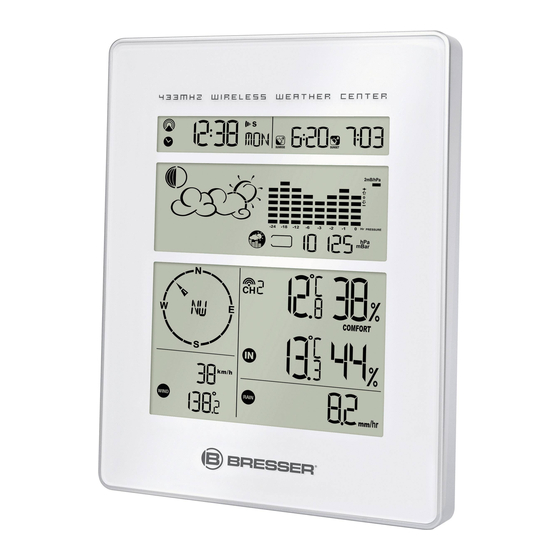
Navigating between Different Modes There are 7 modes available on the main console unit, and each one displays a different category of data. When display is in a certain mode, its corresponding icon will start fl ashing. To navigate between the different modes from the main console unit, press UP to cycle through the modes in a clockwise direction or DOWN to cycle through the modes in an anti-clockwise direction. - Page 13 GB/IE Sunrise/Sunset Mode - Sunrise and sunset times - Longitude and latitude of local area Sunrise time/ Sunset time/ Longitude Latitude Sunrise/ Sunset Icon Temperature and Humidity Mode - Temperature and humidity trend and readings for indoor and selected channel - Comfort level - Dew point - Temperature alerts...
- Page 14 Wind Mode - Wind Chill - Temperature at place of anemometer - Wind direction - Wind speed - Wind gust - Alert for wind speed and wind gust speed Wind Direction Indicator Wind direction in compass points/ bearing Wind Speed/ Gust/ Max.
-
Page 15: Using The Different Weather Modes
GB/IE Using the Different Weather Modes Pressure and Weather Forecast Mode This part of the display indicates the current pressure, sea level pressure, weather forecast, moon phase and pressure trend. A number of historical statistics can also be viewed, such as the sea-level pressure values for the last 24 hours, moon phase for the previous and next 39 days, as well as a pressure/ temperature/ humidity history bar-chart. -
Page 16: Setting The Sea-Level Pressure
Setting the Sea-Level Pressure 1. In Pressure and Weather Forecast Mode, press SET until the sea-level pressure is displayed. 2. Press and hold SET. The Sea-Level Pressure display should be fl ashing. 3. Set Sea-Level Pressure: Press UP or DOWN to adjust value. Press and hold either button for fast advance. Press SET to confi... -
Page 17: Understanding The Weather Forecast Display
GB/IE Understanding the Weather Forecast Display Display Weather Forecast Status Sunny Partly Cloudy Cloudy Rain Heavy Rain Unstable Weather Snow NOTE: 1. The accuracy of a general pressure-based weather forecast is about 70%. 2. The weather forecasts may not necessarily refl ect the current situation. 3. -
Page 18: Clock And Alarm Mode
Clock and Alarm Mode The main console unit can be confi gured to display the time, calendar or UTC time. There are three time alarms available on the console unit: Single alarm: activated once at specifi ed time Weekday alarm: activated everyday from Monday to Friday at specifi ed time Pre-alarm: activated at specifi... - Page 19 GB/IE Rotating between Different Clock/Calendar Displays In Clock and Alarm Mode, each press of SET rotates clock display between: - Hour: Minute: Weekday - Hour: Minute for UTC (Coordinated Universal Time) - Hour: Minute: City - Hour: Minute: Second - Month: Day: Year (or Day: Month: Year depending on settings) Activating/Deactivating the Time Alarms 1.
-
Page 20: Sunrise/Sunset Mode
Disabling/Entering Snooze when Time Alarms are Activated To Enter Snooze: Press SNOOZE to enable snooze function. Note: Alarm will automatically enter snooze mode if no key is pressed after the alarm sounds for 2 minutes. This will occur for a maximum of three times. To Disable Alarm(s): Press ALARM/CHART to disable the alarm(s). - Page 21 GB/IE Accessing Sunrise/Sunset Mode From the main console unit: Press UP or DOWN until the sunrise and sunset icons the display start fl ashing. Setting up the Location Data 1. In Sunrise/Sunset Mode, press and hold SET to enter location data setup. 2.
-
Page 22: Temperature And Humidity Mode
At certain locations (especially those at high latitudes), sunrise and sunset events may not occur within a 24 hour time frame. Display Sunrise status Display Sunset status FULL Sunrise at previous day FULL Sunset at next day or later ---- No sunrise for the whole day ----- No sunset for the whole day... - Page 23 GB/IE Activating/Deactivating the Temperature Alerts 1. In Temperature and Humidity Mode, each press of ALARM/CHART rotates channel temperature display between: - Current Temperature for corresponding channel - Upper Temperature Alert (displays OFF if deactivated): icon displayed - Lower Temperature Alert (displays OFF if deactivated): icon displayed 2.
-
Page 24: Rain Mode
Activating Main Console Unit to Search for All Remote Sensor Signals The main console unit may be manually activated to search for signals from all remote sensors. Press and hold DOWN to enforce a search. Rain Mode The main console unit records the total amount of rainfall for the last hour, last 24 hours, yesterday, last week and last month. -
Page 25: Wind Mode
GB/IE Disabling when Daily Rainfall Alert is Activated To disable Rainfall Alert: Press ALARM/CHART to disable the alert. Wind Mode The wind direction is shown by an animated compass display. Its angle can be displayed as compass points (i.e. NW) or in bearings from the north (i.e. 22.5º). The lower left of the wind display can be set to indicate the temperature at the anemometer or the temperature adjusted with a wind chill factor. - Page 26 Activating/Deactivating Wind Alerts 1. In Wind Mode, each press of ALARM/CHART rotates wind speed display between: - Current wind speed - Wind speed alert (“ALARM HI” displayed) - Gust alert (“GUST ALARM HI” displayed) If the alert is deactivated, “OFF” will be shown, otherwise the alert value is shown. 2.
-
Page 27: Maintenance
GB/IE Maintenance Changing Batteries The battery statuses of the sensors are checked every hour. If the low battery indicators light up, replace the batteries for the corresponding unit immediately. Changing Batteries for the Main Console Unit 1. Remove the latch at the back and replace all batteries. Do not mix old and new batteries. 2. -
Page 28: Troubleshooting
Troubleshooting The display shows dashes “---” for weather parameter(s) The display will show “---” when the wireless link with the remote is lost sensor for the following periods: Thermo-hygro Sensor – 15 minutes Anemometer (Wind Sensor) – 15 minutes Rain Sensor –... -
Page 29: Eec-Declaration Of Conformity
Bresser GmbH declares that the device (Weather station/ Art.No.: 70-02500) is in accordance with applicable guidelines and corresponding standards of the 1999/5/EG directive. Bresser GmbH has issued a “Declaration of Conformity” in accordance with applicable guidelines and corresponding standards. This can be viewed any time upon request. -
Page 30: Dst Defi Nition
Power Main unit : use 4 pcs UM-3 or ”AA” 1.5 V battery Remote Thermo-hygro unit : use 2 pcs UM-3 or “AA” 1.5 V battery Remote Anemometer unit : use 2 pcs UM-3 or “AA” 1.5 V battery Remote Rain gauge unit : use 2 pcs UM-3 or “AA”... - Page 31 GB/IE World Cities City Code Zone City Code Zone Offset Offset Addis Ababa, Ethiopia Cairo, Egypt Adelaide, Australia Calcutta, India (as Kolkata) Algiers, Algeria Cape Town, South Africa Amsterdam, Netherlands Caracas, Venezuela Ankara, Turkey Chihuahua, Mexico Asunción, Paraguay Copenhagen, Denmark Athens, Greece Córdoba, Argentina Bangkok, Thailand...
-
Page 32: Technical Specifications
(QR code) for available versions. Alternatively you can also send an email to manuals@bresser.de or leave a message on +49 (0) 28 72 – 80 74-220*. Please always state your name, precise address, a valid phone number and email address, as well as the article number and name. - Page 36 Bresser GmbH DE-46414 Rhede/Westf. Germany www.bresser.de Irrtümer und technische Änderungen vorbehalten. · Errors and technical changes reserved. · Sous réserve d’erreurs et de modifi cations techniques. Vergissingen en technische veranderingen voorbehouden. · Con riserva di errori e modifi che tecniche.
Need help?
Do you have a question about the 433MHz and is the answer not in the manual?
Questions and answers