Table of Contents
Advertisement
Available languages
Available languages
Quick Links
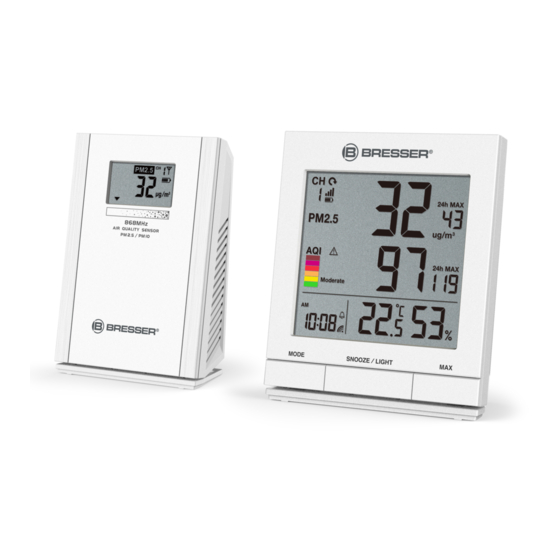
Air Quality Monitor with Wireless Sensor
Feinstaubmessgerät mit Luftqualitätssensor
Art.No.: 7110300
INSTRUCTION MANUAL
EN
BEDIENUNGSANLEITUNG
DE
INSTRUCTION MANUAL
EN
About this Instruction Manual
These operating instructions are to be considered a component of the device.
Please read the safety instructions and the operating instructions carefully before use.
Keep these instructions for renewed use at a later date. When the device is sold or given to someone else, the instruction
manual must be provided to the new owner/user of the product.
GENERAL WARNINGS
• Risk of electric shock — This device contains electronic components that operate via a power source
(batteries). Children should only use the device under adult supervision. Only use the device as described in the
manual; otherwise, you run the risk of an electric shock.
• Choking hazard — Children should only use the device under adult supervision. Keep packaging material, like
plastic bags and rubber bands, out of the reach of children, as these materials pose a choking hazard.
• Risk of chemical burn — Keep batteries out of the reach of children! Make sure you insert the batteries
correctly. Leaking battery acid can lead to chemical burns. Avoid contact of battery acid with skin, eyes and
mucous membranes. In the event of contact, rinse the affected region immediately with a plenty of water and
seek medical attention.
• Risk of fire/explosion — Do not expose the device to high temperatures. Use only the recommended batteries.
Do not short-circuit the device or batteries, or throw them into a fire. Excessive heat or improper handling could
trigger a short-circuit, a fire, or an explosion.
• Do not disassemble the device. In the event of a defect, please contact your dealer. The dealer will contact the
Service Centre and can send the device in to be repaired, if necessary.
• Use only the recommended batteries. Do not use batteries from different brands or with different capacities.
The batteries should be removed from the unit if it has not been used for a long time.
MANUAL DOWNLOAD:
www.bresser.de/P7110300
1
Advertisement
Table of Contents

Related Manuals for Bresser 7110300


Summary of Contents for Bresser 7110300
- Page 1 MANUAL DOWNLOAD: www.bresser.de/P7110300 Air Quality Monitor with Wireless Sensor Feinstaubmessgerät mit Luftqualitätssensor Art.No.: 7110300 INSTRUCTION MANUAL BEDIENUNGSANLEITUNG INSTRUCTION MANUAL About this Instruction Manual These operating instructions are to be considered a component of the device. Please read the safety instructions and the operating instructions carefully before use.
-
Page 2: Notes On Cleaning
Wireless Air Quality Sensor. EC Declaration of Conformity Hereby, Bresser GmbH declares that the equipment type with part number: 7110300 is in compliance with Directive: 2014/53/EU. The full text of the EU declaration of conformity is available at the following internet address: www.bresser.de/download/7110300/CE/7110300_CE.pdf... - Page 3 Low maintenance The Swiss sensor is expected to have a lifetime of over 10 years while operating continuously for 24 hours/ day. With its contamination-resistance material, there is no need for cleaning and/or maintenance, thus avoiding problems related to sensor drift or malfunction. OVERVIEW Air Quality Monitor Wireless PM2.5/PM10 Air Quality Sensor...
-
Page 4: Battery Insertion
BATTERY INSERTION Unscrew and remove the battery door of sensor with a screwdriver. Insert the 3 rechargeable batteries (included) into the battery compartment in the following order: Screw the battery door compartment on tightly. After inserting batteries, all LCD segment will be shown for 1 second. GETTING STARTED Slide [ CHANNEL ] to set the channel number for your sensor(s). -
Page 5: Display Mode
DISPLAY MODE Press [ MODE ] to toggle the display mode between PM10 and PM2.5. MEASUREMENT INTERVAL Powered by DC adapter The device measures PM2.5 or PM10 concentration every minute automatically when powered with a DC adapter. Manual detection User can press [ CHECK ] button anytime to get an updated measurement of PM2.5 or PM10 concentration readings. -
Page 6: Battery Power Status
Note: This 6 level scale of PM2.5 / PM10 concentration is not the same as Air Quality Index (AQI). BATTERY POWER STATUS The device is powered by rechargeable batteries, and comes with battery power indicator. The battery life of the device from fully charged batteries is determined by the number of detections it performed, either through set intervals or manually activated by user. -
Page 7: Data Transmission
Insert new 3 x AA size rechargeable batteries into the battery compartment according to the polarity mark inside battery compartment. Screw the battery door compartment on tightly. After inserting batteries, all LCD segment will be shown for 1 second. PAIRING WIRELESS SENSOR TO CONSOLE DISPLAY This Wireless PM2.5/PM10 Air Quality Sensor can connect to the Air Quality Display console. - Page 8 Place a screw on the wall where you wish to hang for sensor. Hang the sensor on to the screw with or without the mounting adaptor. Vertical angle Slant angle Note: Higher siting may also be appropriate if the sensor is representative of a large area. AIR QUALITY MONITOR 9.
- Page 9 LCD DISPLAY Wireless sensor channel number PM2.5 or PM10 display mode AQI alert on Air Quality Index (AQI) Time with alarm Current PM2.5 / PM10 concentration value 1 hour Maximum PM2.5 / PM10 concentration value Current AQI 1 hour Maximum AQI value 10.
-
Page 10: Time Setting
- To reconnect, move the sensor closer to the display console, or press [ SENSOR ] for the display console to enter signal searching mode. TIME SETTING The time on the display console can be set manually or synchronized to local time with reception of the radio- controlled signal. - Page 11 Note: In setting mode, press and hold [ ] key for 2 seconds to quit time setting mode and return to normal mode. PARTICULATE MATTER(PM2.5 / PM10) AND AIR QUALITY INDEX(AQI) The device displays the maximum micrometer(µm) per cubic meter(m ) of PM2.5 / PM10 and AQI within 1 hour or 24 hours, and the maximum accumulated micrometer(µm) per cubic meter(m ) of PM2.5 or PM10 from the console...
- Page 12 TO VIEW 24 HOUR AVERAGE READING Press [MODE] button to toggle between normal display and 24 hour average. AIR QUALITY INDEX (AQI) AQI Is a yardstick that runs from 0 to 500. The higher the AQI value, the greater the level of air pollution and greater the health concern.
-
Page 13: Alarm Time Setting
NOTE: - Once the alert is triggered, the alarm will sound for 1 minute and the alert icon and readings will be flashing. - If the alert alarm is automatically off after 1 minute, the alert icon and readings will still keep flashing until the AQI reading is below of the alert level set. -
Page 14: Specifications
SPECIFICATIONS WIRELESS PM2.5/PM10 AIR QUALITY SENSOR Dimensions (W x H x D) 82 x 120.5 x 41mm (3.2 x 4.7 x 1.6 in) • 3 x AA size 1.2V NiMH rechargeable batteries • USB charging (5V1A) Main power • 1m/1.2m USB charging cable included Operating temperature range -10°C to 40°C ( -14°F to 140°F ) Operating humidity range... -
Page 15: Warranty And Service
Cd¹ Hg² Pb³ WARRANTY & SERVICE The regular guarantee period is 5 years and begins on the day of purchase. You can consult the full guarantee terms and details of our services at www.bresser.de/warranty_terms. -
Page 16: Allgemeine Warnhinweise
Für das Feinstaubmessgerät werden 2x AA-Batterien und für den Luftqualitätssensor 3x AA-Akkubatterien (NiMH, Wiederaufladbar) benötigt. EG-Konformitätserklärung Hiermit erklärt die Bresser GmbH, dass der Funkanlagentyp mit Artikelnummer: 7110300 der Richtlinie: 2014/53/EU entspricht. Der vollständige Text der EG-Konformitätserklärung ist unter der folgenden Internetadresse verfügbar: www.bresser.de/download/7110300/CE/7110300_CE.pdf... -
Page 17: Wartung
EINLEITUNG Warum PM2,5? PM2,5 (Partikel mit einem Durchmesser von weniger als 2,5 Mikrometern) können tief in die Lunge eindringen, die Alveolarwände reizen und angreifen und so die Lungenfunktion beeinträchtigen, was Asthmaanfälle auslösen oder zu Herz-Kreislauf-Erkrankungen beitragen kann. Beispiele für PM2,5 sind Feinstaub aus Fahrzeugabgasen, Waldbränden, Kraftwerksemissionen und anderen Verbrennungsaktivitäten. -
Page 18: Einlegen Der Batterien
DRAHTLOSER PM2.5/PM10-LUFTQUALITÄTSSENSOR LCD-DISPLAY [ CH1~4 ]-Schiebeschalter [MODE] Taste [ RESET ] Taste [CHECK] Taste Batteriefach Wandhalterung DC-Adapter USB-Stromanschluss EINLEGEN DER BATTERIEN Schrauben Sie das Batteriefach des Sensors mit einem Schraubendreher auf und entfernen Sie die Abdeckung... -
Page 19: Erste Schritte
Legen Sie die 3 wiederaufladbaren Batterien (im Lieferumfang enthalten) in der folgenden Reihenfolge in das Batteriefach ein: Schrauben Sie den Batteriefachdeckel fest an. Nach dem Einlegen der Batterien werden alle LCD-Segmente für 1 Sekunde angezeigt. ERSTE SCHRITTE Schieben Sie den Schalter [KANAL], um die Kanalnummer für Ihre(n) Sensor(en) einzustellen. - Page 20 Standard-Messintervall einstellen Halten Sie [ CHECK ] 2 Sekunden lang gedrückt, bis die Anzeige blinkt Drücken Sie [MODE], um die Intervallzeit zu wählen. Einstellungsreihenfolge: 10m Drücken Sie [CHECK], um die Einstellung abzuschließen und zur normalen Anzeige zurückzukehren. Erkennungsintervall (Minute) Beschreibung 1 (wenn an Adapter angeschlossen) Der Sensor erkennt den PM-Wert jede Minute 10 (Standard)
- Page 21 BATTERIESTATUS Das Gerät wird mit wiederaufladbaren Akkubatterien betrieben und verfügt über eine Batteriestandsanzeige. Die Batterielebensdauer des Geräts bei voll aufgeladenen Batterien wird durch die Anzahl der durchgeführten Erkennungen bestimmt, entweder durch eingestellte Intervalle oder manuell durch den Benutzer aktiviert. 100% <...
- Page 22 Legen Sie drei neue wiederaufladbare Batterien der Größe AA entsprechend der Polaritätsmarkierung im Batteriefach ein. Schrauben Sie den Batteriefachdeckel fest an. Nach dem Einlegen der Batterien werden alle LCD-Segmente für 1 Sekunde angezeigt. KOPPLUNG DES DRAHTLOSEN SENSORS MIT DEM FEINSTAUBMESSGERÄT Dieser drahtlose PM2.5/PM10-Luftqualitätssensor kann an das Feinstaubmessgerät gekoppelt werden.
- Page 23 Bringen Sie eine Schraube an der Wand an, an der Sie den Sensor aufhängen möchten. Stecken Sie den Sensor mit oder ohne Montageadapter auf die Schraube. Vertikaler Winkel Neigungswinkel Hinweis: Eine höhere Position kann auch sinnvoll sein, wenn der Sensor repräsentativ für einen großen Bereich ist. FEINSTAUBMESSGERÄT 9.
- Page 24 LCD-DISPLAY Kanalnummer des drahtlosen Sensors PM2.5/PM10-Anzeigemodus AQI-Warnung eingeschaltet Luftqualitätsindex (AQI) Uhrzeit mit Alarm PM2.5 / PM10 Konzentrationswert 1 Stunde Höchstwert der PM2,5/PM10- Konzentration Aktueller AQI 1 Stunde Maximaler AQI-Wert 10. Innentemperatur & -luftfeuchtigkeit ERSTE SCHRITTE Das Batteriefach öffnen. 2 x AA-Batterien in das Batteriefach einlegen. Achten Sie darauf, dass Sie die Batterien entsprechend den Polaritätsangaben auf dem Batteriefach richtig einsetzen.
- Page 25 - Wenn das Signal unterbrochen wurde und sich nicht innerhalb von 1 Stunde erholt. Das PM2.5 / PM10 zeigt “Er” für den entsprechenden Kanal an. - Um die Verbindung wiederherzustellen, bewegen Sie den Sensor näher an das Feinstaubmessgerät oder drücken Sie [ SENSOR ], damit das Feinstaubmessgerät in den Signalsuchmodus wechselt. ZEITEINSTELLUNG WECHSELN Die Uhrzeit auf dem Feinstaubmessgerät kann manuell eingestellt oder durch den Empfang des Funksignals mit der Ortszeit synchronisiert werden.
- Page 26 Einstellungsreihenfolge: 12/24 Format Stunde Minute ± 23 Stundenversatz °C / °F AUTO/AUS Die [ ]-Taste drücken oder 60 Sekunden keine Eingabe am Gerät vornehmen, um die Einstellung abzuschließen und in den Normalbetrieb zurückzukehren. Hinweis: Halten Sie im Einstellmodus die Taste [ ] 2 Sekunden lang gedrückt, um den Zeiteinstellungsmodus zu verlassen und in den Normalmodus zurückzukehren.
-
Page 27: Alarm Einstellen
24-STUNDEN-DURCHSCHNITTSWERT ANZEIGEN LASSEN Drücken Sie die Taste [MODE], um zwischen der normalen Anzeige und dem 24-Stunden-Durchschnitt umzuschalten. LUFTQUALITÄTSINDEX (AQI) AQI ist ein Maßstab, der von 0 bis 500 reicht. Je höher der AQI-Wert ist, desto höher ist die Luftverschmutzung und desto größer sind die gesundheitlichen Bedenken. -
Page 28: Alarm Stumm Schalten
ALARM STUMM SCHALTEN Die [ SNOOZE / LIGHT ]-Taste drücken, um den Alarm stumm zu schalten. Nach 1 Minute stellt sich der Alarm von alleine ab HINWEIS: - Sobald der Alarm ausgelöst wurde, ertönt der Alarm für 1 Minute und das Warnsymbol und die Messwerte blinken. -
Page 29: Spezifikationen
DIE LCD-HINTERGRUNDBELEUCHTUNG VERWENDEN Drücken Sie im Normalmodus die Taste [ SNOOZE / LIGHT ] , um die Hintergrundbeleuchtung für 5 Sekunden einzuschalten. SPEZIFIKATIONEN DRAHTLOSER PM2.5/PM10-LUFTQUALITÄTSSENSOR Maße (B x H x T) 82 x 120,5 x 41 mm (3,2 x 4,7 x 1,6 Zoll) •... -
Page 30: Garantie & Service
Batterie enthält Cadmium Batterie enthält Quecksilber Batterie enthält Blei Cd¹ Hg² Pb³ GARANTIE & SERVICE Die Garantiezeit für dieses Gerät beträgt 5 Jahre und beginnt am Tag des Kaufs. Sie können die vollständigen Garantiebedingungen und Einzelheiten zu unseren Dienstleistungen unter www.bresser.de/warranty_terms einsehen. - Page 31 E-Mail: service@bresser.de E-Mail: sav@bresser.fr Telefon*: +49 28 72 80 74 210 Téléphone*: 00 800 6343 7000 BRESSER GmbH BRESSER France SARL Kundenservice Pôle d’Activités de Nicopolis Gutenbergstr. 2 314 Avenue des Chênes Verts 46414 Rhede 83170 Brignoles Deutschland France *Lokale Rufnummer in Deutschland (Die Höhe der Gebühren je...
- Page 32 Contact Bresser GmbH Bresser UK Ltd. Gutenbergstraße 2 Suite 3G, Eden House 46414 Rhede · Germany Enterprise Way, Edenbridge, Kent TN8 6Hf, Great Britain www.bresser.de @BresserEurope �� ...
Need help?
Do you have a question about the 7110300 and is the answer not in the manual?
Questions and answers