Table of Contents
Advertisement
Advertisement
Table of Contents

Subscribe to Our Youtube Channel
Related Manuals for La Crosse Technology WS-9046U


Summary of Contents for La Crosse Technology WS-9046U
- Page 1 WS-9046U Wireless 433 MHz Radio-controlled Weather Station Instruction Manual...
-
Page 2: Table Of Contents
TABLE OF CONTENTS Topic Inventory of Contents/Additional Equipment About WWVB Quick Set-Up Guide Detailed Set-Up Guide Battery installation Program Mode Program Sequence and Default Settings Function Keys Setting the LCD Contrast Setting the Time Zone Daylight Saving Time Setting Radio-controlled Time Setting 12/24-hour Time Setting Setting the Time Setting the Year, Day and Month... -
Page 3: Inventory Of Contents/Additional Equipment
INVENTORY OF CONTENTS 1. The WS-9046U weather station (Figure 1). 2. One TX8U remote temperature/humidity sensor (Figure 2). 3. One TX15U wind speed sensor (Figure 3). 4. Mounting hardware 5. Instruction manual and warranty card. OPTIONAL SENSOR (PURCHASE SEPERATELY) •... -
Page 4: About Wwvb
ADDITIONAL EQUIPMENT (not included) 1. Three fresh AA 1.5V batteries for the indoor weather station. 2. Two fresh AA 1.5V batteries for the remote temperature/humidity sensor. (The remote temperature/humidity sensor powers the wind speed sensor and the rainfall sensor so no batteries are required.) 3. -
Page 5: Detailed Set-Up Guide
DETAILED SET-UP GUIDE BATTERY INSTALLATION The first step to powering up the weather station is to insert the connector (RJ11) at the end of the wire attached to the wind speed sensor to the remote temperature/humidity sensor. Please ensure when doing this that the connector is inserted with the proper orientation. -
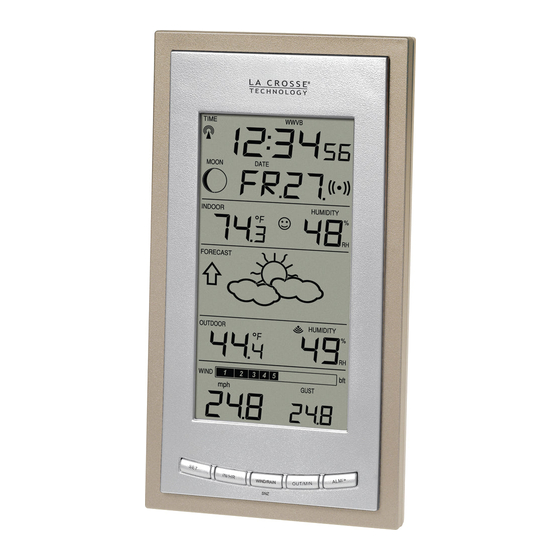
Page 6: Function Keys
FUNCTION KEYS The function keys are located on the front of the unit directly below the LCD (Liquid Crystal Display). SET key IN/HR key III. SETTING THE LCD CONTRAST 1. Press and hold the SET button for 5 seconds. 2. “LCD” will show in the TIME LCD and the number setting will flash. Note: There are 8 LCD contrast levels to choose from—“Lcd 0”... -
Page 7: Radio-Controlled Time Setting
Note: “DST OFF” indicates that the feature is off and the WWVB will not change times automatically. “DST ON” indicates that the feature is on and the WWVB will change times automatically. Note: Some locations (Arizona and parts of Indiana) do not follow Daylight Saving Time, and should select “DST OFF”. -
Page 8: Setting The Snooze
Note: Reception of the WWVB signal will also set the date and day. The reception of the signal will override any programmed date and day. 1. Press and hold the SET button for 5 seconds. 2. “LCD” will show in the TIME LCD and the number setting will flash. 3. -
Page 9: Weather Forecast Icons And Tendency Arrows
The weather forecasting feature is estimated to be 75% accurate and is for the next 12 to 24 hours. The weather forecast is based solely upon the change of air pressure over time. The WS-9046U averages past air-pressure readings to provide an accurate forecast—creating a necessity to disregard all weather forecasting for 12-24 hours after the unit has been set-up, reset, or moved from one altitude to another (i.e. -
Page 10: Indoor Temperature, Humidity, & Comfort
These icons indicate the expected weather change in the next 12 to 24 hours. The icon does not give an exact prediction of the weather, however it should be viewed as a generalization of the expected weather change (for example a “sunny” icon indicates the weather is expected to improve). The weather icons change when the unit detects a change in air pressure. -
Page 11: Moon Phase
2. Press and hold the SET button for 5 seconds. 3. The record is now reset and will show the current time in the TIME LCD and current indoor temperature and humidity in the INDOOR LCD. T o reset the OUTDOOR records: 1. - Page 12 4. The WIND SPEED LCD will now show the maximum wind gust. 5. Press and release the WIND/RAIN/SNZ button. 6. The WIND SPEED LCD will now show the minimum wind chill. 7. Press and release the WIND/RAIN/SNZ button. 8. The WIND SPEED LCD will now show the maximum wind chill. To reset the maximum and minimum wind/wind chill values: 1.
-
Page 13: Ix. Rainfall Measurement
32-38 39-46 47-54 55-63 64-72 IX. RAINFALL MEASUREMENT If you have purchase the optional Rain Sensor, the rainfall measurement can be viewed in the WIND SPEED LCD, otherwise, the rainfall information will not be shown. Simply press the WIND/RAIN/SNZ button to toggle between Wind and Rain display. In the WIND SPEED LCD you can view also three kinds of rainfall measurements: 1. -
Page 14: Time Alarm
To view the current rainfall measurements: Press and release the WIND/RAIN/SNZ button to toggle between GUST, WIND CHILL, 1 hour rainfall volume, 24 hour rainfall volume and total rainfall volume. To view the maximum rainfall measurements: 1. Press the WIND/RAIN/SNZ button and hold for 3 seconds to enter MAX WIND MODE. 2. -
Page 15: Mounting
Note: When in the 12-hour mode and setting an alarm for a time between noon and midnight, “PM” will appear to the left of the alarm time in the DATE LCD. 4. Press and release the OUT/MIN button to adjust the minutes. 5. - Page 16 THE REMOTE WIND SPEED SENSOR The remote wind speed sensor can be mounted two ways: • With the use of screws • Using nylon straps • Using the U-shaped bolt A. MOUNTING WITH SCREWS 1) Unlock the mounting bracket from the remote wind speed sensor leaving the wire going through the bracket.
-
Page 17: Troubleshooting
• Do not submerge in water. • Immediately remove all low powered batteries to avoid leakage and damage. • Opening the casings invalidates the warranty. Do not try to repair the unit. Contact La Crosse Technology for repairs. -
Page 18: Specifications
Technology, Ltd or La Crosse Technology, Ltd’s authorized service center. La Crosse Technology, Ltd will repair or replace this product, at our option and at no charge as stipulated herein, with new or reconditioned parts or products if found to be defective during the limited warranty period specified above. All replaced parts and products become the property of La Crosse Technology, Ltd and must be returned to La Crosse Technology, Ltd. - Page 19 LA CROSSE TECHNOLOGY, LTD WILL NOT ASSUME LIABILITY FOR INCIDENTAL, CONSEQUENTIAL, PUNITIVE, OR OTHER SIMILAR DAMAGES ASSOCIATED WITH THE OPERATION OR MALFUNCTION OF THIS PRODUCT. THIS PRODUCT IS NOT TO BE USED FOR MEDICAL PURPOSES OR FOR PUBLIC INFORMATION.
Need help?
Do you have a question about the WS-9046U and is the answer not in the manual?
Questions and answers