Download Print this page
Furrion FRCBRKT-BL Instructions Manual

Furrion FRCBRKT-BL Instructions Manual

Furrion digital wireless camera system
Hide thumbs Also See for FRCBRKT-BL:

Advertisement

Furrion Digital Wireless Camera System
Designed for 5th Wheel, RV, Caravan and Trailer applications
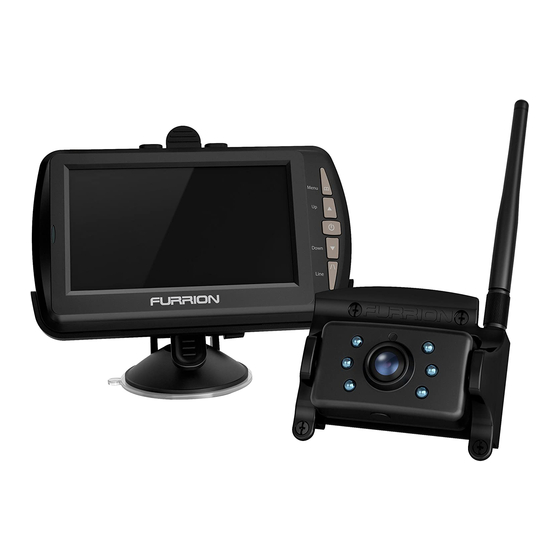
Furrion's new easy install wireless camera kit comes in two parts,
FRCBRKT-BL
1. Furrion mount bracket prep kit. Part No.
FRC12TA-BL
2. Furrion Camera and Monitor Kit. Part No.
Check if your RV or Trailer has been pre installed with the mounting bracket
prep kit.

Advertisement

loading

Summary of Contents for Furrion FRCBRKT-BL

  • Page 1 Furrion Digital Wireless Camera System Designed for 5th Wheel, RV, Caravan and Trailer applications Furrion’s new easy install wireless camera kit comes in two parts, FRCBRKT-BL 1. Furrion mount bracket prep kit. Part No. FRC12TA-BL 2. Furrion Camera and Monitor Kit. Part No.
  • Page 2: Table Of Contents

    Contents: 1. Safety Information 2. General Information 3. Installation instructions 4. Operation 5. Trouble shooting 6. Warranty 7. Technical Specification...
  • Page 3: Safety Information

    • Disconnect all sources of power to the camera before installing. • There are no fuses or disconnects on the Furrion reversing camera unit. Install external fuses/breakers as required. • Do not allow water to enter the LCD Display.
  • Page 4 Caution: A battery or 12V DC electrical system presents a risk of electrical shock or burn hazard. Ensure all power sources are isolated before installation. Warning: These installation instructions are for the use by qualified personnel only. To reduce the risk of electric shock, do not perform any servicing other than that specified in the operating instructions.
  • Page 5 Installation Safety Precautions Use correct size cable and connectors for suppling power to your rear camera Ensure the power supply circuit has circuit protection Connect rear camera to a 12-14V DC circuit only Use insulated tools when working with power supply Use correct safety equipment when working at elevated levels Ensure camera prep bracket gasket is correctly sealed and weatherproof.
  • Page 6: General Information

    This means the Furrion camera unit eliminates the interferences which other analogue signal systems are subject to, meaning the Furrion digital system gives you a clearer picture of what is behind you no matter where you are.
  • Page 7 1 x Mounting bracket gasket 1 x 6ft power cable 1 x Removable Bracket cover When wiring the Furrion camera system as a reversing camera, the power supply for the camera must come from a reversing indication power source (backup lights) or transmission wiring.
  • Page 8 4 screws 12V DC from 7 Way connection 12V DC from backup lamp Connection cable supplied with prep kit Furrion camera Use one of these power sources to supply 12V DC when the system is applied as a reversing camera...
  • Page 9 Mounting bracket installation Feed connector through PVC gasket 5/8” Hole Use 4 screws to fix mounting bracket to back of trailer or RV Ensure the bracket is mounted securely and the gasket is watertight. Affix cover if only prep kit is being installed * If the camera bracket is being mounted as a prep kit without the camera.
  • Page 10: Installation Of Camera

    Installation of camera If your RV or trailer has a Furrion reversing camera prep kit pre installed by the OEM manufacturer. You will need to contact your local dealer or go to furrion.com to purchase a Furrion Camera and monitor installation FRC12TA-BL kit.
  • Page 11: Monitor Installation

    Monitor Installation When choosing a location to mount the monitor, make sure the monitor is in an area that will not obstruct your vision while driving. Before mounting the monitor, clean the mounting surface well. Position the suction mount to the smooth surface which suits your requirement.
  • Page 12: Operation

    Operation Once you have fitted the camera to your trailer, RV, truck or caravan you will need to pair the wireless camera with the LCD monitor before use. (This is only required at initial system comissioning to pair the camera with the LCD screen.) Menu/Return Press to show OSD or return to the previous menu...
  • Page 13 If there is no operation of the camera displayed on the LCD display within 30 seconds of pairing. Repeat pairing process. Note: If you are having trouble pairing the devices, reduce the distance between the camera unit and the LCD display for the pairing process.
  • Page 14 Two Camera Option: This system can support 2 seperate cameras paired to a monitor. This feature enables two seperate cameras to be paired with the same monitor. The cameras can be mounted in seperate locations if required. Once both cameras are paired, use the up and down buttons on the monitor to scroll between the camera views.
  • Page 15: Trouble Shooting

    Trouble Shooting Monitor will not turn on Ensure power cord is connected to the display correctly Make sure the cigarette socket has power output of 12 - 14V DC Check fuse in cigarette socket adapter Camera and display Check if camera unit is recieving power will not pair Reduce the distance between camera and monitor while pairing...
  • Page 16: Technical Specification

    Technical specification of LCD Display: 1. Working voltage: DC8-30V 2. Working current: ≤180mA 3. Standby current: ≤5mA 4. Wireless communication distance: ≥100M (open area outdoors) 5. Working frequency: 2.4G 6. Size of LCD display: 4.3’ 7. Effective pixels of LCD: 480*272 8.
  • Page 17 Product Digital Wireless Camera System(FCA48TA-BL) Trade Name FURRION Model Name FRC12TA-BL Serial Model FCA48TA-BL, FCS43TA-BL FCC ID : 2ABH3FRC12TA-BLC Product Digital Wireless Camera System(FCS43TA-BL) Trade Name FURRION Model Name FRC12TA-BL Serial Model FCA48TA-BL, FCS43TA-BL FCC ID : 2ABH3FRC12TA-BLM * This product is backed by Furrions 12 month product warranty.

This manual is also suitable for:

Frc12ta-bl