Furrion FCN48TASF Installation Manual
Sharkfin camera
Hide thumbs
Also See for FCN48TASF:
- Instruction manual (72 pages) ,
- Installation manual (2 pages) ,
- User manual (108 pages)
Table of Contents
Advertisement
Quick Links
:=URRION
VISIONS
Sharkfin Camera
Installation Guide
Models:
FCN48T
ASF
This
Installation
Guide will
help
you
install
and adjust
the camera
properly.
For
further support and to
download the
complete
user
manual
please
visit
https:/ /furrion.com/ pages/ download-navigation.
Prepare
1. Ensure that all items in your package match those shown
in the 'What's in the box' section on the packaging
box.
2. Before installation, please read and understand all the
important safety-related instructions from the online user
manual.
3. Prepare tools you may need, including a #2 Phillips head
screwdriver, sealant, insulation tape, pencil and/or a
5/8" hole saw (needed only when drilling a new hole).
Mount bracket
Note:
Skip this section if your RV is pre-installed with a
bracket for camera installation.
IMPORTANT:
Before any installation and wiring operation,
remove the key from the ignition and isolate the 12V / 24V
power source.
Always seek professional assistance if you are unsure about
the installation and wiring operation.
1. Determine the mounting location on your RV. Ensure
that there is no obstacle blocking the camera view. The
recommended mounting location is shown below:
-
For rear camera position:
At the top center on the rear of your RV and as high as
practicable (2" below the red marker light if available).
-
For doorway camera position:
Above the top of the
door.
Note:
The RV shown here is for reference only. You can
mount Furrion Vision S products onto various types of
long
vehicles such as trailers and Class A/B/C motorhomes.
-· ·
...
1~
2"
.;
...
. . . .
Rear camera
position
Doorway camera position
2. Use the gasket as a template to mark
a
basic outline on
the chosen location with a pencil. Drill a 5/8" center hole.
Then route the female connector of the
camera
power
cable through the hole and leave 2 inches of
slack.
£,
5/
8
"
3. Connect the bare ends of the camera power
cable
to the
nearest 12V / 24V power supply.
-
For
rear camera position:
You are suggested to share the same power line from
the nearest marker light (such
as
the red marker light
at the top
center
on the rear if
available)
.
-
For doorway camera
position:
You are suggested to share
the
power line from your
RV porch light (or the nearest light
source
from the RV/
trailer
battery).
Note:
Ensure that the fuse on the
connected
power line
provides additional 1A fusing
current
for the
camera.
Ensure proper cable isolation for all bare ends (e.g., by using
insulation tape)
.
4. Fix the gasket and bracket with four #6x3/4" flat self-
tapping screws. If the mounting surface is uneven, apply
sealant around the gasket for better sealing.
Advertisement
Table of Contents

Related Manuals for Furrion FCN48TASF


Summary of Contents for Furrion FCN48TASF
- Page 3 * Le contenu de l’emballage peut être différent en fonction de la trousse achetée. Veuillez prendre le produit réel en référence. * Es posible que los contenidos del embalaje sean diferentes según el kit que haya comprado. Tome el producto real como estándar. Models/Modèle/Modelo: FCN48TASF...
-
Page 4: Welcome
Welcome Thank you for purchasing the Furrion Sharkfin Camera. Before ® operating your new product, please read these instructions carefully. This will ensure safe use and reduce the risk of injury. This instruction manual contains information for installation, maintenance of the product and safe use. -
Page 5: Table Of Contents
Contents Welcome .............. 1 Contents .............. 2 Important Safety Instructions ......3 FCC Statement ..............5 IC Statement................6 Product Overview ..........8 Product Description ..............8 Panel ..................8 Getting Started ............ 10 Pairing the 4.3” Vision S Camera System ......10 Pairing the 5“ and 7” Vision S Camera System ....12 Installation ............ -
Page 6: Important Safety Instructions
Furrion is not liable while the vehicle is in reverse. in full or in part for improper You, as the driver, are solely... - Page 7 ● To reduce the risk of fire, connect the camera only ● There are no serviceable to a circuit provided with a parts in the Furrion Wireless maximum branch-circuit over Observation Camera System. current protection device. Do not disassemble or attempt ●...
-
Page 8: Fcc Statement
Important Safety Instructions (1) This device may not cause harmful interference. ● Electrical appliances and (2) This device must accept overhead power lines can affect any interference received, the wireless signal. including interference that may cause undesired Care operation. ● Do not wash the vehicle with NOTE: The Grantee is not an automatic car wash or responsible for any changes... -
Page 9: Ic Statement
Important Safety Instructions harmful interference to radio RF Exposure communications. However, there The device has been evaluated is no guarantee that interference to meet general RF exposure will not occur in a particular requirement. installation. If this equipment To maintain compliance with does cause harmful interference FCC’s RF exposure guidelines, to radio or television reception,... - Page 10 Important Safety Instructions RF Exposure The device has been evaluated to meet general RF exposure requirement. To maintain compliance with RSS-102 — Radio Frequency (RF) Exposure guidelines, this equipment should be installed and operated with a minimum distance of 20cm between the radiator and your body.
-
Page 11: Product Overview
Product Overview Product Description The Furrion Vision S Camera System is designed to assist the driver by providing a clear and wide image of the area behind the vehicle whenever the vehicle is shifted into reverse. Never rely solely on this product to ensure the area is clear of children and/or obstructions. -
Page 12: Panel
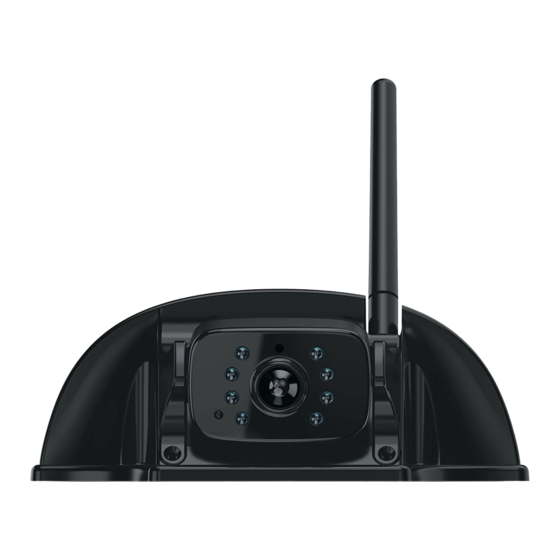
Product Overview Panel Light Sensor Antenna Lens Monitor Pairing LED Indicator Button 8 IR LED... -
Page 13: Getting Started
Getting Started The camera and monitor need to be paired the first time you are using your Vision S Camera System. NOTE: Ensure both the camera and monitor have power supplied during Pairing and setting processes. (The vehicle may need to be running.) Pairing the 4.3”... -
Page 14: Pairing The 5" And 7" Vision S Camera System
Getting Started 5. Repeat steps 1 to 4 to pair the other cameras. 6. Refer to “Camera Settings” section for detail settings of the camera. Pairing the 5“ and 7” Vision S Camera System 4. An icon indicates pairing failed, repeat steps 2 and 3 to 1. - Page 15 Getting Started 2. Select the desired camera 3. Once paired successfully, a red you are going to pair. Press icon will appear after the “MONITOR PAIRING” button device list. at the bottom of the selected camera for 3 seconds to pair. NOTE: The monitor can only pair to one camera for each channel and a total of four cameras are...
- Page 16 Getting Started 5. Repeat steps 1 to 4 to pair the 4. An icon indicates pairing other cameras. failed, repeat steps 2 and 3 to 6. Refer to “General Setup” pair again. section on detail settings of the camera.
-
Page 17: Installation
Installation Suitable Installation COMPLETELY READ THIS MANUAL BEFORE INSTALLATION Position NOTE: We have included all of the items needed for most standard installations, but all vehicles are CAUTION different. We recommend you review your vehicle completely Ensure there are no electrical cables, gas lines, pipes or other before starting. -
Page 18: Camera Installation
Installation ● Mount camera at least 2 inches Camera Installation above or below running lights. Close proximity to lights may 1. Select a suitable mounting cause image blooming, blurring position where you are going and reduced night vision to install the doorway camera. performance. - Page 19 Installation 3. Feed the supplied 6-foot 5. Install the antenna onto the camera power cable through camera and rotate clockwise to the gasket. Ensure the bare lock into place. (Fig. 5) end of the cable goes into the vehicle and the flat side faces inward.
- Page 20 Installation 7. Place the attached cables and connections into the bracket housing by first placing the cable to the right. Place the camera cable filter in the left of the bracket housing. (Fig. 7) Fig. 8 9. Make sure the sealing lip around the edge of the gasket is seated over the edge of the bracket before fully tightening...
- Page 21 Connects to 12V/ 24V Camera Power Supply Installation The Furrion Vision S Camera can be connected to an electrical power source via a 7 Way Connector. Connects to Connects to Wiring to running lights: the camera will activate when the running...
-
Page 22: Specifications
Specifications Specifications SUPPLY VOLTAGE DC8 to 30V WIRELESS FREQUENCY 2.4 GHz WIRELESS RANGE 150m (open area) TRANSMITTING SPEED 6 Mbps (single) RECEIVING SENSITIVITY -88 +/-3dBm DECOMPRESSION FORM H.264 DELAYING TIME <250ms IMAGE DISTANCE <5m 1/3” CMOS SIZE OPTICAL LENS F2.0 IR CUT FILTER 850nm automatic VIEW ANGLE... -
Page 23: Troubleshooting
Troubleshooting Problem Solution Check if the camera is receiving power. Camera and Monitor won’t Make sure to hold the camera pairing button for pair 2 seconds. The light sensor on the camera may be dirty or obstructed. Night vision is poor or does not function Ensure the camera unit is installed at least 2 inches away from rear lights. -
Page 24: Warranty
Warranty FURRION WARRANTS FOR A PERIOD OF 1 YEAR FROM DATE OF RETAIL PURCHASE BY THE ORIGINAL END-USE PURCHASER, THAT THIS PRODUCT, WHEN DELIVERED TO YOU IN NEW CONDITION, IN ORIGINAL PACKAGING, FROM A FURRION AUTHORIZED RESELLER AND USED IN NORMAL CONDITIONS, IS FREE FROM ANY DEFECTS IN MANUFACTURING, MATERIALS, AND WORKMANSHIP. - Page 25 OR PROPERTY, ANY COSTS OF RECOVERING, REPROGRAMMING, OR REPRODUCING ANY PROGRAM OR DATA STORED IN OR USED WITH FURRION PRODUCTS. FURRION’S TOTAL LIABILITY IS LIMITED TO THE REPAIR OR REPLACEMENT OF THIS PRODUCT PURSUANT TO THE TERMS OF THIS WARRANTY.
- Page 26 Furrion Ltd. et enregistrées aux Etats-Unis et ailleurs. ©2007-2018 Furrion Ltd. FurrionFurrion y el logotipo de Furrion y son marcas ® comerciales con licencia de uso de Furrion Ltd. y están registradas en los Esta- dos Unidos y en otros países. FURRION.COM IM-FCM00005 V1.0...
- Page 27 FCN48TASF Vehicle Obervation System Furrion Vision S™ Doorway Security/ Rear Camera Main Features 120˚ 720x480 IP65 CMOS ° INFRARED CAMERA INTELLIGENT MOTION WATERPROOF BUILT IN VIEW ANGLE NIGHT VISION RESOLUTION IR CUT FILTER DETECT MICROPHONE...
- Page 28 Waterproof FCN48TASF-V1.3 Customer Service & Technical Support: Email: support@furrion.com Tel : (888) 354 5792 www.furrion.com Furrion® and the Furrion logo are trademarks licensed for use by Furrion Ltd. and registered in the U.S. and other countries. © 2007-2019 Furrion Ltd.
Need help?
Do you have a question about the FCN48TASF and is the answer not in the manual?
Questions and answers