Roche CoaguChek XS Plus Operator's Manual
Hide thumbs
Also See for CoaguChek XS Plus:
- Operator's manual (152 pages) ,
- User manual (112 pages) ,
- Quick reference manual (2 pages)
Table of Contents
Advertisement
Advertisement
Table of Contents

Related Manuals for Roche CoaguChek XS Plus


Summary of Contents for Roche CoaguChek XS Plus
- Page 1 P O I N T C A R E T E S T I N G CoaguChek XS Plus ® Operator’s Manual...
- Page 2 On the packaging, on the type plate of the instrument and in the manual you may encounter the following symbols, shown here with their meaning: Use by Lot number For in vitro diagnostic use This product fulfils the requirements of Directive 98/79/EC on in vitro diagnostic medical devices.
-
Page 3: The Coaguchek Xs Plus System
(common terms: prothrombin time, PT, Quick value) with CoaguChek XS PT test strips. Please note: This manual contains all the information you need to operate and care for the CoaguChek XS Plus System. Please read this entire manual carefully before you use the monitor. Last update: 2007-04... - Page 4 The CoaguChek XS Plus System...
-
Page 5: Table Of Contents
The CoaguChek XS Plus System Introduction The CoaguChek XS Plus System ....................7 Test principle ............................8 Contents of the pack ........................8 Safety information ..........................9 Operating conditions ........................10 Quality control ..........................11 About this manual Manual format ..........................12 The CoaguChek XS Plus monitor Monitor elements overview ...................... - Page 6 Testing a capillary blood sample Important notes ..........................65 Getting a good capillary blood sample ................... 66 Getting a good test with venous whole blood ..............67 Preparing to test ..........................68 Code chip ............................69 Inserting the code chip ........................ 69 Switching on the monitor ......................
-
Page 7: Introduction
You only need to insert the code chip, turn the monitor on, insert the test strip, and apply a blood sample. When the CoaguChek XS Plus monitor is ready for a measurement, the result will be displayed about 1 minute after application of the sample. After the measurement, the monitor automatically stores the result in memory. -
Page 8: Test Principle
(INR, %Quick, seconds) and the result is displayed. Contents of the pack ■ CoaguChek XS Plus monitor ■ Power supply unit ■... -
Page 9: Safety Information
CoaguChek XS Plus System. Protection against infection There is a potential risk of infection. Medical staff using the CoaguChek XS Plus System to perform tests in more than one patient must be aware that any object coming into contact with human blood is a potential source of infection. -
Page 10: Operating Conditions
Introduction Operating conditions To ensure that your CoaguChek XS Plus System functions properly, please observe the following guidelines: ■ Only use the monitor at a room temperature between 18°C and 32°C. ■ Only use the monitor at a relative humidity between 10% and 85%. -
Page 11: Quality Control
Introduction Quality control The CoaguChek XS Plus System has a number of inbuilt quality-control functions such as: ■ A check of the electronic components and functions every time the monitor is turned on. ■ A check of the test strip temperature while a test is in progress. -
Page 12: About This Manual
About this manual About this manual Manual format The layout of this Operator’s Manual has been specially designed to help you locate the most important information quickly and easily. Where illustrations are used, they always appear on the left side of the page with the accompany- ing explanation on the right. -
Page 13: Main Menu
This column contains an illustration of the dis- This column contains information linked to the play screen. display screen. 28.11.2005 The main menu of the CoaguChek XS Plus MAIN MENU System contains buttons for the following functions: PATIENT TEST ■... -
Page 14: The Coaguchek Xs Plus Monitor
The CoaguChek XS Plus monitor The CoaguChek XS Plus monitor... -
Page 15: Monitor Elements Overview
The CoaguChek XS Plus monitor Monitor elements overview Touchscreen Battery compartment cover Shows results, information, icons and Covers the battery compartment (4 1.5 V results recalled from memory. To view any alkali-manganese batteries type AA) of them, simply touch the button on this or a rechargeable battery pack (REF screen. -
Page 16: Power Supply
(if power goes out or if the local power supply is shut off). To save power, the CoaguChek XS Plus monitor automatically turns itself off after a period of time that can be programmed unless a button has been pressed or a new test strip has been inserted. -
Page 17: Operating The Instrument
Enter the settings of choice (language, unit of measure, user administration if applicable, etc.) * Alternatively, a special rechargeable battery pack may be used. This should be ordered separately from Roche Diagnostics. To recharge, connect the power supply unit to the CoaguChek XS Plus instrument. -
Page 18: Inserting The Batteries
Operating the instrument Inserting the batteries 1 With the monitor turned off, hold it so that the tab on the battery compartment cover points upward. 2 Gently press the tab on the battery com- partment cover towards the centre of the monitor and lift the cover to the side. - Page 19 Operating the instrument 4 Insert the four batteries in the battery compartment as indicated. Pay attention to the positions of “+” (top of battery) and “-” (flat end). Use only alkali-manganese batteries (1.5 V, AA). Think of the environment. Dispose of used batteries according to your local regulations.
-
Page 20: Monitor Setup
Monitor setup Monitor setup Please note: If you have not set the date (after turning on for the first time or because the batteries were removed from the monitor for more than ten minutes), you cannot perform a test. In that case turning on the monitor takes you immediately to the Setup mode, where you must set the date and time (see page 34 and following). -
Page 21: Display Field And Icons
Monitor setup Display field and icons The displays and icons that appear during normal operation are shown here, along with their meaning. Error messages and the description of the icons linked to them are provided in the chapter entitled Error messages starting on page 101. Icon Meaning OK, Save setting... - Page 22 Monitor setup Icon Meaning Apply QC sample (the time left to apply sample is counted down in the display) 120 SEC Insert the code chip Automatic quality control completed successfully Results are displayed as a Quick percentage value. Results are displayed in seconds. Results are displayed in INR units.
- Page 23 Monitor setup Icon Meaning Reports a warning message Reports an error (see: Error messages) Reports a serious error (see: Error messages) Room or monitor temperature is outside the acceptable range. The lid on the test strip guide is open. Communication is taking place via the infrared interface...
-
Page 24: Settings Overview
Monitor setup Settings summary The diagram below shows all of the setup areas that can be accessed on the monitor. SETUP SCREEN CONTRAST UNITS LANGUAGE DATE/TIME OPTIONS SORT BEEP TONE AUTO OFF COMPUTER ID SETUP ADMINISTRATOR OPERATOR PATIENT BLOCK OP. BLOCK QC BLOCK... - Page 25 Monitor setup Group Subgroup Setting Values * SCREEN CONTRAST 0 – 10 (5 *) UNITS INR * INR/SEC INR/%Q LANGUAGE DANSK DEUTSCH ENGLISH (GB) ENGLISH (US) * ESPAÑOL FRANÇAIS ITALIANO NEDERLANDS NORSK PORTUGUÊS SVENSKA DATE/TIME DATE 01/01/2005 * TIME 12:00 AM * Date formats Day.Month.Year (31.12.2005) Month/Day/Year...
- Page 26 Monitor setup Group Subgroup Setting Values * OPTIONS SORT DATE/TIME * PATIENT ID NUMBER BEEP TONE BEEP TONE QUIET MODERATE * LOUD KEY BEEP OFF * AUTO OFF [MINUTES] OFF * 1 … 10 COMPUTER ACTIVE INACTIVE * * Settings that are in the monitor when it leaves the factory are labelled with an asterisk (*).
- Page 27 Monitor setup Group Subgroup Setting Values * ID SETUP ADMINISTRATOR BLANK (OFF) * OPERATOR (OPERATOR LIST REQUIRED) BLANK (OFF) * PATIENT OPTIONAL * REQUIRED BLOCK OP. BLOCK (ONLY IF THE OPERATOR HAS OFF * BEEN SET UP AND ACTIVATED) WEEKLY MONTHLY EVERY 3 MONTHS EVERY 6 MONTHS...
-
Page 28: Screen Setup
Monitor setup Screen setup The Screen setup area contains the options for changing the way the display looks. Contrast Use this setup option to make the screen easier to see, depending on the lighting conditions where you are. 1 From the main menu screen, touch the 28.11.2005 MAIN MENU SETUP button to call up the monitor set-... - Page 29 Monitor setup 4 Touch the arrow button change the contrast in a range from 0 to CONTRAST 28.11.2005 ■ Contrast “0” makes the display very dark. CONTRAST (0–10): ■ Contrast “10” makes the display very light. 5 When you have entered all settings, touch button (OK) to save, or touch the button (Cancel) to cancel this proce- 10:21...
-
Page 30: Units
Monitor setup Units Use this setting to select the unit(s) of measure to be displayed with the results. 1 From the main menu screen, touch the 28.11.2005 MAIN MENU SETUP button to call up the monitor PATIENT TEST settings. QC TEST 2 From the Setup menu screen, touch the MEMORY SCREEN button. - Page 31 Monitor setup The current unit of measure setting is shown with a black background (white type on a black background). You can select either: ■ ■ INR and seconds ■ INR and Quick value in % 4 Touch the button to select the unit of UNITS 28.11.2005 measure of choice.
-
Page 32: Language
Monitor setup Language Use this setting to select the language for all displays (that contain text). 1 Touch the SETUP button in the main MAIN MENU 28.11.2005 menu to call up the monitor settings. PATIENT TEST 2 From the Setup menu screen, touch the QC TEST SCREEN button. - Page 33 Monitor setup 4 Touch the arrow buttons 28:11.2005 LANGUAGE display the language of choice on the DANSK screen. If the arrow is just an outline DEUTSCH this means the button is not active. On this ENGLISH (GB) screen, for example, there are no lan- ENGLISH (US) guages listed above “DANSK”.
-
Page 34: Setting The Date
Monitor setup Setting the date When you turn on the monitor for the first time (or after a long period without power), the input field for the date automatically appears first. The date (and time) must be entered before the monitor can be used further. - Page 35 Monitor setup 4 From the Date/Time menu screen, touch DATE/TIME 28:11.2005 the SET DATE button to set the date. SET DATE DATE 28.11.2005 SET TIME 5 Touch the arrow buttons 2005 YEAR: set the year, then the month, then the day. FORMAT 6 When you have entered all settings, touch MONTH:...
-
Page 36: Setting The Time
Monitor setup Setting the time When you turn on the monitor for the first time (or after a long period without power), this Setup menu appears automatically after you set the date. If you want to correct the time at a later point in time, go to the Setup menu, then select the input field of choice. - Page 37 Monitor setup 4 From the Date/Time menu screen, touch DATE/TIME 28:11.2005 the SET TIME button to set the time. SET DATE TIME 28.11.2005 SET TIME 5 Touch the arrow buttons set the hours, then the minutes. HOUR: FORMAT 6 When you have entered all settings, touch button (OK) to save, or touch the MINUTE: button (Cancel) to cancel this proce-...
-
Page 38: Setting The Display Formats For Date And Time
Monitor setup Setting the display options for date and time It is not required that you select display options for date and time, even though you must enter the date and time. To set the time and date formats, however, first go to the Setup menu 1 From the main menu screen, touch the 28.11.2005 MAIN MENU... - Page 39 Monitor setup DATE/TIME 28:11.2005 4 From the Date/Time menu screen, touch SET DATE the FORMAT button to set the display for- 28.11.2005 FORMAT SET TIME mat. DD.MM.YYYY DATE: FORMAT MM/DD/YYYY The current settings are shown with a black YYYY-MM-DD background (white type on a black back- ground).
-
Page 40: Options Setup
Sort refers to the order in which measured and stored results are displayed when you use the Memory function of your CoaguChek XS Plus monitor. You can display stored results chronologi- cally by date and time or by person, based on the patient ID number. - Page 41 Monitor setup 28.11.2005 SORT The current setting is shown with a black SAVE BY background (white type on a black back- DATE/TIME ground). You may select from the following PATIENT ID sort options: ■ By DATE/TIME ■ By PATIENT ID number 10:21 4 Touch the button to select the “sort by”...
-
Page 42: Beeper
Monitor setup Beep tone Your CoaguChek XS Plus monitor can display information visually, and alert you to special cir- cumstances with a beep tone. When the beep tone is activated, the monitor beeps when: ■ it is switched on ■... - Page 43 Monitor setup 1 From the main menu screen, touch the 28.11.2005 MAIN MENU SETUP button to call up the monitor set- PATIENT TEST tings. QC TEST 2 From the Setup menu screen, touch the MEMORY OPTIONS button. SETUP 3 From the Options menu screen, touch the BEEP TONE button.
- Page 44 Monitor setup The current setting is shown with a black background (white type on a black back- 28.11.2005 BEEP TONE ground). You may select from the following options: QUIET MODERATE For the beep tone LOUD ■ KEY BEEP: ■ Quiet ■...
-
Page 45: Auto Off
Auto Off You can set up your CoaguChek XS Plus monitor so that it turns itself off automatically if it has not been used (no buttons pressed or tests run) for a period of time you select. Use this feature to save power and extend the life of the batteries. - Page 46 Monitor setup You may select from the following options: 28.11.2005 ■ AUTO OFF OFF (monitor never turns itself off) MINUTES: ■ Time until monitor turns itself off: 1…10, 15, 20, 25, 30, 40, 50, 60 minutes 4 Touch the arrow buttons select the time of choice in minutes or to turn the feature off.
-
Page 47: Computer
Monitor setup Computer Your CoaguChek XS Plus monitor can connect with a computer via an infrared interface. Using a computer, you can set up operator lists or lists of test requests, for example, or you can transfer test results stored in the monitor to the PC for further evaluation. The COMPUTER button option allows you to activate or deactivate the monitor’s ability to communicate with a computer. - Page 48 Monitor setup 4 Touch the button with the setting of choice COMPUTER 28.11.2005 for communication with the PC. Your selection is now displayed with a black ACTIVE background. INACTIVE 5 When you have entered all settings, touch button (OK) to save, or touch the button (Cancel) to cancel this proce- 10:21 dure.
-
Page 49: Id Setup
It is not necessary for Administrator identi- fication to be activated to use the CoaguChek XS Plus monitor. However, it can be desired or necessary, depending on the environment and site of use. -
Page 50: Administrator
Monitor setup Administrator In the default setting, the monitor is not protected with an Administrator ID number, and all setup options are accessible to anyone. If you set up an Administrator ID number, the following setup areas are automatically reserved only for the Administrator: ■... - Page 51 Monitor setup If an Administrator ID number has not been set up yet: 1 From the main menu screen, touch the MAIN MENU 28.11.2005 SETUP button to call up the monitor set- PATIENT TEST tings. QC TEST 2 From the Setup menu screen, touch the ID MEMORY SETUP button.
- Page 52 Monitor setup 4 Using the keypad displayed on the screen, ADMINISTRATOR 28.11.2005 ADMINISTRATOR 28.11.2005 ***** ***** enter the Administrator ID number of choice. The ID number should include up to 20 characters and/or symbols of choice. Pay close attention to the buttons you press, because the actual characters and/ Ä...
- Page 53 Monitor setup 9 Enter the Administrator ID number again REPEAT ID 28.11.2005 ***** (the keypad is automatically displayed again on the screen) to confirm the first entry. When you save the entry, the Administra- tor ID number is set. When you cancel the entry, the Adminis- trator ID number is not set and is therefore inactive.
- Page 54 Monitor setup Changing an existing Administrator ID number: 1 From the main menu screen, touch the 28.11.2005 MAIN MENU SETUP button to call up the monitor set- SETUP 28.11.2005 PATIENT TEST tings. SCREEN QC TEST 2 From the Setup menu screen, touch the ID OPTIONS MEMORY SETUP button.
- Page 55 Monitor setup Deactivating an existing Administrator ID number: 1 From the main menu screen, touch the 28.11.2005 MAIN MENU SETUP button to call up the monitor set- SETUP 28.11.2005 PATIENT TEST tings. SCREEN QC TEST 2 From the Setup menu screen, touch the ID OPTIONS MEMORY SETUP button.
-
Page 56: Operator
Monitor setup Operator In the default setting, the monitor is not set up for use with Operator ID numbers. To specify oper- ators, an operator list must be created on the PC. You can enter settings to activate or deactivate the use of the operator list. -
Page 57: Patient
Monitor setup Patient In the default setting, input of Patient ID numbers is “optional”. In practice, this means a Patient ID number can be entered for each test, but this is not required. If you do not enter a Patient ID number, the test is simply assigned a consecutive number (the same as when the Patient ID number is deactivated). - Page 58 Monitor setup 6 Select the form for input of the Patient ID number before each test. You may select from the following options: PATIENT ID 28.11.2005 ALPHANUM. ■ ALPHANUMERIC (ALPHANUM.) (text NUMERIC and numbers, e.g., “J. Doe 3378”) ■ NUMERIC (numbers only, e.g., “3387”) MAX.
-
Page 59: Block Setup
Monitor setup Block setup The Block menu contains the options for quality control that prompt the operator to perform a mandatory quality control test at specified intervals. If the quality control test is not performed as required or if the result is outside the target value range, the monitor is blocked from further use. -
Page 60: Operator Block
Monitor setup Operator block To perform a test with the CoaguChek XS Plus monitor, the individual steps must be performed properly. Quality control can be performed on a regular basis to ensure these steps are performed properly. The operator block prescribes regular quality controls of this type for each operator (who has been set up). - Page 61 Monitor setup 4 Select the interval of choice in which the OP. BLOCK 28.11.2005 mandatory quality control tests must be carried out. WEEKLY MONTHLY EVERY 3 MONTHS You may select from the following options: EVERY 6 MONTHS ■ NO (deactivated) 10:21 ■...
- Page 62 Monitor setup 8 For every option except for NO, you must OP. BLOCK 28.11.2005 now indicate the number of levels in NO. OF LEVELS which the quality control must be per- ONE LEVEL formed. TWO LEVELS 9 When you have selected the option of choice, touch the button (OK) to save, or touch the...
-
Page 63: Qc (Quality Control) Block
Monitor setup QC (Quality control) block The QC Block ensures that quality control tests are run on a regular basis for the monitor to be used. This is independent of the operator, however. Use this option if you work without operator lists. - Page 64 Monitor setup 5 Touch the button with the option of choice for changing the test strip lot. 6 Touch the button to select the interval of choice. Your selection is now displayed with a black background. 7 When you have selected the option of choice, touch the button (OK) to save, or touch the...
-
Page 65: Testing A Capillary Blood Sample
Testing a capillary blood sample Testing a capillary blood sample What you need: ■ CoaguChek XS Plus monitor ■ A test strip container with the supplied code chip ■ Lancing device (e.g. Accu-Chek Softclix Pro) ■ Lancet (e.g. Accu-Chek Softclix Pro Lancet) Important notes Always …... -
Page 66: Getting A Good Capillary Blood Sample
Testing a capillary blood sample Never … ■ … store the monitor at extreme temperatures. ■ … store the monitor in damp or humid conditions without protection. ■ … remove or insert the code chip while the monitor is performing a test. ■... -
Page 67: Getting A Good Test With Venous Whole Blood
There is a potential risk of infection. Medical staff and other persons using the CoaguChek XS Plus monitor to perform tests in more than one patient must be aware that any object coming into contact with human blood is a potential source of infection (see: Clinical and Laboratory Standards Institute: Protection of Laboratory Workers from Occupationally Acquired Infections;... -
Page 68: Preparing To Test
Testing a capillary blood sample Preparing to test 1 Have the test strip container at hand. 2 Make sure that the code chip supplied with these test strips is at hand. -
Page 69: Code Chip
The code chip is required at the least when a new test strip container is opened, to store the lot information about the test strips in the monitor. Your CoaguChek XS Plus monitor stores the data from up to 60 code chips that were inserted. ■... - Page 70 Testing a capillary blood sample 2 Always make sure that the number on the code chip matches the number on the label of the test strip container. 3 Slide the new code chip into the slot on the side of the monitor as shown until you feel it snap into place.
-
Page 71: Switching On The Monitor
Testing a capillary blood sample Switching on the monitor 1 Place the monitor on a level, vibration-free surface or hold it in your hand so it is roughly horizontal. Turn the monitor on by pressing the On/Off button Alternatively, you can insert a test strip or connect it to the power supply unit to turn it on. - Page 72 Testing a capillary blood sample 5 Enter the password. OPERATOR 28.11.2005 ***** 6 After you enter the password, touch the button (OK) to log on. The main menu is displayed and you can start the test. 7 When you touch the button (Cancel), the operator pick list is displayed again.
-
Page 73: Performing A Test
Testing a capillary blood sample Performing a test 8 Check the battery level. If there are no bars 28.11.2005 MAIN MENU 28.11.2005 MAIN MENU left in the battery icon, you cannot perform PATIENT TEST PATIENT TEST any more tests. QC TEST QC TEST 9 Check that the date and time are correct. - Page 74 Testing a capillary blood sample Without patient list 10 Touch the PATIENT TEST button. 11 After you select the option Patient ID as 28.11.2005 PATIENT ID DOE, JOHN either optional or required, you can (and must) enter the Patient ID using the keypad on the screen.
- Page 75 Testing a capillary blood sample With patient list 12 Touch the PATIENT TEST button. 13 Select the patient to be tested from the list TEST 28.11.2005 ✱ that is displayed. Touch the arrow buttons NEW PATIENT to display the entry of Smithee, Alan choice.
- Page 76 Testing a capillary blood sample 15 The test strip icon prompts you to insert a test strip. Remove a test strip from its con- tainer and close the container again with the stopper. 16 Hold the test strip so the lettering “CoaguChek XS PT”...
- Page 77 Testing a capillary blood sample The hourglass icon shows that the test strip is warming up. When the warming-up process is complete, a further beep tone (provided the 28.11.2005 TEST beep tone is turned on) indicates that you can P-ID: DOE, JOHN CODE: 025 now apply blood.
- Page 78 Testing a capillary blood sample 18 Now lance the side of a fingertip with the lancing device. We recommend obtaining the capillary blood from the side of the fingertip as this causes the least pain. Massage the lanced finger until a drop of blood is formed.
- Page 79 Testing a capillary blood sample Alternatively ... ■ …you can touch the blood drop against the side of the sample application area. The test strip draws up the blood by capillary action. During this process you must hold the blood drop to the test strip until the flashing blood drop icon has dis- appeared and the monitor beeps (provided the beep tone is turned on).
- Page 80 Testing a capillary blood sample TEST 28.11.2005 The monitor performs an automatic quality P-ID: DOE, JOHN control test on the test strip before it displays CODE: 025 the test result. “QC” appears in the display. Following a successful outcome of the quality control test, a tick appears after “QC”.
- Page 81 Testing a capillary blood sample In this display, you can scroll through addi- tional results or return to the main menu. Menu Button: Return to main menu Scroll button: Scroll through older values stored for this patient (this feature is active only if older values are present) 20 Remove the test strip from the measure- ment chamber.
- Page 82 Testing a capillary blood sample...
-
Page 83: Quality Control
Quality control Quality control Your CoaguChek XS Plus monitor uses many independent methods to perform quality control tests: ■ A check of the electronic components and functions every time the monitor is turned on. ■ A check of the expiry date and lot information on the test strip. -
Page 84: Preparing To Run A Quality Control Check
Quality control Preparing to run a quality control test Prepare as you would to perform a test with a capillary blood sample. The only difference is the use of control solution instead of blood. 1 Have the test strip container at hand. 2 If you are using the test strip lot for the first time, make sure that the code chip that came with these test strips is at hand. - Page 85 Quality control 7 Apply gentle pressure to the reservoir to transfer the entire contents of the pipette to the vial. Make sure that the pipette does not come in contact with the dried control plasma. 8 Close the container again. 9 Make sure the pipette is at hand for the next steps in the quality control test.
-
Page 86: Performing A Quality Control Check
Quality control Performing a quality control test 11 Place the monitor on a level, vibration-free surface or hold it in your hand so it is roughly horizontal. Turn the monitor on by pressing the On/Off button Alternatively, you can insert a test strip or connect the monitor to the power supply unit to turn it on. - Page 87 Quality control 15 Touch the QC TEST button. 28.11.2005 MAIN MENU PATIENT TEST QC TEST MEMORY SETUP 10:21 16 The test strip icon prompts you to insert a 28.11.2005 QC TEST test strip. Remove a test strip from its con- tainer and close the container again with the stopper.
- Page 88 Quality control 28.11.2005 TEST If you use a new test strip lot and have not inserted the code chip yet, you must do so now. Otherwise you cannot perform a quality control test. code 10:21 28.11.2005 As with the test strips, a code chip is also pro- QC TEST vided with the control solutions.
- Page 89 Quality control 20 If the control solution box contains more QC TEST 28.11.2005 than one level, select the level of choice CODE: 025 for this measurement. LEVEL 10:21 28.11.2005 TEST The hourglass icon shows that the test strip is LEVEL: 1 CODE: 025 warming up.
- Page 90 Quality control 21 Using the pipette, draw up the dissolved contents of the vial. 22 Apply the hanging drop of control solution directly from the pipette to the semicircu- lar, transparent sample application area of the test strip.
- Page 91 Quality control TEST 28.11.2005 You hear a beep tone when you have applied LEVEL: 1 CODE: 025 enough control solution (provided the beep tone is turned on). The pipette icon disappears and the test starts. 10:21 QC TEST 28.11.2005 The result of this quality control test is dis- LEVEL: 1 CODE: 025 played.
- Page 92 Quality control 28.11.2005 QC TEST If a quality control test fails, an up arrow (too LEVEL: 1 CODE: 029 high) or down arrow (too low) is displayed and 28.11.2005 10:21 flashes. (1.8 - 2.6 INR) Please note: The arrow refers to the INR (118 - 127 %Q) result only.
-
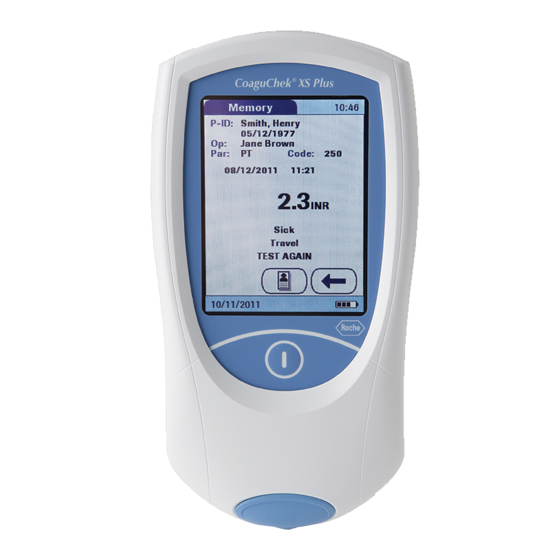
Page 93: Memory
Memory Memory The CoaguChek XS Plus monitor has a 500-value memory for saving results (patient tests and quality controls separately) together with time and date. In addition, up to 60 code chip records (contents of test strip code chips and control solution code chips) are stored. - Page 94 Memory 3 Touch the MEMORY button. 28.11.2005 MAIN MENU PATIENT TEST QC TEST MEMORY SETUP 10:21 4 Select the function you want to perform in 28.11.2005 MEMORY the memory. ■ Display PATIENT RESULT memory PATIENT RESULT ■ Display QC RESULT memory QC RESULT 10:21 The following buttons for general use are...
-
Page 95: Display Patient Result Memory
Memory Display Patient Result memory This memory area contains all test results for your patients, sorted chronologically or by patient ID number. The most recent results are at the top of the list. 1 Touch the arrow buttons MEMORY 28.11.2005 display the entry of choice on the screen. -
Page 96: Display Quality Control Memory
Memory Display QC (Quality Control) memory This memory area contains all quality controls that were run, sorted chronologically. The most recent results are at the top of the list. 1 Touch the arrow buttons 28.11.2005 display the entry of choice on the screen. 03.04.05 19:30 QC 333 PASS If the arrow is just an outline... -
Page 97: Cleaning
Cleaning Cleaning Cleaning the plastic housing Clean the monitor whenever it becomes dirty. Turn off the monitor before cleaning it. Use only the following items for cleaning: ■ Ordinary lint-free swabs (available at pharmacies) ■ Warm water with or without washing-up liquid ■... -
Page 98: Cleaning The Test Strip Guide
Cleaning Cleaning the test strip guide Check the test strip guide regularly for signs of soiling. If the test strip guide has become soiled with blood or any other material, you must clean this area. 1 Remove the measurement chamber cover by pressing upwards from the front (e.g. - Page 99 Cleaning On completion of cleaning: 3 Let the inside of the test strip guide dry for about 10 minutes. 4 After this time, re-attach the measurement chamber cover to the housing. Make sure that the cover is properly closed. You will hear it snap into place.
- Page 100 Cleaning...
-
Page 101: Error Messages
Error messages Error messages Depending on the circumstances, an error message may appear on the display of your monitor. Your first step on receiving an error message should be to try the solution suggested for that error. If the problem persists, please contact your local customer support and service centre (see page 122). - Page 102 Error messages Error message (always prefaced by Brief description Refer to page ERROR) ERROR Test strip beyond expiry date ERROR Test strip unusable ERROR Allowed time for blood application exceeded 107 ERROR Blood application error ERROR Measurement error ERROR Quality control: Test strip unusable or quality control for new lot missing ERROR Measurement error...
- Page 103 Error messages Error message (always prefaced by Brief description Refer to page ERROR) ERROR Internal memory error (patient) Patient ERROR Internal memory error (QC) ERROR Internal memory error (setup) SETUP ERROR Data transfer error ERROR Control solution beyond expiry date ERROR Memory (almost) full ERROR...
-
Page 104: Error Messages After Turning The Monitor On
Error messages Error messages after turning the monitor on This icon appears... Description of error Error: Test strip ERROR A test strip was already inserted when the monitor was turned on with the On/Off button. Solution Remove the test strip. The error message disappears, the monitor is ready. -
Page 105: Error Messages When Preparing To Test
Error messages Error messages when preparing to test This icon appears... Description of error Error: Cover ERROR The measurement chamber cover is not prop- erly closed. Solution Close the measurement chamber cover. The error message disappears, the monitor is ready. This icon appears... - Page 106 Error messages This icon appears... Description of error Error: Test strip ERROR The test strip is beyond its expiry date. Solution First check whether the date setting is correct in the monitor. If it is not, set the correct date. If the date is correct: Turn the monitor off, remove the code chip and test strip.
-
Page 107: Error Messages During Or After Blood Application
Error messages Error messages during or after blood application This icon appears... Description of error Error: Time for application exceeded ERROR The maximum allowed time of 120 seconds for applying blood has been exceeded. Solution Turn the monitor off, remove the test strip and start a new test using the same test strip. This icon appears... - Page 108 Error messages This icon appears... Description of error Error: Quality Control ERROR A quality control test must be carried out when a new test strip lot is used. The quality control for the new lot is missing. Solution Perform a quality control test with the new test strip lot. This icon appears...
-
Page 109: Other Error Messages
Error messages Other error messages This icon appears... Description of error Error: Diagnostic test ERROR Error during the internal diagnostic test which the monitor performs. Solution Turn the monitor off and remove the batteries. Wait at least one minute before re-inserting the batteries in the battery compartment, and then set the date and time as described starting on page 34. - Page 110 Error messages This icon appears... Description of error Error: Memory test (setup) ERROR The memory contains faulty data. SETUP Solution The monitor has a fault. Please call your local customer support and service centre (see p. 122). This icon appears... Description of error Error: Data transfer ERROR...
- Page 111 Error messages This icon appears... Description of error Error: Quality Control ERROR The control solution is beyond its expiry date. Solution Use a new control solution with the code chip belonging to it. This icon appears... Description of error Error: Memory test (capacity) ERROR Memory almost full.
- Page 112 Error messages...
-
Page 113: Further Information
This product incorporates software that is under license from GPL. The source code for this soft- ware can be requested on a usual data exchange medium from the following address: Roche Diagnostics GmbH, Sandhofer Str. 116, D-68305 Mannheim The GPL licensing conditions are printed below (in English only for legal reasons):... - Page 114 Further information Copyright (C) 1989, 1991 Free Software Foundation, Inc. 51 Franklin Street, Suite 330, Boston, MA 02110, USA Everyone is permitted to copy and distribute verbatim copies of this license document, but chang- ing it is not allowed. Preamble The licenses for most software are designed to take away your freedom to share and change it.
- Page 115 Further information it, either verbatim or with modifications and/or translated into another language. (Hereinafter, translation is included without limitation in the term "modification".) Each licensee is addressed as "you". Activities other than copying, distribution and modification are not covered by this License; they are outside its scope.
- Page 116 Further information In addition, mere aggregation of another work not based on the Program with the Program (or with a work based on the Program) on a volume of a storage or distribution medium does not bring the other work under the scope of this License. 3.
- Page 117 Further information 6. Each time you redistribute the Program (or any work based on the Program), the recipient auto- matically receives a license from the original licensor to copy, distribute or modify the Program subject to these terms and conditions. You may not impose any further restrictions on the recipi- ents' exercise of the rights granted herein.
- Page 118 Further information 10. If you wish to incorporate parts of the Program into other free programs whose distribution conditions are different, write to the author to ask for permission. For software which is copy- righted by the Free Software Foundation, write to the Free Software Foundation; we sometimes make exceptions for this.
- Page 119 Further information You should have received a copy of the GNU General Public License along with this program; if not, write to the Free Software Foundation, Inc., 51 Franklin Street, Suite 330, Boston, MA 02110, USA. Also add information on how to contact you by electronic and paper mail. If the program is interactive, make it output a short notice like this when it starts in an interactive mode: Gnomovision version 69, Copyright (C) year name of author Gnomovision comes with ABSO-...
- Page 120 Further information THIS SOFTWARE IS PROVIDED BY THE REGENTS AND CONTRIBUTORS ``AS IS'' AND ANY EXPRESS OR IMPLIED WARRANTIES, INCLUDING, BUT NOT LIMITED TO, THE IMPLIED WAR- RANTIES OF MERCHANTABILITY AND FITNESS FOR A PARTICULAR PURPOSE ARE DIS- CLAIMED. IN NO EVENT SHALL THE REGENTS OR CONTRIBUTORS BE LIABLE FOR ANY DIRECT, INDIRECT, INCIDENTAL, SPECIAL, EXEMPLARY, OR CONSEQUENTIAL DAMAGES (INCLUDING, BUT NOT LIMITED TO, PROCUREMENT OF SUBSTITUTE GOODS OR SERVICES;...
-
Page 121: Product Specifications
Product specifications Product specifications Operating conditions and technical data Temperature range +18 °C to +32 °C Relative humidity 10 to 85% (no condensation) Maximum altitude 4300 m Position Place the monitor on a level, vibration-free surface or hold it so it is roughly horizontal. -
Page 122: Storage And Transport Conditions
201 Boul. Armand-Frappier 15 Rakino Way Laval, Québec H7V 4A2 Mt. Wellington Roche Care Centre Auckland Telephone 1-877-273-3433 Telephone 09-2764157 Repairs Please note that repairs and other modifications to the monitor may only be performed by per- sons authorized by Roche Diagnostics. -
Page 123: Warranty
The statutory guarantee provisions on rights in consumer goods sales in the country of purchase shall apply. The following patents have been granted or are pending for the CoaguChek XS Plus System (monitor and test strips): Patent Nos. US 6662439, US 6881378, US 6207000, EP 1522859 A, WO 03/095092, US 6645368, DE 10356452.7, DE 10359303.9, DE 102004011648.2,... - Page 124 Warranty...
-
Page 125: Alphabetical Index
Alphabetical Index Alphabetical Index Administrator ID ....................50–55 Applying a blood sample ..................78 Auto Off ...........................45 Batteries Inserting ......................18-19 Types .........................16, 19 Beep tone......................42, 76, 87 Block Operator ........................60 Quality control ....................63, 73 Blocks ........................59–64 Blood sample (testing) ..................65–81 Capillary blood sample (testing) ..............65–81 Cleaning ........................97–99 Cleaning the plastic housing................97 Cleaning the test strip guide ................98... - Page 126 Alphabetical Index Data transfer ........................96 Date ...........................34 Display Icons ........................21-23 Display format .......................38 Disposal ................16, 19, 67, 69, 70, 81, 92 Disposing of the instrument ................113 Electromagnetic interference ..................10 Error ........................101–111 Error messages ....................101–111 Fingertip ..........................78 Getting a blood sample .....................66 Icons Drop ..........................77 Error ......................
- Page 127 Alphabetical Index Mains voltage ...................... 10, 121 Measurement Performing ....................... 73-81 Preparation ......................68 Measurement chamber cover .................98 Measuring range ....................80, 121 Memory Button ........................94 Patient result ......................95 Quality control .......................96 Memory ........................93–96 Monitor Elements ........................15 Overview ........................ 15 Setup ......................... 20-64 Operating conditions ..................
- Page 128 Alphabetical Index QC block ........................63, 73 Quality control ..................11, 80, 83–92 Block .........................63 Memory ........................96 Preparation ......................84 Test result .......................91 Relative humidity ....................10, 121 Screen ........................28–39 Setup ..........................20–64 Administrator ID .................... 50-55 Auto Off ........................45 Beeper ........................42 Blocks ........................ 59-64 Computer ........................47 Contrast ........................28 Date ...........................34...
- Page 129 Alphabetical Index Telephone number (information service) ............122 Temperature range ................10, 65, 121, 122 Test principle ........................8 Test result ........................80 Quality control .......................91 Test strip Icon ........................76, 87 Inserting ......................76, 87 Thromboplastin ......................8 Time ..........................36 Touchscreen ........................10 Turn on ..........................71 Unit displayed with the test result .................80 Units ..........................30 Voltage ..........................10...
- Page 130 Alphabetical Index...
- Page 131 COAGUCHEK and SOFTCLIX are trademarks of Roche. Roche Diagnostics GmbH D-68298 Mannheim Germany www.roche.com www.coaguchek.com...
Need help?
Do you have a question about the CoaguChek XS Plus and is the answer not in the manual?
Questions and answers