Roche CoaguChek XS User Manual
Hide thumbs
Also See for CoaguChek XS:
- Quick start manual ,
- User manual (222 pages) ,
- Procedures manual (59 pages)
Table of Contents
Advertisement
Available languages
Available languages
Quick Links
Advertisement
Chapters
Table of Contents

Related Manuals for Roche CoaguChek XS


Summary of Contents for Roche CoaguChek XS
- Page 1 CoaguChek ® User’s Manual Manuale per l’uso...
- Page 2 On the packaging, on the type plate of the monitor and in the User’s Manual you may encounter the following symbols and abbreviations shown here with their meaning: Use by/Expiry date Lot number For in vitro diagnostic use This product fulfills the requirement of Directive 98/79/EC 0088 on in vitro diagnostic medical devices.
- Page 3 Please note: This manual contains all the information you need to operate and care for the CoaguChek XS System. Please read this entire manual carefully before you use the monitor. Last update user information: June 2005...
- Page 4 The CoaguChek XS System...
-
Page 5: Table Of Contents
The CoaguChek XS System Introduction The CoaguChek XS System ............9 Test principle ..................10 Contents of the pack ............... 10 Operating conditions ............... 11 Quality control ..................12 About this manual Manual format ..................13 The CoaguChek XS monitor Monitor guide .................. - Page 6 Testing a capillary blood sample Important notes ................. 44 Getting a good capillary blood sample ........46 Testing by healthcare professionals .......... 47 Preparing to test ................48 Performing a test ................49 Disposal by healthcare professionals ........59 Notes concerning the display of results ........60 Memory Viewing test results .................
- Page 7 Product specifications Operating conditions and technical data ......... 96 Sample material ................. 97 Storage and transport conditions ..........97 Information service ................98 Repairs ....................98 Guarantee Alphabetical index...
-
Page 9: The Coaguchek Xs System
The CoaguChek XS System makes coagulation testing easy. The CoaguChek XS monitor guides you through the test step by step using the symbols in the display. The code chip accompanying the test... -
Page 10: Test Principle
Introduction Test principle The CoaguChek XS PT test strip contains a lyophilized reagent (reagent in dried form). The reactive components of this reagent consist of thrombo- plastin and a peptide substrate. When a sample is applied, thromboplas- tin activates coagulation, which leads to the formation of thrombin. At the same time the monitor starts to measure the time. -
Page 11: Operating Conditions
Introduction Operating conditions To ensure that your CoaguChek XS System functions properly, please observe the following guidelines: ■ Only use the monitor at a room temperature between 18°C and 32°C. ■ Only use the monitor at a relative humidity between 10% and 85%. -
Page 12: Quality Control
Introduction Quality control The CoaguChek XS System has a number of inbuilt quality-control functions such as: ■ A check of the electronic components and functions every time the monitor is turned on. ■ A check of the test strip temperature while a test is in progress. -
Page 13: About This Manual
About this manual About this manual Manual format The layout of this User’s Manual has been specially designed to help you locate the most important information quickly and easily. Where illustra- tions are used, they always appear on the left side of the page with the accompanying explanation text on the right. - Page 14 About this manual Example: This column contains an illustra- This column states what you tion. should do at this point. 1 Press the On/Off button.
- Page 15 About this manual Example: This column contains an illustra- This column contains information tion of the display screen. linked to the display screen. Each time you turn on the moni- 28:88 18:88 tor, it runs a full display check, code error briefly showing all the symbols that might be displayed.
-
Page 16: The Coaguchek Xs Monitor
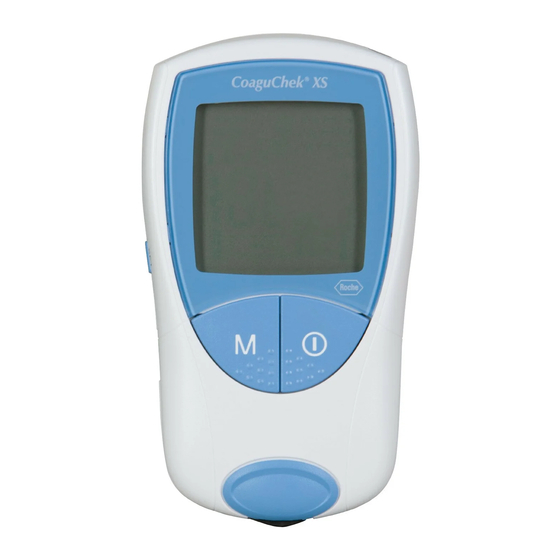
The CoaguChek XS monitor The CoaguChek XS monitor... - Page 17 The CoaguChek XS monitor The CoaguChek XS monitor Display Test strip guide Shows results, information, Insert the test strip here. symbols and results recalled Battery compartment from memory. cover M (memory) button Covers the battery compart- Press this button to recall ment (4 1.5 V alkali-manga-...
-
Page 18: Batteries
The CoaguChek XS monitor Batteries To save power, the CoaguChek XS monitor automatically turns itself off after 3 minutes unless a button has been pressed or a new test strip has been inserted. When the monitor turns itself off, all results obtained up to that point remain in memory. -
Page 19: Starting Up
Starting up Starting up Before using the monitor for the first time, carry out the following steps: Insert the batteries Insert the code chip (you can also carry out this step immediately before testing) Set the current date and time Select the coagulation unit in which the results are to be displayed... -
Page 20: Inserting The Batteries
Starting up Inserting the batteries 1 With the monitor turned off, turn it over. 2 Gently press the tab on the battery compartment cover towards the centre of the monitor and lift off the cover. 3 Insert the four batteries in the battery compartment as indi- cated. - Page 21 Starting up 4 Close the battery compart- ment. 5 Check that all of the display 28:88 18:88 symbols are displayed prop- code error erly. Results may be misread if a segment is missing. If the display check when you turn on the monitor is too quick, you can put it “on hold”...
- Page 22 (because the batteries were removed from the monitor for more than one minute), your CoaguChek XS monitor now automatically enters Set Mode. After you have set the date and time, the monitor enters Test Mode. If you wish...
-
Page 23: Code Chip
Code chip Code chip The code chip provides the monitor with important information which it needs to perform the coagulation test. The chip contains information about the test method, the lot number and the expiry date. The monitor is ready to use once the code chip has been inserted. ■... -
Page 24: Inserting The Code Chip
Code chip Inserting the code chip 1 Remove the old code chip, if one is inserted in the monitor. Discard the old code chip with your household waste. 2 Always make sure that the number on the code chip matches the number on the label of the test strip con- tainer. - Page 25 Code chip 3 Slide the new code chip into the slot on the side of the monitor as shown until you feel it snap into place. Every time you insert a test strip in the monitor, the display shows the number of the code chip that is presently inserted.
-
Page 26: Monitor Setup
Monitor setup Monitor setup Please note: If you have not set the date (after turning on for the first time or because the batteries were removed from the monitor for more than one minute), you cannot perform a test. In that case turning on the monitor takes you immediately to Set Mode, where you must set the date and time. -
Page 27: Settings Summary
Monitor setup Settings summary Setting Options Presetting * Date format Day-Month-Year (31-12-00) 31-12-00 Month-Day-Year (12-31-00) Year-Month-Day (00-12-31) Date 31-12-00 Time format 24-hour format (24h) 12-hour format (12h) with a.m./p.m. Time 12:00 Unit Beep tone Therapeutic range (only INR) Set range [INR] Lower range (1.5 –... -
Page 28: Setting Up The Monitor (Set Mode)
Monitor setup Setting up the monitor (Set Mode) All settings are entered with the Set button and the M button. 1 If the monitor did not auto- matically enter Set Mode when you turned it on, press the Set button (on the left side of the monitor) to put it in Set Mode. - Page 29 Monitor setup 3 Press the M button to change the setting that is currently flashing. You may press the M button repeatedly (or press it and hold it down) until you have reached the correct set- ting. Settings where there are only two options (time format, beep tone) can be toggled on and off with the M button.
- Page 30 Monitor setup 5 You can only move forward from one setting to the next, not backward. Corrections can only be made by repeat- ing the settings. You can exit the settings procedure at any time by pressing the On/Off button .
-
Page 31: Setting The Date Format
Monitor setup Setting the date format First, select the date format (the entire date display flashes). The display options are as follows: ■ 31-12-00 (= presetting) Day-Month-Year ■ 12-31-00 Month-Day-Year ■ 00-12-31 Year-Month-Day When elements in the display are surrounded by a halo, it indicates that they are flashing in the monitor’s display. -
Page 32: Setting The Date
Monitor setup Setting the date The next three settings involve entering first the year, then the month, and finally the day. 3 Press the M button to change the number that is currently flashing and set the current year. 4 Press the Set button to save the year. - Page 33 Monitor setup 7 The preset day flashes. Press the M button until the correct day is displayed. 8 Press the Set button to save the setting. The display then automatically moves on to the time format setting.
-
Page 34: Setting The Time Format
Monitor setup Setting the time format Now select the time format. You can choose between the 24-hour time format (presetting) and the 12-hour time format with “a.m. ” or “p.m. ” . 9 Press the M button to toggle 24 h between 24-hour and 12- hour format. -
Page 35: Setting The Time
Monitor setup Setting the time First you set the hour, then the minutes. 11 Press the M button to change 11:23 the number that is currently flashing. Press the Set button to confirm. You can now set the minutes (again using the 12:23 M button). -
Page 36: Selecting The Unit
Monitor setup Selecting the unit Choose the coagulation unit you wish the monitor to use to display the result. The options are: ■ ■ ■ INR (presetting) Ask your doctor if you are not sure which unit to select. The current coagulation unit flashes. 13 Press the M button to cycle through the three options. -
Page 37: Setting The Beep Tone
Monitor setup Setting the beep tone After you have set the unit, you can choose whether you want the beep tone “On” or “OFF”. If you have selected “On,” the monitor will beep in the following situations: ■ when it detects a test strip, ■... -
Page 38: Setting The Therapeutic Range (Inr)
Monitor setup Setting the therapeutic range (INR) What happens next depends on the coagulation unit you have chosen for your results. If you selected “%Q” or “Sec”, the settings are now complete, and “End” appears in the display (see page 40). If you selected “INR”... - Page 39 Monitor setup 19 Press the M button to set the lower limit (symbolized by the down arrow) within the range 1.5 – 3.5 INR. 20 Press the Set button to save the chosen lower limit and continue with the upper limit setting.
- Page 40 Monitor setup The monitor setup is now complete. This display screen appears auto- matically after you have com- pleted the last setting and remains for a few seconds to indi- cate that the setup procedure is now complete. After that the monitor automati- 11:23 cally enters Test Mode.
- Page 41 Monitor setup If you do not wish to perform a test at this point, turn the monitor off. You can exit the monitor setup procedure at any time (e.g. if you have made an incorrect entry) by pressing the On/Off button .
- Page 42 Monitor setup...
-
Page 43: Testing A Capillary Blood Sample
Testing a capillary blood sample Testing a capillary blood sample What you need ■ CoaguChek XS monitor ■ The code chip already inserted in the monitor (each test strip container has its own code chip) ■ Test strips belonging to the code chip mentioned above ■... -
Page 44: Important Notes
Testing a capillary blood sample Important notes Always … ■ … close the container immediately after having removed a test strip. ■ … operate the monitor at an ambient temperature between 18°C and 32°C. ■ … place the monitor on a level, stable surface (table) or hold it so it is roughly horizontal. - Page 45 Testing a capillary blood sample Never … ■ … store the monitor at extreme temperatures. ■ … store the monitor in damp or humid conditions without protection. ■ … remove or insert the code chip while the monitor is performing a test.
-
Page 46: Getting A Good Capillary Blood Sample
Testing a capillary blood sample Getting a good capillary blood sample To get a suitable drop of blood: ■ Wash your hands in warm water and dry thoroughly. ■ Let your hand hang at your side before lancing your finger. ■... -
Page 47: Testing By Healthcare Professionals
Follow all health and safety regulations in force locally. There is a potential risk of infection. Medical staff and other persons using the CoaguChek XS monitor to perform tests in more than one patient must be aware that any object coming into contact with human blood is a potential source of infection. -
Page 48: Preparing To Test
Testing a capillary blood sample Preparing to test 1 Have the test strip container to hand. 2 Make sure that the code chip belonging to these test strips is inserted in the monitor. 3 Prepare the lancing device by inserting a fresh lancet. Do not lance your finger until asked to do so further on in this description. -
Page 49: Performing A Test
Testing a capillary blood sample Performing a test 1 Wash your hands with soap and warm water. Dry them thoroughly. 2 Place the monitor on a level, vibration-free surface or hold it in your hand so it is roughly horizontal. Turn the monitor on by pressing the On/Off button . - Page 50 Testing a capillary blood sample 4 Check the battery level. If 11:23 there are no bars left in the battery symbol, you cannot perform any more tests. 5 Check that the date and time are correct. Correct any wrong entries as described from page 28 onwards.
- Page 51 Testing a capillary blood sample 7 Hold the test strip so the lettering “CoaguChek XS PT” is facing upward. 8 Slide the test strip into the test strip guide in the direction indicated by the arrows. Slide the test strip in as far as it will go.
- Page 52 Testing a capillary blood sample The code number of the code chip 11:23 inserted in the monitor flashes in code the display. Make sure that this number is identical with the code number printed on the test strip container. 9 If the two numbers are identi- cal, confirm by pressing the M button.
- Page 53 Testing a capillary blood sample The hourglass symbol shows that 11:24 the test strip is warming up. When the warming-up process is com- plete, a further beep tone (pro- vided the beep tone is turned on) indicates that you can now apply blood.
- Page 54 Testing a capillary blood sample 10 Now lance the side of a fin- gertip with the lancing device. We recommend obtaining the capillary blood from the side of the fingertip as this causes least pain. Massage the lanced finger until a drop of blood is formed.
- Page 55 Testing a capillary blood sample 11 Apply the blood directly from the finger to the semicircular, transparent sample applica- tion area of the test strip.
- Page 56 Testing a capillary blood sample Alternatively, you can touch the blood drop against the side of the sample application area (instead of applying it to the centre from above). The test strip draws up the blood by capillary action. During this process you must hold the blood drop to the test strip until the flashing blood drop symbol has disap-...
- Page 57 Testing a capillary blood sample You hear a beep tone when you 11:27 have applied enough blood (pro- vided the beep tone is turned on). The blood drop symbol dis- appears and the test starts. Do not add more blood. Do not touch the test strip until the result is displayed.
- Page 58 Testing a capillary blood sample It is at this point that the coagula- 11:28 tion measurement begins. The hourglass flashes until the moni- tor has the result. The result is displayed in the unit 11:29 you chose when setting up the monitor.
-
Page 59: Disposal By Healthcare Professionals
Testing a capillary blood sample 12 Remove the test strip from the measurement chamber. 13 Turn the monitor off. 14 Discard the used lancet and test strip with your regular household waste. 15 Clean the monitor if this becomes necessary (see page 69). - Page 60 Testing a capillary blood sample Notes concerning the results display If your results are displayed in 11:29 INR and you have activated the relevant option, values that are outside a defined target range are flagged with an up arrow (too high) or a down arrow (too low).
- Page 61 Testing a capillary blood sample You can temporarily change the unit in which the result is pre- sented by pressing the Set button while the result is displayed. Each press of the button takes you to the next available unit (%Q - Sec - INR - …).
- Page 62 Testing a capillary blood sample The valid measuring ranges for 11:23 CoaguChek XS PT test strips are: ■ INR: 0.8-8.0 ■ %Q: 120-5 ■ Sec: 9.6-96 Results that are outside the measuring range are indicated by the symbols > (greater than) or <...
-
Page 63: Memory
Memory Memory The CoaguChek XS monitor has a 100-value memory for saving results together with time and date. Viewing test results 1 Place the monitor on a level, vibration-free surface or hold it in your hand so it is roughly horizontal. - Page 64 Memory 3 Press the M button again to move one result back in time. When you have reached the oldest result, the monitor displays a blank entry. When all memory locations are full, the oldest result is erased to make way for the most recent one.
- Page 65 Memory You can temporarily change the unit in which the result is dis- played (in the same way as directly following a test) by press- ing the Set button while viewing a result in memory. Each press of the button takes you to the next available unit (see page 61).
-
Page 66: Erasing Memory
Memory Erasing memory You can erase the entire memory from your CoaguChek XS monitor. You cannot, however, erase individual results. 1 Place the monitor (which must be turned off) on a level, vibration-free surface or hold it so it is roughly horizontal. - Page 67 Memory The monitor runs the usual dis- play check and then displays mem (flashing) and clr. The number of results in memory is shown in the top right corner of the display. 3 Press the M button to confirm that you wish to erase the entire memory.
- Page 68 Memory The hourglass flashes while the results are being erased. The counter is set to “0” and three bars are displayed, indicating that there are no results saved in memory (the entire memory has been erased).
-
Page 69: Cleaning
Cleaning Cleaning Cleaning the housing Clean the monitor whenever it becomes dirty. Turn off the monitor before cleaning it. Use only the following items for cleaning: ■ Ordinary lint-free swabs (available at pharmacies) ■ Warm water with or without washing-up liquid ■... -
Page 70: Cleaning The Test Strip Guide
Cleaning Cleaning the test strip guide Check the test strip guide regularly for signs of soiling. If the test strip guide has become soiled with blood or any other material, you must clean this area. 1 Remove the measurement chamber cover by pressing upwards from the front (e.g. - Page 71 Cleaning On completion of cleaning: 3 Let the inside of the test strip test strip holder guide dry for about 10 minutes. 4 After this time, re-attach the measurement chamber cover to the housing, ensuring that the test strip holder is in the correct position and properly attached.
-
Page 72: Cleaning By Healthcare Professionals
Cleaning Cleaning by healthcare professionals Use 70 % ethanol or isopropyl alcohol to disinfect the monitor. We recom- mend a mixture of 1-propanol, 2-propanol and glutaraldehyde, sold in some countries under the brand name "Bacillol plus". -
Page 73: Error Messages
Error messages Error messages Depending on the circumstances an error message may appear on the display of your monitor. Your first step on receiving an error message should be to try the solution suggested for that error. If the problem per- sists, please contact your local customer support and service centre (see page 98). -
Page 74: Error Messages Overview
Test strip Test strip in monitor or symbol test strip unusable or the test flashing strip is not a CoaguChek XS PT test strip Temperature symbol Monitor too warm or too cold flashing Battery symbol flashing Battery level too low... - Page 75 Error number: Beyond expiry date Error number: Test strip unusable Error number: Blood application error Error number: Measurement error Error number: Measurement error Error number: Diagnostic testing error Error numbers 1 and 2 are reserved for internal purposes by Roche Diagnostics.
-
Page 76: Error Messages After Turning The Monitor On
Error messages Error messages after turning the monitor on Display Description of error Error: test strip A test strip was already inserted 11:23 when the monitor was turned on error with the On/Off button. Error: ambient temperature The monitor is too cold or too 11:23 warm to measure correctly. - Page 77 Error messages Solution Remove the test strip. The error message disappears, the monitor is ready. Turn the monitor off and allow it to stand for about 30 minutes at room temperature (+18°C to +32°C).
-
Page 78: Error Messages When Preparing To Test
Error messages Display Description of error Error: battery Battery level too low 11:23 error Error messages when preparing to test Error: cover The measurement chamber cover 11:23 is not properly closed. error... - Page 79 Error messages Solution Insert new batteries as described on page 20. Close the measurement chamber cover. The error message disappears, the monitor is ready.
- Page 80 Description of error Error: test strip The test strip is unusable or 11:23 the test strip is not a error CoaguChek XS PT test strip. Error: code chip The code chip is missing, not 11:23 properly inserted in the monitor, code error or damaged.
- Page 81 Error messages Solution Remove the test strip and repeat the test with a new or correct test strip. Insert the code chip, or remove it and re-insert it.
-
Page 82: Error Messages After The Code Number Is Confirmed
Error messages Error messages after the code number was confirmed Display Description of error Error: test strip The test strip is beyond its expiry date. error Error: test strip The test strip is unusable. error... - Page 83 Error messages Solution First check whether the date setting is correct in the monitor. If it is not, set the correct date. If the date is correct: turn the monitor off, remove the code chip and test strip. Use a test strip from a new lot of test strips and insert the code chip that came with the new lot.
-
Page 84: Error Messages During Or After Blood Application
Error messages Display Description of error Error: time exceeded The maximum allowed time of 120 seconds for applying blood has error been exceeded. Error messages during or after blood application Error: blood application Error applying blood to the test strip. error... - Page 85 Error messages Solution Turn the monitor off, remove the test strip and start a new test using the same test strip. Turn the monitor off and remove the test strip. Re-read the instructions about applying blood (starting on page 43) and repeat the test with a new test strip.
- Page 86 Error messages Display Description of error Error: measurement Measurement error error Error: quality control The test strip failed the internal quality control check. The test strip is unusable.
- Page 87 Do not touch or remove the test strip when a test is in progress. Turn the monitor off and remove the test strip. Repeat the test with a new test strip. In case the error occurs again call Roche customer service.
- Page 88 Error messages Display Description of error Error: measurement Measurement error resulting from the blood sample. error...
- Page 89 Do not touch or remove the test strip when a test is in progress. Note on Error 7 “Measurement”: The CoaguChek XS PT test strip may be used for patients under a combination therapy of oral anticoagulants plus heparin injections.
-
Page 90: Error Message During Infrared Downloads
Error messages Display Description of error Error: diagnostic test Error during the internal diagnos- tic test which the monitor per- error forms. Error message during infrared downloads Error: infrared interface Error during communication via 11:23 the infrared interface caused by error stray light. - Page 91 Error messages Solution Turn the monitor off and remove the batteries. Wait at least one minute before re-inserting the batteries in the battery compartment, and then set the date and time as described starting on page 26. Repeat the test. If the error message persists, the monitor has a fault. Please call your local customer support and service centre (see p.
-
Page 92: Display Information And Symbols
Display information and symbols Display information and symbols These symbols may appear on the display. They have the meanings shown: Symbol Meaning Test strip (without sample application area) Test strip (with sample application area) Apply sample User must wait until the monitor has com- pleted an action. - Page 93 Display information and symbols Symbol Meaning Beep tone is turned on Beep tone is turned off Result is above the chosen therapeutic range (only with INR as unit) Result is below the chosen therapeutic range (only with INR as unit) •...
- Page 94 Display information and symbols Symbol Meaning Battery status: • When the batteries still have their full charge, all segments are lit. • Individual segments disappear one by one as the batteries become weaker. • When there is no segment remaining, you can no longer perform a test.
-
Page 95: Further Information
Further information Further information Ordering Please contact your pharmacist or specialist supplier. CoaguChek XS PT Test, REF 0 4625358 24 test strips CoaguChek XS PT Test, REF 0 4625315 2 x 24 test strips CoaguChek Softclix Lancet, REF 0 3506509... -
Page 96: Product Specifications
Product specifications Product specifications Operating conditions and technical data Temperature range +18°C to +32°C Relative humidity 10 to 85% (no condensation) Maximum altitude 4300 m Position Place the monitor on a level, vibration-free sur- face or hold it so it is roughly horizontal. Measuring range %Q: 120 - 5 SEC: 9.6 - 96... -
Page 97: Sample Material
Product specifications Sample material Sample type Capillary whole blood or non-anticoagulated, venous whole blood. Sample size At least 10 µL Interactions Refer to test strip package insert Storage and transport conditions Temperature range -25°C to +70°C Relative humidity 10 to 85% (no condensation) -
Page 98: Information Service
201 Boulevard Armand-Frappier 15 Rakino Way Laval, Quebéc H7V 4A2 Mt. Wellington Coagulation Info-Line Auckland Telephone 1-877-4-COAGUCHEK Telephone 09-2764157 Repairs Please note that repairs and other modifications to the monitor may only be performed by persons authorized by Roche Diagnostics. -
Page 99: Guarantee
CoaguChek XS System (monitor and test strips): US 6662439, US 6881378, US 6207000, EP 1522859 A, WO 03/095092, WO2004/113917 A, US 6645368, DE 10356452.7, DE 10359303.9, DE 102004011648.2, DE 102005002934.5. COAGUCHEK is a trademark of a Member of the Roche Group. © 2005 Roche Diagnostics. All rights reserved. -
Page 100: Alphabetical Index
Alphabetical index Alphabetical index Altitude (operating conditions) ................11 Applying blood ......................55 Batteries inserting ......................20–22 types ......................... 18, 20 Beep tone ......................51 setting ........................37 Blood sample (testing) ..................43–62 Capillary blood sample (testing) ..............43–62 Cleaning ......................... 69–72 by healthcare professionals ................ - Page 101 Alphabetical index Date ..........................32 Date format ........................31 Display function check ....................21, 49 symbols ......................92–94 Disposal ..................18, 20, 24, 25, 47, 59 Electromagnetic interference ................. 11 Error messages ....................73–91 Fingertip ......................... 54 Guarantee ........................99 Humidity .........................
- Page 102 Alphabetical index M button ......................... 29, 63 Measurement chamber cover ................70 Measuring range ......................62 Memory ........................63–68 erasing ......................66–68 Monitor setup ........................ 26–41 Monitor guide ......................17 Ordering ........................95 Operating conditions ..................11, 96 Prothrombin time ......................9 Quality control ......................
- Page 103 Alphabetical index Set button ........................28 Setup ........................26–41 beep tone ....................... 37 date .......................... 32 date format ......................31 setting up the monitor ..................28 summary ........................ 27 therapeutic range ..................38–39 time .......................... 35 time format ......................34 unit ...........................
- Page 104 Alphabetical index Target range ......................36, 60 setting ......................38–39 Technical data ......................96 Telephone number (information service) ............98 Temperature range ..................... 11, 44 Test performing ..................... 49–59 preparing ....................... 48 principle ......................... 10 Test strip inserting ......................... 51 symbol ........................
- Page 105 CoaguChek ® Manuale per l’uso...
- Page 106 Sul materiale d'imballaggio, sulla targhetta dello strumento e all'interno del manuale sono riportati simboli ed abbreviazioni che hanno il seguente significato: Scadenza Numero di lotto Per uso diagnostico in vitro Questo prodotto soddisfa i requisiti della Direttiva 0088 98/79/CE sui dispositivi medico-diagnostici in vitro. Codice dell'articolo Consultare le istruzioni per l'uso Attenzione (consultare la documentazione allegata)!
- Page 107 Il sistema CoaguChek XS Il sistema CoaguChek XS CoaguChek XS è un sistema per la determinazione quantitativa dei valori di coagulazione (denominati comunemente: tempo di protrombina - PT, tempo di Quick) con le strisce reattive CoaguChek XS PT. Per poter controllare i valori in modo autonomo e regolare la terapia con anticoagulanti orali sulla base dei risultati ottenuti con il sistema CoaguChek XS, è...
- Page 108 Il sistema CoaguChek XS...
- Page 109 Il sistema CoaguChek XS ................3 Introduzione ...................... 9 Il sistema CoaguChek XS ..............9 Principio del test ................10 Contenuto della confezione ............10 Condizioni operative ................ 11 Controllo di qualità ................12 Informazioni su questo manuale ............13 Composizione delle pagine ............
- Page 110 Test con un campione di sangue capillare ........43 Avvertenze importanti ..............44 Raccomandazioni per il prelievo e l'analisi di sangue capillare ....................46 Misurazione in ambito professionale ........47 Preparazione del test ..............48 Esecuzione del test ................49 Smaltimento rifiuti in ambito professionale ......
- Page 111 Altre informazioni ..................95 Informazioni per gli ordini .............. 95 Limitazioni del prodotto ..............95 Specifiche tecniche ..................96 Condizioni operative e dati tecnici ..........96 Campione ..................... 97 Condizioni di conservazione e trasporto ........97 Servizio Assistenza ................98 Riparazioni ...................
-
Page 113: Il Sistema Coaguchek Xs
/valore INR/tempo di Quick su sangue capillare prelevato dal polpastrello o su sangue venoso intero non trattato con anticoagulanti. Il sistema CoaguChek XS consente di eseguire il test in modo molto semplice. Lo strumento indica sul display tramite dei simboli le diverse fasi operative. -
Page 114: Principio Del Test
Introduzione Principio del test Le strisce reattive CoaguChek XS PT contengono un reagente secco composto da tromboplastina e substrato peptide. Quando si applica il campione di sangue, la tromboplastina attiva il processo di coagulazione che porta alla formazione di trombina. Contemporaneamente lo stru- mento dà... -
Page 115: Condizioni Operative
Introduzione Condizioni operative Al fine di garantire il perfetto funzionamento del sistema CoaguChek XS, osservare quanto segue: ■ utilizzare lo strumento solo ad una temperatura ambiente compresa fra 18°C e 32°C; ■ utilizzare lo strumento solo ad una umidità relativa compresa fra il 10% e l'85%;... -
Page 116: Controllo Di Qualità
Introduzione Controllo di qualità Il sistema CoaguChek XS dispone di una serie di funzioni integrate di controllo, quali ■ controllo dei componenti elettronici e delle funzioni al momento dell'accensione dello strumento; ■ controllo della temperatura della striscia durante l'esecuzione del test;... -
Page 117: Informazioni Su Questo Manuale
Informazioni su questo manuale Informazioni su questo manuale Composizione delle pagine La composizione delle pagine di questo manuale consente di trovare rapidamente le informazioni più importanti. Le illustrazioni sono accom- pagnate a destra dalle relative spiegazioni. Le istruzioni operative (cioè le operazioni che deve compiere l'utente) e le informazioni particolarmente importanti sono riportate su fondo azzurro. - Page 118 Informazioni su questo manuale Esempio: Questa colonna riporta Questa colonna riporta un'illustrazione. l'operazione da eseguire. 1 Premere il tasto On/Off (acceso/spento).
- Page 119 Informazioni su questo manuale Esempio: Questa colonna riporta un'illu- Questa colonna riporta le infor- strazione di ciò che appare sul mazioni relative al display illu- display dello strumento. strato a fianco. Ad ogni accensione è possibile 28:88 18:88 controllare la funzionalità del code error display.
-
Page 120: Lo Strumento Coaguchek Xs
Lo strumento CoaguChek XS Lo strumento CoaguChek XS... -
Page 121: Schema Degli Elementi
Lo strumento CoaguChek XS Schema degli elementi Display Guida della striscia Visualizza i risultati, i mes- reattiva saggi, i simboli e i valori Qui viene inserita la striscia memorizzati. reattiva. Tasto M (memoria) Coperchio del vano Tasto per richiamare i valori... -
Page 122: Batterie
Lo strumento CoaguChek XS Batterie Per risparmiare energia, lo strumento CoaguChek XS si spegne automati- camente dopo 3 minuti se non si preme alcun tasto e non si inserisce alcuna striscia reattiva. Quando lo strumento si spegne, tutti i risultati precedenti restano conservati in memoria. -
Page 123: Messa In Funzione
Messa in funzione Messa in funzione Prima di mettere in funzione lo strumento è necessario: inserire le batterie, inserire il chip codificatore (anche immediatamente prima della misurazione), impostare data e ora attuali, impostare l'unità di misura per i risultati. -
Page 124: Inserimento Delle Batterie
Messa in funzione Inserimento delle batterie 1 Capovolgere lo strumento spento. 2 Aprire il vano batterie pre- mendo leggermente la lin- guetta di chiusura verso il centro dello strumento e sol- levando il coperchio. 3 Inserire le quattro batterie seguendo i simboli di polarità indicati all'interno del vano. - Page 125 Messa in funzione 4 Chiudere il vano batterie. 5 Controllare il corretto funzio- 28:88 18:88 namento del display al fine di code error evitare interpretazioni errate a causa di una visualizzazione difettosa. Consiglio: la visualizzazione di tutti i segmenti del display al momento dell'accensione è...
- Page 126 Messa in funzione 6 Controllare successivamente 11:23 l'impostazione della data e dell'ora. Se le impostazioni non sono state ancora effettuate oppure sono state cancellate (più di un minuto senza bat- terie), lo strumento CoaguChekXS passa automaticamente nella modalità di impostazione. Dopo aver impostato la data e l'ora, lo strumento passa automaticamente nella...
-
Page 127: Chip Codificatore
Chip codificatore Chip codificatore Il chip codificatore fornisce allo strumento le informazioni necessarie per eseguire il test di coagulazione. Tali informazioni riguardano il metodo del test, il numero di lotto e la data di scadenza delle strisce reattive. Dopo aver inserito il chip codificatore, lo strumento è pronto per la misurazione. ■... -
Page 128: Inserimento Del Chip Codificatore
Chip codificatore Inserimento del chip codificatore 1 Togliere (se presente) il vec- chio chip codificatore. Eliminare il chip codificatore con i normali rifiuti domestici. 2 Verificare sempre che il numero visibile sul chip codi- ficatore corrisponda esatta- mente al numero di codice sull'etichetta del flacone delle strisce reattive. - Page 129 Chip codificatore 3 Inserire il nuovo chip codifi- catore nell'apposita fessura sul fianco dello strumento (come indicato nella figura) fino a che scatta in sede. Quando si introduce una striscia reattiva nello strumento, il display visua- lizza il numero del chip codificatore presente nello strumento. Confron- tare il numero visualizzato con quello stampato sull'etichetta del flacone delle strisce reattive usate.
-
Page 130: Configurazione Dello Strumento
Configurazione dello strumento Configurazione dello strumento Attenzione: se la data non è impostata (dopo la prima accensione o dopo oltre un minuto senza batterie), non è possibile eseguire subito il test. Lo strumento passa in tal caso automaticamente nella modalità di impostazione, dove è necessario impostare data e ora. Una volta effettuata l'impostazione, lo strumento passa automatica- mente nella modalità... -
Page 131: Schema Delle Impostazioni Dello Strumento
Configurazione dello strumento Schema delle impostazioni dello strumento Impostazione Opzioni Pre-impostazione Formato della data Giorno-Mese-Anno 31-12-00 (31-12-00) Mese-Giorno-Anno (12-31-00) Anno-Mese-Giorno (00-12-31) Data 31-12-00 Formato dell'ora Formato a 24 ore (24h) Formato a 12 ore (12h), con indicazione a.m./p.m. 12:00 Unità Segnale acustico On (acceso) Off (spento) -
Page 132: Procedure Di Impostazione (Modalità D'impostazione)
Configurazione dello strumento Procedure di impostazione (modalità d'impostazione) Le impostazioni vengono effettuate con i tasti Set e M come descritto qui di seguito. 1 Se al momento dell'accen- sione lo strumento non è pas- sato automaticamente nella modalità d'impostazione, pre- mere il tasto Set (sul lato sini- stro dello strumento) per entrare nella modalità... - Page 133 Configurazione dello strumento 3 Premere il tasto M per modi- ficare l'impostazione che lam- peggia in quel momento. Premere più volte (o tenere premuto) il tasto M finché appare l'impostazione desi- derata. Le impostazioni con due sole alternative (formato dell'ora, segnale acustico) vengono attivate o disattivate con il tasto M.
- Page 134 Configurazione dello strumento 5 È possibile selezionare le singole impostazioni solo procedendo progressiva- mente. Non è possibile tor- nare indietro. È possibile effettuare correzioni soltanto ripetendo la procedura. La procedura d'impostazione può essere interrotta in qual- siasi momento premendo il tasto On/Off .
-
Page 135: Impostazione Del Formato Della Data
Configurazione dello strumento Impostazione del formato della data In primo luogo selezionare il formato della data (l'intera impostazione della data lampeggia). Sono disponibili i seguenti formati di visualizza- zione: ■ 31-12-00 (= pre-impostazione) Giorno-Mese-Anno ■ 12-31-00 Mese-Giorno-Anno ■ 00-12-31 Anno-Mese-Giorno Nelle illustrazioni gli elementi che sul display lampeggiano sono circon- dati dai raggi. -
Page 136: Impostazione Della Data
Configurazione dello strumento Impostazione della data Impostare prima l'anno, poi il mese e infine il giorno. 3 Premere il tasto M per modi- ficare la cifra che lampeggia e impostare l'anno attuale. 4 Premere il tasto Set per memorizzare l'anno. Il display passa automaticamente all'indicazione del mese. - Page 137 Configurazione dello strumento 7 L'indicazione del giorno lam- peggia. Premere il tasto M finché appare il giorno desi- derato. 8 Premere il tasto Set per memorizzare l'impostazione e passare all'impostazione del formato dell'ora. Il display passa automaticamente al formato dell'ora.
-
Page 138: Impostazione Del Formato Dell'ora
Configurazione dello strumento Impostazione del formato dell'ora Selezionare ora il formato per la visualizzazione dell'ora. È possibile sce- gliere fra il formato internazionale (formato 24 ore = pre-impostazione) e il formato anglo-americano (formato 12 ore con indicazione a.m./p.m.). 9 Premere il tasto M per sce- 24 h gliere fra il formato 24h e il formato 12h. -
Page 139: Impostazione Dell'ora
Configurazione dello strumento Impostazione dell'ora Impostare prima l'ora e poi i minuti. 11 Premere il tasto M per modi- 11:23 ficare la cifra che lampeggia sul display. Una volta impo- stata l'ora, premere il tasto Set per passare ai minuti 12:23 (modificare di nuovo con il tasto M). -
Page 140: Impostazione Dell'unità Di Misura
Configurazione dello strumento Impostazione dell'unità di misura Selezionare l'unità di misura con cui si desidera visualizzare i risultati del test. È possibile scegliere fra: ■ ■ ■ INR (pre-impostazione) In caso di dubbio sull'unità di misura da selezionare, consultare il proprio medico curante. L'unità... -
Page 141: Impostazione Del Segnale Acustico
Configurazione dello strumento Impostazione del segnale acustico Dopo l'impostazione dell'unità di misura, si passa all'impostazione del segnale acustico con "On" (=acceso) e "OFF" (=spento). Se il segnale acustico è impostato su "On", lo strumento emette un segnale nelle seguenti situazioni: ■... -
Page 142: Impostazione Del Range Terapeutico (Inr)
Se è stata selezionata l'unità "%Q" (tempo di Quick) o l'unità "Sec" (secondi), le impostazioni dello strumento CoaguChek XS si concludono qui e sul display dello strumento appare "End" (fine) (vedere p. 40). Se è stata impostata l'unità "INR", è ora possibile scegliere se si desidera anche la visualizzazione dei limiti superiore ed inferiore del range tera- peutico individuale. - Page 143 Configurazione dello strumento 19 Premere il tasto M per impo- stare il valore limite inferiore (rappresentato dalla freccia rivolta verso il basso) nell'intervallo di 1,5-3,5 INR. 20 Premere il tasto Set per memorizzare l'impostazione selezionata e procedere con l'impostazione del valore limite superiore.
- Page 144 Configurazione dello strumento Tutte le impostazioni sono ora concluse. Terminata l'ultima impostazione, il display visualizza automatica- mente la parola "End" (fine) segnalando per pochi secondi la conclusione della procedura di configurazione dello strumento. Lo strumento passa quindi auto- 11:23 maticamente nella modalità di misurazione.
- Page 145 Configurazione dello strumento Se non si desidera effettuare un test, spegnere lo strumento. La procedura d'impostazione può essere interrotta in qualsiasi momento (p.es. se è stata selezionata un'impostazione sbagliata) premendo il tasto On/Off . Iniziare da capo la procedura d'impostazione accendendo lo strumento con il tasto Set.
- Page 146 Configurazione dello strumento...
-
Page 147: Test Con Un Campione Di Sangue Capillare
Test con un campione di sangue capillare Test con un campione di sangue capillare Occorrente: ■ Strumento CoaguChek XS ■ Chip codificatore inserito nello strumento (il chip codificatore è allegato a ciascun flacone di strisce reattive) ■ Flacone con le strisce reattive appartenenti al chip codificatore inserito nello strumento ■... - Page 148 Test con un campione di sangue capillare Avvertenze importanti Ricordarsi sempre di … ■ … richiudere immediatamente il flacone subito dopo aver prelevato la striscia reattiva. ■ … utilizzare lo strumento esclusivamente ad una temperatura ambiente compresa fra 18°C e 32°C. ■...
- Page 149 Test con un campione di sangue capillare Evitare sempre di … ■ … conservare lo strumento a temperature estreme. ■ … conservare lo strumento non protetto in ambienti umidi. ■ … togliere o sostituire il chip codificatoredurante l'esecuzione di un test.
-
Page 150: Raccomandazioni Per Il Prelievo E L'analisi Di Sangue Capillare
Test con un campione di sangue capillare Raccomandazioni per il prelievo e l'analisi di sangue capillare Per il prelievo di una goccia di sangue capillare: ■ Lavare le mani con acqua calda e asciugarle accuratamente. ■ Prima di pungere il polpastrello, lasciar pendere la mano lungo il fianco. -
Page 151: Misurazione In Ambito Professionale
Osservare tutte le norme d'igiene e sicurezza vigenti nel proprio istituto. Potenziale rischio d'infezione: il personale medico-sanitario che utilizza lo strumento CoaguChek XS per eseguire misura- zioni su più persone deve tener presente che tutti gli oggetti che vengono a contatto con il sangue umano rappresentano una potenziale fonte d'infezione (cfr. -
Page 152: Preparazione Del Test
Test con un campione di sangue capillare Preparazione del test 1 Prendere il flacone delle strisce reattive. 2 Verificare che nello strumento sia inserito il chip codificatore appartenente alle strisce reattive in uso. 3 Preparare il pungidito e inserire una nuova lancetta. Attendere e pungere il polpa- strello nel momento in cui la procedura qui descritta lo... -
Page 153: Esecuzione Del Test
Test con un campione di sangue capillare Esecuzione del test 1 Lavare le mani con acqua calda e sapone e asciugarle accuratamente. 2 Collocare lo strumento su una superficie piana e stabile oppure tenerlo ferma- mente in mano in posi- zione orizzontale. - Page 154 Test con un campione di sangue capillare 4 Controllare lo stato delle bat- 11:23 terie. Se nel simbolo della batteria non sono visibili i segmenti, non è più possibile eseguire test. 5 Controllare la data e l'ora. Se necessario, correggere le impostazioni come descritto a pag.
- Page 155 Test con un campione di sangue capillare 7 Tenere la striscia reattiva in modo che la scritta "CoaguChek XS PT" sia rivolta verso l'alto. 8 Inserire la striscia seguendo la direzione della freccia stampata nell'apposita fes- sura dello strumento. Introdurre la striscia sino al suo arresto.
- Page 156 Test con un campione di sangue capillare Sul display lampeggia il numero 11:23 del chip codificatore inserito nello code strumento. Verificare che il numero di codice corrisponda a quello del flacone delle strisce reattive. 9 Se il numero di codice corri- sponde, confermare con il tasto M.
- Page 157 Test con un campione di sangue capillare Mentre la striscia viene portata 11:24 alla giusta temperatura operativa, sul display appare il simbolo della clessidra. Terminato il periodo di riscaldamento, lo strumento emette un segnale acustico (se attivato nelle impostazioni) per richiedere l'applicazione del cam- pione di sangue.
- Page 158 Test con un campione di sangue capillare 10 Pungere lateralmente il pol- pastrello con l'apposito pun- gidito. Si consiglia di prelevare il sangue dai lati del polpastrello, poiché questa zona è meno sensibile al dolore. Massaggiare lievemente lungo il dito per favorire la formazione di una goccia di sangue.
- Page 159 Test con un campione di sangue capillare 11 Applicare la goccia di sangue direttamente dal polpastrello sull'area semicircolare tra- sparente della striscia reat- tiva.
- Page 160 Test con un campione di sangue capillare In alternativa, è anche possi- bile tenere la goccia di sangue lateralmente all'area di applicazione (invece che centralmente dall'alto). In quel punto il sangue viene assorbito per azione capillare dalla striscia reattiva. In questo caso è necessario tenere la goccia di sangue vicino alla striscia reattiva finché...
- Page 161 Test con un campione di sangue capillare Quando è stato applicato sangue 11:27 sufficiente, lo strumento emette un segnale acustico (se attivato). Sul display scompare il simbolo della goccia e la misurazione ha inizio. Non aggiungere sangue sulla striscia. Non toccare la striscia finché...
- Page 162 Test con un campione di sangue capillare A questo punto ha inizio la misu- 11:28 razione vera e propria. Sul display lampeggia la clessidra finché viene visualizzato il risultato. Il risultato viene visualizzato 11:29 nell'unità di misura prescelta (nelle impostazioni dello stru- mento) e memorizzato automati- camente.
-
Page 163: Smaltimento Rifiuti In Ambito Professionale
Test con un campione di sangue capillare 12 Estrarre la striscia dallo stru- mento. 13 Spegnere lo strumento. 14 Eliminare la striscia e la lan- cetta usate insieme ai normali rifiuti domestici. 15 Se necessario, effettuare la pulizia dello strumento (vedere pag. -
Page 164: Avvertenze Sulla Visualizzazione Del Risultato
Test con un campione di sangue capillare Avvertenze sulla visualizzazione del risultato Se per la visualizzazione dei risul- 11:29 tati è stata prescelta l'unità di misura INR, i valori che non rien- trano nel range individuale defi- nito vengono contrassegnati da una freccia verso l'alto (valori superiori al range) o da una frec- cia verso il basso (valori inferiori... - Page 165 Test con un campione di sangue capillare È anche possibile commutare e visualizzare temporaneamente un'altra unità di misura. Mentre il display visualizza il risultato pre- mere il tasto Set. Premendo il tasto si passa alle diverse unità di misura (%Q – Sec –...
- Page 166 Test con un campione di sangue capillare Gli intervalli di misura delle strisce 11:23 reattive CoaguChek XS PT sono: ■ INR: 0,8–8,0 ■ %Q: 120–5 ■ Sec: 9,6–96 I valori che non rientrano nell'intervallo di misura vengono contrassegnati dai simboli >...
-
Page 167: Memoria Dei Risultati
Memoria dei risultati Memoria dei risultati CoaguChek XS è in grado di memorizzare fino a 100 risultati completi di data e ora. Visualizzazione dei risultati memorizzati 1 Porre lo strumento su una superficie piana e stabile oppure tenerlo fermamente in mano in posizione orizzon- tale. - Page 168 Memoria dei risultati 3 Premendo nuovamente il tasto M si scorre via via verso il risultato più vecchio. Una volta raggiunto il risultato più vecchio, sul display appaiono tre lineette per indicare che gli inse- rimenti sono terminati. Se la memoria è piena, il risultato più...
- Page 169 Attenzione: durante il trasferimento dati tramite infrarossi evitare un'illu- minazione circostante troppo forte, poiché la comunicazione potrebbe essere interrotta (vedere pag. 90). Per ulteriori informazioni sul trasferimento dati ad un computer, contat- tare il Servizio Assistenza Roche Diagnostics (vedere pag. 98).
-
Page 170: Cancellazione Dei Risultati In Memoria
Memoria dei risultati Cancellazione dei risultati in memoria È possibile cancellare tutti i risultati presenti nella memoria dello stru- mento. La cancellazione di singoli risultati non è invece possibile. 1 Porre lo strumento su una superficie piana e stabile oppure tenerlo fermamente in mano in posizione orizzon- tale. - Page 171 Memoria dei risultati Dopo il consueto autotest del display, appaiono contemporane- amente le scritte mem (memoria, lampeggia) e clr (ingl.: clear = cancellare). Nell'angolo superiore destro è visualizzato il numero dei risultati memorizzati. 3 Confermare la completa can- cellazione dei dati presenti in memoria premendo il tasto Per abbandonare la modalità...
- Page 172 Memoria dei risultati Durante la procedura di cancella- zione sul display lampeggia il simbolo della clessidra. Il contatore riportato a "0" e le tre lineette sul display indicano che la memoria è ora vuota.
-
Page 173: Pulizia
Pulizia Pulizia Pulizia dello strumento Pulire sempre lo strumento quando sono visibili tracce di sporco. Spegnere lo strumento prima di effettuare la pulizia. Per la pulizia utilizzare esclusivamente i seguenti materiali: ■ tamponi che non lascino pelucchi (acquistabili in farmacia); ■... -
Page 174: Pulizia Della Guida Della Striscia Reattiva
Pulizia Pulizia della guida della striscia reattiva Controllare regolarmente se la guida della striscia reattiva presenta even- tuali tracce di sangue o di sporco. Se necessario, pulire la guida come segue. 1 Togliere il coperchio della camera di misura spingendo la parte anteriore verso l'alto (p.es. - Page 175 Pulizia Una volta terminata la pulizia: 3 Lasciare asciugare per portastriscia circa 10 minuti l'interno della guida della striscia. 4 Rimettere quindi il coperchio della camera di misura. Verifi- care che il portastriscia sia nella giusta posizione e sia inserito correttamente. 5 Assicurarsi che il coperchio sia perfettamente in sede.
-
Page 176: Pulizia In Ambito Professionale
Pulizia Pulizia in ambito professionale Per la disinfezione dello strumento utilizzare etanolo o isopropanolo al 70%. Si consiglia in particolare una miscela composta da 1-propanolo, 2-propanolo e glutaraldeide, in alcuni paesi nota con il nome commer- ciale Bacillol plus. -
Page 177: Messaggi D'errore
Se il problema persiste, contattare il Servizio Assistenza Roche Diagnostics (vedere pag. 98). Lo schema completo di tutti gli elementi ed i simboli che appaiono sul display è riportato a pagina 92. -
Page 178: Schema Dei Messaggi D'errore
La striscia reattiva è nello della stri- strumento oppure scia lam- La striscia è difettosa o non è peggia una striscia CoaguChek XS PT Il simbolo del termo- Lo strumento è troppo caldo o metro lampeggia troppo freddo Il simbolo della batte-... - Page 179 Messaggi d'errore Errore (appare sempre Descrizione vedi error) pag. Numero errore: 000 Tempo scaduto per l'applica- zione del sangue Numero errore: 3 Superata data di scadenza Numero errore: 4 Striscia reattiva difettosa Numero errore: 5 Errore nell'applicazione del sangue Numero errore: 6 Errore durante la misurazione Numero errore: 7 Errore durante la misurazione...
-
Page 180: Messaggi D'errore Dopo L'accensione Dello Strumento
Messaggi d'errore Messaggi d'errore dopo l'accensione dello strumento Display Descrizione Errore: striscia reattiva Al momento dell'accensione con 11:23 il tasto On/Off era inserita una error striscia reattiva nello strumento. Errore: temperatura esterna Lo strumento è troppo freddo o 11:23 troppo caldo per poter misurare error correttamente. - Page 181 Messaggi d'errore Soluzione Togliere la striscia. Il messaggio d'errore scompare, lo strumento è pronto. Spegnere lo strumento e lasciarlo a temperatura ambiente (fra +18°C e +32°C) per circa 30 minuti.
-
Page 182: Messaggi D'errore Durante La Preparazione Del Test
Messaggi d'errore Display Descrizione Errore: batterie Le batterie sono scariche. 11:23 error Messaggi d'errore durante la preparazione del test Errore: coperchio Il coperchio della camera di 11:23 misura non è chiuso perfetta- error mente. - Page 183 Messaggi d'errore Soluzione Inserire nuove batterie come descritto a pag. 20. Chiudere il coperchio della camera di misura. Il messaggio d'errore scompare, lo strumento è pronto.
- Page 184 Display Descrizione Errore: striscia reattiva La striscia è difettosa oppure 11:23 non è una striscia reattiva error CoaguChek XS PT. Errore: chip codificatore Il chip codificatore non è inserito 11:23 o non è inserito perfettamente code error oppure è difettoso.
- Page 185 Messaggi d'errore Soluzione Togliere la striscia e ripetere il test con una striscia reattiva nuova o corretta. Inserire il chip codificatore, oppure toglierlo e reinserirlo correttamente.
-
Page 186: Messaggi D'errore Dopo La Conferma Del Numero Di Codice
Messaggi d'errore Messaggi d'errore dopo la conferma del numero di codice Display Descrizione Errore: striscia reattiva La striscia reattiva ha superato la data di scadenza. error Errore: striscia reattiva La striscia reattiva è difettosa. error... - Page 187 Messaggi d'errore Soluzione Controllare prima di tutto se la data dello strumento è corretta. In caso contrario, impostarla nuovamente. Se la data è corretta: spegnere lo strumento, togliere il chip codificatore e la striscia reattiva e sostituirli con un nuovo lotto di striscie reattive e relativo chip codificatore.
-
Page 188: Messaggi D'errore Durante O Dopo L'applicazione Del Sangue
Messaggi d'errore Display Descrizione Errore: tempo scaduto È scaduto il tempo massimo di 120 secondi previsto per l'appli- error cazione del sangue sulla striscia. Messaggi d'errore durante o dopo l'applicazione del sangue Errore: applicazione del sangue Errore durante l'assorbimento da parte della striscia reattiva. - Page 189 Messaggi d'errore Soluzione Spegnere lo strumento, togliere la striscia e iniziare nuovamente il test con la stessa striscia reattiva. Spegnere lo strumento e togliere la striscia. Leggere nuovamente le istru- zioni per l'applicazione del sangue (da pag. 43) e ripetere il test con una nuova striscia reattiva.
- Page 190 Messaggi d'errore Display Descrizione Errore: test Errore durante la misurazione. error Errore: controllo di qualità La striscia reattiva non ha supe- rato il controllo interno di qualità dello strumento. La striscia reat- tiva è difettosa.
- Page 191 Spegnere lo strumento e togliere la striscia. Ripetere il test con una nuova striscia reattiva. Non togliere o toccare la striscia durante la misurazione. Spegnere lo strumento e togliere la striscia. Ripetere il test con una nuova striscia reattiva. Se l'errore persiste, contattare il Servizio Assistenza Roche Diagnostics.
- Page 192 Messaggi d'errore Display Descrizione Errore: test Errore durante la misurazione causato dal campione di sangue error applicato sulla striscia.
- Page 193 Avvertenza per l'errore 7 (misurazione): Le strisce reattive CoaguChek XS PT possono essere utilizzate anche dai pazienti che rice- vono una terapia combinata di farmaci anticoagulanti orali e iniezioni di eparina. Le concentrazioni massime di eparina che non influenzano il risultato del test sono riportate nel foglietto illustrativo delle strisce reat- tive.
-
Page 194: Messaggio D'errore Di Comunicazione A Infrarossi
Messaggi d'errore Display Descrizione Errore: autotest Errore durante l'autotest interno dello strumento. error Messaggio d'errore di comunicazione a infrarossi Errore: interfaccia a infrarossi Errore di comunicazione 11:23 dell'interfaccia a infrarossi a error causa di forti illuminazioni esterne che creano disturbi. - Page 195 26 e seguenti. Ripetere il test. Se il messaggio d'errore persiste, lo strumento è difettoso. Contattare il Servizio Assistenza Roche Diagnostics. Il trasferimento dei dati tramite l'interfaccia a infrarossi può essere distur- bato da forti luci esterne, soprattutto se dirette verso la porta ad infrarossi o l'apparecchio ricevente (p.es.
-
Page 196: Simboli Sul Display
Simboli sul display Simboli sul display Il display visualizza diversi simboli che hanno il seguente significato: Simbolo Significato Striscia reattiva (senza area di applicazione del campione) Striscia reattiva (con area di applicazione del campione) Applicare il campione di sangue Attendere la conclusione dell'operazione in corso. - Page 197 Simboli sul display Simbolo Significato Il segnale acustico è attivato (On) Il segnale acustico è disattivato (OFF) Il risultato è al di sopra del range terapeutico impostato (solo per l'unità INR). Il risultato è al di sotto del range terapeutico impostato (solo per l'unità...
- Page 198 Simboli sul display Simbolo Significato Stato delle batterie: • Le batterie sono cariche quando tutti i segmenti sono illuminati. • Le batterie si stanno scaricando man mano che scompaiono i singoli seg- menti. • Quando non sono più visibili i seg- menti, non è...
-
Page 199: Altre Informazioni
Altre informazioni Altre informazioni Informazioni per gli ordini Per l'acquisto dei prodotti rivolgersi al farmacista o al rivenditore specializzato. CoaguChek XS PT Test, REF 0 4625358 24 strisce reattive CoaguChek XS PT Test, REF 0 4625315 2 x 24 strisce reattive... -
Page 200: Specifiche Tecniche
Specifiche tecniche Specifiche tecniche Condizioni operative e dati tecnici Intervallo di temperatura da +18°C a +32°C Umidità relativa 10-85% (senza condensa) Altitudine max. 4300 m Collocazione Utilizzare lo strumento su una superficie piana e stabile oppure tenendolo fermamente in mano in posizione orizzontale. Intervallo di misura %Q: 120 –... -
Page 201: Campione
Specifiche tecniche Campione Tipo di campione Sangue intero capillare o sangue intero venoso senza anticoagulanti. Quantità di campione almeno 10 µL Interferenze Consultare il foglietto illustrativo delle strisce reattive. Condizioni di conservazione e trasporto Intervallo di temperatura da -25°C a +70°C Umidità... -
Page 202: Servizio Assistenza
Specifiche tecniche Servizio Assistenza Per ulteriori informazioni rivolgersi al Servizio Assistenza Roche Diagnostics ai seguenti indirizzi: Roche Diagnostics Italia Roche Diagnostics (Svizzera) AG Patient Monitoring Industriestrasse 7 Via G.B. Stucchi, 110 6343 Rotkreuz 20052 Monza (MI) Tel. +41-41-7 99-61 Numero verde: 800-822189 Fax Nr. -
Page 203: Garanzia
Hanno validità le disposizioni di legge vigenti nel rispettivo paese sulla vendita e sulle garanzie relative ai beni di consumo. Il sistema CoaguChek XS (strumento e strisce reattive) è protetto dai seguenti brevetti o domande di brevetto: US 6662439, US 6881378, US 6207000, EP 1522859 A, WO 03/095092, WO2004/113917 A, US 6645368, DE 10356452.7, DE 10359303.9,... -
Page 204: Indice Analitico
Indice analitico Indice analitico Altitudine (condizioni operative) ................11 Applicazione del sangue ..................55 Batterie inserimento ....................20–22 tipo ........................18, 20 Campione di sangue (test) ................43–62 Campione di sangue capillare (test) ............43–62 Chip codificatore ..................23–25, 52 inserimento ...................... - Page 205 Indice analitico Errore ........................73–91 Formato della data ..................... 31 Formato dell'ora ......................34 Garanzia ......................... 99 Illuminazione ......................65, 91 Impostazioni ......................26–41 data .......................... 32 formato della data ....................31 formato dell'ora ....................34 ora ..........................35 procedura ......................28 range terapeutico ..................
- Page 206 Indice analitico Memoria dei risultati ..................63–68 cancellazione ....................66–68 Messa in funzione ....................19–25 Messaggi d'errore ....................73–91 Numero di codice ....................24, 52 Polpastrello ........................54 Prelievo del sangue ....................46 Principio del test ......................10 Pulizia ........................69–72 guida della striscia reattiva ................
- Page 207 Indice analitico Schema elementi dello strumento ............... 17 Segnale acustico ......................51 impostazione ......................37 Servizio Assistenza ..................... 98 Setup ........................26–41 Simboli clessidra ....................53, 58, 68 clr ..........................67 Error ......................... 73–91 goccia ........................53 imballaggio ......................2 mem .........................
- Page 208 Indice analitico Tasto M ........................29, 63 Tasto Set ........................28 Telefono (Servizio Assistenza) ................98 Temperatura ......................11, 44 Tempo di protrombina ....................9 Test esecuzione ..................... 49–59 preparazione ......................48 Test di funzionalità display ................21, 49 Umidità ........................... 11 Unità...
- Page 209 0088 COAGUCHEK and SOFTCLIX are trademarks of Roche. Roche Diagnostics GmbH D-68298 Mannheim Germany www.roche.com www.coaguchek.com...
Need help?
Do you have a question about the CoaguChek XS and is the answer not in the manual?
Questions and answers
Perché quando inserisco la striscia reagente per esame pt inr dopo pochi secondi mi dà :errore 3? Cosa devo fare. Grazie
Error 3 means the test strip is beyond its expiry date. To resolve it, check the date format on the device (must be day-month-year) and make sure the strip is not expired. Use a valid, unexpired test strip.
This answer is automatically generated
Come risolvere l'errore 8
Vorrei sapere cosa fare se l'apparecchio in accensione indica errore 8