Advertisement
Available languages
Available languages
Advertisement
Table of Contents

Related Manuals for HELIX PP50 DSP


Summary of Contents for HELIX PP50 DSP
- Page 1 PP50 DSP P L U G & P L A Y 5-Kanal Verstärker mit integriertem DSP...
-
Page 2: Herzlichen Glückwunsch
HELIX-Endstufe. Verarbeitung und eine überzeugende Anwendung HELIX setzt mit der PP50 DSP neue Maßstäbe im ausgereifter Technologien aus. Viel Freude an diesem Produkt wünscht Ihnen das ren Sie als Kunde direkt von unserer nahezu 30 Team von jährigen Erfahrung in der Forschung und Entwick-... -
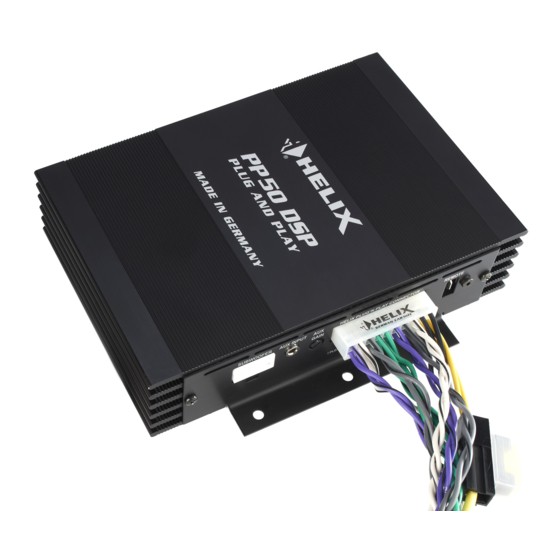
Page 3: Anschluss- Und Bedienelemente
Anschluss- und Bedienelemente Subwoofer-Ausgang HELIX Plug & Play Connector Zum Anschluss eines passiven Plug & Play Verwenden Sie nur das HELIX Originalkabel Subwoofers zum Anschluss der PP50 DSP AUX-Eingang Remote 3,5mm Klinkenbuchse zum Anschluss von Der Remote-Anschluss kann sowohl als Ein- z.B. - Page 4 Hinweis: Sollte der Pegel des Subwoofers zu signal um. laut sein, können Sie mit Hilfe dieses Reglers Beachten Sie bitte, dass die PP50 DSP das Signal die Lautstärke verringern. bei zu geringer Eingangslautstärke nicht mehr er- kennen kann und dadurch wieder auf Radiobetrieb MODE/DIP Schalter umschaltet.
- Page 5 Die Setup-Dateien sind mit den En- geben, bis neue Setups eingespielt wurden. dungen „.af1“ bzw. „.af2“ gekennzeichnet. Mit Hilfe Hinweis: Die PP50 DSP wird werksseitig mit ZWEI des Control-Tasters (10) lässt sich zwischen den unterschiedlichen Setups ausgeliefert. Im ersten Setups umschalten.
- Page 6 Sie mit Hilfe der MODE/DIP-Schalter Nr. 3 und Nr. 4 (Siehe S. 10) die Ausgangslautstärke der 4. In Bezug auf die Stromversorgung der PP50 PP50 DSP um 2 dB verringern. Sofern Ihr Auto- DSP gibt es zwei Alternativen, die nachfolgend radio bis zur maximalen Lautstärke aufgedreht ist unter 4a und 4b beschrieben sind.
- Page 7 Abb. 3 Als Beispiel hier abgebildet ist eine PP20 DSP. Die Installationsanweisung gilt ebenso für die PP50 DSP. Abb. 4a Auslieferungszustand Abb. 4b...
- Page 8 Die PP50 DSP bietet die Möglichkeit, den internen DSP des Verstärkers im Handumdrehen auf einen bestimmten Fahrzeugtypen einzustellen. Dazu benötigen Sie lediglich eine MicroSD oder MicroSDHC Speicherkarte. Es spielt keine Rolle, ob sich auf dieser Speicherkarte noch weitere Daten (Fotos einer 1.
- Page 9 Anschluss und Installation des HELIX Optical & USB Interface Die PP50 DSP ermöglicht den Anschluss des HELIX Optical & USB Interfaces, um die PP50 DSP mit Hilfe bedienerfreundlich zur Verfügung, so dass Sie diese individuell einstellen können. Die Software sowie deren Bedienungsanleitung können Sie auf...
- Page 10 Des Weiteren können auch die wichtigsten Einstellung des DSP über die Schalter aktiviert und verändert werden. Somit haben Sie die Möglichkeit, mit Hilfe dieser Schalter die PP50 DSP nach Ihren Wünschen zu haben, ändern sich die Funktionen der DIP-Schalter grundlegend.
- Page 11 Funktionalität der MODE / DIP-Schalter mit Subwoofer Wahlschalter Schalter 5 einem PC-Setup OFF = PP 7E, PP 7S ON = PP 5E Lautsprecherimpedanz Hinweis: Für einen optimalen Klang ist die korrekte Einstellung dieses Schalters sehr wichtig. Schalter 1 OFF = 4 Ohm ON = 2 Ohm (Die Subwoofer-Kanäle sind dauerhaft 2 Ohm- AUX-Modus...
-
Page 12: Technische Daten
Für Schäden am Fahrzeug oder Gerätedefekte, hervorgerufen durch Bedienungsfehler Gerätes, können wir keine Haftung übernehmen. Alle HELIX Verstärker sind sowohl mit einer E-Kennzeichnung als auch einer CE-Kennzeich- nung versehen. Damit sind die Geräte für den Be- trieb in Fahrzeugen innerhalb der Europäischen... - Page 13 Die Schnittstelle zwischen PP50 DSP und Ihrem Computer: Die Software ist kostenlos nlos Der perfekt auf die PP50 DSP Adapter für mehr als abgestimmte Subwoofer! 2.500 Fahrzeugtypen...
-
Page 14: General Instructions
Use only the provided HELIX cable for connection Before starting your installation, disconnect of the PP50 DSP. The use of other cables can re- the batterys negative terminal to prevent da- radio or the connected loudspeakers! proper performance and to ensure full warran-... - Page 15 Connectors and control units HELIX Plug & Play Connector Subwoofer Output Use only the HELIX original Cable to For connecting a passive Plug & Play connect your PP50 DSP! subwoofer Remote AUX Input The remote connector can be used as either 3.5 mm jack for connecting e.g.
-
Page 16: Initial Start-Up And Functions
Please note: The PP50 DSP is delievered in facto- If the PP50 DSP cannot be switched on via the car radio harness, you can use the remote terminal as mory area (af1) is loaded with the „PC-Tool-Setup“, an input by connecting it to a switched 12+ source. - Page 17 DSP using the onboard the MODE/ DIP-Switches. MicroSD Card reader The MicroSD Card reader allows the user to copy be automatically copied to the PP50 DSP. While the hed. Attention: Do not remove the MicroSD Card whi- le the copy process is in progress.
-
Page 18: Installation
DSP is needed. from the battery. Insulate the now unused connec- tions of the PP50 DSP wire harness J . You can 3. Connect the HELIX cable harness to the PP50 now reconnect the car battery (Refer to Fig. 4b). - Page 19 Fig. 3 A PP20 DSP is shown here as an example. Installation instructions for this model also apply to the PP50 DSP. Fig .4a Delivery status Fig .4b...
-
Page 20: Microsd Card
MicroSD-Slot PP50 DSP 3. Finally, insert the card into the MicroSD slot of the PP50 DSP. The status LED will blink red and saved in the PP50 DSP. The status LED If you’re updating the operating software or adju-... - Page 21 Connection and installation of HELIX Optical & USB Interface using the PP50 DSP PC Tool. The software displays all DSP functions in a user-friendly format so that they can each be adjusted as desired. The software and associated installation instructions can be downloaded You must install the HELIX Optical &...
- Page 22 MODE/DIP switches functionalities The PP50 DSP MODE/DIP switches can be used to set basic functions. Major DSP settings can be activa- ted and changed using the switches. Note: tions change. Important: If you use front or rear loudspeakers with an impedance of 2 Ohms, make sure that Functionality of the MODE/DIP-Switches with the „factory setup“...
- Page 23 Functionality of the MODE/DIP-Switches Subwoofer type selector Switch 5 OFF = PP 7E, PP 7S Speaker load front / rear channels ON = PP 5E Switch 1 OFF = 4 Ohms ON = 2 Ohms Note: The correct setting of this switch is essential (Subwoofer channels can always handle 2 Ohms to optimal sound reproduction.
-
Page 24: Technical Data
Technical Data Cont. power rating RMS / max: .......4 x 35 / 70 Watts ......1 x 160 / 320 (4 x 40 / 80) Watts ......4 x 50 / 70 Watts Frequency range .............10 Hz - 22.000 Hz Bass Boost ..............3 dB / 60 Hz Highpass................50 / 75 / 100 Hz Lowpass ................50 - 120 Hz Total harmonic distortion (THD) ........<...
Need help?
Do you have a question about the PP50 DSP and is the answer not in the manual?
Questions and answers