Table of Contents
Advertisement
C
o
n
t
e
n
t
s
C
o
n
t
e
n
t
s
Package Contents------------------------------------------ 1
Introduction ----------------------------------------------------------1
Features and Benefits ------------------------------------------------2
Welcome to InterVideo Creator 2 ------------------------- 3
1. InterVideo's WinDVD Creator 2 -----------------------------------3
2. Main Window ------------------------------------------------------4
3. Basic Tasks---------------------------------------------------------4
4. Making a Movie ----------------------------------------------------19
Advertisement
Table of Contents

Related Manuals for D-Link DUB-AV300


Summary of Contents for D-Link DUB-AV300
-
Page 1: Table Of Contents
Package Contents------------------------------------------ 1 Introduction ----------------------------------------------------------1 Getting To Know Your USB 2.0 MPEG 1/2/4 Video Grabber --------2 Features and Benefits ------------------------------------------------2 Welcome to InterVideo Creator 2 ------------------------- 3 1. InterVideo’s WinDVD Creator 2 -----------------------------------3 2. Main Window ------------------------------------------------------4 3. Basic Tasks---------------------------------------------------------4 4. -
Page 2: Package Contents
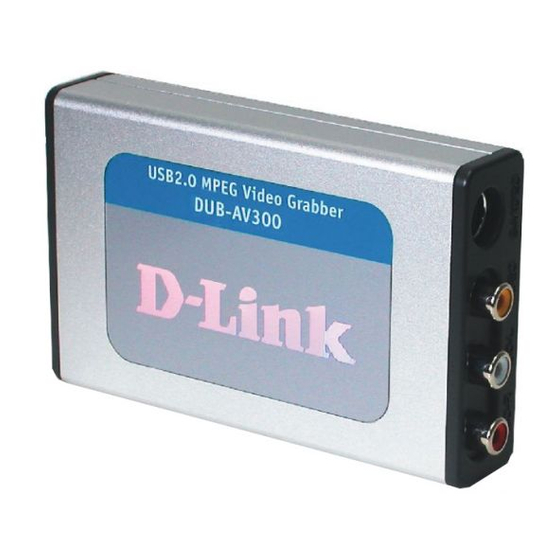
The D-Link DUB-AV300 is an advanced video-capture and display device which provides you with a “high quality PC Theater” solution. The D-Link DUB-AV300 allows you to capture 30 frames per second (fps) while giving you up to 720x480 resolution for a high quality video image on a PC or notebook using USB2.0. -
Page 3: Getting To Know Your Usb 2.0 Mpeg 1/2/4 Video Grabber
AVI, MPEG4, VCD and DVD. Please read the information below which is aimed to assist you in using the WinDVD Grabber Creator 2.0 software with your DUB-AV300 Video Getting To Know Your USB 2.0 MPEG 1/2/4 Video Grabber S-Video Jack... -
Page 4: Welcome To Intervideo Creator
’ ’ 1. InterVideo's WinDVD Creator 2 Welcome to WinDVD Creator 2. This InterVideo application lets you combine your personal video, digital images, and audio into exciting, professional-quality movies. Whether you are editing your first movie or looking for a program that will let you take your productions to the next level, WinDVD Creator's straightforward drag-and-drop editing style combined with its comprehensive editing capabilities will meet your needs today and tomorrow. -
Page 5: Main Window
2. Main Window The following figure identifies the elements of WinDVD Creator's main window. For details on a particular element, click it in the figure. In WinDVD Creator 2, making a movie involves the following processes: capturing content, editing, DVD-authoring, and saving your output. The appearance of WinDVD Creator's main window is different during each process. - Page 6 6. Perform DVD-authoring tasks. 7. Save your movie. 8. Direct record to disc. 3.1 Creating Projects Create a WinDVD Creator 2 project so you can organize your work. A project includes information about the media clips you add, your edits, and your final movie. Because WinDVD Creator 2 lets you save your work to a project, you can exit WinDVD Creator 2 and then later resume working on a movie without losing your changes.
- Page 7 • 3.2.c Import button Notes: • WinDVD Creator 2 automatically imports the files it creates while capturing still images or recording video or audio. Therefore, you do not have to import such files. • Imported files are represented in the libraries as clips. While making a movie, you work with the clips rather than the original source files.
- Page 8 Related Topics Importing with a Command Importing with the Import Button What Can You Capture? 3.2.b. Importing with the Media Files Command To import using the Media Files Command: 1. From the Import menu, choose Media Files. The Import Media File dialog box appears.
- Page 9 3.2.c. Importing with Import Button To import using the Import button: 1. Do one of the following: • Click . Then click in the Storage pane. • Click . Then click in the Editing pane. The Import Media File dialog box appears. 2.
- Page 10 3.3 Breaking Up Video Clips Sometimes the video clips you record or import are too long to work with easily. For example, you might have captured 10 or 20 minutes of video from your camcorder into a single file. This would be much easier to work with if it were broken into smaller clips based on the natural scene breaks in the video.
- Page 11 • WinDVD Creator 2 scans the video clip, looking for changes in the image from frame-to-frame. If it finds a significant change, which is common where the camera stopped and started, it breaks the clip into smaller clips (also called scenes) at the point.
- Page 12 Related Topics Deleting Objects from the Story Board Dragging Audio Clips to the Story Board Dragging Video or Image Clips to the Story Board How to Use the Story Board Placing Special Effects on the Story Board Previewing Contents of the Story Board 3.5 Add Special Effects WinDVD Creator 2 offers the following special effects: Transition Effects...
- Page 13 3.6 Authoring WinDVD Creator 2 lets you include an online table of contents in your movie so that viewers will be able to quickly jump to a specific location in that movie. To include this feature in your movie: 3.6.a Add a theme.
- Page 14 Solid Color Background: 1. Within the Image Library, there will be a Solid Color option. 2. Check the box for a solid color background. 3. Click on button (after the Solid Color has been checked). 4. Select the color, and it will change your background color. If you want to undo or redo a previous action at any time, click on: .
- Page 15 2. In the Story Board, right-click an item you do not want included in the online table of contents. Note: You cannot delete the first chapter. 3. From the shortcut menu that appears, choose Delete Chapter Mark. If you accidentally delete an object's chapter mark, you can restore it by right-clicking the item again and choosing Add Chapter Mark from the shortcut menu that appears.
- Page 16 10.Click WinDVD Creator 2 displays status information while saving your work. You may stop the process at any time by clicking the button. 11. At the prompt that appears after your movie is copied, click OK. Note: • Some applications such as Media Player cannot play VCD or SVCD. You can use WinDVD or a similar player to play it.
- Page 17 Related Topic Modifying Chapter Lists 3.7. Saving Your Work WinDVD Creator 2 includes a wizard that takes you step by step through the process of saving your work in the VCD, SVCD, DVD, or VR format. When saving your work, you have the option of •...
- Page 18 9. From the Burning Speed drop-down menu, select the speed at which you want to write to the CD or DVD.Increasing the speed increases the chances of losing data. 10.Click WinDVD Creator 2 displays status information while saving your work. You may stop the process at any time by clicking the button.
- Page 19 5. Click to go to the next panel. 6. Click Write content to hard disk for later burning. By default, WinDVD Creator 2 saves your movie to the root directory of your hard disk. To save to a different location, browse to the desired location. 7.
-
Page 20: Making A Movie
4. Making a Movie In WinDVD Creator 2, making a movie involves the following four processes: To learn about a particular process, click the appropriate link in the following list. • Capturing content • Editing • DVD-authoring • Saving your work to make a movie 4.1 Working with Projects Use WinDVD Creator 2 projects to organize your work. - Page 21 WinDVD Creator 2 automatically adds the content it captures to one of the WinDVD Creator 2 Media Libraries. Related Topic What Can You Capture? 4.2.a. Recording Video WinDVD Creator 2 can record video content from VCRs, USB cameras, game consoles, and other such sources attached to your computer. While recording video, WinDVD Creator 2 will also record any accompanying audio.
- Page 22 4.2.c. Recording Audio You may add audio to your movie by using WinDVD Creator's Audio Manager to • Record audio from a CD so you can add background music or a voice-over to your movie • Record audio from a microphone so you can add a voice-over to your movie While recording audio in the Audio Manager, you may play back and watch your movie in the Preview Window to keep the recording and movie in sync.
- Page 23 7. When you are ready to start recording, resume playing your movie in the Player Window. Then click . If you are synchronizing the movie and your recording, watch your movie so you can stay in sync. 8. When you finish, click to stop recording.
- Page 24 of the countdown, resume playing back your movie in the Preview Window. Then watch your movie so you can stay in sync. 6. When you finish, click to stop recording. WinDVD Creator 2 automatically adds the recording to the microphone audio track and the Audio Library.
- Page 25 To import using the drag-and-drop feature: Notes: • WinDVD Creator 2 adds the imported files as clips to the appropriate library. For example, video clips are added to the Video Library and image clips are added to the Image Library. •...
- Page 26 • WinDVD Creator 2 adds the imported files as clips to the appropriate Media Library. For example, video clips are added to the Video Library and image clips are added to the Image Library. • The clips in the Media Libraries represent imported files. While making a movie, you work with the clips rather than the original source files.
- Page 27 • The clips in the Media Libraries represent imported files. While making a movie, you work with the clips rather than the original source files. • The audio and video portions of a video file are imported as a single video clip to keep the audio and video synchronized.
- Page 28 1.Click 2. If necessary, open the Video Library by clicking in the Editing pane. 3. In the Video Library, right-click the video clip you want to break up. You may need to scroll up or down in the Editing pane or resize it before the desired clip comes into view.
- Page 29 on the left. • No new files are created on the disk when you generate scene cuts. You may add any of generated scenes to your movie as you would any other clip. • You do not have to delete any unused scenes because WinDVD Creator 2 automatically eliminates the generated scenes when you perform an action that causes WinDVD Creator 2 to leave the Video Library.
- Page 30 Dragging Video or Image Clips to the Time Line Dragging Audio Clips to the Time Line 4.3.c. Trimming Clips Trim a clip to remove unwanted video or audio from the beginning or end. For example, you may have a 30-second video clip but only want to keep the middle 10 seconds.
- Page 31 video or audio that would normally be beyond that point in the clip. To trim a clip with the Video Cut Tool: 1. Click 2. In the Time Line or Story Board, select the clip you want to trim. Then right-click, You may trim a clip with the Video Cut Tool in either the Story Board mode or Time Line mode.
- Page 32 4.3.d. Deleting Clips WinDVD Creator 2 lets you • Delete clips from a Media Library • Delete clips from the Story Board • Delete clips from the Time Line Notes: • Deleting a clip does not delete the original file. To delete a file, use the standard Windows techniques from the desktop or Windows Explorer.
- Page 33 • You cannot delete a clip representing a generated scene from the Video Library. WinDVD Creator 2 will automatically eliminate such clips when you perform an action that causes WinDVD Creator 2 to leave the Video Library. Related Topic Deleting Objects from the Story Board Deleting Objects from the Time Line 4.3.d.2.
- Page 34 • The Story Board and Time Line are not separate items. They are simply different views of your work. Any object deleted from the Story Board will no longer be displayed in the Time Line and vice versa. Related Topics Deleting Objects from the Time Line 4.3.d.3.
- Page 35 Titles These special effects let you add titles to your movie. WinDVD Creator 2 includes a set of title templates that you alter to define the title's text and the font, position, and color of that text. The title effects have a black background. You may also combine a title with a video or image clip to place the title over the clip.
- Page 36 2. Click on the button located in the Media Libraries. The default WinDVD Creator 2 theme's will appear on the side pane. (There are different theme's categorized. To view each category, select the drop-down menu above the side pane and click. 3.
- Page 37 4.5.b. Modifying a Theme's Chapter List. WinDVD Creator 2 uses a theme's chapter list to create an online table of contents for your movie. A chapter list consists of a set of chapter marks ( , and so on) that specify which frames viewers can quickly jump to while viewing your movie.
- Page 38 3. From the TV System drop-down menu, select the appropriate video format (NTSC PAL). 4. In the Volume Name of Disc text box, enter the name you want Windows Explorer to use to refer to your movie on the disc. 5.
- Page 39 3. To return to the Root Menu, Click 4. To close the Preview Window, Click Note: If you want to pause the playback, click After pausing the playback, you may resume it by clicking again. Related Topic Modifying Chapter Lists 4.6 Opening the Disc Manager Disc Manager lets you place video and image content directly onto your DVD.
- Page 40 • Authoring: Authoring lets you choose the theme you want to set for your chapter menu. 4.7 Saving Your Work WinDVD Creator 2 includes a wizard that takes you step by step through the process of saving your work in the VCD, SVCD, DVD, or VR format.. When saving your work, you have the option of •...
- Page 41 write to the CD or DVD.Increasing the speed increases the chances of losing data. 10.Click WinDVD Creator 2 displays status information while saving your work. You may stop the process at any time by clicking the button. 11. At the prompt that appears after your movie is copied, click OK. Note: •...
- Page 42 Creator 2 saves your movie to the root directory of your hard disk. To save to a different location, browse to the desired location. 15. Click WinDVD Creator displays status information while saving your work. You may stop the process at any time by clicking 16.
Need help?
Do you have a question about the DUB-AV300 and is the answer not in the manual?
Questions and answers