Table of Contents
Advertisement
Quick Links
CE Master User Manual for
bowmount
bowGuARD 360°®
foot contRoL
tRoLLInG motoR
NOTE: Do not return your Minn Kota motor to your retailer. Your
retailer is not authorized to repair or replace this unit. You may
obtain service by:
• calling Minn Kota at 1-800-227-6433 or 1-507-345-4623;
• returning your motor to the Minn Kota Factory Service Center;
• sending or taking your motor--- to any Minn Kota authorized
service center on enclosed list.
Please include proof of purchase, serial number and purchase
date for warranty service with any of the above options.
serial number
purchase date
PLeAse thoRouGhLy ReAD thIs useR mAnuAL. foLLow ALL InstRuctIons AnD heeD ALL sAfety & cAutIonARy notIces beLow. use
of thIs motoR Is onLy PeRmItteD foR PeRsons thAt hAve ReAD AnD unDeRstooD these useR InstRuctIons. mInoRs mAy use thIs
motoR onLy unDeR ADuLt suPeRvIsIon.
MAXXUM
pg. 2
pg. 3
pg. 4
pg. 5
pg. 6
pg. 7
pg. 7
pg. 8
pg. 9
pg. 10
pg. 10
pg. 10
pg. 11
Advertisement
Table of Contents

Related Manuals for MINN KOTA MAXXUM Bowmount bowGuard 360°


Summary of Contents for MINN KOTA MAXXUM Bowmount bowGuard 360°
-
Page 1: Table Of Contents
360°® foot contRoL tRoLLInG motoR NOTE: Do not return your Minn Kota motor to your retailer. Your retailer is not authorized to repair or replace this unit. You may obtain service by: • calling Minn Kota at 1-800-227-6433 or 1-507-345-4623;... -
Page 2: Feature Information
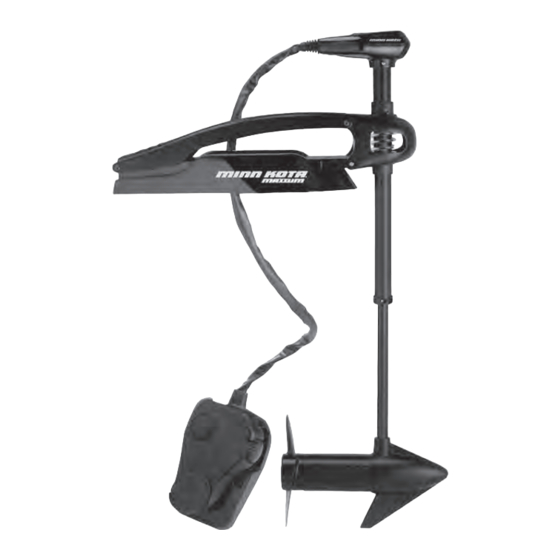
Lighted Direction Indicator Rugged Die cast Aluminum and high strength steel Depth collar Knob bracket bowGuard 360 breakaway Protection Lifetime warranty composite shaft Rotary momentary speed switch control Permanent magnet mom/off/con cool Power™ motor switch heel block weedless wedge™ Propeller Specifications subject to change without notice. -
Page 3: Installation
InstALLAtIon of the bowmount: We recommend that you have another person help with this procedure. 1. For installation, do not remove the shaft/motor from the Bowguard. The Bowguard spring is under ten- sion and must always remain secured. 2. Place the mount, with the motor in the fully retracted (flat) position, on the deck of the boat: •... -
Page 4: Bow Mount Operation
bow mount oPeRAtIon: The bowmount is designed to fold back and lock the motor flat on the deck when not in use and to provide secure stowage for transport. • The pull rope releases the lock bar, which automatically engages when the unit is lowered or raised into position. -
Page 5: Adjustments
DePth ADJustment: • Firmly grasp the outer shaft or control head and hold it Depth Setting Knob steady. • Loosen the depth setting knob until the shaft slides freely. • Raise or lower the motor to the desired depth. • Turn the motor control head to the desired position. •... - Page 6 Attention: •Avoid running your motor with the propeller outside of the water. This may result in injuries from the rotating propeller. •It is recommended to set the speed selector to zero and place the motor in the deployed position prior to con- necting power cables.
-
Page 7: Battery Information
(+) and the (–) terminals of the battery together. take care that no metal object can fall onto the battery and short the terminals. this would immediately lead to a short and utmost fire danger. Recommendation: Use battery boxes and covered battery terminal clamps like Minn Kota accessory #MK- BC-1. boAt RIGGInG AnD motoR InstALLAtIon: An over-current protection device (circuit breaker or fuse) must be used with this motor. -
Page 8: Battery Connection
Recommendation: Use battery boxes and covered battery terminal clamps like Minn Kota accessory #MK-BC-1. -
Page 9: Wiring Diagram
Over-Current Protection Devices not shown in illustrations. INDICATOR LIGHT FIVE SPEED SWITCH WHITE CONNECTING WIRE MOMENTARY SWITCH BLUE CONNECTING WIRE MOM/OFF/CON SWITCH BLACK- TERMINAL BLOCK BLACK - RED+ CONNECTING WIRE MOTOR BATTERY 1 BATTERY 2 wARnInG: • Before connecting Battery, make sure the mom-off-con swItch on the foot PeDAL Is In the off PosItIon. -
Page 10: Propeller Replacement
PRoPeLLeR RePLAcement: • Disconnect motor from battery prior to changing the pro- Weedless Propeller peller. • Hold the propeller and loosen the prop nut with a pli- Prop Washer ers or a wrench. • Remove prop nut and washer. If the drive pin is sheared/broken, you will need to hold the shaft Slot End steady with a screwdriver blade pressed into the... -
Page 11: Limited Warranty
To obtain warranty service in the U.S., the motor or part er’s Minn Kota® trolling motor is free from defects in mate- believed to be defective, and proof of original purchase... - Page 12 This page provides MinnKota® WEEE compliance disassembly instructions. For more mAX 70/sc information about where you should dispose of your waste equipment for recycling and 70 lbs thrust recovery and/or your European Union member state requirements, please contact your 24 volt dealer or distributor from which your product was purchased.
- Page 13 PARTS LIST...
-
Page 16: Environmental Compliance Statement
Minn Kota motors are not subject to the disposal regulations EAG-VO (electric devices directive) that implements the WEEE directive. Nevertheless never dispose of your Minn Kota motor in a garbage bin but at the proper place of collection of your local town council.
Need help?
Do you have a question about the MAXXUM Bowmount bowGuard 360° and is the answer not in the manual?
Questions and answers