Mercedes-Benz COMAND control panel Operating Instructions Manual
Control panel
Hide thumbs
Also See for COMAND control panel:
- Operating instructions manual (298 pages) ,
- Operator's manual (271 pages) ,
- Supplement manual (190 pages)

Related Manuals for Mercedes-Benz COMAND control panel


Summary of Contents for Mercedes-Benz COMAND control panel
- Page 1 COMAND Operating Instructions É2045846182{ËÍ 2045846182 Order no. 6515 6961 13 Part no. 204 584 61 82 Edition C 2012...
- Page 2 Symbols Publication details Warning Internet Environmental note Further information on Mercedes-Benz Possible damage to the vehicle vehicles and Daimler AG can be found on the Internet at the following websites: Instruction http://www.mercedes-benz.com Continuation symbol http://www.daimler.com (Y page) Page reference Display...
- Page 3 Welcome to the world of Mercedes-Benz Before you drive off, familiarize yourself with your COMAND control panel and read this manual. This will help you to obtain the maximum use from your COMAND control panel and to avoid endangering yourself and others.
- Page 5 Contents Index ............4 At a glance ........... 15 Introduction ......... 11 System settings ........39 Navigation ........... 49 Telephone .......... 113 Audio ..........143 Video ..........185 Weather services ......195 Rear Seat Entertainment System ..207...
- Page 6 Index General information ......44 1, 2, 3 ... Interface ........115 911 emergency call ......115 Settings ........... 44 Telephony ........115 ® Bluetooth audio basic display ..176 ® Bluetooth audio device Active partition (USB devices only) Connecting ........172 Selecting ........
- Page 7 Updating ........109 Switching on/off ......33 Displaying the track and album ..162 COMAND controller ......18 Distance COMAND control panel ....... 17 see Navigation, route overview COMAND display ......... 20 DTMF tones Cleaning instructions ....... 22 Sending ......... 124 Setting ..........
- Page 8 Index Individualization Activating/deactivating ....44 Entering characters Intermediate stop In navigation mode ......28 Deleting ........... 64 In the address and the phone Entering ........... 62 book ..........31 ® iPod Using the number pad ..... 29 Alphabetical track selection ..181 Entry Connecting to the Media Deleting ...........
- Page 9 Index Switching to ........179 North up orientation ......100 USB mass storage device ....178 Media list ........... 159 Menu Off-map ..........87 Exiting ..........36 Off-road ..........87 Points of interest ......66 Orientation in direction of travel ..100 Showing ...........
- Page 10 Index Route options Setting ..........52 Radio mode Route overview ........84 Switching to ........144 Route type Radio station Setting ..........52 Storing ........... 146 Read-aloud function ......93 Read-aloud speed Safety notes Setting ..........42 Audio CD/DVD and MP3 mode ..154 Real-time traffic reports .....
- Page 11 Index Station Tone settings Selecting ........146 Balance and fader ......34 Storing ........... 146 Treble and bass ....... 34 Station search ........146 Track Storage options Selecting ........218 Selecting .......... 96 Track information ......220 Summer and standard time Traffic jam function ......
- Page 12 Index Weather map (SIRIUS) Calling up ........200 Legend ........... 204 Moving ........... 200 Showing/hiding layers ....201 Showing/hiding the menu ..... 200 Time stamp ........205 Weather memory (SIRIUS) Selecting an area ......199 Storing an area ......199 ®...
- Page 13 We recommend having any service work on cause undesired operation of the device. electronic components carried out by an Any unauthorized modification to this authorized Mercedes-Benz Center. device could void the user's authority to operate the equipment. WARNING USA only: This device complies with Part In order to avoid distraction which could lead 15 of the FCC Rules.
- Page 14 Daimler interference to radio communications. recommends that you use an authorized Mercedes-Benz Center for this purpose. In WARNING particular, work relevant to safety or on This equipment complies with FCC radiation...
-
Page 15: Function Restrictions
Introduction The NetFront Browser software is based in is in motion. You will notice this, for example, part on the work of the Independent JPEG because you will either not be able to select Group. certain menu items or because COMAND will display a message to this effect. -
Page 17: Table Of Contents
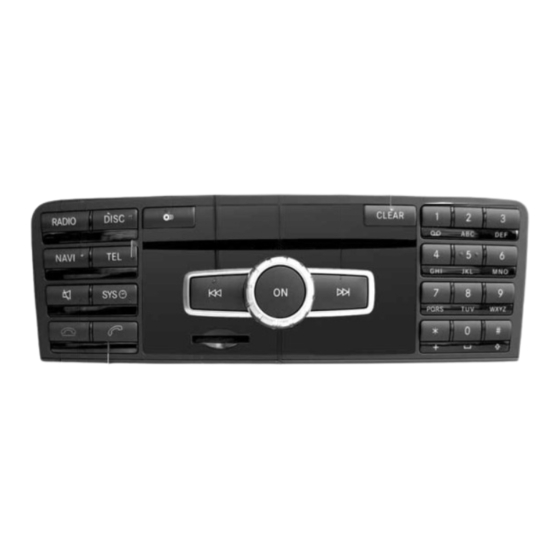
COMAND operating system ....16 Multifunction steering wheel ..... 22 Operating COMAND ......26 Basic functions of COMAND ....33 Climate control status display ... 36 Rear view camera ....... 37... - Page 18 Favorites button (left) Favorites button (right) Depending on the vehicle equipment, up to two favorites buttons may be available in the M-Class. Components of COMAND COMAND consists of: the COMAND display the COMAND control panel with DVD changer the COMAND controller...
- Page 19 COMAND operating system COMAND control panel Function Page Function Page Switches to radio mode Calls up the telephone basic menu: Switches wavebands ® • Bluetooth interface Switches to satellite radio telephony Switches to navigation V Load/eject button mode Shows the menu system...
- Page 20 COMAND operating system Function Page Function Page Number pad SD memory card slot • Selects stations via the Calls up the system menu station presets Accepts a call • Stores stations manually Dials a number • Mobile phone authorization Redials •...
- Page 21 COMAND operating system In the instructions, operating sequences are You can also exit a menu by sliding XVY described as follows: or ZVÆ the COMAND controller. Press the $ button. To call up the basic display: press and Radio mode is activated. hold back button :.
-
Page 22: Comand Operating System
COMAND operating system COMAND display Display overview The COMAND display shows the function currently selected and its associated menus. The COMAND display is divided into several areas. The radio display is shown in the example. Status bar To call up the audio menu Main function bar Display/selection window Radio menu bar... - Page 23 COMAND operating system Menu overview Navi Audio Telephon Video System Symbol ® Route settings FM/AM radio Telephone Video DVD Calling up Calling up (using HD the system Radio™) menu weather service SIRIUS Weather Map settings Satellite radio Address book Personal points Disc of interest O Activating/...
- Page 24 Multifunction steering wheel Settings Time Consumption Display off Rear view camera Activating/deactivating ® Bluetooth Resetting COMAND Delete your personal data using this function, for example before selling your vehicle. If equipped with the rear view camera: if the function is activated and COMAND is switched on, the image from the rear view camera is automatically shown in the COMAND display when reverse gear is engaged.
-
Page 25: Multifunction Steering Wheel
Multifunction steering wheel covering a distance of 44 feet (approximately Function Page 14 m) every second. To select a menu: press the = Rejects or ends a call or ; button. To select a submenu or scroll through Makes or accepts a call the list: press the 9 or : button. - Page 26 Multifunction steering wheel Navigation system menu Audio menu Route guidance inactive Adjusting the volume The display shows the road on which the Press the W or X button. vehicle is currently traveling, provided the digital map contains it. Setting the station/channel Switch on COMAND ( page 33).
- Page 27 Multifunction steering wheel Operating video DVD Switch on COMAND ( page 33). Switch on DVD-Video page 187). In the multifunction display, select the audio menu with the = or ; button. To select the next/previous scene: briefly press the : or 9 button. Telephone menu Multifunction display (example) The display shows the phone number or the...
- Page 28 Operating COMAND The number dialed is stored in the corresponding call list. If there are several numbers for this name, you see a list of sub-entries. Press : or 9 to select the phone number you want. Press the 6 or 9 button again to place the call.
-
Page 29: Operating Comand
Operating COMAND To call up the audio menu Select the station by turning cVd the COMAND controller and press W to Select Audio in the main function bar by confirm. sliding ZV the COMAND controller and The station is set. press W to confirm. - Page 30 Operating COMAND Calling up the current audio function Select Audio in the main function bar by sliding ZV and turning cVd the COMAND controller and press W to confirm. The basic display of the current audio function, e.g. audio CD mode, appears. Press W the COMAND controller and confirm Radio.
- Page 31 Operating COMAND selection list, you select an entry to copy it to All characters that have been entered are the address entry menu. displayed in black, the letter example :. The letters that are added Option 1: city list/street list with automatically by COMAND are displayed in character bar gray ;,...
- Page 32 Operating COMAND It is also possible to switch the city list to the Enter E, W, space, with the corresponding selection list at any time during character keys. input. The space is entered using number key Slide ZV the COMAND controller repeatedly until the city list appears as a Further functions in the list with selection list.
- Page 33 Operating COMAND You will find further information in the "Destination entry" section ( page 53). Entering characters in the address book and in the phone book Introduction The following section describes how to enter characters in the phone book ( page 125) and in the address book ( page 137) when...
- Page 34 Operating COMAND Storing an entry Select and confirm by pressing W the COMAND controller. Select ¬ in the character bar by turning The letter is added to in the data field. cVd the COMAND controller and press Repeat the process until the name has W to confirm.
-
Page 35: Basic Functions Of Comand
Basic functions of COMAND Switching off all navigation Basic functions of COMAND announcements Switching COMAND on/off Navigation announcements: press the Press the q control knob. 8 button during the announcement. A warning message appears. COMAND calls up the previously selected menu. Switching navigation announcements If you switch off COMAND, playback of back on... - Page 36 Basic functions of COMAND Adjusting the volume for phone calls Adjusting treble and bass You can adjust the volume for hands-free Select Treble Bass in the sound menu mode during a telephone call. by turning cVd the COMAND controller and press W to confirm. Turn the q control knob.
- Page 37 Basic functions of COMAND Select a balance setting by sliding XVY the those intended by the sound engineer when the original was recorded. COMAND controller and press W to confirm. ® If you select Logic7 Off, all permissible Select a fader setting by sliding ZVÆ the formats are played as stored on the COMAND controller and press W to medium.
-
Page 38: Climate Control Status Display
Climate control status display You will achieve the best sound results by playing high-quality audio and video DVDs. MP3 tracks should have a bit rate of at least 128 kbit/s. Surround-sound playback does not function for mono signal sources, such as AM radio mode. -
Page 39: Rear View Camera
Rear view camera à Controls the climate control To hide the display: turn or press the COMAND controller. 1, 2 automatically ñ Sets the climate control style to automatic mode (FOCUS/MEDIUM/ Press one of the buttons on the COMAND operating system. DIFFUSE) 1, 2 _ Sets the air distribution... - Page 40 Rear view camera Select Activation by R gear and press W to confirm. The function is switched on O or off ª, depending on the previous status. If a side view camera is available, using COMAND you can switch from the rear view camera picture to the side view camera picture, see the "System settings"...
- Page 41 COMAND features ....... 40 Display settings ........40 Time settings ........40 Fuel consumption display ....41 ON&OFFROAD display ......42 Text reader settings ......42 Voice Control System settings ..42 ® Bluetooth settings ......44 Setting the system language ..... 45 Assigning the favorites button ..
-
Page 42: Comand Features
Time settings selecting day or night design or opt for an COMAND features automatic setting. These Operating Instructions describe all Press the W button. standard and optional equipment available Select Settings by turning cVd the for your COMAND system at the time of COMAND controller and press W to purchase. -
Page 43: Fuel Consumption Display
Fuel consumption display The following navigation system functions Abbreviation Meaning require the time, time zone and summer/ Day/Month/Year standard time to be set correctly in order to work properly: (date format) route guidance on routes with time- Hours/Minutes HH/MM dependent traffic guidance (time format) calculation of expected time of arrival You can set the 24-hour or the AM/PM... -
Page 44: On&Offroad Display
Voice Control System settings You can find more information about the Calling up displays ON&OFFROAD functions and the display Press the W button. itself in the vehicle Operator's Manual. In the system menu, slide ZV the COMAND controller up until the Full Calling up displays Screen... -
Page 45: Voice Control System Settings
Voice Control System settings during voice control operation and the interfere, such as the radio or the navigation individualization process. system. After starting the session, the system guides you through the training with spoken Press the W button. instructions. Select Settings by turning cVd the Press the W button. -
Page 46: Bluetooth ® Settings
® Bluetooth settings Select and press W to confirm. Select Delete Individualization press W to confirm. If you select No, individualization will be canceled. The data from the first part is A prompt appears asking whether you stored automatically. really wish to delete. If you select Yes, the second part will begin. -
Page 47: Setting The System Language
Assigning the favorites button Select the language by turning cVd the COMAND controller and press W to confirm. COMAND loads the selected language and sets it. Assigning the favorites button ® Activating/deactivating Bluetooth This function is available, e.g. for the M-Class. Press the W button. -
Page 48: Importing/Exporting Data
Importing/exporting data Select Assign As Favorite and press Select Settings by turning cVd the W to confirm. COMAND controller and press W to The list of predefined functions appears. confirm. If your vehicle is equipped with a favorites Select Import/Export Data and press button, the # dot indicates the currently W to confirm. -
Page 49: Reset Function
Reset function ! Never remove the stick or card when writing data to the USB stick or the memory card You may otherwise lose data. Reset function You can reset COMAND to the factory settings. Among other things, this will delete all personal COMAND data (e.g. - Page 51 COMAND features ....... 50 Introduction ......... 50 Basic settings ........52 Destination entry ........ 53 Entering a point of interest ....66 Personal points of interest ....72 Search & Send ........76 Route guidance ........77 Traffic reports ........88 Destination memory ......
-
Page 52: Comand Features
Introduction COMAND features regulations during your journey. Road and traffic rules and regulations always have These Operating Instructions describe all priority over the navigation commands standard and optional equipment available generated by the system. for your COMAND system at the time of purchase. - Page 53 Introduction fact that certain menu items are grayed out Current vehicle position and cannot be selected. Navigation menu bar The following entries are not possible, for example: entering the destination city and street entering a destination via the map entering points of interest in the vicinity of a city or via a name search editing entries using the number keypad for direct entry...
-
Page 54: Basic Settings
Basic settings Basic settings Route settings Setting route type and route options You can select the following route types: Fast Route: COMAND calculates a route with the shortest (minimized) journey time. Dynamic Traffic Route: same route type as Fast Route. In addition, COMAND takes any traffic reports received with Route settings menu (start of menu) regard to the route into account during... -
Page 55: Destination Entry
Destination entry Setting the number of persons in the vehicle for the use of carpool lanes For route calculation, you can take HOV or carpool lanes into account. If you use HOV or carpool lanes, please observe the applicable laws as well as the local and time limitation conditions. - Page 56 Destination entry Select Dest. by turning cVd the COMAND Entering a destination by address controller and pressing W to confirm. Introduction Select Address Entry and press W to When entering an address as the destination, confirm. you have the following options: The address entry menu appears.
- Page 57 Destination entry Last States/Provinces States (U.S.A.) Provinces (Canada) To select a list: turn cVd the COMAND controller and press W to confirm. The list of selected states/provinces appears. To select a state/province: turn cVd the COMAND controller and press W to confirm.
- Page 58 Destination entry COMAND controller and press W to confirm. You will see the house number list either with the character bar (option 1) or as a selection list (option 2). Option 1: house number list with character bar Enter and 0. Instructions for entering characters using city input as an example can be found in the "Entering characters in Street list...
- Page 59 Destination entry Starting route calculation Option 2 – route guidance is already active: if route guidance is already active, a You can now have COMAND calculate the prompt will appear asking whether you wish route to the address entered or save the to terminate the currently active route address first, e.g.
- Page 60 Destination entry Option 2: ZIP code list as selection list Select and press W to confirm. After selecting Yes, the Saving Procedure Successful message appears. Entering a ZIP code Select in the address entry menu by turning cVd and sliding ZVÆ the COMAND controller and press W to confirm.
- Page 61 Destination entry navigation mode (entering a city)" section Option 1: intersection list with character page 28). Enter an intersection. Instructions for entering characters using city input as an example can be found in the "Entering characters in navigation mode (entering a city)"...
- Page 62 Destination entry Selecting a destination from the destination memory (e.g. My address) Introduction The destination memory always contains an entry named "My address". You may wish to assign your home address to this entry, for example ( page 57), and select it for route guidance.
- Page 63 Destination entry To start route calculation: select Start Entering a destination using the map and press W to confirm. Calling up the map To switch on navigation mode: press the Entering a destination from the list of Ø function button. last destinations To show the menu: press W the COMAND To switch on navigation mode: press the...
- Page 64 Destination entry To set the map scale: as soon as you turn Select Destination in the navigation cVd the COMAND controller, the scale bar system menu bar by turning cVd the appears. COMAND controller and pressing W to confirm. Turn cVd until the desired scale is set. Turning clockwise zooms out from the map;...
- Page 65 Destination entry predefined destinations in eight categories a radius of approximately 60 mi from the current vehicle position. for this purpose, e.g. FILLING STATION CAFÉ. If COMAND finds destinations, a list appears on the right-hand side of the When you have entered your intermediate display.
- Page 66 Destination entry Deleting an intermediate stop If an intermediate stop has already been entered, you can delete it. To switch on navigation mode: press the Ø function button. To show the menu: press W the COMAND controller. Select Destination in the navigation system menu bar by turning cVd the Waypoint menu without waypoints COMAND controller and pressing W to...
- Page 67 Destination entry This menu item is available if the waypoint Selection Step has a telephone number and a mobile Enter a point of From POIs phone is connected to COMAND interest page 116). page 66). To call up the map: select with the COMAND controller and press W to From Personal...
- Page 68 Entering a point of interest To change the sequence of the You can look for points of interest: waypoints: select Swap in the waypoint in the vicinity of the destination menu by turning cVd the COMAND near the current vehicle position controller and press W to confirm.
-
Page 69: Entering A Point Of Interest
Entering a point of interest Defining the position for the point of interest search Selection Characteristic Instructions Near Entry is only possible Select Near Destination from the Destination when route guidance is points of interest menu ( page 66) and active. - Page 70 Entering a point of interest Selection Characteristic Instructions You can call up all the Search By Name Select Search By Name in the points of points of interest in the interest menu and press W to confirm. digital map or focus your Select All POIs or one of the three...
- Page 71 Entering a point of interest An entry contains the following information: an arrow that shows the linear direction to the point of interest the linear distance to the point of interest the name of the point of interest The arrow and linear distance to the destination are not visible if you have entered a point of interest within a specific city.
- Page 72 Entering a point of interest for instance, in regard to the quality of the food, furnishing, service, and provides an average pricing level as well as a general description. Point of interest with address To start route calculation To store an address in the destination memory To display details Select the entry with the Z icon by turning...
- Page 73 Entering a point of interest Point of interest list with character bar Select Guide in the navigation system menu bar by turning cVd the COMAND If you have selected Search By Name in the controller and press W to confirm. point of interest menu ( page 66) and then If points of interest are available:...
- Page 74 Personal points of interest To start route calculation: select Start and press W to confirm. A prompt appears asking whether the point of interest should be used as the destination. Select and press W to confirm. If you select Yes, route guidance starts. If you select No, you can choose a new point of interest.
-
Page 75: Personal Points Of Interest
Personal points of interest Select a category and press W to confirm. The icon display is switched on O or off ª, depending on the previous status. The icons are displayed on the map at scales of 1/16 mi, 1/8 mi and 1/4 mi. Visual information for personal points of interest When the vehicle is approaching a personal... - Page 76 Personal points of interest Option 1 To delete a category: select Delete press W to confirm. Insert the SD memory card ( page 157). A prompt appears asking whether the Hide the menu ( page 51) to display the category should be deleted. map in full screen mode.
- Page 77 Personal points of interest Selecting as the destination Insert the SD memory card ( page 157). To switch on navigation mode: press the Ø function button. To show the menu: press W the COMAND controller. Select Destination in the navigation system menu bar by turning cVd the COMAND controller and press W to confirm.
-
Page 78: Search & Send
Search & Send If route guidance has not been activated, Selecting and sending a destination route calculation for the personal point of address interest will start immediately. Please observe the notes on entering an Select and press W to confirm. address on the maps.google.com If you select Yes, the personal point of website. -
Page 79: Route Guidance
COMAND automatically calculates a downloaded in the same order as they are new route to the destination. sent. If you own several Mercedes-Benz If the digital map contains the corresponding vehicles equipped with an mbrace information, the following applies:... - Page 80 Route guidance The announced distance to the next change Change of direction of direction depends on the type of road and Introduction its permissible speed limit. The display is now split into two sectors. In Changes of direction have three phases: the left half, you see the normal map view.
- Page 81 Route guidance Lane recommendations Overview On multilane roads, COMAND can display lane recommendations for the next change of direction. The corresponding data must be available in the digital map. COMAND displays lane recommendations B based on the next two changes of direction.
- Page 82 Route guidance Display and description of lane recommendations The colors used in the lane recommendation display vary depending on whether day or night design is switched on. Lane Day design Night design Recommended lane C Dark blue Light blue In this lane, you will be able to complete the next two changes of direction without changing lanes.
- Page 83 Route guidance To show the menu: press W the COMAND Navigation announcements controller. Repeating navigation announcements Select Navi in the main function bar by sliding ZV the COMAND controller and WARNING press W to confirm. Navigation announcements are intended to direct you while driving without diverting your Select Announce Street Names...
- Page 84 Route guidance Reducing volume during a navigation The total length of the section that can be announcement blocked is defined by the digital map. The menu items are available accordingly. The volume of an active audio or video source To start route calculation: select Start can be automatically reduced during a and press W to confirm.
- Page 85 Route guidance Function is activated: alternative routes are calculated directly after the destination is entered. Menu functions To select the next or previous alternative route: select Next Previous and press W to confirm. To start route guidance using the selected alternative route: select Start Example: route 1 and press W to confirm.
- Page 86 Route guidance The example shows: If the first or last route section is highlighted, you cannot select Previous the destination O Next. two waypoints To zoom in or out of the map: select N the relevant information on distance, or M and press W to confirm. estimated time of arrival and estimated remaining driving time To close the route overview: select...
- Page 87 Route guidance Calling up the Routes menu Insert the SD memory card ( page 157). To switch on navigation mode: press the Ø function button. To show the menu: press W the COMAND controller. Select Destination in the navigation system menu bar by turning cVd the COMAND controller and pressing W to Example: route display stopped confirm.
- Page 88 Route guidance cVd the COMAND controller and press Starting route calculation W to confirm. Select Start in the menu by turning cVd the COMAND controller and press W to confirm. Displaying and editing the recorded COMAND attempts to align the recorded route route with the digital map.
- Page 89 Route guidance Select Swap in the menu by turning cVd appropriateness for use may be affected by the COMAND controller and press W to various factors such as time of day, time of confirm. year and immediate weather conditions that cannot be judged or taken into consideration Deleting the route by the COMAND system.
- Page 90 Traffic reports Route guidance from an off-road digital map and thus considers the vehicle to location to a destination be in an off-road position. In the display, you will see the Off Mapped If the vehicle position is within the area Road message, an arrow and the distance to covered by the digital map, but the map does...
- Page 91 Traffic reports Icon delimiting the section of the route affected Icon indicating an incident on the route (traffic flow) Destination Map scale...
- Page 92 Traffic reports Icon for real-time traffic reports Icon Description Traffic reports in the map display List of Traffic traffic reports reports Warning This appears at the beginning of the Entry type: Entry (red) affected route section if route warning type: guidance is active and the route leads warning through an affected area.
- Page 93 Traffic reports Icon Description Traffic reports in the map display List of Traffic traffic reports reports Green Unimpeded No delays (Not (Not line with traffic flow available) available) Only appears on the side of the road arrows (direction of travel) on which traffic flow is unimpeded Red line Warning...
- Page 94 Traffic reports To scroll within a report or to access Show all messages: select the next report: turn cVd the COMAND Messages by turning cVd the COMAND controller. controller and press W to confirm. You see a list of all roads, areas and regions To return to the report: slide XVY the for which traffic reports are available, even COMAND controller.
-
Page 95: Traffic Reports
Traffic reports To switch off the read-aloud function: select Cancel Read-Aloud Function press W to confirm or press the 8 button. COMAND reads the current report aloud and then exits the read-aloud function. Automatic read-aloud function To switch on navigation mode: press the Ø... - Page 96 Destination memory To show the menu: press W the COMAND controller. Select Dest. in the navigation system menu bar by turning cVd the COMAND controller and pressing W to confirm. Select From Memory and press W to confirm. You will see the destination memory list either with the character bar (option 1) or as a selection list (option 2).
-
Page 97: Destination Memory
Destination memory If a home address has already been stored, If you have not yet entered any you will see a prompt asking you whether characters, the My Address entry is My Address entry should be automatically highlighted in the selection overwritten. - Page 98 Destination memory asking whether you wish to overwrite the Select Destination in the navigation existing data. system menu bar by turning cVd the COMAND controller and pressing W to Select and press W to confirm. confirm. If you select Yes, the entry is overwritten. If you select No, the process will be aborted.
-
Page 99: Previous Destinations
Previous destinations turning cVd the COMAND controller and Select a category, e.g. Home, and press W to confirm. press W to confirm. You will see the address book either with You see the address data of the selected the character bar or as a selection list. entry. - Page 100 Map operation and settings Select From last destinations Storing the vehicle position in the list press W to confirm. of previous destinations The list of last destinations appears. To switch on navigation mode: press the Select the desired destination and press Ø...
-
Page 101: Map Operation And Settings
Map operation and settings Display = may be the name of a street, for example, provided the digital map contains the necessary data. Alternatively, it may show the geo-coordinate position of the crosshair if the Geo-coordinates display is switched on ( page 102). - Page 102 Map operation and settings the COMAND controller and press W to The following display modes are possible: confirm. 0 North orientation (the map view is displayed so that north is always up). Select Destination Position Map press W to confirm. ¤...
- Page 103 Map operation and settings COMAND controller and press W to confirm. A # dot indicates the new setting. Setting the point of interest icons on the You can set the points of interest you wish to have displayed as symbols on the map. Points of interest are, for example, gas stations, hotels, cinemas and restaurants.
- Page 104 Map operation and settings Map information in the display Icon for estimated time of arrival Estimated time of arrival During route guidance, you can have map information shown at the bottom edge of the You can only see this display during route display.
- Page 105 Map operation and settings Freeway information While scrolling the map ( page 61), you will see the geo-coordinates of the crosshair When driving on freeways, you can have the position. Height display : and number of nearest gas stations, rest areas, etc., as well satellites used ? are not displayed.
- Page 106 Map operation and settings The data required for displaying buildings is not available for all cities. To show the menu: press W the COMAND controller. Select Navi in the main function bar by sliding ZV and turning cVd the COMAND controller and press W to confirm.
- Page 107 Additional settings Traffic information on the map If you subscribe to the SIRIUS XM Satellite Radio Traffic Message Service, traffic information can be displayed on the map. You can select three categories for the display. To switch the displays on/off: press W the COMAND controller to show the menu.
- Page 108 Additional settings Option 1: the menu appears To adjust the size of the square: turn cVd the COMAND controller. Select Using Map, From Memory From The square is enlarged or reduced. Personal POIs and press W to confirm. To confirm the settings: press W. If you select Using Map, the map with the...
-
Page 109: Additional Settings
Additional settings Select Display / Change and press W to confirm. The area to be avoided is indicated in the map. To change the location of the area: slide the COMAND controller XVY, ZVÆ or aVb. The area is moved on the map. To adjust the size of the area: turn cVd the COMAND controller. - Page 110 VÆ and turning cVd the The map data version number is shown. Information about new versions of the COMAND controller and press W to digital map can be obtained from an confirm. authorized Mercedes-Benz Center. Select Compass and press W to confirm.
- Page 111 Enter the activation code. map can be obtained from an authorized After entering the activation code Mercedes-Benz Center. You can have the correctly, COMAND starts updating the digital map updated there with a DVD, or you digital map. Once the update is finished, can update it yourself.
- Page 112 Additional settings Insert the requested DVD. Once the update has been successfully completed, you will see a message to this effect. To confirm the message: press W the COMAND controller. Take the DVD out of the slot. The update is complete. If the update is not successfully completed, you will see a message that the map update is not possible.
-
Page 113: Problems With The Navigation System
To hide the message: switch COMAND off and then on again. The navigation system will be operational again until it has to access the faulty area of the hard drive once more. The message will then reappear. Consult an authorized Mercedes-Benz Center. - Page 114 To confirm the message: press W the COMAND controller. DVD containing the Eject the DVD. digital map is incompatible with the Have the database checked at an authorized Mercedes-Benz Center. system software. Problem Possible causes/consequences and M Solutions The map software The DVD is dirty.
- Page 115 COMAND features ......114 General information ......114 ® Telephony via the Bluetooth inter- face ............ 115 Reception and transmission volume 120 Telephone operation ......120 Using the phone book ...... 125 Using call lists ........129 Using the speed dial list ....131 Text message (SMS) ......
-
Page 116: Comand Features
Internet at you move from one transmitter/receiver http://www.mbusa-mobile.com. Or call area (cell) into another and no channels are the Mercedes-Benz Customer Assistance free. Center on 1-800-FOR-MERCedes(1-800-367-6372) for you use a SIM card which is not compatible the USA or on 1-800-387-0100 for Canada. -
Page 117: Telephony Via The Bluetooth ® Interface
If no network is available, you Alternatively, call the Mercedes-Benz may not be able to make a "911" Customer Assistance Center at emergency call. If you attempt to make an... - Page 118 ® Telephony via the Bluetooth interface Searching for a mobile phone your mobile phone (see the mobile phone operating instructions). Press the % function button on Some displays (e.g. the signal strength) COMAND. depend on the supported version of the Select Phone in the telephone basic menu...
- Page 119 ® Telephony via the Bluetooth interface mobile phone ( page 119). If COMAND Mercedes-Benz recommends de- does not find your mobile phone, external authorization in COMAND and on the authorization ( page 118) may be mobile phone. Subsequent authorization necessary.
- Page 120 ® Telephony via the Bluetooth interface Select the list symbol to the right of the entry by sliding VY the COMAND controller and press W to confirm. Select External Authorization press W to confirm. ® Start the Bluetooth search on the mobile phone (see the mobile phone operating instructions).
- Page 121 To close the detailed view: turn cVd or slide XVY the COMAND controller. De-registering (de-authorizing) a mobile phone Mercedes-Benz USA, LLC recommends de-authorization on both COMAND and on the mobile phone. Subsequent authorization may otherwise fail. ® Telephone basic menu (Bluetooth...
-
Page 122: Reception And Transmission Volume
Internet at Rejecting or accepting a call http://www.mbusa-mobile.com. Or call When there is an incoming call, you see a the Mercedes-Benz Customer Assistance corresponding window in the display. Center at 1-800-FOR-MERCedes (1-800-367-6372) (for the USA) or Customer Relations at 1-800-387-0100 (for Canada). -
Page 123: Telephone Operation
Telephone operation in the address book) or shows the Unknown (phone number withheld) message. You can also accept a call as described above when another main function is switched on in COMAND. Once you have accepted the call, the display switches to telephone mode. - Page 124 Telephone operation Redialing Select Speed Dial Preset List turning cVd the COMAND controller and On COMAND press W to confirm. Call up the telephone basic menu The speed dial list appears. page 119). Select the storage location and press W to Select °...
- Page 125 Telephone operation Switching the hands-free microphone To accept: select Accept and press W to on/off confirm. This function is also available during an active Press the 6 button on COMAND or on phone call. the multifunction steering wheel. Call up the telephone basic menu Option 1: if you accept the waiting call, the page 119).
- Page 126 Telephone operation Select symbol : by turning cVd the Ends an active call COMAND controller and press W to Select ¢ in the telephone basic menu and confirm. press W to confirm. Press the ; button on COMAND. Press the ~ button on COMAND or on the multifunction steering wheel.
-
Page 127: Using The Phone Book
Using the phone book book before selling or transferring ownership of your vehicle. Calling up the phone book Overview Select Name in the telephone basic menu by turning cVd the COMAND controller and press W to confirm. If the phone book contains entries, they will To return to the call display: select be displayed in alphabetical order. - Page 128 Using the phone book Symbol overview Icon Explanation Æ Address book entry that has been entered or changed via COMAND Imported contact that has been saved in the phone or address book Address book entry with voice tag These entries have also been assigned a voice tag. Voice tags are available in vehicles with the Voice Control System (see the separate operating instructions).
- Page 129 Using the phone book Changing the character set of the To return to the phone book using the character bar character bar: select & in the list and press W to confirm. Select p and press W to confirm. The character set changes each time you Press the % back button.
- Page 130 Using the phone book The entry is created in the phone book Creating a new entry in the phone and in the address book. book Slide ZV the COMAND controller repeatedly in the phone book until the Adding telephone numbers to an selection list appears.
-
Page 131: Using Call Lists
Using call lists Using call lists Opening the call list and selecting an entry Introduction Press the % function button. COMAND displays lists of calls received Select Call Lists in the telephone basic (including missed calls) and made during menu by sliding VÆ and turning cVd the phone operation. - Page 132 Using call lists Displaying details about a list entry Number category Display (phone book and address COMAND can also show a shortened list entry book) in full. Select a list entry by turning cVd the Not Classified No symbol COMAND controller. ¸...
-
Page 133: Using The Speed Dial List
Using the speed dial list Adding a phone number to an address Deleting call lists book entry This function is available when COMAND Open a call list and select an entry creates and manages the call lists. page 129). ® This is the case if you use a Bluetooth Select the list symbol to the right of the telephone without the support of the PBAP... - Page 134 Using the speed dial list Select the list symbol to the right of the Option 2 entry by sliding VY the COMAND Call up the telephone basic menu; see controller and press W to confirm. page 119) A menu appears. Select Call Lists by sliding VÆ...
-
Page 135: Text Message (Sms)
Text message (SMS) Text message (SMS) Information and requirements ® The functions can be used if the Bluetooth mobile phone supports the MAP (Message ® Access Profile) Bluetooth profile. When the mobile phone is connected, the 30 most recent text messages which are currently stored on the phone are loaded to the COMAND's text message inbox and displayed. - Page 136 Text message (SMS) To cancel the read-aloud function: press Select Details and press W to confirm. the 8 button. The detailed display appears. To close the detailed view: slide XVY the COMAND controller. Press W, select Cancel Read-Aloud Function and press W to confirm. Returning to the telephone basic menu Switching the display Press the % back button.
-
Page 137: Using The Address Book
Using the address book If you select No, the process will be aborted. You can use the "New entry" or "Add no." functions to save this telephone number or This delete function is not supported by to add it to an existing entry. all mobile phones. - Page 138 Using the address book When a new mobile phone is connected to company, two addresses, geo-coordinates COMAND, all the contacts from the and up to five telephone numbers. previous mobile phone are deleted from the To browse in the address book: turn address book.
- Page 139 Using the address book Option 2: search for an address book entry Creating a new entry in the address page 136). book Select the list symbol to the right of the You can enter address data directly into the entry by sliding VY the COMAND address book.
- Page 140 Using the address book Starting route guidance to an address Select the address data field by turning cVd the COMAND controller and press W to confirm. The route to the destination address is calculated and route guidance starts page 57). Calling a telephone number Select the phone number data field by Select...
- Page 141 Using the address book number in the phone book and can be Select the list symbol to the right of the dialed immediately. data field by sliding VY the COMAND controller and press W to confirm. Select Save and press W to confirm. The new category is stored.
- Page 142 Using the address book match the digital map, COMAND prompts you Select Voice Name and press W to to re-enter the address. confirm. Select Delete and press W to confirm. It is best then to store the new address A deletion prompt appears. under the address book entry.
-
Page 143: Importing Contacts
Using the address book Search for an entry in the phone book on It is not necessary to authorize the device in the mobile phone d ( page 126). COMAND to do so. Please bear the following in mind: Select the list symbol to the right of the entry by sliding VY the COMAND ®... - Page 144 Using the address book Overwrite imports the entries from the memory card or USB device and overwrites all entries in the address book with the ¯ symbol. The previous entries are then no longer available. After the contact data has been imported successfully, you will see a message to this effect.
- Page 145 COMAND features ......144 Radio mode ........144 Satellite radio ........148 Audio CD/DVD and MP3 mode ..154 Music search ........165 MUSIC REGISTER ......168 ® Bluetooth audio mode ....172 Media Interface mode ...... 178 Audio AUX mode ....... 182...
-
Page 146: Comand Features
Radio mode COMAND features These Operating Instructions describe all standard and optional equipment available for your COMAND system at the time of purchase. Country-specific deviations are possible. Please note that your COMAND system may not be equipped with all the features described. -
Page 147: Radio Mode
Radio mode Notes on HD Radio™ Switching wavebands The functions of HD Radio™ include: Option 1 digital transmission in the same You can switch the radio between the FM, AM wavebands as analog AM/FM. The and WB waveband. analog AM/FM stations remain in the Press the $ function button repeatedly same position when selecting a station. - Page 148 Radio mode Enter a frequency using the number keys. Selecting a station COMAND tunes in to the frequency Selecting a station using the station entered. search function Waveband Frequency Press the E or F button. AM (MF) 530 – 1700 kHz Turn cVd or slide XVY the COMAND FM (VHF) 87.7 –...
- Page 149 Radio mode Weather Band Switching on Press the $ function button repeatedly until the Weather Band is switched on. Select the currently set waveband by sliding VÆ and turning cVd the COMAND controller and press W to confirm. Station memory (example) Select from the menu and press W to Select a preset by turning cVd the...
- Page 150 Satellite radio Select a channel by turning cVd the Select Info in the radio display by sliding VÆ and turning cVd the COMAND COMAND controller and press W to controller and press W to confirm. confirm. Information on the currently selected station is displayed.
- Page 151 Call the phone number of your satellite as well as other issues beyond the control radio provider shown on the screen. of Mercedes-Benz USA, LLC. Operation You can also have the satellite service may also be impaired in certain locations activated online.
- Page 152 Satellite radio switches on the satellite radio. Pressing the button again takes you back to FM radio mode. Option 2 Select Audio in the main function bar by sliding ZV and turning cVd the COMAND controller and press W to confirm. If satellite radio mode was the last mode selected, it will now be active.
-
Page 153: Satellite Radio
Satellite radio by channel number and allows you to browse all available channels. Selecting a channel Channel search Turn cVd or slide XVY the COMAND controller while the display/selection window in the SatRadio display is active. Press the E or F button. To enter a channel: irrespective of the COMAND searches in both directions option, press the corresponding number... - Page 154 Satellite radio Select a channel by turning cVd the COMAND controller and press W to confirm. Option 2 Select Channel List with Artist, Title and press W to confirm. The channel list appears and displays the artists and tracks currently being played. Station presets Select a preset by turning cVd the COMAND controller and press and hold...
-
Page 155: Displaying Information
Satellite radio Selecting a channel from the preset list Select Sat radio in the submenu bar by turning cVd the COMAND controller and To call up the preset list: select press W to confirm. Presets in the submenu bar by turning cVd the COMAND controller and press Select Service... -
Page 156: Important Safety Notes
Audio CD/DVD and MP3 mode To insert a CD/DVD into the magazine Audio CD/DVD and MP3 mode tray: press the V load/eject button. Important safety notes A menu shows the current load status of the magazine trays. The last tray selected WARNING is identified by a red digit. -
Page 157: Audio Cd/Dvd And Mp3 Mode
Audio CD/DVD and MP3 mode The DVD changer loads the disc into the insert more than one disc into a magazine tray at a time. selected magazine tray. The Loading disc <x> message appears. Insert a disc into the disc slot with the printed side facing upwards. - Page 158 Due to the wide range of SD memory cards available on the market, playback cannot be guaranteed for all brands of SD memory card. The readable storage capacity depends on the memory card used. You can obtain further information at any authorized Mercedes-Benz Center.
- Page 159 Audio CD/DVD and MP3 mode Inserting an SD memory card By pressing the function button repeatedly, you can change the operating Insert the memory card into the slot until it mode in the following order: engages in place. The side with the audio CD/DVD / video DVD/MP3 CD/ contacts must face downwards and point MP3 DVD in the DVD changer (disc...
- Page 160 Audio CD/DVD and MP3 mode Example display: audio CD mode Example display: MP3 mode CD cover (if available) Cover (if available) Track time Track time Track number and track name (only if Track number and name stored on the disc as CD text or if Graphic time and track display ®...
- Page 161 Audio CD/DVD and MP3 mode In audio DVD mode only Selecting audio CD/DVD/MP3 discs To pause playback: switch on audio DVD Selecting via the media list mode ( page 157). In audio CD/DVD and MP3 mode: select Select Ë by sliding VÆ and turning Media by sliding VÆ...
- Page 162 Audio CD/DVD and MP3 mode If you have selected the playback options Random Tracks Random Folder, the track order is random. Selecting a track using the number keypad Press the ¯ button on the number keypad. A numerical entry field appears. The number of positions offered corresponds to Media list showing all magazine trays the number of tracks on the CD/DVD.
- Page 163 Audio CD/DVD and MP3 mode You will find further information on searching controller until the desired position has for music in the "Music search" section been reached. page 165). In audio CD/audio DVD mode/MP3 mode, Press and hold the E or F button select Search by sliding VÆ...
- Page 164 ® Gracenote music recognition technology. A menu appears. Information about new versions can be obtained from an authorized Mercedes-Benz Center. You can have your music recognition software updated there with a DVD, or you can update it yourself. The Gracenote Media Database is...
- Page 165 Audio CD/DVD and MP3 mode Displaying metadata (MP3 mode) Selecting an active partition (USB mass storage devices only) COMAND can also display the album name and artist (metadata) during playback, if this You can select this function for USB mass information has been entered into the storage devices when the storage device is system.
- Page 166 Audio CD/DVD and MP3 mode see a corresponding display in the display/ folders. A folder may also contain subfolders. selection window. See the example of the A disc can contain a maximum of 255 folders. display in audio CD mode ( page 158).
-
Page 167: Music Search
Music search Notes on CDs/DVDs the disc, the loading process may require a longer time before the first track is played. Discs with copy protection are not The MP3 audio encoding method is under compatible with the audio CD standard and license from Fraunhofer IIS (Institut therefore may not be able to be played by Integrierte Schaltungen –... - Page 168 Music search Select Search by sliding VÆ and turning cVd the COMAND controller and press W to confirm. The category list appears. Track information is complete message appears once the search is completed. Playback then starts with the previously active audio source. To cancel the music search: confirm Category list Cancel...
- Page 169 Music search Select a track and press W to confirm. Select the desired cover by turning cVd Playback starts. the COMAND controller and press W to confirm. The corresponding album is played. Selecting a year of publication Select Year in the category list Selection via keyword search page 165) by turning cVd the COMAND controller and press W to confirm.
-
Page 170: Music Register
MUSIC REGISTER Select an entry by turning cVd the Select a track and press W to confirm. COMAND controller and press W to Playback starts and the basic display appears. confirm. MUSIC REGISTER General information You can store music files in a compressed format in the MUSIC REGISTER page 169). - Page 171 MUSIC REGISTER If music files are available, playback begins at Switch on audio CD mode ( page 157). the point last listened to. With an audio CD inserted, select in the If there are no music files, you will see a CD basic display by sliding VÆ...
- Page 172 MUSIC REGISTER Deleting all music files This function deletes all music files from the MUSIC REGISTER. ! In order to prevent malfunctions, do not use COMAND during this time. Switch to MUSIC REGISTER ( page 168). Select Music Register by sliding VÆ and turning cVd the COMAND controller and press W to confirm.
- Page 173 MUSIC REGISTER MUSIC REGISTER Select Change and press W to confirm. USB storage device Enter a name for the folder/track. Instructions for entering characters can be Switch to MUSIC REGISTER ( page 168). found in the "Entering characters in the Select Search by sliding VÆ...
- Page 174 Bluetooth audio devices to On COMAND COMAND, visit http://www.mbusa-mobile.com (for ® Activate the Bluetooth function in USA). Alternatively, call the Mercedes-Benz COMAND ( page 45). Customer Assistance Center at 1-800-FOR-MERCedes (1-800-367-6372) General information (for USA) or Customer Relations at ®...
-
Page 175: Bluetooth ® Audio Mode
116) and Example: Bluetooth ® device list ® in the Bluetooth device list ( page 173). Newly detected mobile phone with Mercedes-Benz recommends authorizing a ® Bluetooth audio function in range ® mobile phone in Bluetooth telephony ® Bluetooth audio player not within range page 116). - Page 176 ® Bluetooth audio mode Option 2 (Secure Simple Pairing): if the ® options to connect a Bluetooth audio digit codes displayed in COMAND and on device: ® the Bluetooth audio device are the same, Option 1 confirm by pressing W. Confirm Connect Last Device in the...
- Page 177 ® Bluetooth audio mode Displaying details ® Switching to Bluetooth audio mode ® Select a Bluetooth audio device in the Option 1 ® Bluetooth device list. Connect ( page 172) or reconnect Select the symbol to the right of the ®...
- Page 178 ® Bluetooth audio mode ® Starting playback if the Bluetooth audio device has been stopped During the search for mobile phones page 116), the connection with the ® Bluetooth audio device is terminated. In the ® Bluetooth audio basic display ( page 176), you will see the No Bluetooth Audio...
- Page 179 ® Bluetooth audio mode Select BT Audio by sliding VÆ and turning Selecting a track cVd the COMAND controller and press This function is not supported by all W to confirm. ® Bluetooth audio devices. The # dot indicates the option selected. To skip forwards or backwards to a Select the option by turning cVd the track: press the E or F button on...
- Page 180 (see the operating power. instructions of the respective device). Mercedes-Benz USA, LLC accepts no the Media Interface connection is faulty. liability for damage to external devices. a mass storage device (e.g. USB stick or...
-
Page 181: Media Interface Mode
In the media list ( page 159), select the options. entry at position 0 by turning cVd the Consult an authorized Mercedes-Benz COMAND controller and press W to Center if you have further questions. confirm. COMAND activates the connected device. - Page 182 Media Interface mode The current playback option ( page 163) is Enter more numbers if desired. shown with a symbol behind album name The track plays after the last possible E (no display for Normal Track Sequence). number is entered. Pressing and holding a number key for If the device connected does not contain more than two seconds completes the...
- Page 183 Media Interface mode Calling up a category list To switch to the next folder up: slide XV the COMAND controller or press the Select Search in the basic display by % button. sliding VÆ and turning cVd the COMAND controller and press W to confirm. Playing back the content of a category The category list appears.
- Page 184 You will find further information online at For MP3 players, the random playlists http://www.mbusa-mobile.com. Or call offer a maximum of 300 tracks chosen at the Mercedes-Benz Customer Assistance random. Center at 1-800-FOR-MERCedes To select a playback option: select (1-800-367-6372) (for the USA) or...
-
Page 185: Audio Aux Mode
Audio AUX mode Select using cVd and press W to Select Volume in the AUX display by turning cVd the COMAND controller and press confirm. The audio AUX menu appears. The medium W to confirm. in the external audio source is played, if the A menu appears. - Page 187 COMAND features ......186 General information ......186 Basic settings ........186 Video DVD mode ....... 186 AUX video mode ........ 192 Picture viewer ........193...
- Page 188 Video DVD mode Changing the picture format COMAND features Press W the COMAND controller to show These Operating Instructions describe all the menu. standard and optional equipment available Select DVD-Video by sliding VÆ and for your COMAND system at the time of turning cVd the COMAND controller and purchase.
-
Page 189: Back Button
Notes about discs factory. This setting can be changed at an Playback problems may occur when playing authorized Mercedes-Benz Center. This will copied discs. There are a large variety of allow you to play video DVDs with a discs, DVD authoring software, writing different region code, provided that they software and writers available. - Page 190 Video DVD mode By pressing this function button repeatedly, you can change the operating mode in the following order: audio CD/DVD, video DVD or MP3 disc in the DVD changer memory card mode MUSIC REGISTER USB storage device Media Interface or audio AUX mode ®...
- Page 191 Video DVD mode Pause function Media selection Sound settings Press W the COMAND controller to show the menu. To pause playback: select Ë by Fast forwarding/rewinding turning cVd the COMAND controller and In full-screen mode, slide XVY and hold the press W to confirm.
- Page 192 Video DVD mode Press W the COMAND controller to show If you select a CD, an audio DVD or an MP3 medium, you switch to the respective the menu. audio mode. You can find further Select DVD-Video by turning cVd the information about the media list on COMAND controller and press W to page 159).
- Page 193 Video DVD mode To reconfirm your selection: confirm In full-screen mode, press W the COMAND Select by pressing W. controller to show the menu. COMAND executes the action. Select DVD-Video in the menu by turning cVd the COMAND controller and press Make a selection from the further options, W to confirm.
-
Page 194: Interactive Content
AUX video mode Interactive content DVDs can contain interactive content (e.g. a video game). In a video game, for example, you may be able to influence events by selecting and triggering actions. The type and number of actions depend on the DVD. Select an action by sliding ZVÆ... - Page 195 Picture viewer whether the system is able to play the Displaying pictures sound at high volume without distorting it. Select ( page 166) Photos in the category list by turning cVd the COMAND controller and press W to confirm. Increasing the volume using COMAND A folder directory appears.
- Page 196 Picture viewer To start playing music: confirm Search by pressing W. The category list appears ( page 165). Select a category by turning cVd the COMAND controller and press W to confirm. Select other entries within the category (e.g. track, album) until the music starts playing.
- Page 197 COMAND features ......196 SIRIUS Weather ........ 196...
- Page 198 SIRIUS Weather Hurricane: description of a tropical COMAND features cyclone which mostly develop in the Atlantic Ocean or in the North Pacific These Operating Instructions describe all Ocean or South Pacific Ocean. The wind standard and optional equipment available speeds are above 74 mph (118 km/h). To for your COMAND system at the time of characterize the strength of a hurricane, purchase.
- Page 199 SIRIUS Weather Switching off Press the % button. Select Back by turning cVd the COMAND controller and confirm by pressing W. Both options appear in the SIRIUS weather basic menu. Displaying detailed information Daily forecast as an information chart (example) Besides the current temperatures, you can You see the following information: display information such as wind speeds and...
-
Page 200: Information Chart
SIRIUS Weather already saved areas in the memory page 199). COMAND receives weather forecast data from the nearest weather station at the selected destination. Option 1: selecting the location in the information chart Select Position in the information chart by turning cVd the COMAND controller Select a state, e.g. - Page 201 SIRIUS Weather Memory functions Storing the area in the weather memory For areas that are frequently called up, 10 presets (0, 1 – 9) are available in the weather memory. In the preset memory: select the area for the weather forecast ( page 197).
- Page 202 SIRIUS Weather the daily forecast is shown, briefly press a number key, such as l. The weather data of the selected area is shown. Weather map Calling up the weather map Select in the information chart by turning cVd the COMAND controller and press W to confirm.
- Page 203 SIRIUS Weather Switching layers on the map on/off You can switch on differing layers, for example to display the rain radar, weather fronts and the course of tropical storms on the map. Display the menu on the weather map ( page 200).
- Page 204 SIRIUS Weather Layer Map display Selectable scales Shows the path/directional movement speed of a Tropical Storm Tracks tropical storm with time and strength information Winds Shows the wind direction and wind speed 5 km There are a number of illustrated examples in the following section. Sample displays of weather data in the Rain radar Radar Map...
- Page 205 SIRIUS Weather Weather map with information on a cyclone Weather fronts (legend) (example) Cold front (blue line with blue triangles) The following information is shown (if Warm front (red line with red semi-circles) available): Stationary front (red-blue line with red category of the tropical storm semi-circles and blue triangles) date and time of observation (time stamp)
- Page 206 SIRIUS Weather Path of tropical storms Region of Category Tropical Storm Tracks display layer origin is activated ( page 201) and weather data is Atlantic, Tropical Low available. North and Pressure System Symbol ? shows the current position of the South Pacific tropical cyclone.
- Page 207 SIRIUS Weather The time stamps correspond to the time at The symbol for a tornadic storm is also the vehicle's current position. The change valid for a cyclone (mesocyclone). over from summer time to standard time is Precipitation type Color scale performed automatically.
- Page 209 COMAND features ......208 General information ......208 Basic functions ......... 213 System settings ........ 215 Audio CD/DVD and MP3 mode ..216 Video DVD mode ....... 221 Operation with an active COMAND source ..........225 AUX mode .......... 228...
-
Page 210: Comand Features
General information COMAND features WARNING Due to a potential choking hazard, wired These Operating Instructions describe all headset usage by children should only occur standard and optional equipment available with adult supervision. for your COMAND system at the time of purchase. -
Page 211: General Information
General information Rear-compartment screens AUX jacks, detailed view in the "CD/DVD drive and AUX jacks" section ( page 210) Display Remote control Overview Two remote controls are included in the scope of supply for the USA and Canada. Switches the screen on/off Switches the button lighting on/off Selects the screen for the remote control Selects a menu or menu item... - Page 212 General information Switching the button lighting on/off Confirms a selection or setting Switches sound on/off (for corded Press button ; on the remote control. headphones) Depending on the previous status, the Adjusts the volume (for corded button lighting is switched on or off. headphones) If you do not use the remote control for Skips to a track, fast-forward/fast-rewind...
- Page 213 General information Cordless headphones Overview Volume control Selects a screen for the headphones Battery compartment cover Switches the cordless headphones on/off Indicator lamp with various displays ( page 211) Open both sides of the headphones and adjust the fit of the headphones by pulling the headphone band in the direction of the arrow.
- Page 214 General information On the remote control Status display Green The batteries are fine. The batteries are almost discharged. The headphones are switched continuous on and connected to a screen. Flashing The headphones are searching for the connection to a screen. No display The headphones are switched (dark)
-
Page 215: Basic Functions
Basic functions Insert the new batteries. Observe the Right-hand battery: the positive pole (+) polarity markings on the batteries and must face downwards. battery compartment when doing so. To close the battery compartment: Left-hand battery: the positive pole (+) press battery compartment cover must face upwards. - Page 216 Basic functions The following functions affect only one The headphones' volume setting does not screen: affect the main loudspeakers. audio and video functions as well as picture settings Adjusting the sound settings switching between full screen and the You can select the sound settings in the audio menu CD/DVD/MP3, video DVD and AUX modes.
-
Page 217: System Settings
System settings the other screen. You make these settings using the remote control ( page 209). Selecting the display language Select System using the 9=; button on the remote control and press 9 to confirm. You see the system menu on the selected rear screen. - Page 218 Audio CD/DVD and MP3 mode Setting the brightness General information Select Settings with the : button and You will find information on the following topics in the Audio section: press the 9 button to confirm. Select Brightness using the 9: notes on CDs/DVDs ( page 165) buttons and press the 9 button to confirm.
-
Page 219: Audio Cd/Dvd And Mp3 Mode
Audio CD/DVD and MP3 mode Example: audio CD mode The CD/DVD drive plays the disc: Type of data medium _ if it has been inserted correctly and is a Track number permissible disc, and Track name (only if stored on the disc as after you have switched on disc mode CD text) (audio CD/audio DVD/MP3 mode) - Page 220 Audio CD/DVD and MP3 mode Selecting a track To set the bass To set the treble Selecting by skipping to a track Disc name (if stored on the disc) To skip forwards or backwards to a To call up the track list track: press the = or ;...
- Page 221 Audio CD/DVD and MP3 mode Making a selection by entering the track number directly Press the h button on the remote control. The track entry display appears. Example: track 2 Press number button 2. Example: track 12 Press the corresponding number keys in Folder selection symbol rapid succession.
- Page 222 Audio CD/DVD and MP3 mode To pause playback: select Ë using Select an audio format using the 9: buttons and press the 9 button the :=; buttons on the remote to confirm. control and press the 9 button to confirm. The Ë...
-
Page 223: Video Dvd Mode
Video DVD mode Select Display Track Information Switching to video DVD mode using the 9: buttons and press the Insert a video DVD. 9 button to confirm. The Rear Seat Entertainment System loads The function is switched on O or off ª, the disc. - Page 224 Video DVD mode Pause function Track time To show the menu To show the menu: press the 9 button on the remote control. Showing/hiding the menu Select Menu while the navigation menu is To show: press the 9 button on the shown and press the 9 button to confirm.
- Page 225 Video DVD mode Option 1 Selecting a scene/chapter Press the 9 button on the remote control Note and show the menu. Further information on this function is Select DVD-Video and press the 9 button available in the "Video" section on the remote control to confirm. page 189).
- Page 226 Video DVD mode Stopping a film or skipping to the Select DVD Functions and press the 9 beginning or end of a scene button to confirm. Select Menu and press the 9 button to Select any menu item from the DVD menu. confirm.
-
Page 227: Operation With An Active Comand Source
Operation with an active COMAND source be possible to access the settings from the Interactive content DVD menu. DVDs can also contain interactive content Press the 9 button on the remote control (e.g. a video game). In a video game, you may and show the menu. - Page 228 Operation with an active COMAND source Selecting an active COMAND source in the rear-compartment screen Loading the active COMAND source Select COMAND using the 9=; buttons on the remote control and press 9 to confirm. The audio or video source selected in COMAND is loaded in the Rear Seat Entertainment System.
- Page 229 Operation with an active COMAND source MP3 mode To select a track by skipping to a track: press the = or ; button on the remote control. Press the E or F button. The skip forward function skips to the next track.
- Page 230 For further details about external video AUX menu sources, please consult an authorized Select Source from the AUX menu and Mercedes-Benz Center. press the 9 button to confirm. Select Disk Drive Aux and press the 9 button to confirm. You will hear and see the content of the...
-
Page 231: Aux Mode
AUX mode playback. If no video image is available Changing the picture format from the AUX source connected, you will Select Display Aux Disc Drive Aux see an audio menu. in the AUX menu and press the 9 button to confirm. Displaying AUX Select 16:9...
Need help?
Do you have a question about the COMAND control panel and is the answer not in the manual?
Questions and answers