Mercedes-Benz COMAND Operator's Manual
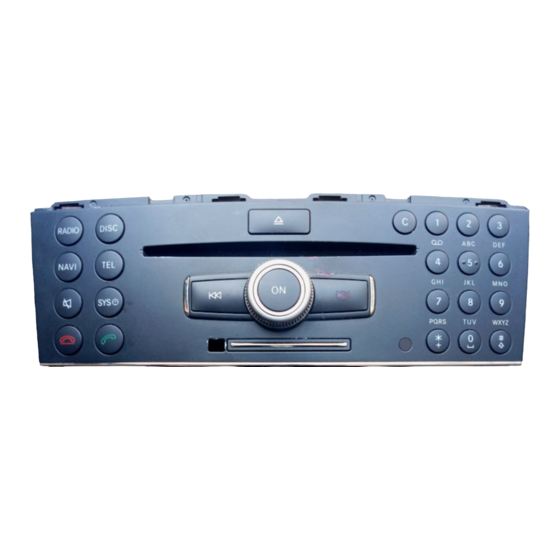
Control unit
Hide thumbs
Also See for COMAND:
- Operating instructions manual (298 pages) ,
- Operator's manual (271 pages) ,
- Supplement manual (190 pages)
Table of Contents
Advertisement
Quick Links
Download this manual
See also:
Operator's Manual
Advertisement
Table of Contents

Subscribe to Our Youtube Channel
Related Manuals for Mercedes-Benz COMAND


Summary of Contents for Mercedes-Benz COMAND
- Page 1 Bild in der Größe 215x70 mm einfügen COMAND Operator’s Manual...
- Page 2 Please make yourself familiar with your we reserve the right to make changes in COMAND control unit and read the instruc- design and equipment. Therefore, informa- tions in this manual before operating the tion, illustrations and descriptions in this COMAND system.
-
Page 4: Table Of Contents
Notes on MP3 mode ... . 52 Operating COMAND ....31 Notes on CD/DVD discs..54 Introduction . - Page 5 ... . 107 COMAND phone book ... . . 93 Stop function ....78 Changing entry .
- Page 6 Content Importing vCards from a Entering a POI in the vicinity of a Saving a destination in the PCMCIA card ....110 specific location ....141 destination memory .
- Page 7 Content Emergency calls ....172 Audio aux ....199 Roadside Assistance.
-
Page 8: Introduction
Video System settings This operating guide has been designed to help you use your COMAND control unit in Here you will find all information regarding Here you will find all the important infor- all situations. Each chapter has its own col- the video system. -
Page 9: Symbols
The continuation symbol Highlights hazards that may result in dam- marks an interrupted proce- ment, your COMAND system equip- age to your COMAND. dure which will be continued ment may deviate from some on the next page. -
Page 10: Operating Safety
Operation is subject to the following two place before answering or placing a call, or thorized Mercedes-Benz Center. conditions: consulting the COMAND screen to read nav- igational maps, instructions, or downloaded (1) This device may not cause harmful in- information. - Page 11 Introduction Operating safety NOTE: This equipment has been tested and Warning Warning found to comply with the limits for a Class A dig- ital device, pursuant to Part 15 of the FCC Rules. Change or modification not expressly ap- This equipment complies with FCC radiation These limits are designed to provide reasonable proved by the party responsible for compli- exposure limits set forth for uncontrolled...
-
Page 12: Declaration Of Conformity Regarding The Distribution Of Telecommunica-Tions Equipment
Systems tions equipment For safety reasons, some COMAND func- which have not been changed may be affected tions are restricted or not available when DaimlerChrysler declares herewith that due to the connectivity of the electronics. -
Page 14: At A Glance
At a glance COMAND control system ..14 Multifunction steering wheel . . .23 Operating COMAND ...31 Basic functions of COMAND ..35... -
Page 15: Comand Control System
3 COMAND control unit with the COMAND controller with the Back DVD changer and Clear button With COMAND you can operate the follow- 4 COMAND controller ing main functions: 5 Clear button (CLR) the navigation system 6 Back button... -
Page 16: Comand Display
Additional menus are available at the top In this example, the Audio main function is of the COMAND display 2 for the naviga- set to the radio mode and the main area 3 tion, audio and telephone main functions is active. - Page 17 At a glance COMAND control system Main Function menu items The table below illustrates the structure of the main functions and the associated menu items. Navi Audio Phone Video System Map Display FM / AM Radio Phone (Resumes playback if...
-
Page 18: Comand Control Unit
With the COMAND control unit you can hind the COMAND display and/or secure any The display tilts downwards. switch the COMAND on/off objects to the COMAND display itself. This may Back into standard position: Press adjust the volume obstruct the movement when the display is being 1 again. - Page 19 At a glance COMAND control system...
- Page 20 63, 78 Switching hands-free mi- 3 Disc slot Selecting next track crophone on/off Loading CDs/DVDs 8 Switching COMAND on/ Switching traffic and navi- Ejecting CDs/DVDs gation announcements off 9 Setting the volume Updating the map soft- h Switching to phone mode...
-
Page 21: Comand Controller
This enables you to move the selector bar in the menu to the “Station List” menu item. Operating the COMAND controller Press the COMAND controller n. The COMAND controller features the fol- This confirms your selection. The sta- 1 COMAND controller lowing options: tion list appears. - Page 22 At a glance COMAND control system Symbol How to use the COMAND controller Function Press briefly. Select menu item. Exit full-screen image with Navi. Press and hold until the selected Accept destination for navigation. action has been carried out. Rotate.
-
Page 23: Back Button
To exit menu: Briefly press the í To delete an individual character: button 1. Briefly press the î button 1. COMAND switches to the next menu To delete an entire entry: Press and hold the î button 1. level up within the operating mode cur- rently in use. -
Page 24: Multifunction Steering Wheel
At a glance Multifunction steering wheel Multifunction steering wheel Function Page Function Page Use the buttons on the multifunction steer- 5 Select submenu or scroll 1 Multifunction display ing wheel to operate the multifunction dis- through lists 2 æ volume up play. -
Page 25: Operating The Multifunction Display
At a glance Multifunction steering wheel To select the standard display: keep Operating the Multifunction display Multifunction display pressing the L back button until the The description field on the multifunction standard display with the odometer Warning display shows you values and settings as and trip odometer appears again in the well as any display messages that may A driver’s attention to the road and traffic... - Page 26 At a glance Multifunction steering wheel Multifunction display menus Menus Functions and submenus Navi ( page 26) Navigation messages Audio ( page 27) Selecting radio stations Operating the DVD changer/Music register /Memory card Tel ( page 29) Accepting a call Selecting a phone book entry Calls dialed...
-
Page 27: Navi Menu
At a glance Multifunction steering wheel Route guidance active When a maneuver is announced, you will Navi menu see the symbol for the maneuver and be- The multi-function display shows naviga- side it a graphic distance display 2. This No Maneuver announced tion instructions in the Navi menu. -
Page 28: Audio Menu
“Off map”: the vehicle is outside the Selecting a radio station/channel Lane recommen- Meaning range of the digital map. The vehicle is dation display Switch on COMAND and select “FM/ in an off-map position. Lane without lower Uninterrupted lane AM Radio“ ( page 40) or “SatRadio“... - Page 29 At a glance Multifunction steering wheel Operating the DVD changer/Music reg- Operating the DVD video ister/Memory card Switch on COMAND and select DVD Switch on COMAND and select “Disc“, video ( page 77). “Memory card“ ( page 60) or “Music Select the Audio menu.
-
Page 30: Tel Menu
Switch on COMAND; the traffic situation at all times. Use the mo- bile phone only when road, weather and traf- Select the “Tel”... - Page 31 COMAND at any the mobile phone. This means that you do time. not have to search through the entire If there is more than one number for phone book.
-
Page 32: Operating Comand
At a glance Operating COMAND To switch back to the line 1: Exiting the menu without selecting Operating COMAND Slide qm and press n. Slide against the list direction. Opening menu for a main function The Audio menu appears. Example 2: Navigation, Enter Destina-... -
Page 33: Character Entry
Slide to switch between the lines in the speller. Press the í button. To confirm character selection: COMAND goes one step back in the se- Press n. lection procedure. A possible option: Accepting first list entry To switch predictive speller lan- Press and hold n until the guage (character set): Select !. -
Page 34: Operating Example
“Station List” Select B and press n. 1 + symbol for additional options Depending on the initial situation, this se- COMAND will complete your entry if To select a town: Rotate or slide quence of actions may be shorter. the name is unambiguous. In this case qmr. - Page 35 At a glance Operating COMAND Switching to the current audio mode Switching to radio mode To switch to the main function line: You can also call up the required audio Slide qm. mode directly using the buttons. To select “Audio” again: Slide qm.
-
Page 36: Basic Functions Of Comand
Volume of navigation announcements Basic functions of COMAND X appears in the status line. The COMAND components can be found on You can set the volume for navigation an- If you change the audio or video source or alter ( page 14). Operating examples can be found... -
Page 37: Selecting Sound Settings
At a glance Basic functions of COMAND Setting balance and fader Selecting sound settings You can select different sound settings for The balance determines whether the each audio and video source. The sound sound intensity is higher on the driver’s menu can be opened from the submenu of side or on the front passenger’s side. -
Page 38: Surround Sound
At a glance Basic functions of COMAND ® To save setting: Press n. The “LOGIC7 On” function of the harman/ By selecting “LOGIC7® Off”, the playback ® kardon LOGIC7 Surround Sound system per- of all playable formats is performed as on the ex- The setting is stored and the menu is mits the playback of discrete 5.1 and stereo re-... - Page 39 Setting the surround sound Please note the following: For an optimal sound in all seats, balance For surround sound, you can select be- and fader should be set to the centre of the ® ® tween “LOGIC7 On” and “LOGIC7 Off”.
-
Page 40: Audio
Audio Radio..........40 Satellite radio* ......45 CD audio/DVD audio/MP3...52 Music Register.......67 Audio Aux ........71... -
Page 41: Radio
The radio display appears. The last se- Radio lected station in the last selected wave- Information on the COMAND control system band is heard. and how to operate it can be found on ( page 14) and ( page 31). -
Page 42: Submenu Overview
Audio Radio Submenu overview Radio (FM and AM only) Presets (FM and AM only) Channel (WB only) Sound Enter Frequency Autostore List of receivable channels Treble D Station information List of stored stations Bass (only FM) Balance/Fader Surround sound... -
Page 43: Switching Wavebands
Tuning to a station rently permissible. You can switch the radio between the FM, You can tune to a station via station search COMAND will tune to the frequency en- AM, and WB wavebands. or by manual frequency input. tered. -
Page 44: Storing Stations
Press n if the display/selection win- tone sounds. dow is highlighted. COMAND searches for receivable sta- tions. A corresponding message is dis- played. The available stations are Press and hold a number key, e.g. Select “Presets” in the radio display. -
Page 45: Switching To Weather Band
Audio Radio Searching a channel To select a channel: Rotate Switching to weather band slide qmr. Slide to highlight the submenu. Rotate or slide if the dis- To tune to the selected channel: play/selection window is highlighted. To select the weather band: Press n. -
Page 46: Satellite Radio
Audio Satellite radio* Note that categories and channels shown in SIRIUS Satellite Radio provides over 130 Satellite radio* illustrations are dependent on programming con- channels of digital-quality radio, including 100% Important notes tent delivered by the service provider. Program- commercial-free music, sports, news and enter- ming content is subject to change. -
Page 47: Subscribing
Audio Satellite radio* After the connection is made: Subscribing Follow the instructions given by the op- Subscribing to satellite radio erator. To switch to satellite radio operation: The activation process may take up to 10 minutes. If it is successful, you will From another main function see the display with the message Select “Audio”... -
Page 48: Satellite Radio Operation
Satellite radio main menu when the signal is not available. 1 SatRadio main display From another main function 2 Channel name After the COMAND acquires the signal, the Select “Audio” “Audio” 3 Memory preset number Satellite radio display will appear. The sta- “SatRadio”. - Page 49 Audio Satellite radio* Changing the category Selecting a channel SatRadio menu On the submenu bar rotate Satellite radio stations are split up into cat- You can use the following functions: slide until “SatRadio” is highlight- egories. You can select between various Channel search categories such as News/Talk, Sports and Channel selection via direct entry...
- Page 50 You can only select numbers that are cur- Saving channels manually rently permissible. Selecting a channel from the Satellite COMAND will tune to the channel en- preset memory ( page 50) tered. Storing channels manually Selecting a channel from the SatRadio...
- Page 51 1 Category Select “Presets” “Autostore” from 2 Channel the SatRadio submenu. 3 Artist COMAND searches for receivable Press a number key, e.g. , on the 4 Song title channels. A corresponding message is control unit. You will see (if available) displayed.
- Page 52 Audio Satellite radio* Displaying service information Channel list updates Sound settings You can call the provider service center for While receiving a new channel list the mes- Refer to chapter “At a glance” on how to questions or releases whenever you need. sage “Updating Channels”...
-
Page 53: Cd Audio/Dvd Audio And Mp3
CD as an MP3 CD. Only the MP3 tracks CD-R and CD-RW can be accessed. Warning DVD+R and DVD+RW COMAND is classified as a Class 1 laser File structure of storage medium DVD-R and DVD-RW product. You must not open the casing. When creating an MP3 storage medium,... - Page 54 In everyday speech, this format has been re- authorization has been obtained from the Other readable audio formats placed by the designation “MP3”. copyright holder. COMAND can also read music files in the Permissible bit and scan rates ® Notes about audio DVD discs WMA (Windows...
-
Page 55: Notes On Cd/Dvd Discs
When playing copied discs, problems may occur stationary. There is a risk of accident by be- with the playback. COMAND can play audio CDs with the high- ing distracted from road and traffic condi- resolution surround format. A wide variety of discs, disc writing software and tions if you load a CD/DVD while the vehicle writers are available. - Page 56 The DVD changer plays the disc if A menu indicates which magazine com- Only insert a CD after COMAND has prompt- it has been inserted correctly partments are currently loaded. The ed you to do so with this message. Only insert highlighted or currently playing com- it is a permissible disc.
- Page 57 The message “Please Insert Disc <x>” will be displayed. Press the í button next to the Only insert a CD after COMAND has prompt- COMAND controller. Magazine menu, one disc loaded ed you to do so with this message. Only insert 1 Magazine compartment occupied, one CD per magazine compartment.
-
Page 58: Loading Pcmcia Memory Card
CD audio/DVD audio and MP3 COMAND loads the memory card and Loading PCMCIA memory card displays the message “Reading memo- COMAND supports type I and II 16 bit full- ry card”. size PCMCIA memory cards. If no MP3 tracks can be found, a mes- COMAND supports commercially available sage will be displayed. -
Page 59: Ejecting Pcmcia Memory Card
Audio CD audio/DVD audio and MP3 Ejecting PCMCIA memory card Remove the disc from the slot 1. Select “Eject All”. If you do not remove the disc from the The DVD changer ejects the first disc 1 Eject button slot 1, the DVD changer will automat- found. -
Page 60: Submenu Overview
Audio CD audio/DVD audio and MP3 Submenu overview CD or DVD-A g/h/T Track list Changer Sound or MP3 (DVD audio mode only) (CD and DVD audio mode only) (CD audio mode only) Folder (MP3 mode only) Normal track sequence g Pause Display track list Media selection via me- Treble... -
Page 61: Switching To Cd Audio, Dvd Audio Or Mp3
(CD audio, 2 Track number DVD audio, MP3-CD or DVD video). COMAND “Disc” accesses audio discs in the DVD 3 Track name (only if stored on disc as then accesses all discs in the DVD changer, the changer, “Memory Card”... -
Page 62: Stop Function
Audio CD audio/DVD audio and MP3 Example of DVD audio display Example of MP3 display Stop function The function is only available in DVD audio mode. Switch to DVD audio mode. To interrupt playback: Select h. The g display changes to T. To resume playback: Select T. -
Page 63: Pause Function
Audio CD audio/DVD audio and MP3 The media list shows you the storage me- Pause function Selecting CD/DVD/MP3 media dia currently available: In CD audio, DVD audio and MP3 In CD audio, DVD audio and In the DVD changer (magazine com- mode: Select “Changer”. -
Page 64: Selecting Tracks
Audio CD audio/DVD audio and MP3 The track list appears. The dotRindi- Selecting tracks Selecting folders cates the current track. For many operating functions you can also The function is only available in MP3 mode. To select a track: Rotate or slide use the buttons on the multifunction steering Switch to MP3 mode ( page 60). -
Page 65: Gracenote Media Database
® the Gracenote Media Database is stored Press n. on the COMAND’s hard drive. Access to The track is played, the corresponding this database is indicated by the folder is now the active folder. Gracenote logo being displayed in the low- er right of some audio displays. - Page 66 Benz center by means of a DVD or, perform function must be switched on. on and off the update process yourself. If this is the case, COMAND provides the ® The Gracenote Media Database is updated Switching to CD audio mode...
-
Page 67: Setting Audio Format
An activated option remains item(s) cannot be selected. dom order. active after COMAND is switched on or off. Switch to DVD audio mode To select an option: Switch to CD au- ( page 60). -
Page 68: Music Register
Register” in the display with Audio Keep your original music files in a safe menu ( page 40). place. A fault with the COMAND may cause the music files stored in the Music Register to be If “Music Register” was active last, you only lost. -
Page 69: Recording Music Files
Audio Music Register Selecting tracks to be recorded Selecting a destination folder Recording music files CD information, including album, title, artist Rotate or slide until Rotate or slide until name and track name is obtained from the “Tracks” is highlighted. “Folder”... -
Page 70: Deleting All Music Files
Audio Music Register Start the reording Deleting all music files Folder functions Rotate or slide until “Start” This function can be used to delete all the You can view the content of the Music Reg- is highlighted. music files in the Music Register. ister, change folder/track names and de- lete individual folders/tracks. -
Page 71: Playback Options
The display changes to the next folder “Normal Track Sequence” another medium. An activated option remains You will hear the tracks in the normal active after COMAND is switched on or off. sequence (e.g. track 1, 2, 3 etc.). Changing folder/track name “Random Tracks”... -
Page 72: Audio Aux
An external audio source (AUX) can be Select “Audio” “Aux”. Due to the different volumes of the external connected to COMAND via the 1/8" jack The Audio Aux menu appears. audio sources, system messages (e.g. navi- 1 located inside the glovebox. -
Page 74: Video
Video DVD video........74... -
Page 75: Dvd Video
The following message will then appear in data on both sides, (DVD on one side, audio data COMAND is classified as a Class 1 laser the display: “In order not to distract you on the other side), this cannot be ejected and product. -
Page 76: Dvd Playback Conditions
Information on this can usually be found ei- ther on the DVD itself or on the DVD sleeve. The factory setting for COMAND is region code 1. An authorized Mercedes-Benz Center can change this setting. This will enable you to... -
Page 77: Submenu Overview
Video DVD video Submenu overview DVD-Video Changer Sound DVD functions g Pause h Stop playback Medium selection Treble Brightness T Resuming playback Bass T Restarting playback Contrast Balance/Fader Color Surround sound 16:9 Optimized Widescreen... -
Page 78: Switching To Dvd Video
Press the function button Pressing the function button switches di- rectly to the disc mode selected last (CD audio, DVD audio, MP3 CD or DVD video). COMAND then accesses all discs in the DVD changer. If necessary select “Changer” and in... -
Page 79: Fast Forward/Reverse
Press n. The option selector remains at T. COMAND switches the medium. To restart playback: Select T. If you select a CD-/DVD-audio or MP3 me- Playback will start from the beginning. dium, the system switches to the corresponding The menu system is hidden. -
Page 80: Pause Function
Video DVD video Pause function Selecting a film/track Picture settings In DVD video mode, if necessary dis- The function is only available if the DVD is di- Adjusting the brightness, contrast or vided into several films/tracks. play the menu system ( page 77). color In DVD video mode, if necessary dis- To activate playback pause:... -
Page 81: Dvd Menu
Select “DVD-Video” “DVD Func- To confirm selection: Select “Select”. tions” “Menu”. COMAND will perform the action or dis- The DVD menu appears. plays a submenu represented by the menu item selected in the DVD menu. Selecting menu items from the DVD... -
Page 82: Setting Language
Video DVD video Stopping film or skipping to the In the selection menu select the menu Setting language beginning/end of a scene item “Go Up”. The function is not available for all DVDs. If Depending on the DVD, it is possible the it is available, you can set the DVD menu lan- Select any menu item from the DVD menu item “Go Up”... -
Page 83: Subtitles And Camera Angle
Video DVD video Subtitles and camera angle Interactive content The functions are not available for all DVDs. DVDs may have interactive content (e.g. a The number of subtitles or camera angles is de- video game). termined by the DVD content. The settings may In a video game, for example, you can con- also be possible in the DVD menu ( page 80). -
Page 84: Telephone
Telephone General information......85 Activating the mobile phone..86 Submenu overview .......91 COMAND phone book ....93 Call lists..........97 Making calls........ 101 Address book......104... -
Page 85: Safety Precautions
Telephone Safety Precautions Safety Precautions Warning Warning You and others may damage your health due Never operate radio transmitters equipped Warning to excessive electromagnetic radiation. By with a built-in or attached antenna (i.e. with- Some jurisdictions prohibit the driver from using an external antenna, the possible out being connected to an external antenna) using a cellular telephone while driving. -
Page 86: General Information
Bluetooth-enabled If you try to make an outgoing call, the mobile phones to COMAND is available via when using a mobile phone with “Twin- message “No Service” appears briefly. the Internet at www.mbusa.com. -
Page 87: Activating The Mobile Phone
It is recommended to give the device a them in the phone list. personal name, by which you can clearly recog- For making calls using COMAND via the nize your mobile phone. ® The duration of the search procedure de-... - Page 88 You must enter Select the as yet unauthorized device check whether, conversely, your mobile the same number on COMAND and on the device (no check mark yet) from the list. phone can find COMAND. to be authorized. Please also refer to the instruc- Select “Options”...
- Page 89 The details screen for the device is dis- played. ® Bluetooth must be activated To close details screen: Rotate ymz, ( page 169) or press n. slide If the “Bluetooth” function on the COMAND is switched off, the message “Blue- tooth not activated in system settings.” appears.
-
Page 90: Setting Transmit And Receive Volume
To confirm selection: Press n or Reception volume and Transmission only ap- slide om. pear for authorized devices. The COMAND imports the data for the business cards and displays the num- ber of business cards received. To end reception: Press n. -
Page 91: 911" Emergency Call
Telephone Activating the mobile phone Enter the digits on the COMAND con- “911” emergency call trol unit ( page 101). Press the button. Warning The phone establishes the connection. The 911 emergency call system is a public service. Using it without due cause is a Wait until the emergency call centre criminal offense. -
Page 92: Submenu Overview
Telephone Submenu overview Submenu overview Name Phone Call lists or Mic off/on Displaying COMAND phone book Phone list Displaying or deleting call lists Receive business cards Switching the hands-free microphone off/on (during a call) Import external data... -
Page 93: Phone Main Menu
2 Signal strength (if provided by phone) Select “Phone” “Phone” 3 Call status “Phone”. 4 Displays COMAND phone book If phone mode was active last, you only need 5 Displays call list selection to select “Phone”. 6 Speller with characters for entering... -
Page 94: Comand Phone Book
Telephone COMAND phone book COMAND phone book Selecting an entry The COMAND phone book is an extract of Selecting via list entries from the COMAND address book. All the COMAND address book entries hav- Rotate or slide until the de- ing at least one phone number can be sired entry is highlighted. -
Page 95: Initiating Call To An Entry
Creating a new entry COMAND can also fully display an abbrevi- When a new entry is added through the Slide until the predictive speller is COMAND phone book, it is saved to the address ated entry. not highlighted. book. Select entry. -
Page 96: Deleting Entry
Phone book entry selected: entire entry has been deleted. ters corresponding to the selected data field. The entry is deleted in the COMAND phone book and the address book if the To switch predictive speller to up- Press and hold î until the entire en-... -
Page 97: Adding Phone Number To A Phone Book Entry
Telephone COMAND phone book Press and hold î until the entry has Select the number to be overwritten. Adding phone number to a phone been deleted. The input menu appears with the data book entry To save entry: Select B. -
Page 98: Call Lists
COMAND can also fully display an abbrevi- ed if calls have already been received or made from COMAND. ated list entry. The display of missed calls in the COMAND dis- Select the list entry. play is not possible with all mobile phones. Select “Options”... - Page 99 Saved list entries are displayed as the “Not Classified” name. They are either saved in the address “Home” book or in the COMAND phone book. “Work” Saving in the address book as a new Phone category entry “Not Classified”...
- Page 100 ( or &. Press and hold î next to the Phone No.”. To switch predictive speller charac- COMAND controller until the entry has “Save” has no function if the selected list ter set: Select #. been deleted. entry is already saved in the address book.
- Page 101 The saved call lists are retained in COMAND confirm whether you wish to overwrite even if you use the COMAND with another mo- one of the existing numbers. bile phone. For this reason you should delete any Select “Yes”...
-
Page 102: Making Calls
You can also accept a call as described ( page 92). aled last will be at the top of the list. above if COMAND is displaying a screen for an- To enter digits: Select all the digits other main application. After accepting the call, one after the other. -
Page 103: Functions During A Single Call
Open the call list and select an entry the symbol > appears in the main ar- ( page 97). To switch on: Select “Mic On”. Open the COMAND phone book and The symbol > disappears select an entry ( page 104). Phone mode with a single call To initiate call: Press n. - Page 104 You then have two calls, the accept- ed call is the active call. Switch display to phone mode if neces- sary ( page 92). To terminate call: Select 4. Press on the COMAND control unit or the t button on the multifunc- tion steering wheel.
-
Page 105: Address Book
Before your journey please familiarize your- data self with the address book functions. Deleting Only use the COMAND when road and traffic conditions permit you to do so. Otherwise Creating a new ad- Deleting an ad- you could be involved in an accident in... -
Page 106: Creating A New Address Book Entry
If you save phone numbers in the tive speller is hidden. To move the cursor in the data field: COMAND phone book, these are saved in the ad- and press n to select Then slideqmr Select Y or Z. -
Page 107: Searching For An Address Book Entry
Telephone Address book Cancelling an entry address data from the navigation system, Searching for an address book entry which support navigation and are covered Select A. Open the address book ( page 104) by the digital map data. You can quickly and select “Search”. -
Page 108: Deleting Entry
Press the î button next to the lighted. COMAND controller. After entering each character or after each deletion of a character, the clos- est matching entry is given at the top of... -
Page 109: Changing Entry
Telephone Address book Closing details screen Continue from the step “Switching data field” in the “Creating a new address Select “Back”. book entry” section ( page 105). Changing entry Changing category of a phone number data field Changing an address book entry Display the details for an entry and Search for an address book entry highlight the phone number data field... -
Page 110: Initiating A Phone Call To An Entry
Bluetooth interface. have saved a destination in the destination mem- ory ( page 159). COMAND then also saves the Display the details for an entry and destination in the address book with the com- highlight the phone number data field plete address data that support navigation. -
Page 111: Voice Tags
( page 106). Press n. Select “Options” “Voice Name” The data import is started. “Delete”. A delete prompt appears. Select “Yes” or “No”. COMAND will delete or retain the voice tag on the basis of the selection. -
Page 112: Navigation
Navigation Introduction....112 Destination input ... .126 POI input ....141 Route guidance . -
Page 113: Introduction
14 m) every second. over the navigation commands generated by Only touch the discs at the edges. COMAND calculates the route to the desti- the system. Handle the discs with care in order to nation without taking account of the follow- prevent reading errors. - Page 114 If you perform the update with the engine off and displayed. the vehicle battery is no longer powerful enough, COMAND may shut off automatically during the If the magazine is full, you will first need to process to protect the battery. In this case, re- eject a disc ( page 57).
- Page 115 Update process Map data is already installed You cannot eject the DVD during the up- date. If you switch COMAND off during the The version release and a corresponding The update process starts once the DVD update, this will interrupt the update and message will be given on the display.
-
Page 116: General Information
( page 114). Use map software After vehicle transport (e.g. by ferry, car ment has cooled down. compatible with the system software. train or by towing) COMAND must deter- Restart the update. mine the vehicle location again. Please note that in this case the update The memory medium (hard drive) inte- must run through right to the end. -
Page 117: Input Restriction
Hard disk drive activated as soon as the speed falls below nation. apprx. 2 mph. COMAND has an integrated hard drive on Direction arrow accuracy is also dependant which the map software is stored. Certain entries cannot be made when the on correct vehicle position and/or direction. -
Page 118: Menu Overview
Navigation Introduction Menu overview Navi Selecting map display Setting route calculation mode Setting Block Area Selecting information on map Switching highway information on/off Navi submenus 6 (with active route Guide Route (with active route Position Destination guidance) guidance) Selecting POI in depict- Opening detour function Save vehicle location or Repeating current navi-... -
Page 119: Switching To Navigation Mode
Navigation Introduction Switching to navigation mode Press the function button Select “Navi” in the main function menu. This displays the map with the menu system either displayed or hidden. “ If the message Please insert the map DVD ” to activate Navigation. appears instead of the Map without activated route guidance and Map without activated route guidance and... - Page 120 The map scale 3 is displayed as soon 2 Crosshairs as you start rotating ymz. Rotating COMAND saves the current vehicle lo- 3 Information on crosshairs position clockwise makes the map smaller, ro- cation as a destination in the last desti- 4 Set map scale tating anticlockwise enlarges it.
-
Page 121: Basic Settings
Crosshair Position”. Map orientation ance is active. COMAND saves the crosshairs position To display menu system if applica- as a destination in the last destinations ble: Press n. memory ( page 162). A window ap-... - Page 122 Navigation Introduction 8 = Bird’s-eye view (the map display is The following settings are available: oriented in the direction of travel, the “Standard Symbols” map projection reproduces the curva- Displays the factory-set symbols ture of the earth’s surface, the orange “Personal Symbols”...
- Page 123 “Avoid Ferries” If you change the route type setting when “Avoid AutoTrains” route guidance is active, COMAND calculates a new route. Block Area You can define an area within the map dis- The blocked area appears in red.
- Page 124 Navigation Introduction To confirm the area and exit map If you select “Yes” COMAND deletes display: Press n. the entry. A message will be displayed. Hide menu system if applicable Information on map ( page 119). You can have map information displayed at...
- Page 125 Navigation Introduction Time of arrival/distance to destination Current street Adequate GPS reception must be available for all displays. The altitude display 1 may differ from reality because the navigation system cal- culates it using the GPS signals. In the “Move map” function the displays 1 and 4 are not displayed.
- Page 126 Navigation Introduction Highway information If the digital map does not supply any data, only a stylized road without highway information When driving on highways, you can have is displayed in the right-hand half of the screen. the next gas stations, service areas, etc. as well as the distance to them displayed in the right-hand half of the screen.
-
Page 127: Destination Input
Navigation Destination input The Enter Destination menu appears. Destination input Entering a destination via the ad- dress Introduction to destination input In some countries, it is not possible to enter addresses at vehicle speeds above apprx. Warning 3 mph. The function becomes available again as soon as the speed falls below apprx. - Page 128 Navigation Destination input Selecting a state/province Entering a city City list with predictive speller If this list is given in the display, the You can only select those states/provinces You can only enter those cities that are predictive speller 8 is activated automat- that are stored in the digital map.
- Page 129 Press the î button next to the always displays a city that best matches COMAND controller. the characters already entered. If COMAND can match the characters en- COMAND automatically adds matching let- To delete an entire entry: Select tered definitively to one city, the Enter ters 2 to those characters 1 already en- õ...
- Page 130 City list without predictive speller If no other options exist, the Enter Des- tination menu appears again in the dis- play. COMAND has accepted the selected city and entered it automatically in the Enter Destination menu. Entering a zip code You can only enter those zip codes that are stored in the digital map.
- Page 131 Switching to the zip code list without ways displays a zip code that best matches predictive speller If COMAND can assign the zip code to the characters already entered. COMAND You can switch to the list at any point while...
- Page 132 Navigation Destination input Entering a street Street list without predictive speller Any city center that has already been en- tered is deleted when a street is entered. You can only enter those streets that are stored in the digital map. In the Enter Destination menu select “Street”.
- Page 133 Navigation Destination input If no other options exist, the Enter Des- City center list without predictive spell- tination menu appears again. COMAND has accepted the selected street and entered it automatically in the Enter Destination menu. Now you can start the route calculation ( page 135).
- Page 134 Navigation Destination input Entering a house number proceed as described under proceed as described under “City list with It is not possible to enter house numbers un- predictive speller” ( page 127). til the street has been entered. You can only en- ter those house numbers that are stored in the House number list without predictive digital map.
- Page 135 Destination input To confirm selection: Press n. Junction list without predictive speller After the confirmation, the Enter Desti- nation menu appears again. COMAND has accepted the selected house num- ber and entered it automatically in the Enter Destination menu. Now you can start the route calculation ( page 135).
-
Page 136: Entering A Destination From The Desti- Nation Memory
Navigation Destination input Starting route calculation If you select “Yes” COMAND cancels Entering a destination from the des- route guidance and starts the route cal- tination memory Route calculation can only be started once culation to the newly entered destina-... - Page 137 For the steps of Entering characters Select B and press n. Deleting an entry If COMAND can match the characters en- tered definitively to one entry, the list ap- Accepting first list entry 1 Character entered by the user pears automatically without the predictive...
-
Page 138: Tinations
Navigation Destination input Destination memory list without Entering destination from the last Entering destination via the map predictive speller destinations In some countries, entering destinations via the map is not possible at vehicle speeds above If necessary switch to navigation mode apprx. -
Page 139: Entering Stopover Destination
To move the map: Slide qmr, stopover destination. Stopover destinations may be predefined destinations in the following cate- wmx. gories suggested by COMAND for you to select: To set the map scale: Rotate ymz. “Mercedes-Benz Service” Rotating clockwise makes the map “Hospital”... - Page 140 To select a destination: Press n. Select a menu item. If COMAND is unable to find any destina- The Enter Destination menu appears tions, a message to that effect will be dis- The rest of the destination entry will vary and displays the address of the desti- played.
- Page 141 ( page 135). Deleting stopover destination An existing stopover destination can be de- leted. Switch to navigation mode if neces- sary. Select “Destination” “Stopover” “Delete Stopover”. COMAND deletes the stopover destina- tion and recalculates the route to the main destination.
-
Page 142: Poi Input
Navigation POI input POI input Entering a POI in the vicinity of a Entering a POI via a name search specific location This function gives you access to all POIs Entering a POI in local area of desti- that are available in the digital map. nation Option 1 In the map display with the menu sys-... -
Page 143: Choosing A Poi Category
Navigation POI input POI via phone number: Choosing a POI category A numerically sorted list is available The categories and POIs available depend on the area for which you wish to enter a Selecting a category POI. Depending on the number of available cat- POI in local area of destination: egories, the main category list is displayed Alphabetically sorted categories and... - Page 144 To confirm character selection: Press n. If COMAND can match the characters en- tered definitively to one entry, the list ap- Deleting an entry pears automatically without the speller. To delete individual characters: Se- lect õ...
- Page 145 Navigation POI input To select main category: Rotate For the steps of or slide qmr. Entering characters To cancel selection: Press the í Deleting an entry button. Accepting first list entry To confirm selection: Press n. Cancelling an entry Main categories with the + symbol Switching to the list without predic- contain additional subcategories.
- Page 146 3 Starts route calculation Depending on the POI category selected, 4 Cancels selection COMAND uses different reference points when To cancel selection: Press the í determining the distance to the destination: button. In the vicinity of the location: The distance to the POI from the current vehicle location.
- Page 147 To accept first list entry: Press and hold n until the list appears without speller. 1 First list entry after opening the list If COMAND can match the characters en- 2 POI list tered definitively to one entry, the address 3 Predictive speller entry appears automatically ( page 145).
-
Page 148: Entering A Poi Via The Map
The scale starting at which symbols are displayed on the map varies from sym- bol to symbol. You can select which symbols COMAND should display ( page 121). 1 Information about the highlighted POI The POI nearest to the center of the 2 Highlighted POI... -
Page 149: Route Guidance
Navigation Route guidance COMAND guides you to the destination by Route guidance Driving maneuver means of driving recommendations in the Driving maneuvers are given in three phas- General information form of navigation announcements or route guidance displays. Preparation phase Warning... - Page 150 Depending on the selected basic setting in junction zoom in the right-hand half. “Information on map” ( page 123) in 4 you COMAND prepares you for the next driving will see maneuver. Based on the example display Information on “Arrival Time / Distance”...
-
Page 151: Example Display Without Driving Maneuver
Example display without driving ma- Traffic lane recommendations neuver COMAND announces the imminent driving On multi-lane roads, COMAND may display maneuver. In the example, the announce- traffic lane recommendations for imminent ment is made 90 ft. ahead of the driving driving maneuvers. - Page 152 Navigation Route guidance Explanation of the traffic lane recom- Depiction of the traffic lane recommen- mendations dations Recommended lane 6: The color depiction of the traffic lane rec- From this lane it is possible to carry out ommendations differs depending on the next two driving maneuvers without whether the display is set to day or night changing lanes.
-
Page 153: Destination Or Destination Region Reached
Warning entering the destination via the map. In this case, COMAND guides you on roads The COMAND navigation system may direct 1 Off-road destination known to the system for as long as possi-... -
Page 154: Navigation Announcements
As soon as the vehicle location is found To switch off navigation announce- COMAND can guide you from such a posi- again, route guidance continues in the usu- ments: Press during the announce- tion to a destination. -
Page 155: Cancelling Route Guidance
COMAND calculates the route. change or delete this. Then set length of block. Detour function If you switch COMAND on again or To delete block: Select “Navi” The Detour function blocks a route segment start the engine. ahead. You can set the length of the block. -
Page 156: Alternative Route
Navigation Route guidance Alternative route Route browser Displaying destination information You can have other routes calculated for the The route browser provides an overview of In the map display with the menu sys- original route guidance using the “Alternative the route. You can move along the route seg- tem displayed ( page 119) select Route”... - Page 157 Navigation Route guidance When calculating the estimated time of ar- rival, COMAND uses the time set on the CO- MAND as its basis. For this reason, the time on COMAND must be set correctly ( page 165). The calculation of the estimated time of arrival...
-
Page 158: Destination Memory
Navigation Destination memory To assign address for first time: Destination memory Press and hold n until the predictive Home address speller disappears. There is always an entry in the destination The entry “My Address” is highlighted memory with the name “My Address” at the top automatically in the list. - Page 159 ( page 160) you will find “Save”. ance out how to link address book entries to data that COMAND then saves the entry. A mes- If the “My Address” entry already contains support navigation. sage is displayed and then the Enter data that support navigation (Q symbol), you To confirm selection: Press n.
-
Page 160: Saving A Destination In The Destination Memory
If necessary switch to navigation mode and display menu system This function also saves the destination to ( page 118). the address book. COMAND creates an address book entry there, which contains the complete Select “Destination” “From Last address data that support navigation. You can Destinations”. - Page 161 If you select “Yes” the message “Saving Assigning destination to an address Procedure Successful” appears, select- book entry If you select “Yes” COMAND saves the ing “No” cancels the operation. data. This function assigns the complete address data that support navigation to an existing ad- Saving destination with name dress book entry.
-
Page 162: Deleting Destination Or Home Address From The Destination Memory
If necessary switch to navigation mode COMAND deletes this data there too. If the cor- and display menu system responding address book entry does not contain ( page 118). -
Page 163: Last Destinations
If the and display menu system If you move the map manually, crosshairs memory is full, COMAND deletes the oldest des- ( page 118). will appear on it. The crosshairs position can be tination. -
Page 164: System Settings
System settings Opening System menu ....164 Menu overview ......164 Display settings......164 Time settings ......165 Read-out settings ....... 166 Voice control settings ....167 ® Bluetooth settings ....169 Reset..........171 Setting the system language ..171 Tele Aid*........ -
Page 165: System Settings
Select “System” in the menu bar with Time main functions. Text reader speed Voice control Bluetooth Reset (resets COMAND to factory settings) Use this function to delete your person- al data, e.g. before 1 Brightness bar selling your vehicle. To adjust brightness: Rotate slide qmr. -
Page 166: Time Settings
The dotRin front of the list entry indi- cates the current selection. The abbreviations mean: Date format: DD - Day, MM - Month, In the “Automatic” setting, COMAND evalu- YY/YYYY - Year ates the automatic vehicle light sensor and auto- matically switches over the display design. -
Page 167: Read-Out Settings
System settings System settings Setting time zone and switching be- Read-out settings tween daylight saving time and stan- dard time Setting reading speed The correct time zone and daylight saving/ You can use this feature to adjust the read- standard time settings are essential for the fol- out speed of the address book via voice lowing system functions to operate correctly: control. -
Page 168: Voice Control Settings
System settings System settings Individualization function If you select “No”, the first part of the Voice control settings individualization will start. You will be You can use the individualization function Switching help screen on/off prompted to confirm that you wish to option to adapt the Voice control system practice numbers or voice commands. - Page 169 System settings System settings Once the first part is over, you will be Cancelling first or second part of indi- Switching individualization on/off prompted to confirm that you wish to vidualization process Select “System” “System Settings” start the second part. Select “Cancel”.
-
Page 170: Bluetooth® Settings
‘visible’ for COMAND, so If a phone is not in the vehicle but has been that COMAND can find it and display it. The pro- devices: authorized previously, the phone symbol cedure for performing this setting is given in the All (available) devices found, regardless ®... - Page 171 (de-authorize) one of the To cancel entry on COMAND: Select list no longer includes this device. authorized devices. You will then have to switch “Back”.
-
Page 172: Reset
System settings System settings Reset Setting the system language You can fully reset COMAND to the factory Select “System” “Language”. settings. This process deletes all personal data, The language list appears. among other things, (e.g. station memory, ad- The dotRindicates the current setting. -
Page 173: Tele Aid
Close cover after the emergency call is concluded. During the emergency call message “Emer- gency Call Activated” is displayed, operation from COMAND is not possible. For a complete description and additional information on Emergency calls please re- fer to the vehicle Operator's Manual. -
Page 174: Roadside Assistance
¡ (for longer than 2 seconds). 2 seconds). A call to the Customer Assistance Cen- A call to a Mercedes-Benz Roadside As- ter will be initiated. The button will sistance dispatcher will be initiated. flash while the call is in progress. -
Page 176: Voice Control
Voice Control Overview ....176 Phone operation ... . .179 Navigation ....183 Address book . -
Page 177: Overview
Voice Control Overview Overview Traffic regulations always have priority over Symbols only used in this chapter any route recommendations given. The following symbols indicate: Operating Safety Bear in mind that at a speed of just 30 mph that you have to say something (approximately 50 km/h), your vehicle is Warning covering a distance of 44 feet (approximate-... - Page 178 You can cancel the dialog with voice control applications using voice control. at any time. Voice control is operational around half a minute after COMAND is switched on.
- Page 179 0 - 9 are permitted. if voice control requires additional informa- Press any button on COMAND. Say the letters in groups of five to sev- tion from you. en letters.
-
Page 180: Phone Operation
Voice Control Phone operation Phone operation Operation Warning You can use voice control to: Never operate radio transmitters equipped Warning place a call by using your voice to input with a built-in or attached antenna (i.e. with- Some jurisdictions prohibit the driver from a phone number out being connected to an external antenna) using a cellular telephone while driving. -
Page 181: Commands
Voice Control Phone operation mately half a second between each block Voice control repeats the digits it recogniz- Commands of digits) and waits for you to continue es after each block of digits (with a pause “Phone” speaking. of about half a second between each block of digits) and waits for you to continue Example of dialog: Use the “Phone”... - Page 182 Voice Control Phone operation “Confirm” “Correction” “Delete” While you are entering a number, you can While you are entering a number, you can While you are entering a number, you can use the “Confirm” command to have all the use the “Correction” command to correct use the “Delete”...
- Page 183 Voice Control Phone operation Press the ! button while a phone “Save name” (address book) If there is more than one phone number for an entry, voice control queries this. call is in progress. ( page 192) Do you want to make a work call or An acoustic signal confirms that the “Dial name”...
-
Page 184: Navigation
Voice Control Navigation Navigation Warning Warning During route guidance, you will not receive Please do not use the Voice Control System Warning information on: in an emergency, as the tone of your voice For safety reasons, you should only select a may change in a stressful situation. -
Page 185: Operation
Voice Control Navigation To select the navigation application Operation Entering an address press the ! button on the multi- You can use voice control to: If voice control fails to recognize your entry, function steering wheel. it is advisable to spell the name of the town and enter a state Give the “Navigation”... - Page 186 Voice Control Navigation “Enter destination” “Enter town” Please say the name of the street You can use the “Enter destination” com- You can use the “Enter town” command to mand to enter a complete address. enter any town in the state or province that Park Avenue is currently selected.
- Page 187 Voice Control Navigation Example of dialog: Say each individual letter clearly. “Enter district” (center) Enter town It is not easy to avoid confusion of similar- You can use the “Enter district” command sounding letters (e.g. D and E). to enter an area in a city which you have Please say the name of the town selected previously.
- Page 188 Voice Control Navigation u The system shows a numbered list Example of dialog: Example of dialog: of POI categories Enter Street House number Please select a line number or say Please say the name of the street Please say the house number in sin- the category name gle digits Mabel’s Street...
- Page 189 If the desired voice tag already exists in the “Next car park” You can use the “Last destinations” com- address book, the system asks if you want to add “Next Mercedes-Benz Service” mand to reselect a destination from a list the address. of the previously selected destinations.
- Page 190 Voice Control Navigation “Find address” “Route information” “Cancel route guidance” You can use the “Find address” command You can use the “Route information” com- You can use this command to stop route to select a previously saved address and mand to have the following information on guidance.
- Page 191 Voice Control Navigation “List destination memory” You can use the “List destination memory” command to listen to the entries from the address book’s destination memory and, if required, navigate to one of them. List destination memory The system reads out all entries, from the address book destination memory.
-
Page 192: Address Book
Voice Control Address book “ pends on the text that was entered. To Address book Operation make a call you must say the text of the en- You can use voice control at any time to: try. Warning save a name Check the address book entries for the fol- Please devote your attention first and fore- lowing:... -
Page 193: Commands
Voice Control Address book Voice control repeats the digits it recogniz- Would you like to save the number Commands es after each block of digits (with a pause in a category? “Address book” of about half a second between each block of digits) and waits for you to continue To open the address book: say the Name and number saved... - Page 194 Voice Control Address book Work “List address book” You have cancelled the dialog. The sys- tem confirms by responding “Cancel”. Smith work. Dialing number. You can use the “List address book” com- mand to listen to all names and voice tags “List phone book”...
- Page 195 “Find entry” “Spell entry” You can use the “Next page” or “Previous page” commands to scroll through the list. You You can use the “Find entry” command to You can use the “Spell entry” command to can use the “Correction” command to spell the open any address book entry.
-
Page 196: Radio And Satellite Radio
Voice Control Radio and Satellite Radio* The names of all received and stored sta- Selecting a waveband Radio and Satellite Radio* tions are available for voice recognition. To You can set the waveband with the follow- improve voice recognition, you can store a Warning ing commands: voice tag for a specific speaker. - Page 197 Voice Control Radio and Satellite Radio* Selecting the frequency (FM range) When you have given the command, voice “Station Favorite station” control prompts up to three times to say You can select frequencies within the FM Using this command, you can select a the station name.
- Page 198 Voice Control Radio and Satellite Radio* “Enter channel number” “Delete station” (Satellite radio) All voice tags have been deleted You can use the “Delete station” command from the station list Use the command “Enter channel number” to delete a voice tag for a station from your to select a satellite radio category.
-
Page 199: Dvd Changer
Voice Control DVD changer To select the CD application: press “Next CD/DVD” DVD changer the ! button. With the “Next CD”/“Next DVD” com- Say one of the following commands: Warning mands, you can select the next audio CD/ DVD from your DVD changer. “CD player/CD changer”... -
Page 200: External Equipment (Aux)
PCMCIA card on the COMAND system. “DVD video” With the “DVD video” command, you can start a video DVD on the COMAND system. “Hard disk” With the “Hard disk” command, you can change to the internal hard disk (Music... -
Page 201: Command List
Voice Control Command list Command list Navigation Continue In the Command list section, you will find Route guidance Go forward all the main commands for operating voice Next page control. The commands available to you DVD video Previous page depend on the vehicle’s equipment. Go back Some functions have several voice com- DVD audio... -
Page 202: Phone Commands
Voice Control Command list Phone commands Enter PIN Enter PIN code Phone Enter PIN number Telephone on/phone on List phone book Save Read out phone book Save PIN/PIN code Redial Save name Redial last number Save number Redial last phone number Save phone number Correction Dial PIN... -
Page 203: Navigation Commands
Voice Control Command list Navigation commands Zoom out Spell district Zoom out of map Spell center Navigation Zoom out completely Point(s) of interest/POI(s) Route guidance Enter point(s) of interest/POI(s) Zoom in completely Street Enter state Guidance instructions on Enter street Change state Switch guidance instruction/instruc- tions on Switch route guidance in-... -
Page 204: Address Book Commands
Car phone Terminate route guidance/naviga- Spell entry tion/nav/destination guidance Landline Spell name Next gas station Landline phone Find entry Next Mercedes-Benz Service Landline phone Delete name Next workshop Mobile List destination memory Next MB service Mobile phone Read out/play destination memory... -
Page 205: Audio And Video Commands
Voice Control Command list Work/office/business/company/ Accept Audio and video commands mobile Accept PIN Audio Work/office/business/company/ Accept name phone Radio Accept phone number Mobile phone work/office/business/ Okay Radio on company Finished 87 7 megahertz - 107 9 megahertz Home <1> - <6> 87 point 7 to 107 point 9 Home car Select 1 - select 6... -
Page 206: Satellite Radio* (Sirius)
Voice Control Command list Save station Next category CD changer Previous category Select station CD changer Category <category name> List station list Next CD Read out station list Select category Other CD Delete station list List category list Previous CD Read out category list Previous station Last CD... -
Page 207: Mp3
Voice Control Command list Hard disk DVD audio Hard disk DVD audio MP3 changer (on) DVD audio changer on Music register Next MP3 Next DVD audio Memory card Other MP3 Other DVD audio Memory card Previous MP3 Previous DVD audio Last MP3 Last DVD audio Repeat/replay MP3... -
Page 208: Aux
Voice Control Command list Previous track Last track Audio aux Repeat/replay track Video Track 1 - Track 99 Video Track number 1 - Track number 99 DVD video DVD audio 1 - DVD audio 6 DVD audio number 1 - DVD audio number 6... -
Page 209: Troubleshooting
Voice Control Troubleshooting Troubleshooting Problem Possible cause/consequence Suggested solutions Voice control does not under- You have not operated the system Only operate the system from the driver’s seat. stand you. from the driver’s seat. Voice control does not under- You have spoken too exaggerated- State the commands coherently and clearly without exag- stand you. - Page 210 Voice Control Troubleshooting Problem Possible cause/consequence Suggested solutions An address book entry without The names entered in the address Create a speaker-dependent voice tag ( page 182). a speaker-dependent voice tag book do not sound sufficiently dif- is not recognized. ferent, or are not pronounced as Give the “List address book”...
- Page 211 Problem Possible cause/consequence Suggested solutions If you are making speaker-de- The two voice tags differ from each Say the voice tag with the same intonation both times. pendent voice tags, the system other. prompts you to enter them sev- eral times.
-
Page 212: Help Function
Voice Control Troubleshooting “Help” Help function If you press the ! button and say the Voice control has a comprehensive help function to assist the user. command “Help”, you will receive help for the application currently selected. The voice control help function provides: If you select the “Help”... -
Page 214: Technical Terminology
CD con- (Binary digit) (DVD Recordable) tains this information. The smallest unit of digital information. ->DVD which can be read and written COMAND control system but not deleted. Bit rate (Cockpit Management and Data Measurement of transmission speed. DVD+RW System) Indicates the number of ->bits trans-... - Page 215 LOGIC7 Music recognition software that is Portable personal computer (PC). Multi-channel surround technology stored on COMAND’s hard drive. If -> from the professional audio industry, NTSC the selected audio CD does not contain which plays back 5.1 and stereo recor-...
- Page 216 ->DVD. The factory setting of the entry of this kind is stored in the mobile pressed form, similar to ->MP3, COMAND is code 2 ( page 75). It can phone’s telephone book, a separate ->MPEG1 Audio-Layer 3, but in contrast...
-
Page 218: Index
Receiving ..... 88 COMAND controller CD mode..... . 60 Operation . - Page 219 Index Destination memory ... . 157 DVD video ..... . 74 Home address.
- Page 220 Off map ..... . 152 COMAND ....101 Music Register .
- Page 221 Automatic tuning....48 Redial (COMAND) ....101 UDF ......215 Operation .
- Page 222 Index Video DVD mode..... 74 Voice Control Explanation ....215 Settings.
- Page 224 We reserve the right to modify the technical details of the COMAND system as given in the data and illustrations of this Operator’s Manual. Press time: 06/06/2007 Reprinting, translation and copying, even of excerpts, is not permitted without prior authorization in writing.
- Page 225 Order-No. 6515 6784 13 Part-No. 204 584 13 81 US Edition A 2008...
Need help?
Do you have a question about the COMAND and is the answer not in the manual?
Questions and answers