
Related Manuals for Axminster CT-90H


Summary of Contents for Axminster CT-90H
- Page 1 Code 508334 Code 508336 CT-90H & CT-90HB Extractors CT-90H Code 508334 CT-90HB Code 508336 AT&M: 16/12/2014 REF: 508470...
-
Page 2: Declaration Of Conformity
Index of Contents Index of Contents Declaration of Conformity What’s Included 030-04-05-06 General Instruction for 230V Machines Specific Safety for Dust Extractors 07-08 Specification Assembly 08-09-10-11-12-13 Illustration and Parts Description 14-15-16-17 Operating Instruction Ducting System Maintenance Weekly LEV System Maintenance Log 20-21 LEV Testing Extraction Accessories... -
Page 3: What's Included
What’s Included Model Number CT-90H Model Number CT-90HB Quantity Item Part Quantity Item Part 508334 508336 1 No Base 1 No Base 1 No Tube Support Bar 1 No Tube Handle 2 No Upright Supports 1 No Upright Support 1 No... - Page 4 What’s Included CT-90H Extractor...
- Page 5 What’s Included CT-90H Extractor CT-90HB Extractor Continues Over..
- Page 6 What’s Included CT-90HB Extractor...
- Page 7 General Instruction for 230V Machines Good Working Practices/Safety sharp edge. If the work you are carrying out is liable to generate flying grit, dust or chips, wear the appropriate The following suggestions will enable you to observe safety clothing, goggles, gloves, masks etc. If the work good working practices, keep yourself and fellow operation appears to be excessively noisy, wear workers safe and maintain your tools and equipment in...
-
Page 8: Specification
(standing on rubber feet?, suspended in the air etc). NOTE: DO NOT FIT PLASTIC WASTE BAGS TO THIS MACHINE! Specification Code 508334 Code 508336 Model CT-90H Model CT-90HB Rating Trade Rating Trade Power 0.75kW 230V 1ph Power 1.5kW 230V 1ph... - Page 9 Assembly Having unpacked the boxes, put all components where they are readily to hand. 1. Locate the base (1-14), twelve UNC short bolts (12j - 27i) and upright supports (3-16). Place one of the supports (3-16) on to base and line up the pre-drilled holes with the ones to the side of the base, lightly secure in place with two UNC bolts, see fig 01-02-03.
- Page 10 1. Put to hand the castor wheels, line up the holes in the brackets with the pre-drilled holes to the extractor’s base and secure with domed bolts (12i) for (CT-90H) and Hex bolts (27i) for (CT-90HB), see fig 15-16. Fig 15-16 6.
- Page 11 3. Lower the wheel assembly down and slot the hex bolt through the pre-drilled holes to the side of the extractor’s base, see fig 19. CT-90H Extractor Only Before sliding the Hex bolt down through the second hole, screw on an 1/2" Hex nut (12d) onto CT-90H Extractor Only the thread, see fig 20.
- Page 12 Assembly Extractor Filter 1. Locate the filter assembly ( 6-26) filter retaining belts (8-24) and foam seal bands (7-25). 2. Put to hand the wide foam seal band, peal back the Fig 28 paper backing, position the end of band up against the underside of the upper lip on the extractor housing and firmly press down to secure in place.
- Page 13 Assembly Fig 31 Shaker Paddle Operating Handle 1. Locate the shaker paddle (9-23), insert the handle mounting over the paddle drive shaft making sure the clamping bolt is positioned over the machined face then tighten the bolt using the supplied spanner to secure the handle, see fig 36-37-38.
-
Page 14: Illustration And Parts Description
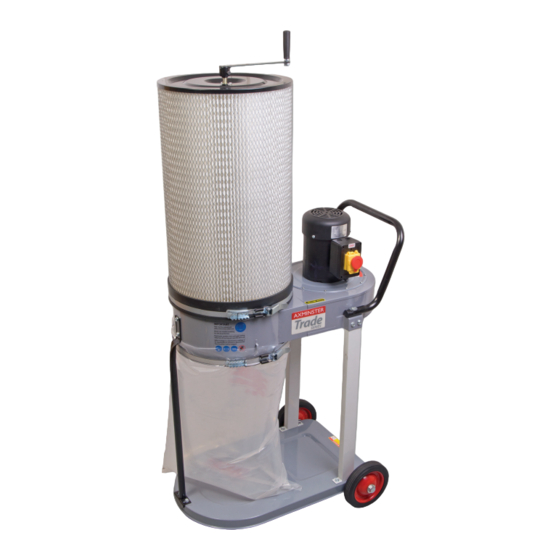
Illustration and Parts Description Shaker paddle operating handle Filter Motor assembly Tube handle NVR switch assembly Filter retaining belt Extractor assembly Bag retaining belt Upright supports Tube support bar Wheels Base CT-90H Filter dust bag... - Page 15 Illustration and Parts Description NVR switch assembly with (O) Shaker paddle assembly indicating (OFF) and (I) indicating (ON). For emergencies “SLAP” the shroud Dust extraction outlet down to “STOP” the machine. Motor vents Filter and dust bag and retaining steel belts...
- Page 16 Illustration and Parts Description Shaker paddle operating handle Motor assembly Filter NVR switch assembly Extractor assembly Filter retaining belt Tube handle Bag retaining belt Upright supports Filter dust bag Base CT-90HB Wheels...
- Page 17 Illustration and Parts Description NVR switch assembly with (O) Filter retaining steel belt clip indicating (OFF) and (I) indicating (ON). For emergencies “SLAP” the shroud Bag hook to hold the dust bag in place when fitting the retaining steel belt down to “STOP”...
-
Page 18: Operating Instructions
SOUNDS, CONTACT THE “TECHNICAL SALES” FOR SUPPORT. Fig 43-44 Phone: 03332 406406 Email: technical@axminster.co.uk Reduced Suction Performance After a period of time dust, sawdust and shavings can build-up causing blockages and reduced suction performance. Carry out the following checks to keep your extractor working at peak performance. -
Page 19: Ducting System
Ducting System Gerneral Info Many manufacturers will state the volume of air required for each machine in their manual. If not, note the size of the extraction port and use the chart below outlet size volume of air required 200 m³/hr 700 m³/hr 1100 m³/hr Basic design... - Page 20 Weekly LEV System Maintenance Log REMOVE AND CLEAN FILTERS REMOVE AND CLEAN FILTERS...
- Page 21 Weekly LEV System Maintenance Log REMOVE AND CLEAN FILTERS REMOVE AND CLEAN FILTERS Nearly 14 months it is now a legal requirement to have your system tested and certified...
- Page 22 A guide to local exhaust ventilation (LEV) Extraction Accessories Extraction Accessories For all of our accessories please see our catalogue or visit our website at axminster.co.uk. Contact us on: Call: 03332 406406 Web: axminster.co.uk...
-
Page 23: Exploded Diagram/Parts List
Exploded Diagram/Parts List CT-90H... - Page 24 Exploded Diagram/Parts List CT-90HB...
- Page 25 Exploded Diagram/Parts List CT-90H Description Q’TY Lock Nut 1/2” Motor Hex Bolt 5/16” x 1/2” Motor Plate Cap Screw M6 x 20 Handle Tube Cap Base Collector Support Manin Housing Canister Filter Unit Plastic Washer Hex Bolt 1/2” x 4”...
- Page 26 Exploded Diagram/Parts List CT-90H Filter Assembly CT-90HB Filter Assembly...
-
Page 27: Wiring Diagram
Exploded Diagram/Parts List CT-90H Filter Parts List Description Q’TY Washer 1/4” x 18 Canister Filter Flapper Spindle Hex Bolt M6 x 10 Bearing Fixing Plate Belt Clamp CK-370 Bearing Foam Strip 5 x 32 x 1200 Round HD Screw M 5 x 8... - Page 28 Free Three Year Guarantee on Axminster Hobby, Trade and Industrial Series woodworking and engineering machines, Axminster Air compressors and Air Tools, and bench top grinders - no The Guarantee is transferable from owner to owner in the first three years but you must have original proof of purchase.
Need help?
Do you have a question about the CT-90H and is the answer not in the manual?
Questions and answers