Black & Decker GL250 Original Instructions Manual

Black & Decker GL250 Original Instructions Manual

Hide thumbs Also See for GL250:
GL250
GL310
GL360
Table of Contents
loading

Frequently Asked Questions (11)

  • How do I operate the Black & Decker GL250 trimmer?

    To operate your Black & Decker GL250 trimmer, follow these steps:

    1. To switch the tool on, squeeze the trigger lever.
    2. To switch the tool off, release the trigger lever.

    For optimum use:

    • Only cut dry grass to achieve optimum cutting results.
    • Hold the tool as shown in figure D (not provided in the manual excerpt).
    • Gently swing the trimmer from side to side.
    • When cutting long grass, work in stages from the top and take small cuts.
    • Keep the tool away from hard objects and delicate plants.
    • If the cutting is done along pavements, abrasive surfaces, or heavier weeds, the cutting line will wear faster and require more feeding.
    • As the string gets shorter due to wear, gently bump the unit on the ground whilst running to feed the line.
    • If the tool starts running slowly, reduce the load.

    For more information, see page 6 of the manual.
    Was this helpful?
  • How do I troubleshoot the automatic line feed on my Black & Decker GL250 trimmer?

    If the bump feed does not work, try the following:

    1. Keep the tabs depressed and remove the spool cover from the housing.
    2. Pull the cutting line until it protrudes 11 cm from the housing. If there isn't enough line, install a new spool as instructed in the manual.
    3. Align the tabs on the spool cover with the cut outs in the housing.
    4. Push the cover onto the housing until it snaps securely into place.
    5. If the cutting line extends beyond the trimming blade, cut it off so it just reaches the blade.

    If the bump feed still doesn't work or the spool is jammed, consider these suggestions:

    • Carefully clean the spool cover and housing.
    • Remove the spool and check that the spring is in place.
    • Remove the spool and unwind the cutting line, then wind it on neatly again as described in the manual, and replace the spool.

    For more information, see page 7 of the manual.
    Was this helpful?
  • What type of replacement line or spool does the Black & Decker GL250 trimmer require?

    For replacement spools of cutting line, you can use Black & Decker cat. no. A6226. If winding new cutting line onto an empty spool, replacement packs are available under cat. no. A6170 (25 m), A6046 (37.5 m) & A6171 (40 m). It is important to only use the appropriate type of Black & Decker cutting line.

    Was this helpful?
  • How do I manually rewind the spool on my Black & Decker GL250 trimmer?

    You can wind new cutting line onto an empty spool by following these steps:

    1. Remove the empty spool from the tool.
    2. Remove any remaining cutting line from the spool.
    3. Feed 2 cm of cutting line into one of the holes (17) in the spool.
    4. Wind the cutting line onto the spool in the direction of the arrow (18). Ensure the line is wound neatly and in layers, without criss-crossing.
    5. Let the line protrude approximately 10 cm from the spool and hold it in place with a finger.
    6. Fit the spool back onto the tool as described in the manual.

    For more information, see page 7 of the manual.
    Was this helpful?
  • Can the Black & Decker GL250 trimmer be used for edging along sidewalks?

    The Black & Decker GL250 trimmer has been designed for trimming and finishing lawn edges and to cut grass in confined spaces. However, the cutting line will wear faster and require more frequent feeding if cutting is done along pavements or other abrasive surfaces.

    Was this helpful?
  • How do I remove the spool cover on the Black & Decker GL250 trimmer?
    Was this helpful?
  • What kind of power source does the Black & Decker GL250 trimmer use?

    The Black & Decker GL250 trimmer uses an Input Voltage of 230 VAC and has a Power Input of 250 W. It is a mains-powered appliance.

    Was this helpful?
  • Why does my Black & Decker GL250 trimmer go through string line so quickly?

    The cutting line will wear faster and require more feeding if the cutting is done along pavements or other abrasive surfaces or heavier weeds are being cut.

    Was this helpful?
  • How do I clean and maintain my Black & Decker GL250 trimmer?

    To clean and maintain your trimmer:

    • Regularly clean the ventilation slots in your tool using a soft brush or dry cloth.
    • Regularly clean the motor housing using a damp cloth. Do not use any abrasive or solvent-based cleaner.

    Before performing any maintenance, switch off and unplug the appliance.


    For more information, see page 7 of the manual.
    Was this helpful?
  • How do I assemble the Black & Decker GL250 trimmer out of the box?

    Before assembly, ensure the tool is switched off and unplugged. For the GL250 model, you will need to fit the guard:

    1. Place the guard onto the tool as shown.
    2. Firmly press the guard (6) until it snaps into place.
    3. Secure the guard with the screw.

    Never use the tool unless the guard is properly fitted. After assembly, release the cutting line by removing the tape holding it to the spool housing.


    For more information, see page 6 of the manual.
    Was this helpful?
  • Are there any common safety tips for using the Black & Decker GL250 trimmer?

    Yes, there are several safety tips for using the Black & Decker GL250 trimmer:

    • Read all of this manual carefully before operating the appliance.
    • Always use safety glasses or goggles.
    • Never allow children or people unfamiliar with the instructions to use the appliance.
    • Do not allow children or animals to come near the work area or to touch the appliance or power supply cord.
    • Only use the appliance in daylight or good artificial light.
    • Use in a dry location only; do not allow the appliance to become wet or immerse it in water.
    • Do not open the body casing as there are no user-serviceable parts inside.
    • Do not operate the appliance in explosive atmospheres.
    • Never pull the cable to remove the plug from a socket.
    • Always ensure the ventilation slots are kept clear of debris.
    • Do not use the lawn trimmer if the cords are damaged or worn.
    • Keep extension cords away from cutting elements.
    • Always remove the plug from the socket before inspecting a damaged cable.
    • Be aware of flying objects; keep bystanders away from the cutting area.
    • Do not expose the appliance to rain or high humidity.
    • Wear stout shoes or boots to protect your feet and long trousers to protect your legs.
    • Before using, check that your cutting path is free from sticks, stones, wire and any other obstacles.
    • Only use the appliance in the upright position, with the cutting line near the ground.
    • Move slowly when using the appliance, especially on damp and slippery grass.
    • Do not work on steep slopes; work across the face of slopes, not up and down.
    • Never cross gravel paths or roads while the appliance is running.
    • Never touch the cutting line while the appliance is running.
    • Do not put the appliance down until the cutting line has come to a complete standstill.
    • Use only the appropriate type of cutting line; never use metal cutting line or fishing line.
    • Be careful not to touch the line trimming blade.
    • Take care to keep the mains cable away from the cutting line and be aware of its position.
    • Keep hands and feet away from the cutting line at all times, especially when switching on the motor.
    • Before using and after any impact, check for signs of wear or damage and repair as necessary.
    • Never operate the appliance with damaged guards or without guards in place.
    • Take care against injury from any device fitted for trimming the filament line length. After extending new cutter line, return the machine to its normal operating position before switching on.
    • Never attempt to lock the trigger lever in the on position.

    For more information, see pages 4, 5 and 6 of the manual.
    Was this helpful?
Need help?

Need help?

Do you have a question about the GL250 and is the answer not in the manual?

Questions and answers

Summary of Contents for Black & Decker GL250

  • Page 1 GL250 GL310 GL360...
  • Page 4: Intended Use

    ENGLISH (Original instructions) Intended use Safety of others This appliance is not intended for use by persons Your Black & Decker trimmer has been designed for trimming (including children) with reduced physical, sensory or and finishing lawn edges and to cut grass in confined spaces. mental capabilities, or lack of experience and knowledge, This appliance is intended for consumer use only.
  • Page 5: Using An Extension Cable

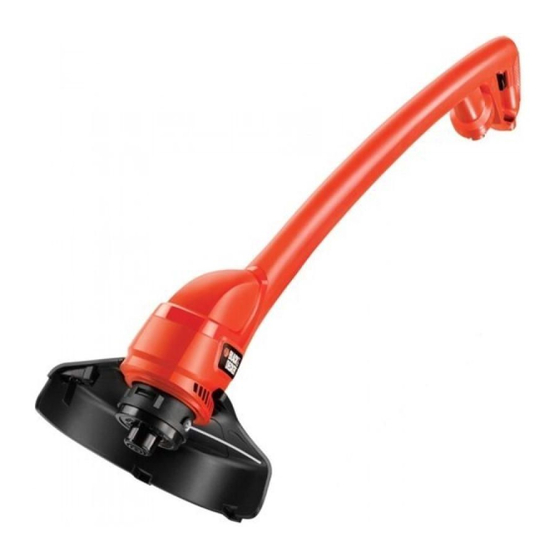
    ENGLISH (Original instructions) Using an extension cable Always ensure that the ventilation slots are kept clear of debris. Always use an approved extension cable suitable for the Do not use the lawn trimmer (edge trimmer), if the cords power input of this appliance (see technical data). The are damaged or worn.
  • Page 6 ENGLISH (Original instructions) Features This appliance includes some or all of the following features. Warning! Let the tool work at its own pace. Do not overload. 1. On/off switch Switching on and off 2. Handle 3. Cable restraint To switch the tool on, squeeze the trigger lever (1). 4.
  • Page 7: Troubleshooting

    ENGLISH (Original instructions) Winding a new cutting line onto an empty spool Push the cover onto the housing until it snaps securely (fig. G - I) into place. If the cutting line protrudes beyond the trimming blade, You may wind new cutting line onto an empty spool. cut it off so that it just reaches the blade.
  • Page 8: Ec Declaration Of Conformity

    You can check the location of your nearest authorised repair agent by contacting your local Black & Decker office at the GL250/GL310/GL360 address indicated in this manual. Alternatively, a list of Black & Decker declares that these products described under authorised Black &...
  • Page 9 Guarantee Black & Decker is confident of the quality of its products and offers an outstanding guarantee. This guarantee statement is in addition to and in no way prejudices your statutory rights. The guarantee is valid within the territories of the Member States of the European Union and the European Free Trade Area.
  • Page 10 TYP. GL250 Partial support - Only parts shown available Nur die aufgefuerten teile sind lieferbar Reparation partielle - Seules les pieces indiquees sont disponibles Supporto parziale - Sono disponibili soltanto le parti evidenziate Solo estan disponibles las peizas listadas So se encontram disponiveis as pecas listadas...
  • Page 11 TYP. GL310 - GL360 Partial support - Only parts shown available Nur die aufgefuerten teile sind lieferbar Reparation partielle - Seules les pieces indiquees sont disponibles Supporto parziale - Sono disponibili soltanto le parti evidenziate Solo estan disponibles las peizas listadas So se encontram disponiveis as pecas listadas Gedeeltelijke ondersteuning - alleen de getoonde onderdelen zijn beschikbaar...
  • Page 12 Australia Black & Decker (Australia) Pty. Ltd. Tel. 03-8720 5100 20 Fletcher Road, Mooroolbark, Fax 03-9727 5940 Victoria, 3138 New Zealand Black & Decker Tel. +64 9 259 1133 5 Te Apunga Place Fax +64 9 259 1122 Mt Wellington Auckland 1060 United Kingdom Black &...

This manual is also suitable for:

Gl310Gl360

Table of Contents