Bostitch GF28WW Operation And Maintenance Manual
Cordless gas nailers
Hide thumbs
Also See for GF28WW:
- Safety & operating instructions manual (235 pages) ,
- Safety & operating instructions manual (241 pages)
Table of Contents
Advertisement
Available languages
Available languages
GF28WW, GF33PT &
GFN1564K, GFN1664K, GBT1850K
CORDLESS GAS NAILERS
CLAVADORAS INALÁMBRICAS A GAS
CLOUEUSES À GAZ SANS FIL
OPERATION and MAINTENANCE MANUAL
MANUAL DE OPERACIÓN Y DE MANTENIMIENTO
MANUEL D'INSTRUCTIONS ET D'ENTRETIEN
BEFORE OPERATING THIS TOOL, ALL OPERATORS SHOULD STUDY THIS MANUAL TO
UNDERSTAND AND FOLLOW THE SAFETY WARNINGS AND INSTRUCTIONS. KEEP THESE
INSTRUCTIONS WITH THE TOOL FOR FUTURE REFERENCE. IF YOU HAVE ANY QUESTIONS,
CONTACT YOUR BOSTITCH REPRESENTATIVE OR DISTRIBUTOR.
ANTES DE OPERAR ESTA HERRAMIENTA, TODOS LOS OPERADORES DEBERÁN ESTUDIAR
ESTE MANUAL PARA PODER COMPRENDER Y SEGUIR LAS ADVERTENCIAS SOBRE
SEGURIDAD Y LAS INSTRUCCIONES. MANTENGA ESTAS INSTRUCCIONES CON LA
HERRAMIENTA PARA FUTURA REFERENCIA, SI TIENE ALGUNA DUDA, COMUNÍQUESE CON
SU REPRESENTANTE DE BOSTITCH O CON SU DISTRIBUIDOR.
LIRE ATTENTIVEMENT LE PRÉSENT MANUEL AVANT D'UTILISER L'APPAREIL. PRÉTER UNE
ATTENTION
TOUTE
PARTICULIÈRE
AUX
CONSIGNES
DE
SÉCURITÉ
ET
AUX
AVERTISSEMENTS. GARDER CE MANUEL AVEC L'OUTIL POUR FUTUR RÉFÉRENCE. SI
VOUS AVEZ
DES
QUESTIONS, CONTACTEZ VOTRE
REPRÉSENTANT
OU VOTRE
CONCESSIONNAIRE BOSTITCH.
STANLEY FASTENING SYSTEMS L.P.
189774REVA 12/09
Advertisement
Chapters
Table of Contents

Related Manuals for Bostitch GF28WW


Summary of Contents for Bostitch GF28WW
- Page 1 ESTE MANUAL PARA PODER COMPRENDER Y SEGUIR LAS ADVERTENCIAS SOBRE SEGURIDAD Y LAS INSTRUCCIONES. MANTENGA ESTAS INSTRUCCIONES CON LA HERRAMIENTA PARA FUTURA REFERENCIA, SI TIENE ALGUNA DUDA, COMUNÍQUESE CON SU REPRESENTANTE DE BOSTITCH O CON SU DISTRIBUIDOR. LIRE ATTENTIVEMENT LE PRÉSENT MANUEL AVANT D’UTILISER L’APPAREIL. PRÉTER UNE ATTENTION TOUTE PARTICULIÈRE...
-
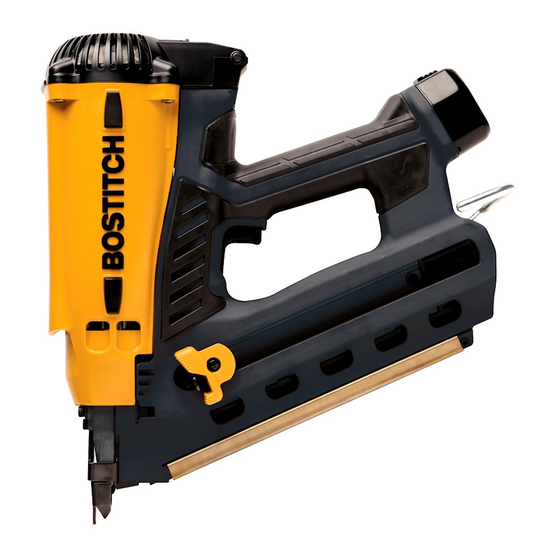
Page 2: Tool Illustration
TOOL ILLUSTRATION Finish Tools: Actuator Top cover Battery Handle Chamber Piston Driver Trigger blade Exhaust Outlet Magazine Area Pusher Firing head (outlet) Contact Arm Latch Framing Tools: Cell cover Top cover Handle Chamber Battery Trigger Piston Driver Hook blade Exhaust Magazine Outlet Area... -
Page 4: Table Of Contents
To obtain warranty service in the U.S. return the product, together with proof of purchase, to the U.S. Bostitch National or Regional Independent Authorized Warranty Service Center. -
Page 5: Safety Warnings & Instructions
SAFETY INSTRUCTIONS EYE PROTECTION which conforms to ANSI specifications and provides protection against flying particles both from the FRONT and SIDE should ALWAYS be worn by the operator and others in the work area when connecting to air supply, loading, operating or servicing this tool. -
Page 6: Battery And Charger Safety Instructions
BATTERY AND CHARGER You must charge the battery before using the nailer. Before using the Bostitch battery charger 9B12073R or 9B12071R, be sure to read and understand all instructions, warnings and cautionary statements on it, the battery and in this manual. - Page 7 5. Use of an attachment not recommended or sold wattage rating by the voltage rating–for example: by Bostitch may result in a risk of fire, electical shock, or personal injury. 1,250 watts = 10 amperes 6.
-
Page 8: Using & Loading Battery
The battery used in this device may present a risk of fire or chemical burn if mistreated. Do not recharge, disassemble, heat above 104°F (40°C), or incinerate. Replace the battery ONLY with the same type of Bostitch battery designed for your tool, use of another battery may present a risk of fire or explosion. -
Page 9: Preparing The Fuel Cell
PREPARING THE FUEL CELL READ SECTION TITLED “INSTALLING FUEL CELL ” SAFETY INSTRUCTIONS ON PAGE 10. If the gas leaks from the metering valve or the gas cartridge after attaching the metering valve, replace with new metering valve. Do not attempt to reuse the metering valve. Replace with new metering valve. To attach the metering valve to a fuel cell: 1. -
Page 10: Installing The Fuel Cell
INSTALLING FUEL CELLS FUEL CELL CONTENTS EXTREMELY FLAMMABLE. Do not incinerate even when empty. FUEL CELL CONTENTS UNDER PRESSURE: Keep away from temperatures over 120˚F (50˚C). Keep out of sun. Store at room temperature (68°-80°F / 20°-27°C). KEEP OUT OF THE REACH OF CHILDREN. MAY FORM FLAMMABLE/EXPLOSIVE VAPOR-AIR MIXTURE: Do not use near flames or spray on heated surfaces. -
Page 11: Tool Operation Safety
TEST1 (without nails loaded): 1. Press contact arm against work surface while pulling back pusher. DO NOT PULL TRIGGER (Fig. 1). Tool should not cycle. If tool cycles contact Bostitch, as service is necessary. DO NOT USE TOOL. TEST 2 (without nails loaded): 1. -
Page 12: Loading Fasteners
LOADING FASTENERS Never touch trigger or depress contact arm when loading nails. Keep nailer pointing downward LOADING FASTENERS INTO GF28WW, GF33PT, GFN1564K & GFN1664K 1. Insert stick of nails into back of magazine. 2. Slide nails forward to front of magazine. -
Page 13: Tool Operation
TOOL OPERATION EYE PROTECTION which conforms to ANSI specifications and provides protection against flying particles both from the FRONT and SIDE should ALWAYS be worn by the operator and others in the work area when connecting to air supply, loading, operating or servicing this tool. -
Page 14: Dial-A-Depth
MANUAL OBSERVE THE FOLLOWING FOR SAFE OPERATION • Use the BOSTITCH cordless tool only for the purpose for which it was designed. • Never use this tool in a manner that could cause a fastener to be directed toward the user or others in the work area. -
Page 15: Installing The Belt Hook
INSTALLING THE BELT HOOK Always disconnect fuel and battery before making adjustments or before attempting any part assembly or disassembly. Hook can be used on either side of the tool. To remove, replace or switch belt hook side, see Fig. 1 & 3. 1. -
Page 16: Maintenance And Troubleshooting Chart
Load more nails in the magazine. Fan does not operate when push lever is pressed. Note the color of the light indicator. If red: charge the battery. If green: Contact Bostitch for replacement. Unable to charge battery. Check the electrical cord. -16-... -
Page 17: Accessories
Allen wrench for M4 screw GBT1850K GFN1664K & Allen wrench for M5 screw GBT1850K 3B Charger (9B12073R) Non-marring tip for GFN1564K for GF28WW & 2B Battery (9B12072R) & GFN1664K GF33PT for GF28WW & Non-marring tip for GBT1850K GF33PT Cigarette lighter... -
Page 18: Ilustración De La Herramienta
ILUSTRACIÓN DE LA HERRAMIENTA Revise el cable eléctrico: Actuador Cubierta superior Batería Manija Cámara Pistón Aspa del Gatillo controlador Área de salida de escape Cargador Impulsor Cabezal disparador (salida) Brazo de contacto Herramientas Pestillo para la estructura: Cubierta de la pila Cubierta superior Manija Cámara... -
Page 19: Especificaciones Del Cargador Y La Herramienta
-19-... -
Page 20: Introducción / Garantía
Stanley Fastening Systems, L.P. (“Bostitch”) garantiza al comprador minorista original que el producto adquirido no tiene defectos de material o mano de obra y acepta reparar o reemplazar, según Bostitch lo decida, cualquier clavadora o emgrampadora inalámbrica a gas defectuosa de la marca Bostitch por un período de dos (2) años a partir de la fecha de compra. -
Page 21: Advertencias De Seguridad E Instrucciones
INSTRUCCIONES DE SEGURIDAD PROTECCIÓN OCULAR que cumpla con las especificaciones ANSI y proporcione protección contra partículas voladoras tanto al FRENTE como de LADO SIEMPRE la deberá utilizar el operador y cualquier otra persona que se encuentra en el área de trabajo relacionado con el suministro de aire, carga, operación o servicio de esta herramienta. - Page 22 PARA EL USO DE LA BATERÍA Y DEL CARGADOR Debe cargar la batería antes de usar la clavadora. Antes de usar el cargador de batería Bostitch 9B12073R o 9B12071R, asegúrese de leer y comprender todas las instrucciones, advertencias e indicaciones de precaución que se encuentran en él, en la batería y en este manual.
-
Page 23: Instrucciones De Seguridad De La Batería Y El Cargador
Inserte objetos extraños en el orificio de 1. NUNCA Desarme la batería. 8. NUNCA la batería o el cargador de batería. 2. NUNCA Incendie la batería, incluso si está dañada o completamente gastada. La batería puede 9. NUNCA Utilice un transformador de refuerzo explotar en el fuego. - Page 24 (2) la batería y (3) el producto que utiliza la batería. Para reducir el riesgo de lesiones, cargue sólo baterías recargables Bostitch 9B12070R o 9B12072R. Otro tipo de baterías pueden explotar causando lesión o daño personal. Si la clasificación de entrada de un cargador de 4.
-
Page 25: Uso Y Carga De La Batería
4. La luz indicadora se apagará cuando la batería se cargó por completo. Si la luz no desaparece después de 4 horas, desenchufe el cargador y comuníquese con Bostitch, ya puede se puede necesitar una reparación. 5. Retire la batería en el cargador (Fig. 1). -
Page 26: Preparación De La Pila De Combustible
CARGAR LA BATERÍA EN LA HERRAMIENTA No use la herramienta a menos que la luz indicadora sea VERDE. 1. Cuando la batería esté cargada, inserte la batería en la parte trasera de la manija de la herramienta. (Fig. 4) 2. La luz VERDE que parpadea indica “Listo para colocar los sujetadores”. (Fig. 5) 3. -
Page 27: Instalación De La Pila De Combustible
INSTALACIÓN DE LAS PILAS DE COMBUSTIBLE CONTENIDOS EXTREMADAMENTE INFLAMABLES DE LA PILA DE COMBUSTIBLE. No incendie cuando está vacía. CONTENIDOS BAJO PRESIÓN DE LA PILA DE COMBUSTIBLE: Mantenga lejos de temperaturas superiores a 120 ºF (50 ºC). Mantenga fuera de la exposición directa al sol. Almacene a temperatura ambiente (68 a 80 ºF / 20 a 27 ºC). -
Page 28: Seguridad De Operación De La Herramienta
3. Apunte la clavadora hacia abajo, lejos de la cara y el cuerpo, jale el gatillo y sostenga durante 5 segundos. La herramienta no debe girar. Si la herramienta gira, comuníquese con Bostitch ya que se necesita una reparación. NO USE LA HERRAMIENTA. -
Page 29: Carga De Los Sujetadores
Nunca toque el gatillo ni presione el brazo de contacto mientras carga los clavos. Mantenga la clavadora apuntando hacia abajo CARGAR LOS SUJETADORES EN GF28WW, GF33PT, GFN1564K Y GFN1664K 1. Si no se observa un funcionamiento anormal, la herramienta está lista para cargar los clavos. -
Page 30: Operación De La Herramienta
OPERACIÓN DE LA HERRAMIENTA PROTECCIÓN OCULAR que cumpla con las especificaciones ANSI y proporcione protección contra partículas voladoras tanto al FRENTE como de LADO SIEMPRE la deberá utilizar el operador y cualquier otra persona que se encuentra en el área de trabajo relacionado con el suministro de aire, carga, operación o servicio de esta herramienta. -
Page 31: Dial-A-Depth
EN ESTE MANUAL, OBSERVE LO SIGUIENTE PARA UNA OPERACIÓN SEGURA • Use la herramienta inalámbrica BOSTITCH únicamente para los fines para los que fue diseñada. • Nunca use esta herramienta de forma que un sujetador pueda ser dirigido hacia el usuario u otra persona en el área de trabajo. -
Page 32: Instalación Del Gancho Del Cinto
INSTALACIÓN DEL GANCHO DEL CINTO Siempre desconecte la pila de combustible y la batería antes de realizar ajustes o antes de intentar armar o desarmar cualquier pieza. El gancho se puede usar en cualquier lado de la herramienta. Para retirar, reemplazar o cambiar el lado del gancho del cinto, consulte la Fig. -
Page 33: Cuadro De Mantenimiento Y Resolución De Problemas
Cargue más clavos en el cargador. presiona la palanca. Observe el color de la luz indicadora. Si es rojo: cargue la batería. Si es verde: comuníquese con Bostitch para obtener los repuestos. No se puede cargar la batería. Revise el cable eléctrico. -33-... -
Page 34: Accesorios
GBT1850K GFN1664K Llave Allen para tornillo M5 3B Cargador (9B12073R) y GBT1850K Punta que no daña la superficie para GF28WW 2B Batería (9B12072R) para GFN1564K y GFN1664K y GF33PT para GF28WW Punta que no daña la superficie Enchufe de conexión... -
Page 35: Illustration De L'outil
ILLUSTRATION DE L ’OUTIL Outils de finition : Plaquette d'actionnement Couvercle supérieur Poignée Pile Chambre Piston Lame de mandrin Gâchette Zone de sortie d'air Magasin Poussoir Embout de tir (sortie) Bras de contact Verrou Agrafeuses : Protecteur de combustible Couvercle supérieur Poignée Chambre Pile... -
Page 36: Fiche Technique De L'outil Et Du Chargeur
-36-... -
Page 37: Introduction Et Garantie
Bostitch, toute agrafeuse ou cloueuse à gaz de marque Bostitch pour une période de deux (2) ans à compter de la date d’achat. -
Page 38: Avertissements De Sécurité Et Instructions
Pour obtenir le service de garantie aux É.-U., faites parvenir le produit avec la preuve d’achat au centre de service de garantie national de Bostitch ou à un centre de service de garantie autorisé régional indépendant. Aux É.-U., vous pouvez aussi appeler le 1-800-556-6696 ou visiter www.BOSTITCH.com pour trouver l’emplacement le plus pratique pour vous. - Page 39 L ’UTILISATION DE LA PILE ET DU CHARGEUR La pile doit être chargée avant l’utilisation de la cloueuse. Avant d’utiliser le chargeur de pile 9B12073R ou 9B12071R de Bostitch, assurez-vous de lire et de comprendre toutes les instructions, avertissements et énoncés de sécurité de ce dispositif et de la pile de ce manuel.
-
Page 40: Consignes De Sécurité De La Pile Et Du Chargeur
1. Ne démontez JAMAIS une pile. Il ne faut JAMAIS insérer des objets étrangers 2. Il ne faut JAMAIS incinérer la pile même si dans l'orifice de la pile ou du chargeur de pile. elle est endommagée ou morte. La pile Il ne faut JAMAIS utiliser un transformateur jetée au feu peut exploser. - Page 41 25 (7,5) 50 (15) 100 (30) 150 (45) 3. Pour réduire le risque de blessure, chargez uniquement des piles rechargeables 9B12070R ou 9B12072R de Bostitch. Tous autres types de piles peuvent exploser et occasionner des *Si la tension nominale d'entrée du chargeur de pile blessures corporelles et des dommages.
- Page 42 Ne rechargez pas, ne démontez pas, ne chauffez pas à plus de 40 °C (104 °F), n’incinérez pas. Remplacez la pile UNIQUEMENT par une pile de même type Bostitch conçue pour votre outil. L’utilisation d’un autre type de pile présente un risque d’incendie ou d’explosion.
-
Page 43: Utilisation Et Charge De La Pile
3. Insérez la pile dans le chargeur (Fig. 1). Le témoin lumineux s’allumera. 4. Le témoin lumineux s’éteindra lorsque la charge de pile est complète. Si le témoin lumineux ne s’éteint pas après 4 heures, débranchez le chargeur et communiquez avec Bostitch; un entretien peut être nécessaire. -
Page 44: Préparation De La Pile À Combustible
RÉPARATION D’UNE PILE À COMBUSTIBLE LISEZ LES CONSIGNES DE SÉCURITÉ DU CHAPITRE INTITULÉ « INSTALLATION DE LA PILE À COMBUSTIBLE » À LA PAGE 10. Pour toute fuite de gaz de la valve doseuse ou de la cartouche de gaz après le raccordement de la valve doseuse, installez une nouvelle valve doseuse. -
Page 45: Installation De La Pile À Combustible
INSTALLATION DES PILES À COMBUSTIBLE LES PILES À COMBUSTIBLE RENFERMENT UN CONTENU EXTRÊMEMENT INFLAMMABLE. N’incinérez pas une pile à combustible vide. LA PILE À COMBUSTIBLE EST UN CONTENANT SOUS PRESSION : Gardez loin des sources de chaleur supérieures à 50 °C (120 °F). N’exposez pas au soleil. Entreposez à la température ambiante (20 - 27 °C/68 - 80 °F) Gardez hors de la portée des enfants. -
Page 46: Fonctionnement Sécuritaire De L'outil
1. Appuyez le bras de contact contre la surface de travail et en tirant sur le poussoir. N’ APPUYEZ PAS entretien si l’outil s’exécute. NʼUTILISEZ PAS LʼOUTIL. SUR LA GÂCHETTE (Fig. 1). Outil ne doit pas s’exécuter. Communiquez avec Bostitch pour un VÉRIFICATION 2 (sans clous) : 1. -
Page 47: Chargement Des Attaches
Ne touchez jamais la gâchette ou ne relâchez jamais le bras de contact lorsque vous chargez des clous. Gardez la cloueuse pointée vers le bas. CHARGEMENT DES ATTACHES POUR LES MODÈLES GF28WW, GFN1564K et GFN1664K. 1. Insérez les clous à l’arrière du magasin. -
Page 48: Fonctionnement De L'outil
FONCTIONNEMENT DE L ’OUTIL Des LUNETTES DE SÉCURITÉ conformes aux normes ANSI et qui protège des particules projetées du côté FRONTAL ainsi que du côté LATÉRAL doivent TOUJOURS être portées par l’opérateur et toute autre personne se trouvant dans la zone de travail lors du raccordement à... -
Page 49: Dial-A-Depth
DANS CE MANUEL, VEILLEZ À OBSERVER LES PRÉCAUTIONS SUIVANTES • N’utilisez jamais l’outil sans fil BOSTITCH pour un usage autre que celui pour lequel il a été conçu. • N’orientez jamais l’outil de façon à ce qu’il puisse éjecter une attache en direction de l’utilisateur ou d’autres personnes dans la zone de travail. -
Page 50: Installation Du Crochet De Courroie
INSTALLATION DU CROCHET DE COURROIE Débranchez toujours la pile à combustible et la pile avant d’effectuer des réglages ou avant de commencer le montage ou le démontage de pièces. Le crochet peut être utilisé de part et d’autre de l’outil. Pour l’enlever, replacez ou installez le crochet de courroie de l’autre côté, voir Fig. -
Page 51: Tableau D'entretien Et Dépannage
Remarquez la couleur du témoin S'il est rouge : chargez la pile. lumineux. S'il est vert : Communiquez avec Bostitch pour une pièce de rechange. Impossible de charger la pile. Vérifiez le cordon d'alimentation. -51-... -
Page 52: Accessoires
GFN1564, Clé hexagonale pour vis M4 GBT1850K GFN1664K et Clé hexagonale pour vis M5 GBT1850K 3B Chargeur (9B12073R) Embout anti-rayure pour pour GF28WW et 2B Pile (9B12072R) GFN1564K et GFN1664K GF33PT pour GF28WW Embout anti-rayure pour et GF33PT GBT1850K...
Need help?
Do you have a question about the GF28WW and is the answer not in the manual?
Questions and answers