
Related Manuals for Mahlkonig K60 ES


Summary of Contents for Mahlkonig K60 ES
-
Page 1: Operating Instructions
H O R E C A | G A S T R O G R I N D E R Operating Instructions K60 ES Grind-on-Demand“ ” The professional art of grinding since 1924... - Page 2 H O R E C A | G A S T R O G R I N D E R Dear customer / service personnel the ”Single Espresso Grinder K60 ES” is a fully automatic espresso coffee grinder of the proven MAHLKÖNIG quality.
-
Page 3: Table Of Contents
H O R E C A | G A S T R O G R I N D E R Table of Contents 1. Safety 7. Cleaning 1.1 Symbols 7.1 Cleaning with GRINDZ™ Grinder Cleaner 1.2 Safety Instructions 7.2 Cleaning of the Spout and the Hopper 1.3 Usage Purpose 7.3 Cleaning the Grinder Placement Surface Area 1.4 User Requirements... -
Page 4: Safety
1.2 Safety Instructions Only whole roasted coffee beans may be ground in the K60 ES. Children cannot appreciate the dangers that can exist in the op- eration of electrical grinders. For this reason, never leave children When unpacking please inspect whether the power supply (volt- unsupervised with electronic appliances such as this grinder. -
Page 5: Usage Purpose
H O R E C A | G A S T R O G R I N D E R 2. Technical Data 1.3 Usage Purpose Type K60 ES Only whole roasted coffee beans may be ground in the K60 ES Voltage/Frequency 200-230V / 50/60Hz grinder. Never use the grinder to grind other products or objects. 115-120V 50/60Hz 1.4 User Requirements... -
Page 6: Description
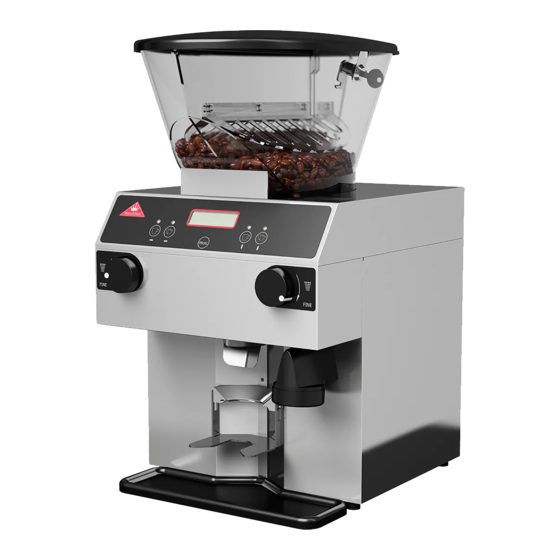
H O R E C A | G A S T R O G R I N D E R 3. Description Main Components and Operating Elements The main components and operating elements are pictured in the illustration. Pos. 1 Operating Panel Pos. -
Page 7: Running Time Limitation
H O R E C A | G A S T R O G R I N D E R 3.3 Running Time Limitation As soon as a grinder is activated, a second counter starts. If 30 seconds are reached, the grinder stops and displays the message, ”Running time too long - allow cooling”... - Page 8 H O R E C A | G A S T R O G R I N D E R 4.2.5 Check whether the hopper (Pos.2) and the covering are latched. The hopper is latched if the funnel bolt with the bracket is turned all the way to the left.
-
Page 9: Operating Panel
H O R E C A | G A S T R O G R I N D E R 4.4 Basic Adjustment Now fi ll both chambers of the bean container with the type of coffee beans that you use and open the latch slider of the hopper. After the grinder is ready for operation the basic adjustment can be set according to the following steps: The grinder is ready for operation! -
Page 10: Operation
H O R E C A | G A S T R O G R I N D E R Mainmenu Submenu 5. Operation Press Press Press Press Press Press sight doses programming sight doses programming sight doses programming sight doses programming MAHLKÖNIG 1) DOSES PROG. -
Page 11: Operating Faults
H O R E C A | G A S T R O G R I N D E R 6. Operating faults Defect Cause Remedy Alarm signal Cause of fault Consequences The display is off. The electroni- Insert the plug into the GR.x BLOCKED Foreign body in the block of motor GR.1 or GR... -
Page 12: Cleaning
Avoid allowing foreign objects to fall into the grinder. We recommend regular cleaning of the K60 ES. For cleaning, use only cleaning agents approved for food product applications, respectively, the hopper. In- termediate funnel and lid can also be washed in a dishwashing machine or a sink or tub with a brush and dishwashing liquid. -
Page 13: Cleaning Of The Spout And The Hopper
H O R E C A | G A S T R O G R I N D E R 7.3 Cleaning of the spout and hopper 7.5 Cleaning the Grinder Casing 7.3.1 Grind the remaining coffee beans. Close the hopper. Open Clean your grinder externally from time to time with a damp the lid by applying pressure above the lock against the hop- cloth. - Page 14 H O R E C A | G A S T R O G R I N D E R 7.5.3 Now pull the screen (Pos.6) off the casing. Pull out the latch 7.5.5 Vacuum out and wipe the intermediate funnel. Afterwards, bolt (Pos.9) and pull off the cover upwards (Pos.15).
-
Page 15: Maintenance And Repair
H O R E C A | G A S T R O G R I N D E R 7.5.8 Re-hook the spout casing by pressing together and hanging 8. Maintenance and Repair it back in position. Install the intermediate funnel. Recon- nect the grinder to the power supply. -
Page 16: Certifi Cate
H O R E C A | G A S T R O G R I N D E R 10. Certifi cate 11. Warranty Conditions 1. The warranty period is 1 year from the date of purchase. 2. The warranty covers all damages that can be attributed to infe- EC Declaration Conformity rior materials or defective workmanship. - Page 17 H O R E C A | G A S T R O G R I N D E R MAHLKÖNIG GmbH & Co. KG Tilsiter Straße 142 D- 22047 Hamburg, Germany Tel.: 040 / 69 69 40-0 Fax: 040 / 69 39 721 offi...
Need help?
Do you have a question about the K60 ES and is the answer not in the manual?
Questions and answers